
Page Curl
Image Tricks is the Best Option
Back in 2017, I blogged about using Page Curl in Graphic Converter. At the time it was the only application that offered any decent page curl effect.
Turns out the Page Curl library is part of Apple's Core Image library. So any application that uses Core Images has the ability to add the Page Curl with Shadow functionality.
I was surprise to see that Affinity Designer. Affinity Photo, Pixelmator Pro and Photoscape X don't offer any page curl feature. Yes, you can always use masks and layers but there has to be an easy way.
While it's not something that I use all the time, it would be nice to add a page curl effect. Besides Apple provides the library for free.
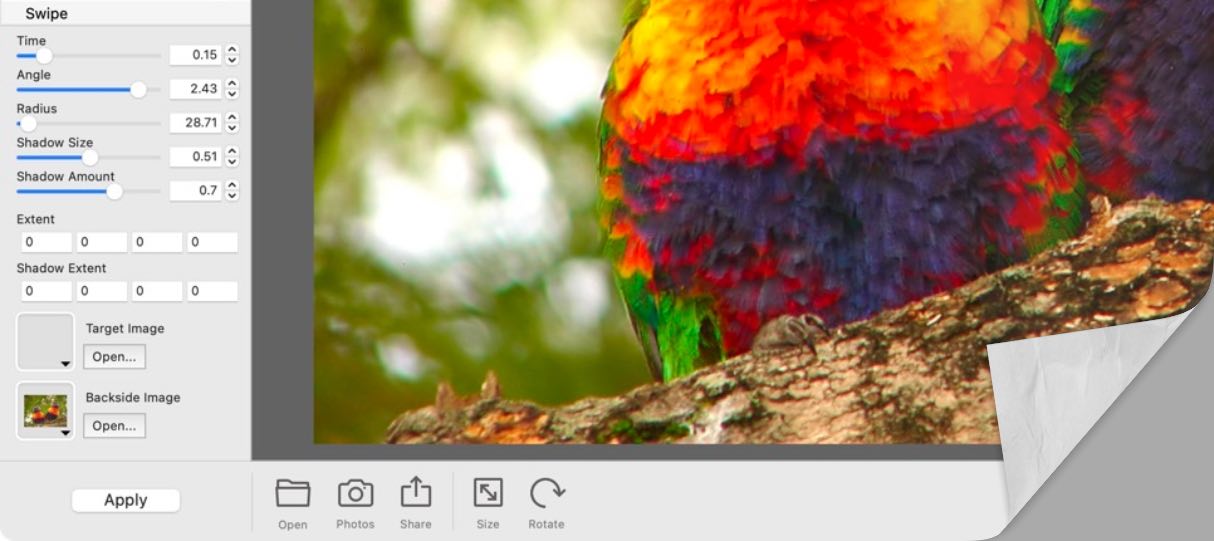
Image Tricks is a great application to add Page Curl to any image.
Image Tricks
Image Tricks by Belight Software, offers a lot of the Core Image functionality. It's a nice application that makes simple touch ups easy.
To get the best use of Image Tricks, I would suggest getting the pro version. It's only $9.99 - a one-time fee. You can read my quick review from the March 4th blog post.
Page Curl in Image Tricks Pro
Here are some notes from my use of the Page Curl feature in Image Tricks Pro:
There are nine options for Page Curl with Shadows: Time, Angle, Radius, Shadow Size, Shadow Amount, Extent, Shadow Extent, Target Image, and Backside Image. You can use these settings to customize the look of your page curl.
To make the curl appear on the bottom right, set Time: .2, Angle: 2.44, Radius 28.71.
To make the curl appear on the top right: set Time: .31, Angle: -2.29, Radius: 28.71
When you click on the thumbnail on the Backside image or the Target image you get some images to pick from. This is a feature not offered in GraphicConverter.
Easy and Fast
If you're looking to add Page Curl effects to any image, I highly recommend using Image Tricks.
PermalinkLaunchBar Quick Search
Use LaunchBar to start. your Amazon Searches
Here is a quick uses for LaunchBar.
Quick Amazon Search
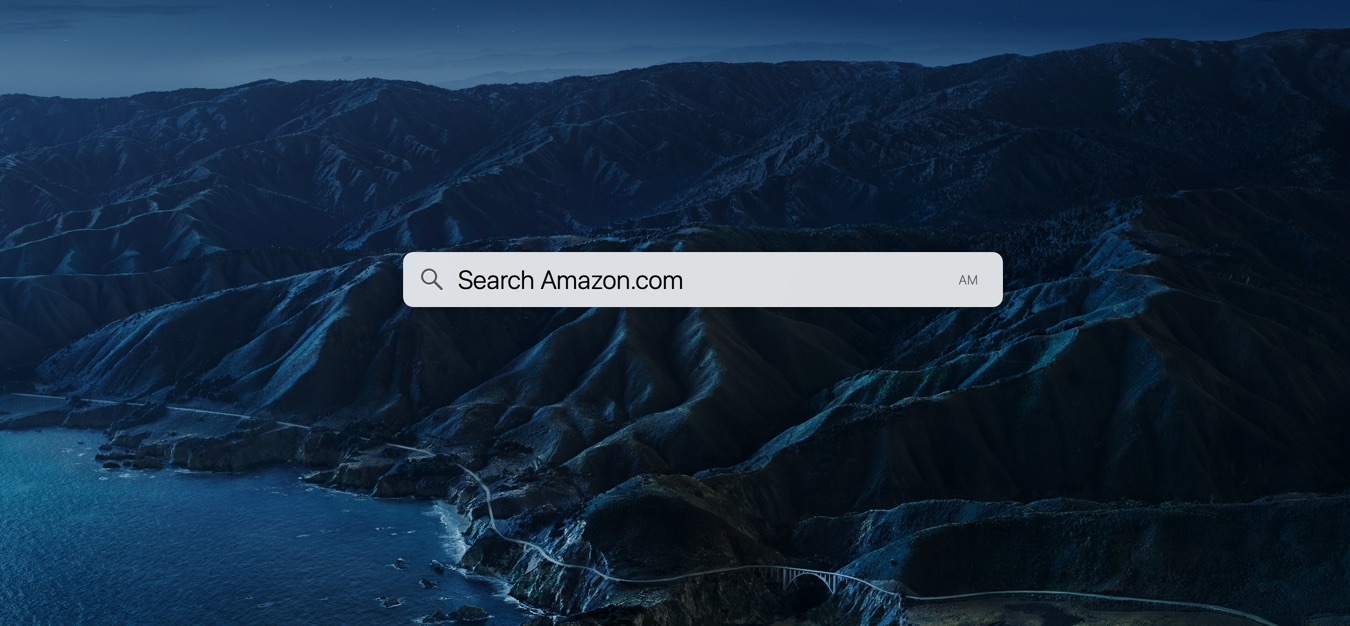
LaunchBar can quickly search Amazon with just a few keystrokes. Once you get familiar with this process, you'll see how this is much better than using bookmarks or the browser Bookmark Bar.
- Enable LaunchBar using the Command - Space
- Type: Amazon
- Type: ( spacebar )
- Then type in your search term and hit enter
If you see a lot of files when you type in "Amazon" you may have your Cloud Drive Index. I would recommend disabling your iCloud Drive so that you can better navigate around LaunchBar.
How to diable the iCloud Drive
- Enable LaunchBar using the Command - Space<
- Type in: Command Option I to open the LaunchBar index pane
- On the right scroll down and right-click on the iCloud Drive
- Select Disable
Note: You can always re-enable the index by following the above steps but select "Enable"
Some Parting Thoughts
As you continue to use this LaunchBar will put the Amazon search higher in the quick action/
This is much faster to use than opening a browser, clicking the bookmark, and then typing your search query.
The nice thing about this method is that you get a new tab every time you use it. So if you're searching for multiple items, you can stay focused on what area you're shopping for.
Once you use this method, you'll see the advantages of other search sites such as DuckDuck Go, Bing, and others. I added Etsy and Stackoverloy to my custom Search template.
Permalink360 Photo Viewer
Spherical Viewer vs RICOH THETA
My 360 Camera
The Ricoh Theta is a unique device that captures spherical images with just the press of a button. No post-processing or stitching is required; the Ricoh Theta does it all in-camera. This makes sharing your spherical images quick and easy, as they can be viewed right on your smartphone or computer.
The Ricoh Theta also has some great features for business users. For example, you can embed 360 degree views into your website or blog to give customers a better sense of what your business is like. You can also use the Ricoh Theta to create immersive marketing materials such as product demos and virtual tours.
Spherical Viewer
Spherical Viewer is a free Panoramic view application that you can use to view 360 degree photos and videos. With Spherical Viewer, you can pan around the photo or video to see all the details.
This is a good application to view 360 images or videos. However, all you can do is view images - there's no ability to save views.
RICOH THETA
The RICOH THETA app is a powerful panoramic viewer that enables users to view 360-degree photos and videos. With the app, users can easily share their photos and videos with others via social media platforms or email. The app also provides a variety of viewing options, including split screen mode and full-screen mode. In addition, the RICOH THETA app offers users the ability to control playback speed and add music to their videos.
The one feature that I like about this app is the ability to take capture of the current 360-view. Images captured are saved with the following dimensions: 3418 à -  1958 - which is slightly bigger than the 16:9 ratio.
Embed 360 image
Panoraven has the ability to host the image:
momento360 can also host the image:
Which 360-Viewer do you like better?
PermalinkToast Audio Assistant
Basic Audio Editor that lacks features
I was really excited to try Toast Audio Assistant. I read all the great reviews and thought it would be a great tool to help me with my audio editing. Unfortunately, I found that it was very difficult to use and didn't really do what I needed it to do. The interface is not very user-friendly and the controls are confusing. I also found that the software crashed a lot and was generally unreliable. Overall, I was disappointed in Toast Audio Assistant and wouldn't recommend it to anyone."
Product Description
Toast® Audio Assistant lets you capture audio from a variety of sources. You can then edit the audio, break it up into tracks, add effects, and export it to iTunes or burn it on disc.
My Notes on Testing
You can't resize the edit window, basically you have to zoom in/out to see the entire track and edit segments. You can't expand the window to make use of the large screen.
I can't find the edit button. The PDF Instructions says there's an edit button - I can't find it.
Supported Export format: m4v, Apple MPEG-4 Audio, Wave, AIFF, AIFC, CAF, and MPEG-$ Audio.
When you select a section of the text you can add individual track information.
Available Audio effects are the System-Supplied Audio Units in OS X: AUBandpass, AUDynamicsProcessor, AUDelay, AUDistortion, AUFilter, AUGraphicEQ, AUHipass, AUHighShelfFilter, AUPeakLimiter, AULowpass, AULowShelfFilter, AUMultibandCompressor, AUMatrixReverb, AUNBandEQ, AUNetSend, AUNewTimePitch, AUParametricEQ, RoundTripAAC, AURogerBeep, AUReverb2, AUSampleDelay, and AUPitch. You can read up on the effects on the Apple Developer site.
Final Thoughts
This is a basic audio editor. There's so much more power in Audicity and Rogue Amoeba Fission.
You are much better off learning all the tools in Audacity and Fission than using Toast Audio Assistant.
For this review I give it 2 stars out of five:

Scanning Dialog Box
A look at some Scan Options
When you scan items into your computer, using the Apple scanning api, there are several options in the dialog box. This blog post takes a look at those options.
Basic Operations
I would recommend using the “Auto Selection†and the Detect Separate items. Then make the adjustments as needed. This is an easy way to scan an image into your Mac.
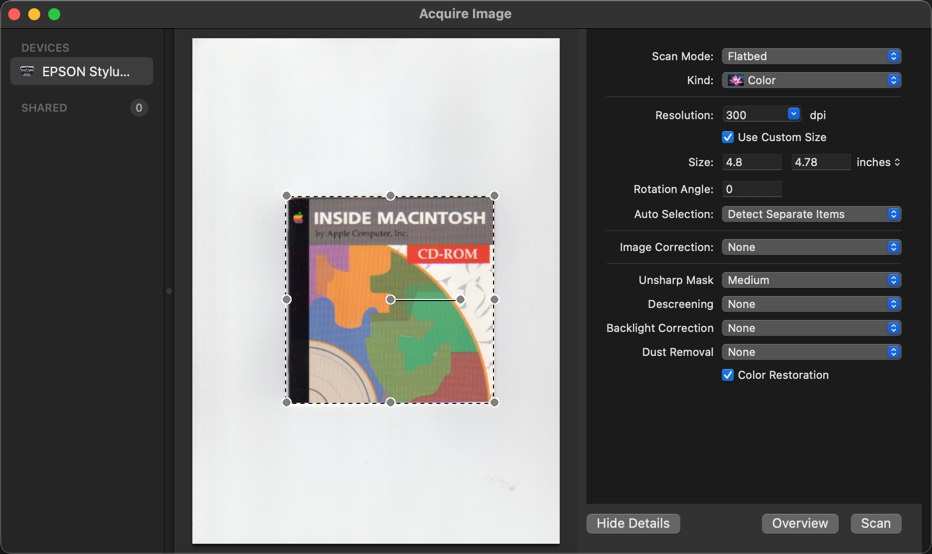
Scan Configurations
Here’s is a breakdown of the various configurations that Apple provides.
Scan Mode - Choose Flatbed or Document Feeder from the pop-up menu. Most cases it will be flatbed - where you scan and remove items.
Kind - What type of image are you scanning; Text, Black & White, or Color.
Resolution - What quality scan should you use. I would recommend using
Size - This is the size of the area being scanned. This is important if you know the size of the document you’re scanning. This will tell you if you’re getting the entire document size.
Rotation Angle - If you didn’t place the object straight on the scanner, you will need to adjust the angle. When you adjust the
Image Correction - Adjust the color or exposure of the scanned image. Choose Manual, then adjust the controls. In most cases, you are better off doing this post scan in photo editing software.
Unsharp Mask - Makes the edges of certain image areas clearer. Turn off this option to leave softer edges.
Descreening - Removes the ripple pattern that might appear in subtly shaded image areas, such as skin tones. This option improves results when scanning magazines or newspapers. (The results of descreening do not appear in the preview image, only in your scanned image.)
Backlight Correction - Removes shadows from photos that have too much background light.
Dust Removal - Removes dust marks from your originals automatically.
PermalinkRoxio Akrilic
Convert Your Images To Art
Are you looking for a way to take your photos to the next level? Roxio Akrilic can help. With this amazing software, you can transform your photos into stunning photo art. Whether you want to create a work of art for your home or give the perfect gift, Roxio Akrilic can help you achieve your goals. Best of all, it's easy to use! So why wait? Give Roxio Akrilic a try today and see what you can create!
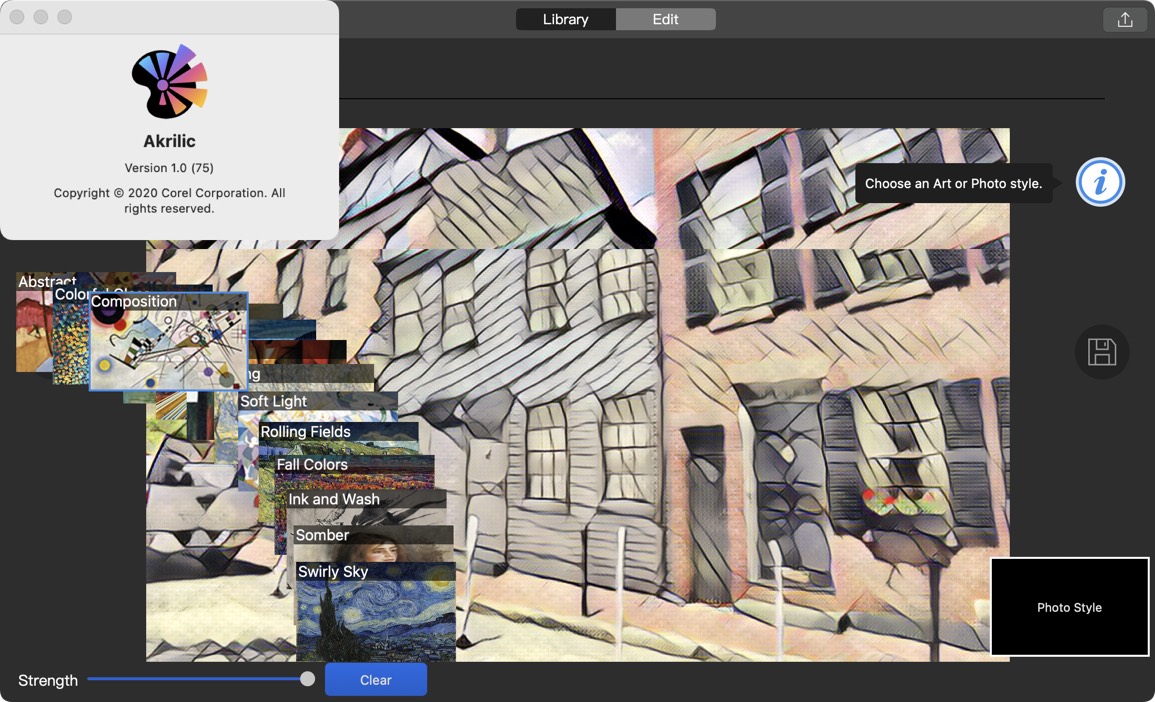
Four Things I Learned
To get to the Art effects, you need to go through several steps, first the focus area, then Crop and Rotate, then set the color mood, then some adjustments (such as focus, emphasized, creative), then you can apply the art style.
There are 13 Art Styles and 6 photo styles.
Art Styles options: Abstract, Colorful Glass, Composition, Impressionist, Night Road, Red Fox, Spring, Soft Light, Rolling Fields, Fall Colors, Ink and Wash, Somber, Swirly Sky.
Photo Styles: Cool, Modern B&W, Modern Fade, Retro B&W, Retro Fade, Warm.
Custom Import - You can even import an image to use that image style - which is great when you want to maintain colors on a blog post.
To get an idea of the application capabilities, download the Akrillic Uer Guide.
Sample Image
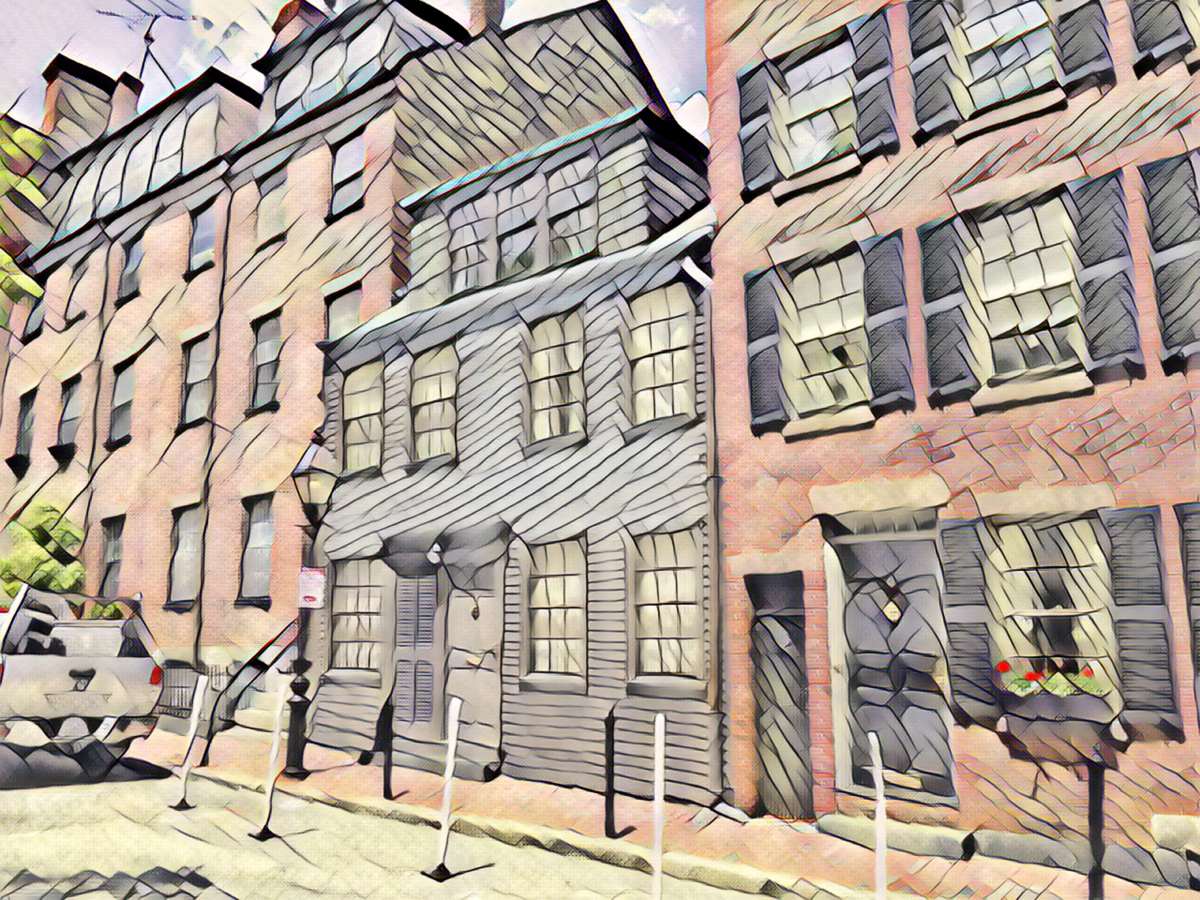
Composition Example
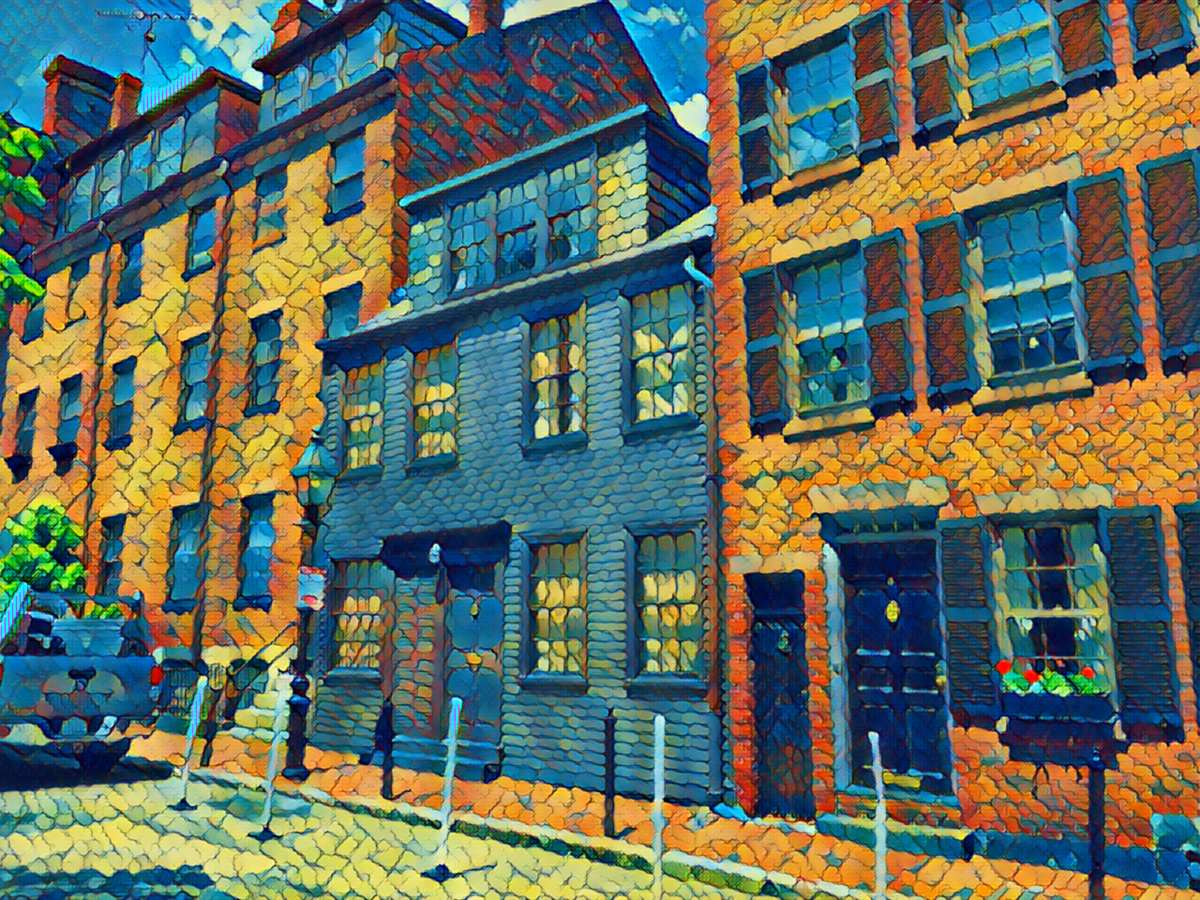
ColorfulGlass Example
Corel AfterShot 3
Quick Review of the features of Corel After Shot 3
When you purchase Toast 19 Pro, you also get various other apps included including Corel AfterShot 3. I didn't need this as I have Affinity Photo and Photoscape X.
I decided to see what filters and features Corel has that other graphic programs don't have - and is it worth the space on my computer.
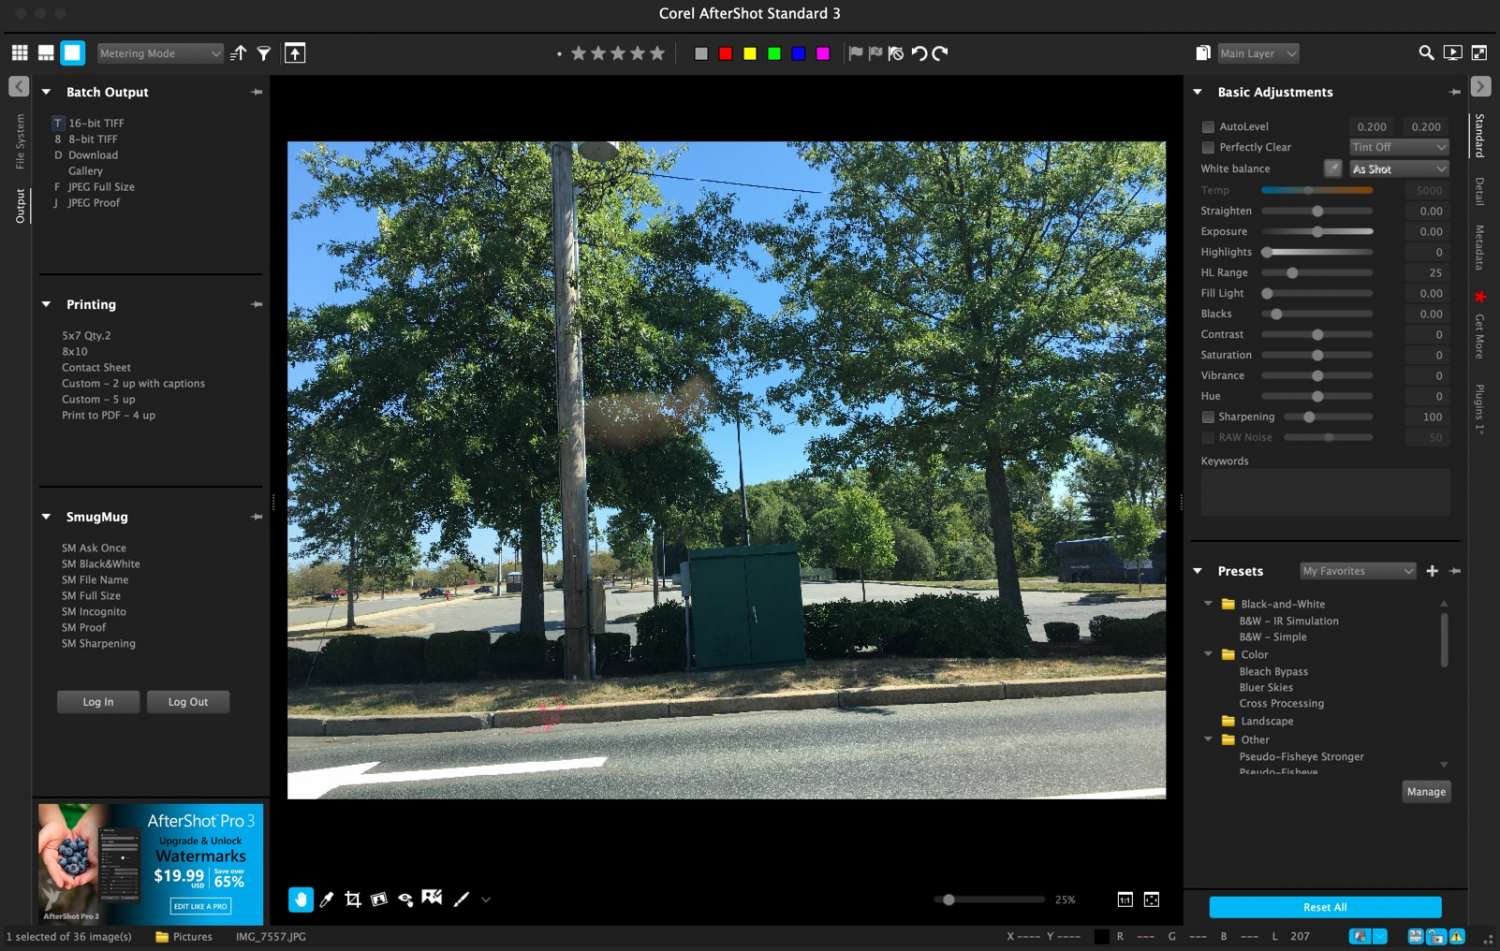
AfterShot 3
AfterShot Pro 3 is the latest version of Corel’s RAW photo editor. It offers a comprehensive set of features for adjusting, managing, and outputting your photos. AfterShot Pro 3 can handle RAW files from most popular cameras, as well as JPEGs and TIFFs.
One of the program’s strong suits is its non-destructive editing environment. You can make adjustments to your photos without harming the original file. This also makes it easy to revert back to an earlier version if you don’t like the changes you made.
AfterShot Pro 3 has a number of built-in presets that let you quickly improve your photos with just a few clicks. There are also tools for correcting lens distortion and chromatic aberration, removing noise, and improving detail in shadow areas. You can even create custom presets based on your own preferences or specific shooting conditions
Review and Thoughts
Luminar Neo has more powerful image adjustments. While the "Basic Adjustments" in Corel Aftershot are fine, you do have a lot more power in Luminar Neo and in Photoscape X.
The thumbnail view lets you see previews of images in a particular folder, and the thumbnails appear below the editor which is nice.
This is an application that would work well if I took a bunch of pictures at an event and there was some color correction that needed to be done before I sent it to a client.
There are a ton of camera profiles available to help fix images.
There's no filters or effects in Corel AfterShot 3.
The standard tools let you adjust the Temp, Brightness, Exposure, Highlights, Fill Light, Blacks, Contrast, Saturation, Vibrance, Hue, and Sharpening.
Final Thoughts
This isn't an application that I am likely to use that much. PhotoScape and Affinity Photo has a lot of similar functions. They also offer a lot more features that AfterShot is missing - such as advanced touch-ups and the ability to use masks and layers.
PermalinkStyle App
Cool App is no longer usable
Style App is a pretty cool app that converts an image into an art piece. It's pretty cool because you could have a boring image and with a simple click of a button - you have a prize-winning art piece that would sure to pick up some $$$ in an NFT auction.
Product Description
Utilizing artificial intelligence and neural networks, Style App will take an image or video that you supply it and apply a style to your media.
The only problem is that since 2020, the application has failed to work. When you try to convert an image you get a dialog box that says, "Python cannot be opened because the developer cannot be verified."
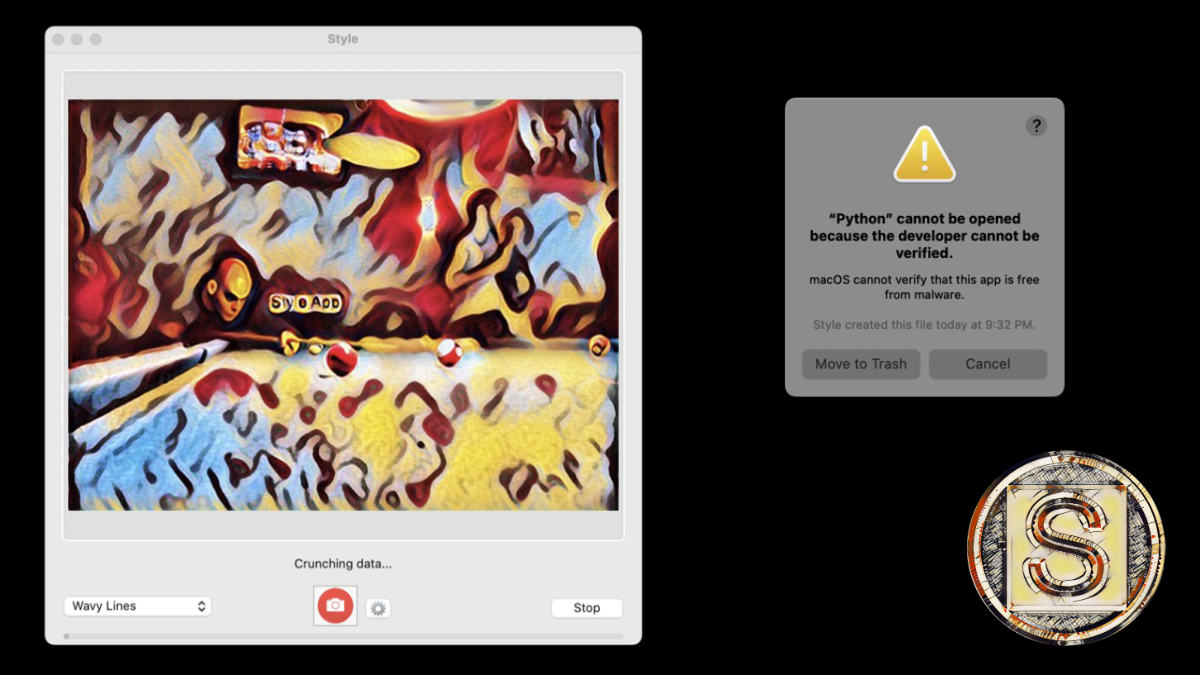
Here's the technical error in the macOS console log:
ASP: Library load (/private/var/folders/yj/rkhkt9915kv1c5py9jpzspdr0000gn/T/io.macdaddy.Style/_MEIZFeMx5/Python) rejected: library load disallowed by system policy
There's nothing you can do to get this working. It would be risky to try to run the application as the "root" user, as you don't know what other changes are also broken.
The folks at MacDaddy have to fix this application so that it will work again - not sure if the application has been abandoned as the website hasn't been updated in a while.
These are some of the designs that you can create:
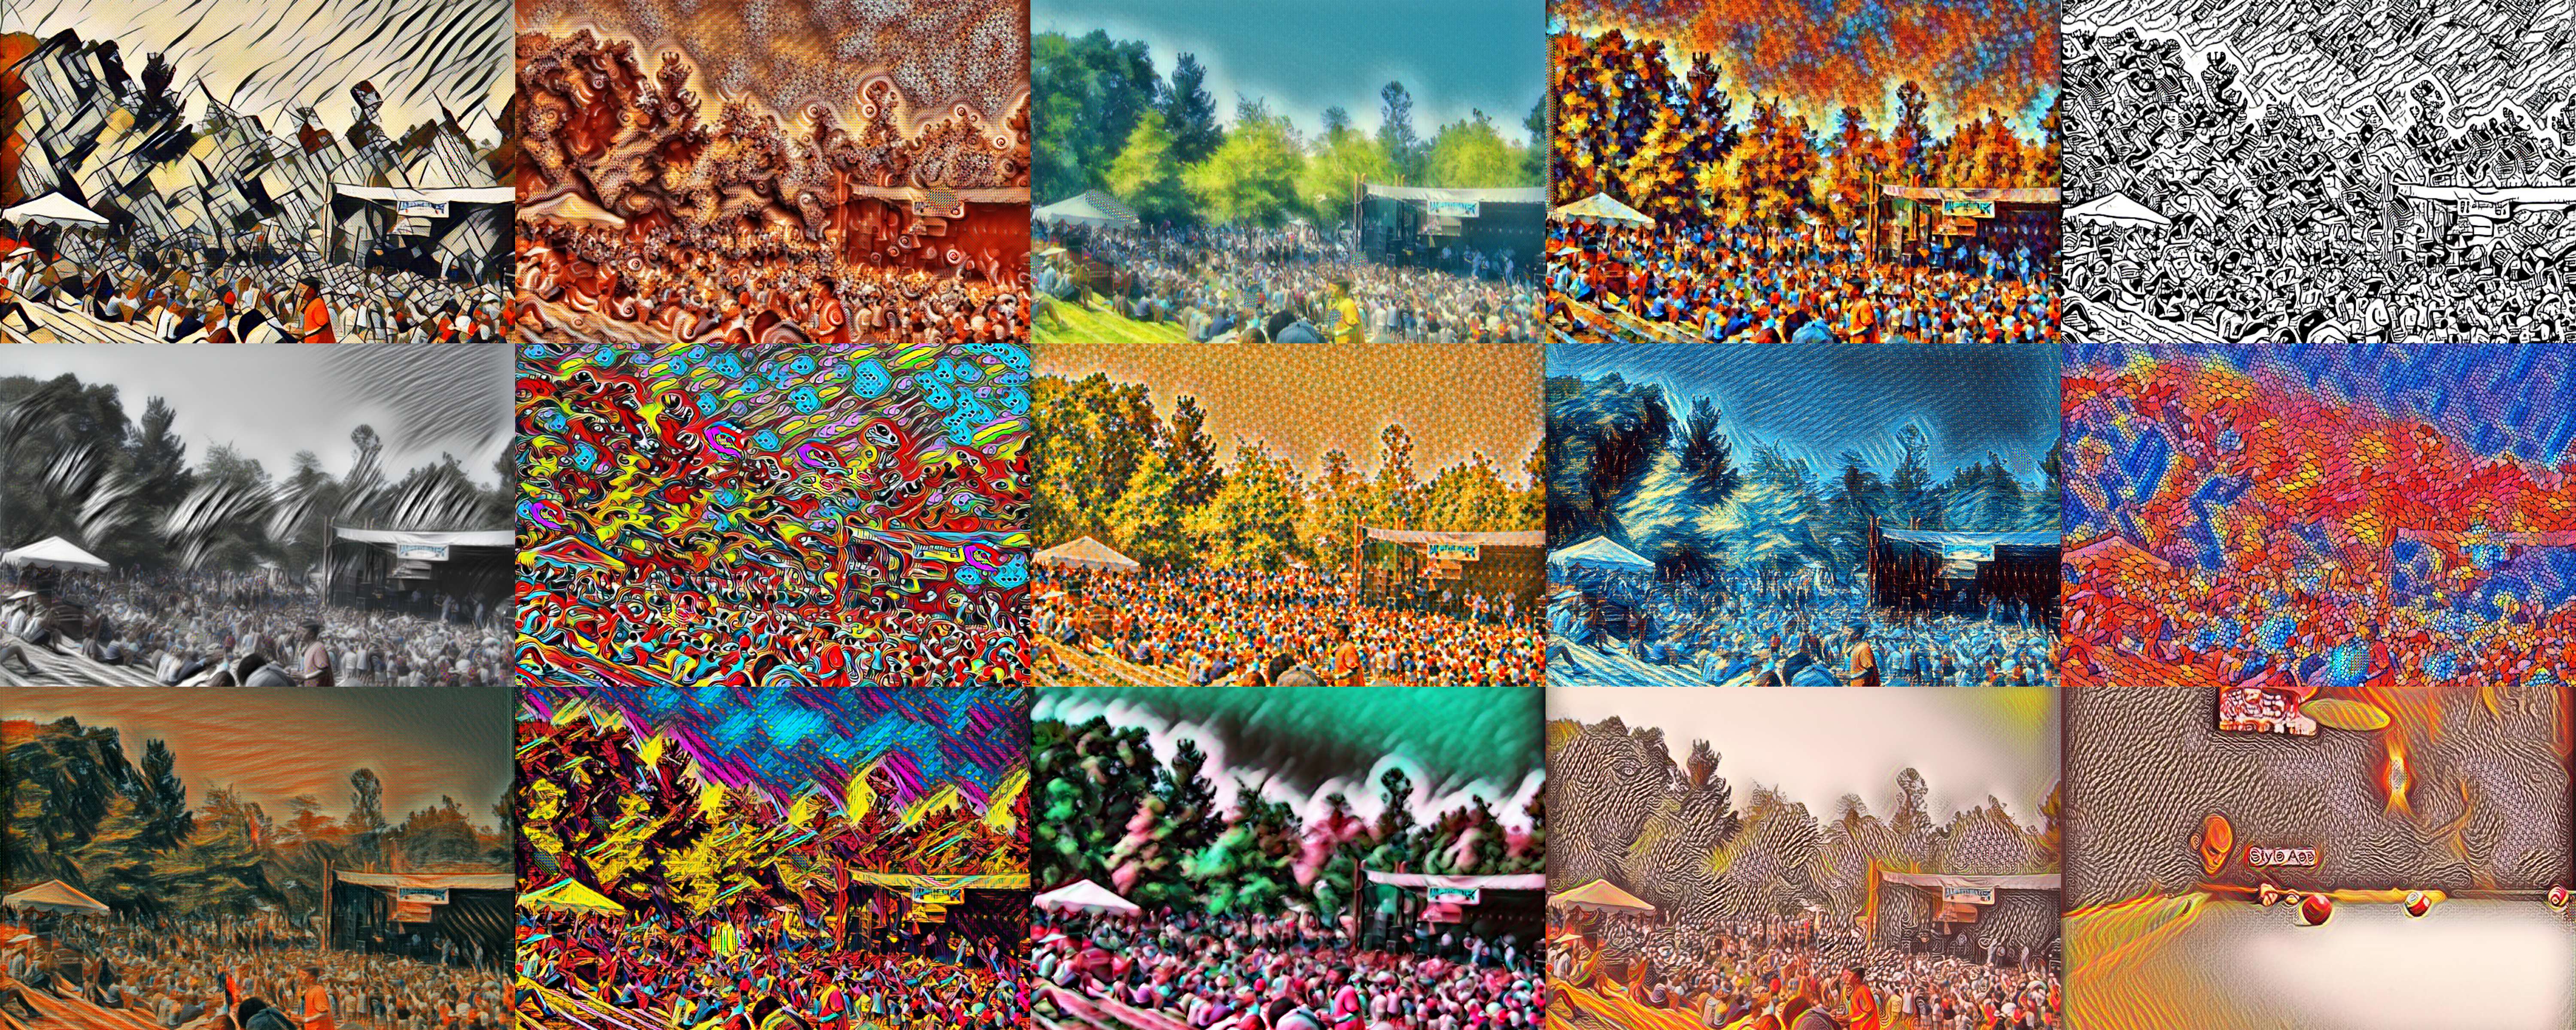
Some Examples of Style that I did back in 2017
Stlye Effect Names
It appears that some styles have been removed from preview versions of the app. Here is the list of style names:
Finger Painting, ASCII Full, Mandelbrot, Starry Night, Colorful World, ASCII Empty, Kandinsky, Psychedelic, Stone Art, Pencil Drawing, Drip Painting, Acrylic Paint, Jagged, Cubist, Outline, Seurat, John Constable, Acrylic, Colored Pencil Lines, Edtaonisl, Kanagawa, Moving Castle, Oil Painting, The Scream, Ballpoint, Composition, Dot Drawing, Candy, Colored Shrapnel, Wavy Lines, Psychedelic Blobs
Alternatives
There are a few alternative applications:
Image Tricks by Belight Software - They have many of the similar styles that are found in Style App.
Graphic Converter - The Filter and Effect menu have a ton of effects that you can apply to images.
Photoscape X - Has about 40 different effects that you can apply. You can't "apply all" as separate images as you do in Style App, but spend about 5-mins and you'll certainly find something creative.
PermalinkiMac Boxes
Save that iMac Box!
If you're like most people, when you get a new iMac, the first thing you do is toss the box. After all, who needs it? You've got the computer and that's all you need, right? Wrong! If you're ever planning on moving your iMac, or even just transporting it from one room to another, keeping the box is a must.
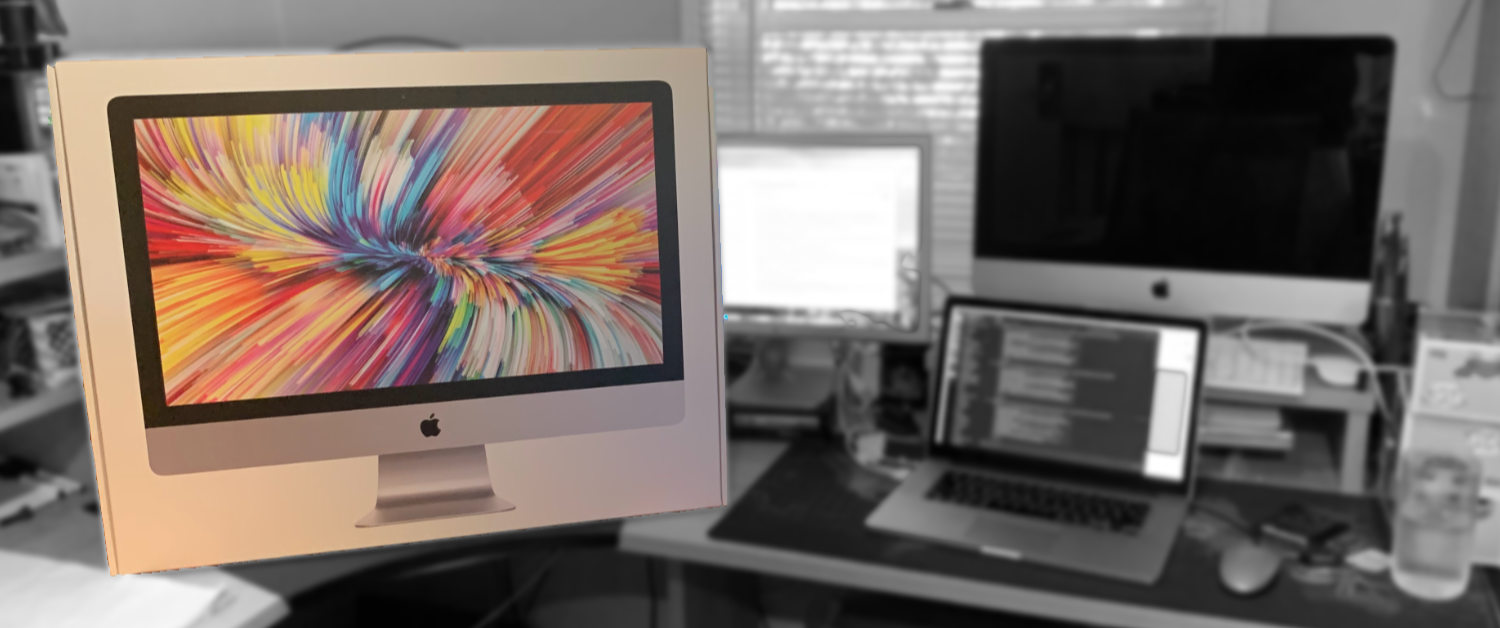
iMac on a Desk - Don't you love the new iMac Smell?
Here are four reasons why:
- The box provides great protection for your computer. If something happens during transport and your computer gets damaged, having the original box will make filing a claim much easier.
- The box can serve as extra storage for your cords and other accessories. Once everything is packed up inside of it, there's no need to worry about losing any of your cables or adapters - they'll be safe and sound until you need them again.
- The box can help keep your desktop clean and organized. When everything has its own designated space in the packaging container, there's less chance of things getting jumbled around or misplaced during transport.
- Finally - and this may be the most important reason of all - if something goes wrong with your computer after purchase but still within Apple's one-year warranty period, having the original packaging could mean that Apple will consider repairing or replacing your device under their warranty policy."
About
A Mac veteran since 1989, I'm here to share my experience with tips and tricks every Friday. Witnessing the evolution of Mac software and hardware firsthand, I've gained a deep understanding of how these machines work and can help you troubleshoot any issues that may come up.
Check out all the blog posts.
Blog Schedule
| Thursday | Business |
| Friday | Macintosh |
| Saturday | Internet Tools |
| Sunday | Open Topic |
| Monday | Media Monday |
| Tuesday | QA |
| Wednesday | Veed |
Other Posts
- Apple Dock
- Type Styler
- PhotoLemur Update
- Graphic Converter Collage Tool
- Launchbar Clipboard History
- Roxio Audio Assistant
- Recent Applications in the Catalina Dock
- Audacity Audio Leveling: Normalize vs. Loudness Normalization
- Soundtrack Pro
- CameraBag Pro
- ParticleShop
- Keychain Secure Notes
- Boost Your Efficiency with LaunchBar's Hidden Calculator Gem
- Snagit 2023
- Dealing with the Grayed out song Listing in iTunes