
iMac 2011
iMac 2011 will be Vintage in August 2018
If you have an iMac 2011, this is your final chance to get any repairs done to the computer. Apple has announced that they will be allowing repairs of the 2011 iMac computer through August of this year.
After August 2018, the iMac computer will be considered a vintage system. Apple is doing this extension since they sold a lot of the iMac 2011 computer, as it was available on the market for a long time. Typically they stop supporting a system 5-years after the last sold date.
What this means to iMac 2011 Users
If your encountering an issue with the iMac this is a good time to get it fixed. Some examples:
- Dead pixel on the screen
- Crack screen
- Display hinge issues
- Stuck disk in the DVD drive
- Computer just doesn't seem to work well
This is the time to bring it in to get it fixed.
After August your chances of getting it fixed could be very limited and be more costly.
Why Bother Repairs?
The iMac 2011 is still a good computer. If you plan on still using it when you get a new computer, you should get the fix done now.
In addition, if you plan to give the computer to your son/daughter it would be good doing in fine working order.
Five Reason to Upgrade
As good as the iMac 2011 was there are five strong reasons to upgrade to the latest iMac:
- The computer has technology inside the box is eight years old. To put it in perspective, Apple iPhone 1.0 was also introduced in the same year. Would you still use the original iPhone today?
- The computer has older USB 2.0 and Firewire 800 ports. Most devices are USB 3.0 powered. All external Hard Drives and Thumb drives are optimized to work in USB 3.0
- Newer iMac has better Bluetooth technology support. You can't connect your iPhone to the computer using the existing Bluetooth technology on the iMac 2011.
- The iMacs today are much faster. They run faster using a faster logic board and now use solid-state memory for storage.
- Thunderbolt 3 - At 40 Gb/s, it's the fastest port available on a computer today.
Creating Sequential Directories
Tips on creating multiple directories in Terminal
There’s an easy way to create a number sequence directories. This is useful when your creating directories for days of a month. I did this for a while organizing blog postings.
To create ten directories starting with the number 21:
mkdir {21..31}
If you need to create a directory with a leading zero:
mkdir $(printf "%02i " $(seq 1 20))
To do a directory in this format: MM-DD Simple use this:
mkdir $(date ‘%b-%d’)
Hope this gives people ideas on different ways to create directories.
PermalinkPixel Fonts
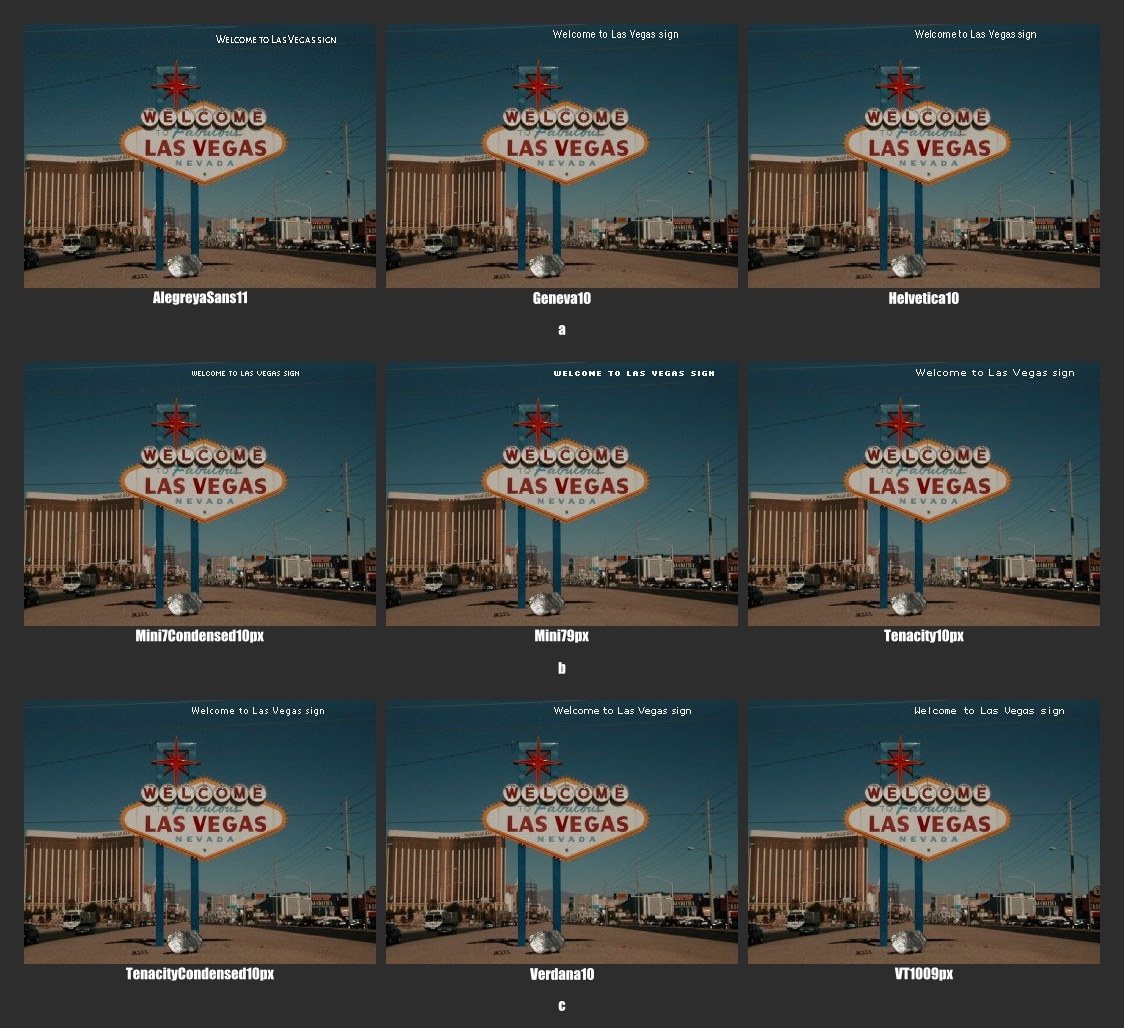
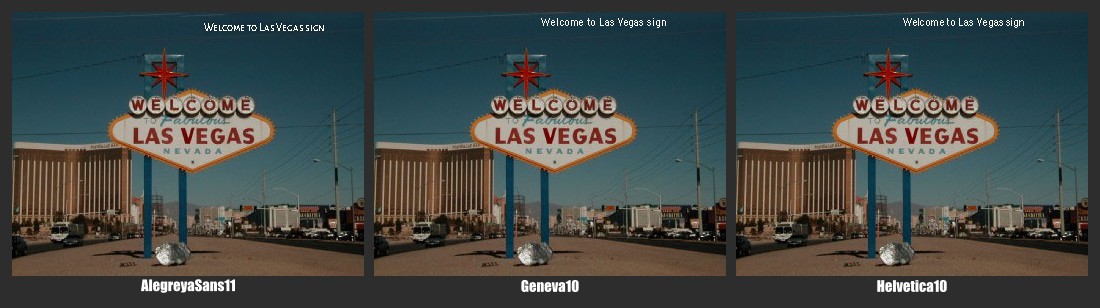
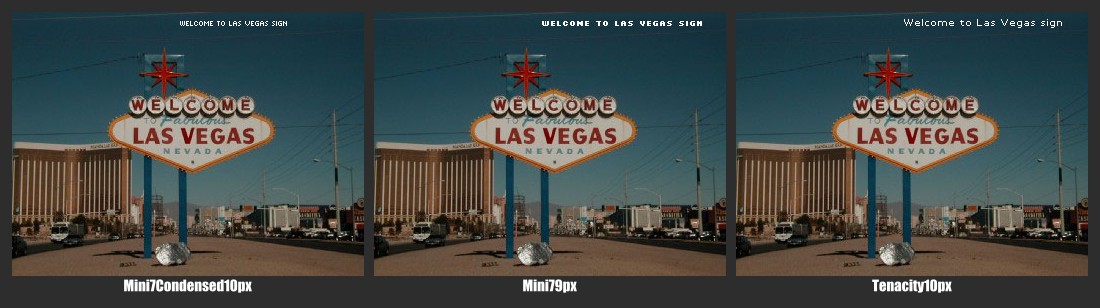
Selecting the best Pixel Fonts for Image Captions
Designers use pixel fonts when they need a good font that looks good when the text is really small. Usually this for text on photos or for navigation buttons.
There are two-pixel font families that are in just about every Macintosh font library - Mini7 and Tenacity. These aren't there by default, you'll have to download them.
Pixel fonts work best in bitmap programs such as Photoshop, Pixelmator. Turn off any anti-alias.
Mini 7
Mini 7 looks great at 7 points, making it one of the smallest font types available. Mini 7 is only available as an uppercase font style. You can't get any fancy character types too. Sorry names with accents but it won't work with Mini 7.
Despite the limitations, Mini7 is one of the most popular pixel base fonts on the Internet.
Mini 7 is available in Condensed, Condensed-Bold, Extended, Extended-Bold, Tight, Extras and Bold
Tenacity
Tenacity is a more developed font and looks good at 10 or 20 points.
Tenacity also comes with additional styles such as Caps, Condensed, Condensed-Bold, Extended, Extended-Bold, Extras and Bold.
Which is the Better Font?
A few years ago, I did a quick page (before blogs was a thing) on the best caption font. Here's a reprint of my findings.
Using Fonts in Photo Captions
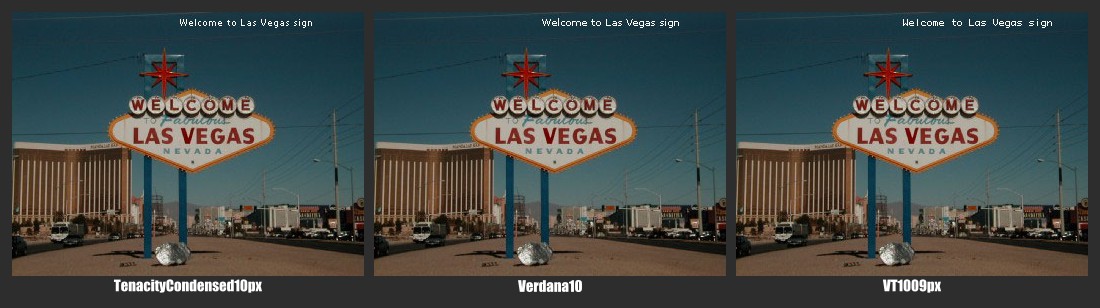
The following are examples of several Macintosh font types being used as captions.
Recomended Fonts
- Alegreya Sans SC
- Geneva
- Tenacity
- Mini 7
- Helvetica
- VT100
- Verdana
I believe that Verdana 10 Point and Tenacity Condensed 10 Point are the best choices for using as caption fonts.
Download a larger high quality compairson: Full Caption Stack (675k)
Which font do you think is the best Pixel based font?
PermalinkPanoramic Photo Challenge
Is DoubleTake better than Affinity Photo?
Taking Panorama photos is a good way to get a landscape view of any environment.
iPhone Camera Panoramic
Apple includes a Pano mode in the camera app, but it takes some skill to hold the camera right. Also, the lighting doesn't mix well.
In my tests, the pictures that I take in Panoramic mode tends to have weird lighting and be very flat. That is, you can't raise the camera up if you want to include a full view of a tree or Building.
Software Stitching
Stitching a bunch of photos post-production is a good way to create a more effective panoramic photo. You can then crop the photo to your needs.
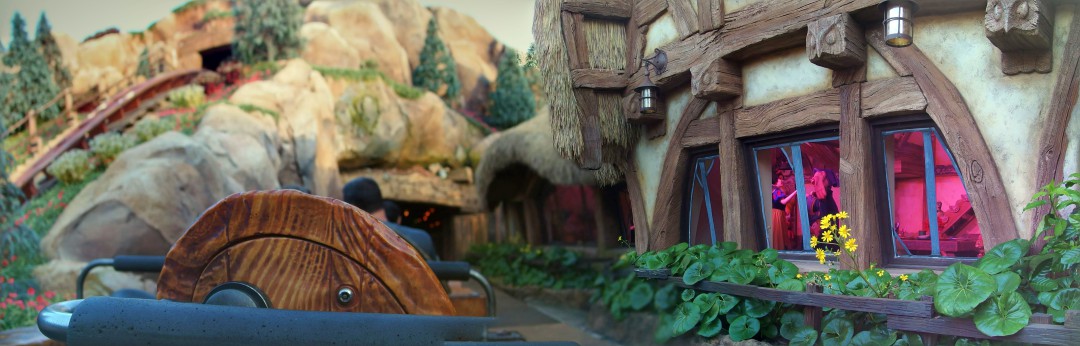
Using the stiching method, I was able to create this cool focus effect. Notice how the picture is focus in a couple areas. You can’t do this in Apple’s Pano.
I have been using Affinity Photo for my stitching, and it has been working well. I recently heard about DoubleTtake and thought it would be interesting to see which app gives you more control.
The Challenge
I took seven pictures of the Back Bay T Station in Boston, Massachusetts. I then ran it through DoubleTake, and Affinity Photo's Panoramic functionality. The only modification that was made was to crop out the excess picture.
Here is the result of the Challenge:
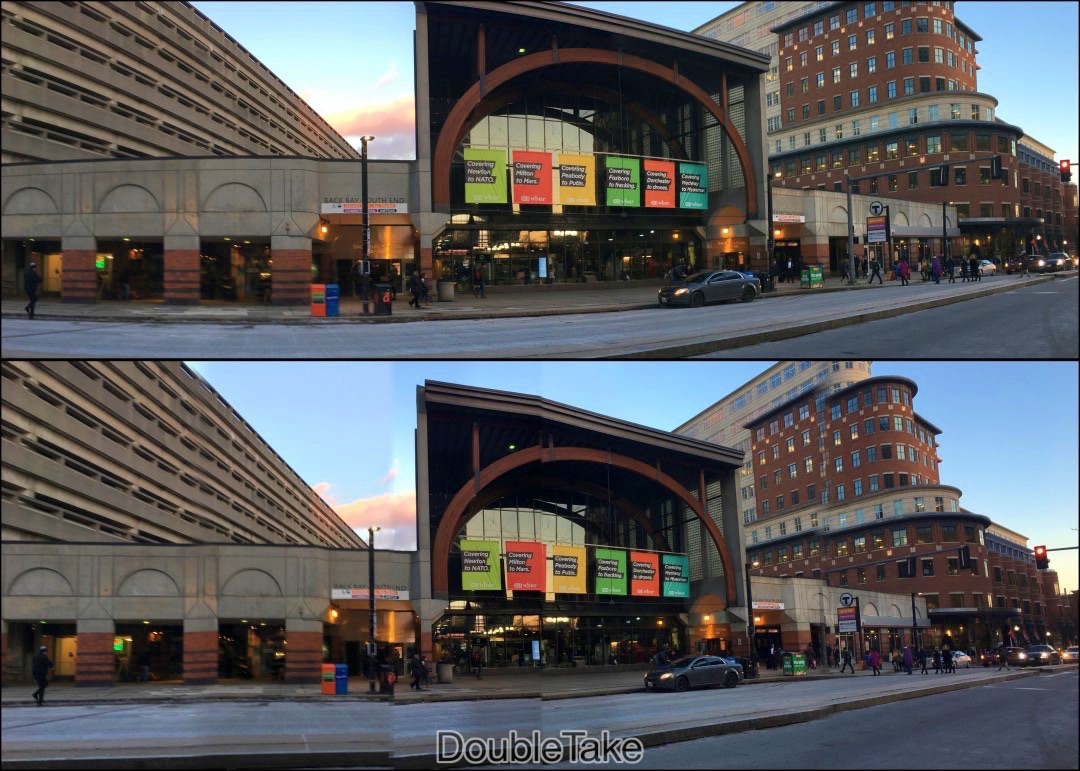
Click on image for a larger version.
DoubleTake
DoubleTake does a fairly good job of setting up the Panoramic shot. You do have to move pictures around to fix the alignment. There are lots of adjustment capabilities within the software. You can move handles to fix to make the photo transitions smooth.
DoubleTake focuses more on getting the largest possible view. In my test, the final crop image was 6718 x 2549.
Affinity Photo
Affinity Photo does a great job of putting the picture together. Basically, I accepted the Panoramic shot, and then crop to opaque. There was no adjustment needed.
Affinity Photo seems to focus more on getting the best picture. In my test, the image was 6187 x 2051.
Granted I have used Affinity Photo for a while, but it was so much easier to use.
PermalinkSmart Converter
Smart Converter 2 is a good media tool to use
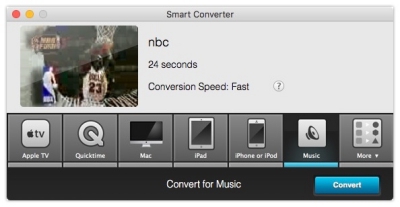
Shedworx's Smart Converter 2 tool is a great way to convert a media file from one format to another. It's a great quick media converter that just works well.
There are two Smart Converter versions, here's the key difference between the free version and the paid version:
In the Smart Converter Pro 2 version:
- Search Meta-Data files
- Automatically adds meta-data for searching
- Subtitle support
- Supports Multiple audio tracks
- Define a different output location (You can avoid iTunes!)
- Disable the ability to add media files to iTunes
- Surround Sound support
- Folder Monitoring (Have Smart Converter run everytime a file is placed in a folder.)
Product Description
Smart Converter Pro provides a faster, higher quality conversion than every other converter:
- It's so smart - only converts stuff that needs converting, and leaves the rest alone--this means it's very fast and maintains the highest possible quality of video and audio.
- Simple to use - drag, drop and click convert - Smart Converter Pro looks after the rest.
- Movie and TV Show info - automatically add key info and artwork for your movies and TV shows.
- Folder monitoring - automatically convert movies as they are added to nominated folders.
- Subtitles - include subtitles, add external subtitles and even load subtitles from the web!
- Supports 100's of media formats and converts to all your favourite devices and file types, including AppleTV, iPad, iPhone, Smart TV, PS3 and more.
- iTunes Savvy - auto import your converted movies and music to iTunes.
Quick and Easy
I like Smart Converter because It can easily convert classic media files - such as Real Media files to MP4. It's a quick way to once again access old media files. (Without Smart Converter I would have to wait for Quicktime to convert old Sorxxx codec videos)
I also use Smart Converter to extract audio from MOV files. Useful when I just want the soundtrack and not have to watch the movie.
Haven't upgrade to the Pro version because I don't have the need for all the features of going pro. If you have a lot of files that need converting, then going pro is the way to go.
My Tips and Tricks
Some video screen capture files done in Snagit will not convert well. Apparently, there's a lot of masking between shots This means that you'll see some strange views in your final output.. (Not Smart Converter problem as Quicktime will have this same issue.) I have found ElMedia Player as a good converter in these cases.
Keep in mind that the final conversation is only as good as the source. Smart Converter can't make a video compress with Sorenson Codec look better in MP4.
Some mp4 files will not convert to audio-only. Haven't figured out why this is the case. ) I use Fission to extract the audio.
If you're not able to find your audio clip in iTunes it's because iTunes thinks it's a movie file.
Supports Converting 177 Media Types!
Here are all the file formats extensions supported by either version of Smart Converter:
avi, mp4, mkv, mts, m2ts, m4v, mp3, m4a, mov, flv, mpa, wmv, wma, wav, 3gp, 3g2, 3gp, 4xm, IFF, ISS, MTV, RoQ, aac, ac3, adts, aea, aiff, alaw, amr, anm, apc, ape, asf, asf_stream, ass, au, avi, avm2, avs, bethsoftvid, bfi, bink, c93, caf, cavsvideo, cdg, crc, daud, dirac, dnxhd, dsicin, dts, dv, dvd, dxa, ea, ea_cdata, eac3, f32be, f32le, f64be, f64le, ffm, film_cpk, filmstrip, flac, flic, flv, framecrc, gif, gsm, gxf, h261, h263, h264, idcin, image2, image2pipe, ingenient, ipmovie, ipod, iv8, lmlm4, m4v, mkv, matroska, mjpeg, mlp, mm, mmf, mov, mov, mp4, m4a, 3gp, 3g2, mj2, mp2, mp3, mp4, mpc, mpc8, mpeg, mpeg1video, mpeg2video, mpegts, mpegtsraw, mpegvideo, mpjpeg, msnwctcp, mulaw, mvi, mxf, mxf_d10, nc, nsv, null, nut, nuv, ogg, oma, psp, psxstr, pva, qcp, r3d, rawvideo, rcv, rl2, rm, rpl, rtp, rtsp, s16be, s16le, s24be, s24le, s32be, s32le, s8, sdp, shn, siff, smk, sol, sox, spdif, svcd, swf, thp, tiertexseq, tmv, truehd, tta, txd, u16be, u16le, u24be, u24le, u32be, u32le, u8, vc1, vc1test, vcd, vmd, voc, vqf, w64, wav, wc3movie, webm, wsaud, wsvqa, wv, xa, yop,
Getting Smart Converter
You can get the free version on the Apple Store or from ShedWorx Website.
PermalinkParticleShop
General review of ParticleShop
ParticleShop is a unique brush effect tool, it makes the brush come alive and adds all sorts of special effects. Basically, the brush comes alive as you apply it to the image. Based on the color/size and brush you get all sorts of unique special effects.
This is not your standard brush tool. It's a way to paint effect to your photos, such as fire, smoke and bubbles.
I originally purchased ParticleShop as part of the "Create Your 12 App MEGA Mac Bundle" from Bundle Hunt. I saw the description and thought it would be worth trying out. (It was priced at $49.99) I got the 12-App bundle for $19.99.
Description from the 'About ParticleShop' menu
Leave the physics to us; no static stamps here! Experience the strokes of grab-and-go living brushes that spring, flow, gravitate and glow based on your unique expression. Artistically enhance photos, designs, and illustrations with the realistic awe-inspiring results.
Craft your visual masterpiece with brushes that are built to perform with a pressure-sensitive tablet, touchscreen or mouse. Free yourself to create, ranter than configure by exploring an array of artistic brushes that require minimal setup and a clean and simple user interface in which to create.
Are you ready to get started? You can access ParticleShop resources online to find exciting new brushes, get help, and learn more about the product.
Demo of ParticleShop

Not a great artist, but I added a couple of effects to an image.
Cool Tool
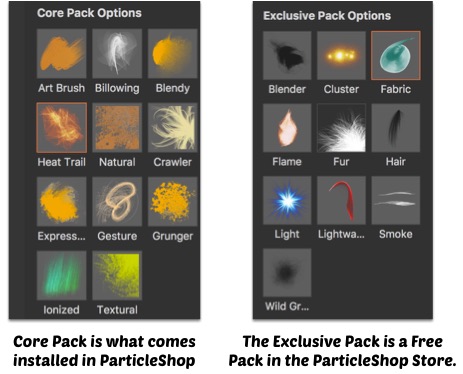
ParticleShop is a cool tool, it comes with 11 brushes in the Core Pack. However, once you start playing around with it you quickly feel that 11 brushes aren't enough and you could do so much more with more brushes. In order to get new ones you have to purchase them on Painter's online store.
The prices for extra packs range from $29 to $79 - you can get the entire collection for $95. I think it's pretty expensive for my budget, but I guess if you're into brush touch up then it would be a reasonable amount of the creative brush effects that you get.
At the End of the Day
I don't think I'll be using ParticleShop too much, it's a cool tool for people that spend a lot of time touching up photos and graphics files. Looks like having a pressure sensitive Wacom tablet would be practical to get the most out of the tool.
ParticleShop is a Photoshop Plug-in and does not work with Affinity Photo. Since I don't use Photoshop Elements 13 that much, I don't think that I'll be using ParticleShop.
PermalinkQuadro Sync
Quadro Sync is a cool way to integrate your iPhone with your computer
Quadro Sync is a cool way to control your computer from your Smart Phone. You have the ability to assign specific functions so that when you open up the application your smartphone screen changes to display buttons of tasks to perform.
You can customize the button assignments and button designs. Giving you full control over how Quadro Sync works.
Quadro is an excellent application to help with common tasks that you encounter every day. If you been thinking about getting an external controller pad, consider trying Quadro first.
This is a two-bit application; there's the desktop app that is always listening! and interacting with iOS! and there's an iOS app that has to be running. After a few minutes of inactivity, the iOS app will go to sleep -saving your screen and device power.
If you're just going to charge your phone at your desk, why not put it to great use?
Description from Quadro Website
Here's a description from Quadro.me website:
Power up your workstation
Control your applications with a simplified yet enhanced personal interface. Automate any recurring iteration and optimize your workflow.
Reduce the gap between ideation and execution. And have fun doing it.
Personal computing, truly
Personalize any function and representation of your actions. Use color, icons and images to convey meaning and smoothen your path to action.
Automate your workflow
Direct activation is cool again, but that's not enough.
Sequence any action easily to create your cross-application macros and let Quadro do the dirty work for you.
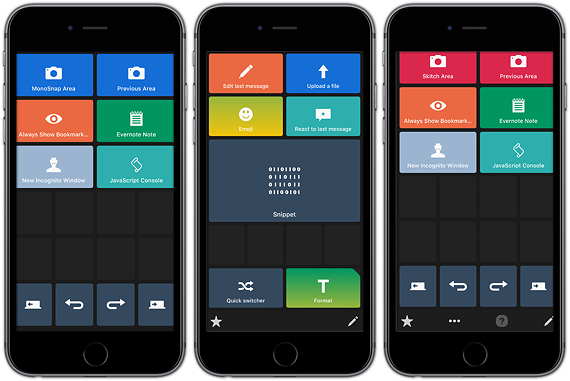
BBEdit Screen Example
I spent a lot of time in BBEdit for PHP development and text cleanup. I spent some time thinking about what tools would make sense to make a Quadro action:

- Zap Gremlins - Clean up the selected text.
- Paragraph - Create HTML Paragraph from selection
- Backup to Evernote - Quick way to backup my document to Evernote.
- Process Lines Containing - Quick Filter
- Find - Open up the Find/Replace dialog box
- Remove Line Breaks - Clean up the selected text.
- Add Hyperlink - Open the Hyperlink dialog to add a link to the selected text.
Obviously all of these commands can be performed by keyboard shortcuts. Making them as action buttons in Quadro makes it quicker to apply these actions.
For example, I am opting to backup my documents to Evernote more often because the big green button is there to remind me.
Which Devices can You Install Quadro Sync?
If you have any old devices that are just sitting in storage, you may want to dust it off and make it your new Quadro pad.
The Quadro iOS App will work on any devices that can run iOS 8.0 or newer, according to Apple these are the devices that will run on iOS 8:
|
|
Getting the Application
To get started, visit the Quadro website and download the application.
PermalinkPhotoBulk
PhotoBulk is a good Photo Utility software
PhotoBulk is a neat little application where you can apply four different tasks to an unlimited set of images.
This past summer, I got the application as part of the The Next Web software package deal. In September, they came out with an update - my purchase wasn't eligible for the free upgrade. However, they will offer a 50% discount on previous purchases, which is very good.
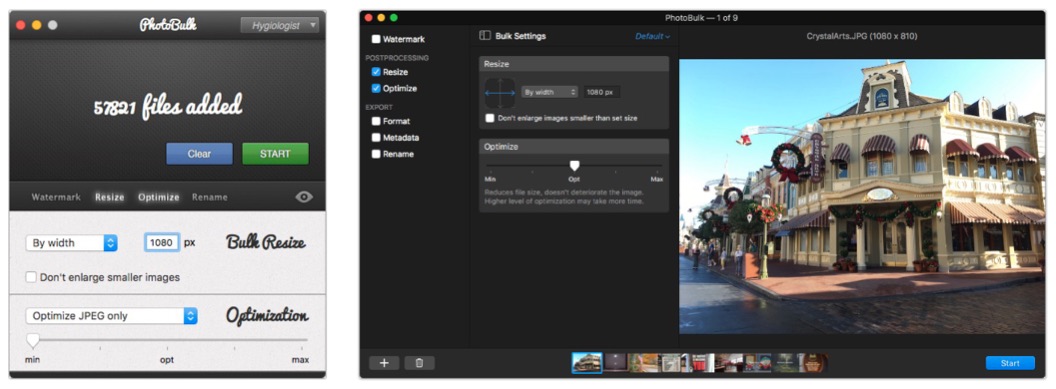
The screen difference between the old view and the new view.
Watermark
There are four different watermarks that you can apply to each image:
- Text - Simple text, (i.e. Copyright Info) with the ability to select different font sizes and color. You can also change the opacity. You can change the angle or location of the text.
- Image - Place any image logo in simi
- Script - Repeat a text watermark on your image.
- Datestamp - Add a timestamp to your image. You have the same capabilities as the text
Resize
This is useful if you want to transform a bunch of images to a similar size. You can change By Width, By Height, Percentage, By Max file size, Free Size.
Optimize
You can reduce the size of images (JPG and PNG) files. The only bad part is that you can’t tell if the compression will cause a serious quality problem with the images.
In my test, it actually did a pretty good job optimizing. I used the mid-point, called ‘opt’ and checked the files and they looked fine, I couldn’t tell any visual difference.
Note: There is no preview functionality in the September update
Rename
Rename a the drop images. This is useful when you want to rename a bunch of common photos. Such as vacation photos.
Performing Action
When you start the action, the tasks will always create a new folder and put the new images in the folder. You don't have to worry about the original file.
Overall View
There are some useful functionality however, I think your better off using functiionality in GraphicConverter or PhotoScape X. These applications offer a lot more features. At the end of the day, you get more bang for your buck.
The watermark feature in PhotoBulk is nice, but not something that I would be using frequently.
PermalinkPhotoScape X December Update
Photoscape X has some new features.
On December 20th, 2017, Photoscape X was updated with nine new features an unspecified number of bug fixes. The application is shaping up to be a very useful tool, and I certainly would recommend it as a compliment to Affinity Photo or Pixelmator.
Here's a breakdown of the new Features released in the December update:
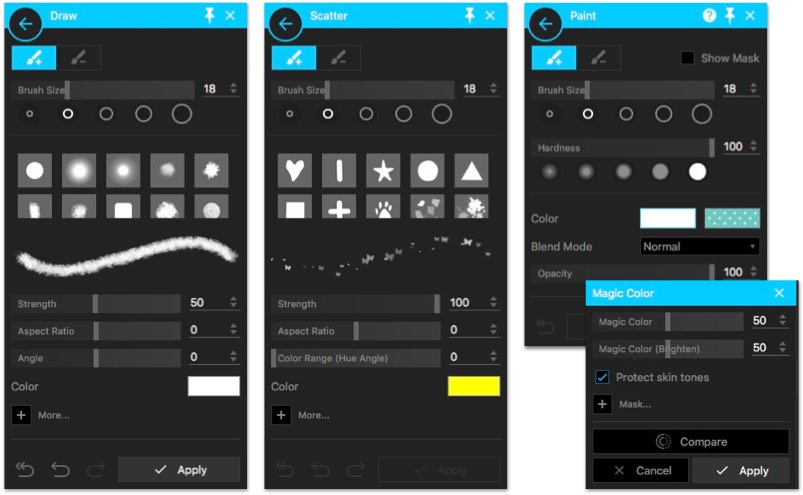
Menus Options of the new features
Draw Brushes
There are now 11 new Draw Brushes. These brushes are useful to add additional effects to the images. There's a lot more capabilities in Affinity Photo and Pixelmator, including the ability to create your own brush.
I played around with this and can see this would be a good way to quickly enhance images, especially using the Blend Mode.
Scatter Brushes
Nice to see scatter brushes back! This is a favorite paint feature that I am glad to see back on the Mac! I first encountered scattered brush in SuperPaint. Scatter brush is a way to display some brush strokes randomly. Usually done with a special shape brush such as Heart, Confetti, Snowflakes, Dog Prints and more.
Photoscape X includes 11 brushes in this release. I am sure they will release some new ones in future updates. Very cool feature to use to add effects to images, such as snowflakes or adding Bokeh effects.
Paint Bucket Tool
The Paint Bucket tool will change a specific pixel to any color that you wish. I can see this would be useful if you have a solid color background and wanted to change it to some other color.
I played around with this feature for a bit and don't see it very useful for photos. I think it will be good to touch up graphics files.
Magic Color Filter
The Magic Color filter is a quick way to brighten up your images. Now you don't have to play around with various Clarity and Brighten settings. Simply click on the "Magic Color" checkbox and instantly see the image improve.
You can adjust the setting to better improve the image.
I tested this feature with several images and it works very well. The images are nice and bright! A quick way to touch up an image if you don't have time to do it! This is a great tool to have and I certainly see this being used all the time.
Touch-up Compairson
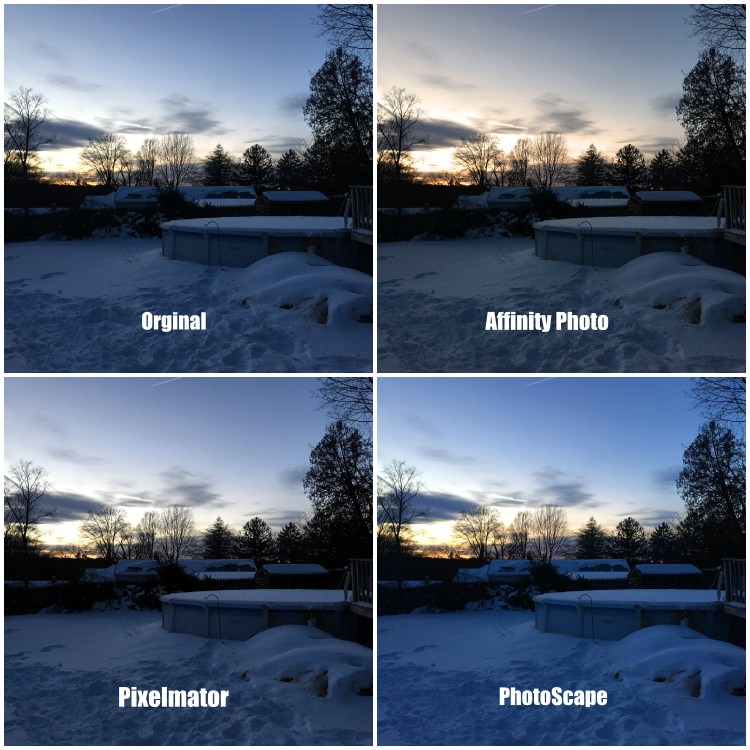
In the above example, I ran the same photo through each application and selected the Auto Color Adjustment once. I didn't make any special changes to the image. I think Photoscape did a great job with bringing out the blue in the snow.
PermalinkBest Macintosh Blog Posting of 2017
Top Macintosh Post of 2017
This year I found some great Macintosh software - Affinity Photo, Affinity Designer and Keyboard Maestro. They all played into helping make 2017 a very productive year.
Many of this year's post were around those applications. Next year might see a shift to more developer and video applications.
Top Seven Macintosh Post of 2017
In no particular order..
- imageSnap - Creative way to take camera snapshots.
- EUASOO Mouse Mice Z-7900 on MacOS - Great practical mouse! It feels comfortable using it all day.
- Launchbar Clipboard History - I had no idea how useful this would be.
- Using Microsoft Shapes and Smart Art in Affinity Designer - Great knowing there's a lot of Infographic type shapes at my disposal. Kudos to Microsoft for making these smart art available.
- Save-As Dialog Boxes - Great tip on navigating everyday dialog boxes.
- PhotoScape X - Great graphic application that packed with a lot of tools. Highly recommend playing around with it to understand the capabilities.
- Keynote Slides for iMovie - Expand the text capabilities of iMovie with this Keynote tip.
You can find all the Macintosh post over on the Macintosh Blog Listing page.
Lots of exciting Macintosh post are planned for 2018. If you have any tips/tricks that you would like to share, please let me know.
PermalinkAbout
A Mac veteran since 1989, I'm here to share my experience with tips and tricks every Friday. Witnessing the evolution of Mac software and hardware firsthand, I've gained a deep understanding of how these machines work and can help you troubleshoot any issues that may come up.
Check out all the blog posts.
Blog Schedule
| Thursday | Business |
| Friday | Macintosh |
| Saturday | Internet Tools |
| Sunday | Open Topic |
| Monday | Media Monday |
| Tuesday | QA |
| Wednesday | Veed |
Other Posts
- Luminar
- Bootstrap 4 BBEdit Tools
- OBS Studio
- Save-As Dialog Boxes
- External Monitor for iMac
- BBEdit Canonize Command
- Rogue Amoeba's Fission
- Art Text 4 Designs
- EUASOO Mouse Mice Z-7900 on MacOS
- Image Tricks Pro
- BBEdit: Process Lines Containing
- radioSHARK
- Macintosh ExFAT Format
- OmniGraffle 2020 Calendar
- macOS Ventura