
Organizing Your Workspace: Adding macOS Dock Spacers
Simple Terminal Commands
Recently I needed to add some spacers to my macOS dock to better categorize my apps. During the process, I discovered that there are actually two kinds of spacers available: Small and Large.
If you like a clean aesthetic, these invisible tiles are perfect for grouping similar applications together. Here are the commands to create them using your Terminal.
Small Spacer
Perfect for subtle separation between icons.
defaults write com.apple.dock persistent-apps -array-add '{"tile-type"="small-spacer-tile";}';killall Dock;Large Spacer
Standard width spacing, identical to the gap between apps and the trash can.
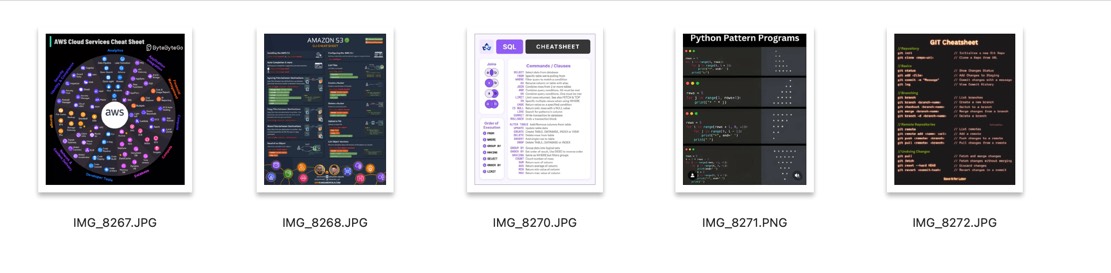
defaults write com.apple.dock persistent-apps -array-add '{"tile-type"="spacer-tile";}';killall Dock;How to Create a Single PDF from a Bunch of Images
A Simple Guide for X.com Tip Collectors*
If you're active on X.com in 2025, you've probably noticed a trend: people are sharing a ton of clever tips, tricks, and guides for apps and services, often in the form of cheap, downloadable images. From productivity hacks to software shortcuts, these visuals are gold - but they're scattered across your downloads folder. What if you want to consolidate them into a single, printable document? Maybe a double-sided reference sheet to keep handy or a neat PDF to store digitally? This blog post will show you how to turn those images into a single PDF using a free, built-in tool on your Mac - no fancy apps or subscriptions required. Plus, we'll cover why printing at a place like Staples can save you money and make your guide look sharp.
Why Combine Images into a PDF?
With so many X.com users posting bite-sized tips as JPGs or PNGs, it's easy to end up with a collection of images you want to keep together. Creating a single PDF is perfect for: - Printing a Reference Guide: Combine tips into a double-sided sheet for quick access. - Saving Space: One PDF is easier to manage than a dozen loose images. - Professional Look: A PDF looks polished and is easy to share or store. - Cost-Effective Printing: Instead of burning through expensive ink at home, take your PDF to Staples or another print shop. At about $0.99 per page for color laser printing, you'll get vibrant, professional results without breaking the bank.
The Easiest Way to Create a PDF: Using Preview on Mac
You don't need to shell out for pricey software to merge images into a PDF. Mac's built-in Preview app is all you need, and it's free. Here's a step-by-step guide to make it happen:
Gather Your Images: Collect all the JPGs or PNGs you want to combine. Maybe it's a set of Photoshop shortcuts or a guide to mastering a new app from X.com. Put them in one folder for easy access.
Open in Preview: Select all the images (Command + click to select multiple files), right-click one of them, and choose Open With > Preview. This opens all images in a single Preview window, with a sidebar showing thumbnails of each image.
Arrange the Order: In the sidebar, drag and drop the thumbnails to reorder the images. This sets the page order for your PDF. Want your favorite tip first? Just drag it to the top.
Adjust Orientation (If Needed): If some images are sideways, select the thumbnail in the sidebar and click the Rotate button in the toolbar (a curved arrow). This ensures everything looks right in the final PDF.
Create the PDF: Once your images are in order, go to the menu bar and select File > Print. In the print dialog box, look for the PDF dropdown menu in the lower-left corner. Click it and choose Save as PDF.
Save Your File: Choose a name for your PDF (like "X.com Tips 2025") and pick a save location. Hit Save, and voila! You've got a single PDF with all your images.
Bonus Tip: For a quick visual guide, check out a YouTube tutorial on merging images into a PDF using Preview's "Quick Action" method. It's a slightly different approach but confirms how easy this process is.
Fastest Way?
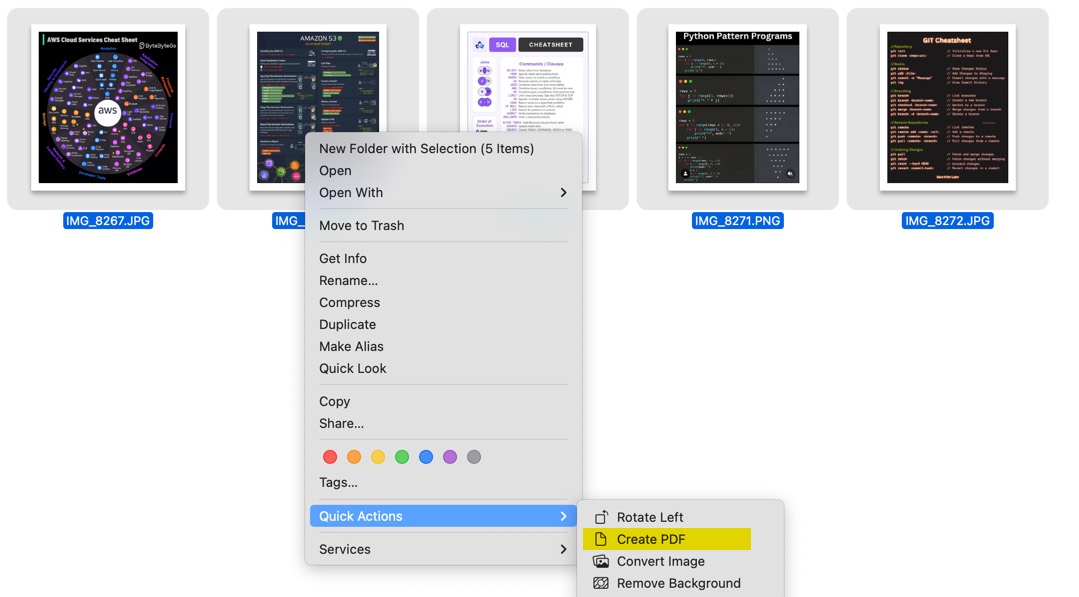
Using the "Quick Action" Might be faster but you have more control on the layout using the Preview method.
Why Print at Staples?
Sure, you could print your PDF at home, but color ink is pricey, and the results might not pop like you want. Taking your PDF to a print shop like Staples has some big perks: - Cost Savings: At roughly $0.99 per page for color laser printing, you're saving on ink and paper costs compared to home printing. - Professional Quality: Laser printing delivers crisp, vibrant colors, perfect for those detailed X.com infographics. - Double-Sided Option: Ask for double-sided printing to create a compact reference sheet that's easy to carry or pin up.
Why This Matters in 2025
The tips and tricks flooding X.com are a treasure trove of knowledge, but loose images can get lost in the digital shuffle. By turning them into a single PDF, you're creating a resource you can use anywhere - whether it's printed as a cheat sheet or stored on your device. The Preview method is fast, free, and gives you control over the final product. Plus, it's a reminder that sometimes the simplest tools - like a built-in Mac app - can solve modern problems without a subscription or download.
So, next time you snag a batch of cool tips from X.com, don't let them languish in your downloads folder. Combine them into a PDF, head to Staples for a pro-quality print, and keep those insights at your fingertips. It's a small effort for a big payoff - both in organization and inspiration.
PermalinkChrome Warning to Allow Device Discovery on Local Networks
Should Mac Users Be Concerned?
If you're a Mac user and have recently encountered a prompt from Google Chrome asking, "Allow 'Google Chrome' to find devices on local networks?" - complete with options to "Don't Allow" or "Allow" - you might be wondering what it means and whether it poses a risk. Let's break it down.

What Does This Warning Mean?
This pop-up is part of Chrome's attempt to enable features like casting (e.g., sending videos or tabs to a smart TV or Chromecast) or other device discovery functionalities that rely on identifying devices on your local network. By allowing this, Chrome can scan your network to detect compatible devices and display them as options for content sharing. This feature leverages protocols like mDNS (multicast DNS) to locate devices without requiring manual configuration.
Why Does It Appear?
Apple's macOS has tightened security settings over time, particularly with network permissions. Starting with macOS Mojave (10.14) and continuing in later versions, apps must explicitly request permission to access local network resources. This Chrome prompt is a response to those security measures, ensuring users are aware and can consent to the action.
Should Mac Users Be Concerned?
For the average user, this warning is not inherently a cause for alarm. However, there are a few considerations:
Privacy Implications: Allowing Chrome to scan your local network means it can detect all devices connected to your Wi-Fi, including smart home gadgets, printers, or other computers. While Chrome itself doesn't misuse this data, a malicious extension or compromised browser could potentially exploit this access. This risk is low but not zero.
Security Risks: If your network is unsecured (e.g., no password or weak encryption), permitting device discovery could expose your devices to unauthorized access. A well-secured network with a strong password and up-to-date firmware mitigates this concern.
Unnecessary Feature Use: If you don't use Chromecast or similar casting features, there's little benefit to granting this permission. Denying it won't impact your browsing experience and keeps your network information private.
Recommendation for Mac Users
- Default Choice: Opt for "Don't Allow" unless you actively need to cast content or use a feature requiring device discovery. You can always change this later in System Settings under "Security & Privacy" > "Files and Folders" or "Network" if needed.
- Monitor Permissions: Regularly review which apps have network access on your Mac to ensure only trusted applications are granted permissions.
- Secure Your Network: Use a strong Wi-Fi password, enable WPA3 encryption if supported, and keep your router firmware updated to minimize risks.
Conclusion
Mac users don't need to be overly concerned about this Chrome warning, especially if they take basic security precautions. It's a standard permission request tied to modern network features, but denying it is a safe default unless you specifically require the functionality. Stay informed, keep your system secure, and enjoy a worry-free browsing experience!
PermalinkSnagit has limits on Apply Effects on Objects
Try "Reveal Canvas" in Pixelmator Pro to Expand the Capabilies of Editing
Have you ever tried to stitch together a bunch of screenshots in Snagit, only to hit a brick wall? Maybe you find it impossible to add clean drop shadows and other stylish effects to your selected object>. If you've little frustrated - you're definitely not alone!
The Problem: When Simple Image Editing Isn't So Simple
Snagit is fantastic for quick screenshots or basic annotations, but it can fall short when you want to combine multiple images into one seamless graphic and add some touch ups to the objects. The main issue? You're can only add effects to the whole image. That means if you drag in another screenshot or try to move things around, you can apply some styles.
The Solution: Pixelmator Pro - Friendly Power At Your Fingertips
Enter Pixelmator Pro. If the thought of learning a "pro" app sounds intimidating, don't worry - this one is made for everyone. Pixelmator Pro is all about drag-and-drop simplicity. You can toss in your screenshots, move things around, and play with effects - all without dealing with confusing menus or technical nonsense.

Meet the "Reveal Canvas" Feature: Your Ticket to an Endless, Flexible Workspace
But here's where things get really exciting: Pixelmator Pro's "Reveal Canvas" feature. Think of it like having a digital whiteboard that never runs out of space. If you move an image (or several images) so they hang off the edge of your workspace, Pixelmator Pro doesn't throw an error or cut them off. Instead, just click Image > Reveal Canvas, and - voilà! - the canvas expands to fit everything, no matter how big your collage gets,
A Practical Example: Easily Combine Screenshots With Style
Let's say you're making a step-by-step tutorial and want to line up multiple large screenshots in one image. Here's how Pixelmator Pro makes it easier:
- Drag all your screenshots into Pixelmator Pro. Don't worry about them going over the edge.
- When you're done arranging, go to the menu and select "Reveal Canvas." Instantly, your workspace grows to fit every piece.
- Want a drop shadow on a particular screenshot? Select the screenshot, select a drop shadow style, and you're done - with no annoying limitations or workarounds.
No More Boundaries - Only Creativity
With Pixelmator Pro's "Reveal Canvas," you'll never feel trapped or limited by your editing software again. Whether you're piecing together a mega-collage or want to add stylish effects to your work, it's all quick, simple, and - most importantly - fun.
So next time you're feeling boxed in… just reveal your canvas, and let your creativity stretch as far as you need!
PermalinkFree Up 30GB in 30 Minutes
Your Ultimate Guide to Decluttering macOS Cache and Mystery Files!
As macOS users, we love our Macs for their sleek performance and intuitive design. But over time, even the tidiest Mac can accumulate digital clutter - cache files, temporary data, and mysterious leftovers from long-forgotten apps. If your storage is feeling cramped, don’t panic! In this guide, we’ll walk you through two powerful ways to reclaim space: clearing out the Chrome cache** and carefully navigating the enigmatic **Group Containers folder**. With a bit of caution and know-how, you can free up **30GB (or more!) in just 30 minutes. Let’s dive in.
Part 1: Clearing Chrome Cache on macOS
If you’re a Chrome user, you’ve probably noticed your Mac’s storage slowly dwindling. Chrome’s cache - temporary files stored to speed up Browse - can balloon to several gigabytes over time. Clearing it out is a quick win for reclaiming space and can even resolve pesky browser issues like slow loading or glitchy websites.
Why Clear the Chrome Cache?
- Reclaim Storage: Cache files can grow massive, especially if you browse media-heavy sites like YouTube or Netflix.
- Fix Browser Issues: Corrupted cache files can cause websites to misbehave or load incorrectly.
- Improve Performance: A leaner cache means Chrome spends less time sifting through outdated data.
Step-by-Step Guide to Clear Chrome Cache
Follow these steps to manually delete Chrome’s cache files on macOS. Important: Close Chrome completely before proceeding to avoid file access issues or data corruption.
- Quit Google Chrome:
- Ensure Chrome is fully closed. Click the Chrome menu in the top-left corner and select Quit Google Chrome, or press
Command + Q. - Verify Chrome isn’t running in the background by checking the Dock or Activity Monitor.
- Ensure Chrome is fully closed. Click the Chrome menu in the top-left corner and select Quit Google Chrome, or press
- Open Finder:
- Launch Finder from your Dock or by clicking the desktop.
- Navigate to the Cache Folder:
- Press
Command + Shift + Gto open the “Go to Folder” dialog. - Type
~/Library/Caches/Google/Chrome/Default/Cacheand hit Enter. This takes you to Chrome’s cache directory.
- Press
- Select and Delete Cache Files:
- In the Cache folder, you’ll see files and subfolders (e.g.,
Cache_Data). Select everything by pressingCommand + A. - Drag the selected items to the Trash, or right-click and choose Move to Trash.
- For safety, avoid deleting the parent
GoogleorChromefolders - just focus on the contents of theCachefolder.
- In the Cache folder, you’ll see files and subfolders (e.g.,
- Empty the Trash:
- Right-click the Trash icon in the Dock and select Empty Trash to permanently delete the files and free up space.
- Verify the Space Saved:
- Check your available storage by clicking the Apple menu > About This Mac** > **Storage. You might be surprised how much space you’ve reclaimed!
Pro Tip
If you’re unsure about manually deleting files, Chrome has a built-in cache-clearing tool. Go to Chrome > Settings > Privacy and Security > Clear Browse Data**, select **Cached images and files**, and click **Clear Data. However, the manual method ensures you’re targeting the exact cache folder and can reveal just how much space those files were hogging.
Caution
Always quit Chrome before deleting cache files to prevent crashes or incomplete deletions. If Chrome is running, macOS may block access to some files, or you could disrupt active Browse sessions.
Part 2: Navigating the Group Containers Folder
The ~/Library/Group Containers folder is a lesser-known corner of macOS that can harbor gigabytes of data. But tread carefully - this folder contains shared app data, and deleting the wrong files could break apps or lose important information. Let’s demystify it and explore how to safely reclaim space.
What Is the Group Containers Folder?
The ~/Library/Group Containers folder stores shared data for apps that use Apple’s App Groups feature. This includes:
- Shared Preferences: Settings or data shared between related apps (e.g., an app and its extension).
- Temporary Files: Downloads, caches, or temporary data from apps like messaging platforms or cloud services.
- App-Specific Data: Files from apps that use iCloud, keychain, or other shared services.
You’ll find subfolders with cryptic names like group.com.developer.appname or unique identifiers. These often belong to apps you’ve installed (or uninstalled), such as Slack, WhatsApp, or iCloud-enabled apps.
Why Clean Group Containers?
- Old App Data: Uninstalled apps may leave behind large files, like cached messages or media from chat apps.
- Temporary Bloat: Some apps store temporary files that aren’t automatically purged.
- Storage Savings: Subfolders can grow to several gigabytes, especially for apps like Zoom or Dropbox.
How to Identify Safe-to-Delete Files
Cleaning Group Containers requires caution, as deleting critical files can disrupt apps or iCloud syncing. Here’s a general approach to identify files that *might* be safe to delete:
- Open Finder and Navigate:
- Press
Command + Shift + Gand enter~/Library/Group Containers. - You’ll see subfolders with names like
group.com.slackorUBF8T346G9.com.apple.notes.
- Press
- Identify Subfolders:
- Look for folders tied to apps you no longer use. For example:
group.com.slackmight contain cached messages or media from an old Slack installation.group.com.whatsappcould hold large downloaded files from WhatsApp.- Folders with developer names (e.g.,
com.microsoft) might relate to uninstalled apps like Teams.
- Check folder sizes by right-clicking a folder and selecting Get Info. Large folders (e.g., 1GB+) are prime candidates for inspection.
- Look for folders tied to apps you no longer use. For example:
- Spot Common Culprits:
- Old App Installers: Some apps store installer data or updates in Group Containers.
- Messaging App Data: Apps like WhatsApp or Telegram may store cached media (e.g., videos, images).
- Temporary Files: Look for folders labeled
CachesorTemporaryItemswithin Group Containers. - Uninstalled App Data: If you recognize a developer or app you’ve removed, its folder is likely safe to delete.
- Research Before Deleting:
- If a folder’s name isn’t obvious (e.g.,
UBF8T346G9), search online for the identifier to confirm its associated app. - Avoid deleting folders tied to active apps, iCloud, or system services (e.g., anything with
com.apple).
- If a folder’s name isn’t obvious (e.g.,
- Delete with Care:
- Move a folder to the Trash by dragging it or right-clicking and selecting Move to Trash.
- Empty the Trash to reclaim space, but only after confirming the folder’s contents aren’t needed.
- Check Storage Again:
- Revisit About This Mac > Storage to see how much space you’ve freed up.
Examples of Potentially Safe Files to Delete
- Old Slack Data: The
group.com.slackfolder might contain gigabytes of cached messages or files from a workspace you no longer use. - WhatsApp Media:
group.com.whatsappoften stores downloaded images or videos, which can be safely deleted if you’ve backed up important chats. - Uninstalled App Leftovers: If you deleted an app like Adobe Creative Cloud, check for folders like
com.adobe.acc.installer. - Temporary Files: Subfolders named
CachesorTempwithin Group Containers are often safe if tied to uninstalled apps.
Strong Warning: Proceed with Caution
The Group Containers folder is a minefield for the unprepared. Deleting the wrong files can:
- Break app functionality (e.g., losing preferences or sync data).
- Disrupt iCloud syncing, potentially affecting data across your devices.
- Cause unexpected errors in apps that rely on shared data.
Always:
- Back Up First: Use Time Machine or another backup solution before deleting anything.
- Research Unknown Folders: If you’re unsure about a folder’s purpose, search its name online or consult the app’s documentation.
- Avoid Apple Folders: Steer clear of anything with
com.applein the name, as these are often critical to macOS or iCloud.
Safer Alternative: Use macOS’s Optimize Storage
If manually cleaning Group Containers feels too risky, macOS’s built-in Optimize Storage feature is a safer way to manage large files:
- Go to Apple menu > About This Mac > Storage > Manage.
- Enable Store in iCloud to offload files to the cloud.
- Use Empty Trash Automatically to clear old files.
- Review Recommendations to identify large files, downloads, or unused apps.
- Check the Files tab to find large documents or downloads (e.g., old DMGs or temporary media) that might overlap with Group Containers data.
Optimize Storage is less granular but reduces the risk of deleting something critical.
How to Safely Clean Up Your Final Cut Pro Workflow
Safe Way to Reclaim Your Hard Drive
As video editors, we've all been there: your Mac's storage is running dangerously low, Final Cut Pro is sluggish, and you're wondering where all your disk space disappeared. The culprit is often lurking within your Final Cut Pro libraries - specifically in the "Final Cut Original Media" and "Final Cut Proxy Media" folders that silently accumulate gigabytes of files over time.
Managing these media files isn't just about freeing up storage space; it's essential for maintaining optimal performance, preventing project corruption, and ensuring your editing workflow remains smooth and efficient. When left unchecked, these folders can balloon to consume hundreds of gigabytes, slowing down your system and making it increasingly difficult to manage your projects effectively.
Having too many "unused" files can prevent you from storing needed files that you want to keep. Let's clean up your computer!

Understanding Final Cut Pro's Media Architecture
Before diving into cleanup procedures, it's crucial to understand what these folders contain and why Final Cut Pro creates them in the first place.
Final Cut Original Media Folder
The "Final Cut Original Media" folder stores copies of your source footage that Final Cut Pro automatically imports when you add media to your library. This happens in several scenarios:
- When you import media files from cameras, memory cards, or external drives
- When you use the "Copy to Library" option during import
- When Final Cut Pro needs to transcode files for compatibility
- When you're working with formats that require conversion for optimal playback
These files serve as your master copies within the library structure, ensuring your projects remain self-contained and accessible even if the original source media is moved or deleted.
Final Cut Proxy Media Folder
The "Final Cut Proxy Media" folder contains lower-resolution versions of your footage designed to improve playback performance during editing. Final Cut Pro generates proxy media when:
- You enable "Create proxy media" during import
- You manually create proxies for high-resolution footage (4K, 8K, or high-bitrate formats)
- You're working on less powerful hardware that struggles with native resolution playback
- You're collaborating with team members who need lighter files for review
While proxy media significantly improves editing performance, these files can accumulate quickly, especially when working with multiple high-resolution projects.
Step-by-Step Cleanup Process
Step 1: Locate Your Media Folders
First, you need to find where these folders are stored within your Final Cut Pro libraries:
- Open Final Cut Pro and locate the library you want to clean up in the Libraries sidebar
- Right-click on the library name and select "Reveal in Finder"
- Navigate into the library package by right-clicking the library file and selecting "Show Package Contents"
- Look for the following folders:
Final Cut Original MediaFinal Cut Proxy MediaFinal Cut Optimized Media(also worth checking for cleanup)
Step 2: Assess Your Current Storage Usage
Before making any deletions, get a clear picture of what you're working with:
- Select each media folder and press Command+I to view its size
- Note which projects are currently active versus completed or archived
- Check the modification dates of files to identify older, potentially unused media
Step 3: Use Final Cut Pro's Built-in Management Tools
Final Cut Pro provides several tools specifically designed for media management:
Delete Generated Media Option:
- Select your library in the Libraries sidebar
- Go to File > Delete Generated Media
- Choose from options like "Delete Proxy Media," "Delete Optimized Media," or "Delete All"
- This method is safe because it only removes generated files, not your original source media
Library Properties Method: 1. Select your library and press Command+I 2. Click the "Storage Locations" tab 3. Review media storage and click "Delete Generated Media" for specific categories
Step 4: Manual Cleanup for Advanced Users
For more granular control, you can manually examine and remove files:
- Before proceeding, create a backup of your entire library
- Open the media folders in Finder
- Sort files by date modified to identify older files
- Cross-reference with your active projects to ensure files are no longer needed
- Move suspicious files to a temporary folder rather than deleting immediately
- Test your projects to ensure everything still works correctly
Step 5: Consolidate and Reorganize
After cleanup, consolidate your remaining media:
- Go to File > Consolidate Library Media
- Choose "Copy media to library" if you want everything self-contained
- Select "Move media to library" to relocate files without duplicating
- This process helps reorganize your media structure and can identify any broken links
Conclusion
Maintaining clean "Final Cut Original Media" and "Final Cut Proxy Media" folders is essential for optimal Final Cut Pro performance and efficient storage management. By implementing the strategies outlined in this guide - using Final Cut Pro's built-in tools, establishing regular maintenance routines, and following proper backup procedures - you can significantly improve your editing workflow while preventing storage-related headaches.
The key to successful media management lies in being proactive rather than reactive. Don't wait until your drive is full or your system is crawling to address media bloat. Instead, incorporate these cleanup practices into your regular workflow, and you'll enjoy faster performance, more organized projects, and greater peace of mind knowing your media is properly managed.
Remember: a clean workflow is a fast workflow. Taking the time to properly manage your Final Cut Pro media folders will pay dividends in improved productivity and reduced technical frustrations throughout your editing career.
PermalinkHow to Split Videos for Better Smart Conform Results in FInal Cut Pro
Unlock the full potential of Final Cut Pro\'s Smart Conform by preparing your footage with precision.
The Manual Magic: Why Scene Splitting Matters
Final Cut Pro doesn’t have an automated tool to split videos based on scene changes (wouldn’t that be a fantastic feature?). This means a little manual effort on your part can go a long way in achieving truly fantastic Smart Conform results. Think of it as giving Final Cut Pro a clearer roadmap for your creative vision!
Here’s a step-by-step guide to splitting your video effectively, ensuring every scene gets the attention it deserves:
1. Import and Organize Your Footage
Your journey begins by bringing your video into Final Cut Pro. Once imported, drag it onto your timeline. To set yourself up for success, switch to the “Organize” workspace layout. This layout provides a clean, focused view of your clips and timeline, helping you concentrate on navigating through your footage without distractions.
2. Identify Scene Changes with Precision
Now for the detective work! Play through your video and keep a keen eye out for natural transitions between scenes. These could be:
- Hard Cuts: An abrupt change from one shot to another.
- Fades: A gradual transition where one scene fades out and another fades in.
- Significant Visual Shifts: For example, a sudden change from a close-up interview shot to a sweeping wide shot of a landscape.
For ultimate accuracy, zoom in on your timeline. Use the Command + shortcut to zoom in and Command - to zoom out. This allows you to pinpoint the exact frame where one scene gracefully ends and another vibrant scene begins.
3. Split Clips Using the Blade Tool
Once you’ve identified that perfect scene change, it’s time to make your cut. Select the Blade tool by simply pressing B on your keyboard, or by choosing it from the Tools pop-up menu located in the top-left corner of your timeline.
Move the playhead (also known as the skimmer) directly to the precise frame where you want to split the clip, and then click. Voila! You’ve created a clean cut. For those who prefer a more dynamic workflow, you can even press Command + B during playback to split the clip on the fly. This action divides your original clip into two distinct segments, each representing a single scene.
B key to temporarily activate the Blade tool. This allows you to make multiple splits quickly, and once you release the key, you'll automatically revert to your previous tool, saving you clicks and time.
4. Apply Smart Conform to Each Segment
With your video now neatly segmented by scene, you're ready to unleash the power of Smart Conform. Select the clips you wish to reframe (or, for a truly efficient workflow, select the entire timeline to process all clips in one go).
There are two primary ways to apply Smart Conform:
- Go to Modify > Smart Conform from the top menu.
- Alternatively, create a new project with your desired aspect ratio (e.g., Vertical for social media, or Square) and ensure you enable the Smart Conform checkbox when duplicating the project.
Final Cut Pro will then meticulously analyze each individual clip, intelligently adjusting the framing to ensure the primary action or subjects remain perfectly in focus within your new aspect ratio.
After Smart Conform completes its magic, enable the overscan view (go to View > Show Overscan). This feature allows you to see beyond the cropped frame, giving you a clear understanding of how the crop was applied and if any crucial elements were inadvertently cut. If needed, you can always make manual adjustments using the Transform effect to fine-tune the framing.
5. Fine-Tune Framing for Each Scene
This is where the real artistic control comes in! Because each scene is now its own independent clip, you have the flexibility to adjust the framing on a shot-by-shot basis. For instance, if Smart Conform didn’t quite nail the centering of a subject in a vertical crop, you can easily use the Transform tool to reposition or scale that specific clip manually.
This granular control is incredibly valuable, especially for elements like lower thirds or other on-screen graphics, which often require precise manual repositioning to look perfect in different aspect ratios.
6. Navigate Frames Efficiently for Precision
To achieve the utmost precision when splitting your scenes, mastering frame-by-frame navigation is key. Use the period (.) key to move your playhead forward one frame at a time, and the comma (,) key to move it backward one frame.
This simple yet powerful technique is incredibly helpful when you're zoomed in on your timeline, allowing you to find the absolute exact transition point between scenes, ensuring your splits are as clean and accurate as possible.
Creating a Shortcut to Open a Specific Pages Template
Apple\\\\\\\\\\\\\\\'s Shortcut App is a cool tool
If you frequently use a specific template in Apple Pages and want to skip the Template Chooser dialog box, you can create a macOS Shortcut to open a new document based on your preferred template. This is especially handy if you have multiple personal templates and want to streamline your workflow. Here's how to set it up.

Prerequisites
- A Mac running macOS with the Shortcuts app.
- Apple Pages installed.
- A custom or existing template saved in Pages.
Step-by-Step Guide
- Open Pages and go to the Template Chooser (File > New).
- Find your desired template. If it's a custom template, ensure it's saved in the Template Chooser (File > Save as Template > Add to Template Chooser).
- Note the exact name of the template as it appears in the Template Chooser.
- Open the Shortcuts app on your Mac.
- Click the "+" button to create a new shortcut.
- Name your shortcut (e.g., "Open My Invoice Template").
- In the search bar, type "Pages" and select Create Document.
- In the Create Document action, set the Template field to the exact name of your desired template (e.g., "My Invoice Template").
- If the template name doesn't appear, ensure it's correctly saved in the Template Chooser.
- Add another action: Search for "Open" and select Open URLs (or Open File if the document needs to be opened in Pages explicitly).
- Ensure the action is set to open the document in Pages.
- Click the blue "Play" button in the Shortcuts app to test your shortcut.
- Pages should launch and create a new document based on your specified template, bypassing the Template Chooser.
- Save the shortcut by closing the document.
- To make the shortcut easily accessible, right-click it in the Shortcuts app and select Add to Dock or Pin to Menu Bar.
- Template Name: The template name in the shortcut must match exactly, including spaces Ascertain that your template is correctly saved in the Template Chooser, or the shortcut may fail.
- Multiple Templates: Create separate shortcuts for different templates to streamline your workflow further.
Why This Matters
By creating a shortcut, you eliminate the repetitive task of navigating the Template Chooser, saving time and clicks. This is particularly useful for freelancers, writers, or anyone who relies on consistent document formatting.
PermalinkCreating a Memorable Slideshow with Final Cut Pro
Lot more Flexability than Other Apps
Recently, I was tasked with creating a slideshow to honor someone's memories for a luncheon event. While the Photos app is a convenient option for quick slideshows, I found that Final Cut Pro offers far more control and flexibility to craft a polished, professional presentation. Here's a guide to creating a memorable slideshow using Final Cut Pro, based on my experience.
Why Choose Final Cut Pro?
Final Cut Pro gives you precise control over every aspect of your slideshow, allowing you to customize details that simpler tools like the Photos app can't match. For example: - Customizable Display Times: You can set specific durations for each photo, letting some linger longer for emotional impact. - Unique Backgrounds: Add custom backgrounds or effects to enhance the mood of the slideshow. - Professional Transitions and Effects: Create smooth, visually appealing transitions and dynamic photo movements.
While it may require a bit of learning, Final Cut Pro proved to be a faster and more effective solution for creating a tailored slideshow.
Step-by-Step Process
Here's how I built the slideshow:
Import Your Images
Start by dragging and dropping your selected images into the Final Cut Pro timeline. This is as simple as it sounds - import your photos into the project library, then drag them to the timeline in your desired order.Adjust Display Durations
Unlike the Photos app, which often applies uniform timing, Final Cut Pro lets you adjust how long each image appears. Simply click and drag the edges of an image in the timeline to extend or shorten its duration. For example, I extended key photos to emphasize special moments.Apply Transitions
Transitions between slides can make or break the flow of a slideshow. I found that the Dissolve transition worked best in most cases for a smooth, elegant shift between images. To apply:- Go to the Transitions panel.
- Drag the Cross Dissolve (or your preferred transition) between two images in the timeline.
- Adjust the transition duration by dragging its edges for a faster or slower effect.
Add Motion with the Ken Burns Effect
To bring static images to life, I applied the Ken Burns effect, which adds subtle panning and zooming to photos. Final Cut Pro has a built-in Ken Burns effect, but I also explored additional options from FCPEffects, which offers a great set of customizable Ken Burns effects. To apply:- Select an image in the timeline.
- In the viewer, click the crop/ken burns icon.
- Set the start and end positions for the zoom/pan effect.
- Fine-tune the speed and direction to suit the mood of the photo.
Customize the Background
To enhance the slideshow's aesthetic, I experimented with background layers. You can add a solid color, gradient, or even a subtle video loop behind your photos:- Import a background image or video into the project.
- Place it in a layer below your photos in the timeline.
- Adjust opacity or add effects to ensure the background complements, rather than distracts from, the images.
Looping for Events
For the luncheon, I wanted the slideshow to play continuously. Using QuickTime Player, I exported the final video and set it to loop during the event:- Export your slideshow from Final Cut Pro (File > Share > Master File).
- Open the video in QuickTime Player.
- Go to View > Loop to enable continuous playback.
Tips for Success
- Organize Your Media First: Sort and name your photos before importing to streamline the process.
- Keep Transitions Consistent: Stick to one or two transition types (like Dissolve) for a cohesive look.
- Test the Timing: Preview your slideshow to ensure the pacing feels natural, especially for longer images or emotional moments.
- Explore FCPEffects: Their Ken Burns effect pack is a worthwhile investment for adding professional motion to your slideshow.
- Backup Your Project: Save frequently and create a backup of your Final Cut Pro project to avoid losing your work.
Final Thoughts
Creating a slideshow in Final Cut Pro may require a small learning curve, but the ability to customize every detail - display times, transitions, backgrounds, and effects - makes it worth the effort. For the luncheon, this approach resulted in a heartfelt, professional slideshow that played seamlessly on a loop, perfectly honoring the person's memories. Whether you're crafting a slideshow for an event or personal project, Final Cut Pro is a powerful tool to bring your vision to life.
PermalinkBurning Music CDs in 2025
Still Possible with Apple Music

Burning CDs might feel like a thing of the past, but sometimes, the old ways are still the best solution. While it's true that most modern cars have ditched CD players in favor of Bluetooth and USB options, there are still moments when creating a CD makes sense.
Why I Burned a CD Recently
I was working on a project for my church that required background music to be played using a CD player. Streaming wasn't an option, and USB compatibility was out of the question. So, I turned to my trusty Mac to see if CD burning was still viable. To my surprise, Apple Music still supports this functionality - and it’s relatively easy to do.
What You Need
- A Mac computer with Apple Music installed
- A CD/DVD burner - you can use Apple's SuperDrive or a third-party model from Amazon
- Blank CD-R discs (audio CD format recommended for maximum compatibility)
- A playlist with music ready to burn
Steps to Burn a CD in Apple Music
- Create a new playlist and add your desired tracks.
- Ensure all tracks are downloaded locally (not streamed).
- Insert a blank CD-R into your external CD/DVD drive.
- Right-click on the playlist name in Apple Music and select "Burn Playlist to Disc".
- Choose Audio CD as the disc format and configure the gap between songs if needed.
- Click Burn and wait while Apple Music creates your disc.
Important Tips
- Stick with CD-Rs instead of CD-RWs for best compatibility with older CD players.
- Make sure your burner is connected directly to your Mac, not through a USB hub.
- Test the CD in the target player before your event or presentation.
Final Thoughts
Even in 2025, it's good to know you can still burn a CD when needed. Apple hasn't removed the feature, and with the right hardware, you can create audio discs with ease. Whether it's for a car, a presentation, or an archival project, the humble CD still has a place - even if it's a small one.
PermalinkAbout
A Mac veteran since 1989, I'm here to share my experience with tips and tricks every Friday. Witnessing the evolution of Mac software and hardware firsthand, I've gained a deep understanding of how these machines work and can help you troubleshoot any issues that may come up.
Check out all the blog posts.
Blog Schedule
| Thursday | Business |
| Friday | Macintosh |
| Saturday | Internet Tools |
| Sunday | Open Topic |
| Monday | Media Monday |
| Tuesday | QA |
| Wednesday | Veed |