
Smart Converter Pro
It is worth upgrading to Smart Converter Pro
Earlier this year I blogged about how Smart Converter is a great application for converting media files. I finally decided to upgrade to the Professional version. So this post is all about the differences between the two versions and if it's really worth going for the upgrade.
Key Differences
With the Pro version you can:
- Batch a bunch of files so they can be converted. Have it run when your not using the computer - "Set it and forget it"
- Customize the six conversation type buttons to your environment. For example, you can have a Apple TV 4k, and an Apple TV 4.
- Convert to various music format types including OGG Audio
- Set the conversion destination to where you want it go. (No more fumbling through the iTunes directory)
- Trash the original file after the conversion.
- Maintain the original file creation time - useful when converting old MOV files and don't want to loose the creation dates
Remember the output quality is only going to be as good as the original. Many clips that I was converting were encoded using RealMedia for low bandwidth connections. Remember dial-up?
Here's the results of one of the videos that I got converted - A video of Marshall "Do" Applewhite from Heaven's Gate from 1997 original format was rv10 (RV10 / 0x30315652), yuv420p, 160x112, 33 kb/s, 15 fps, 15 tbr, 1k tbn, 1k tbc:
It's not great, but it works and it was quick. Smart Converter Pro did a great job!
Worth The Upgrade?
I believe it worth the upgrade if you have a lot of media files that you are looking to convert. The free version gives you a taste of what you can do and is a bit limited of the capabilities.
I like how I can customize the button row for things that are important to my typical conversion types.
PermalinkPath Finder 8
Modules Functionality now in Path Finder 8
Path Finder allows you to have more File Management control. You can better manage your files and get things done quicker with Path Finder. Read the my Blog Post about Path Finder 7 on June 10, 2016.
On May 20, 2018, Cocoatech officially announced Path Finder 8. It's the first major update in 2 year!
What Makes Path Finder 8 Worth Looking at?
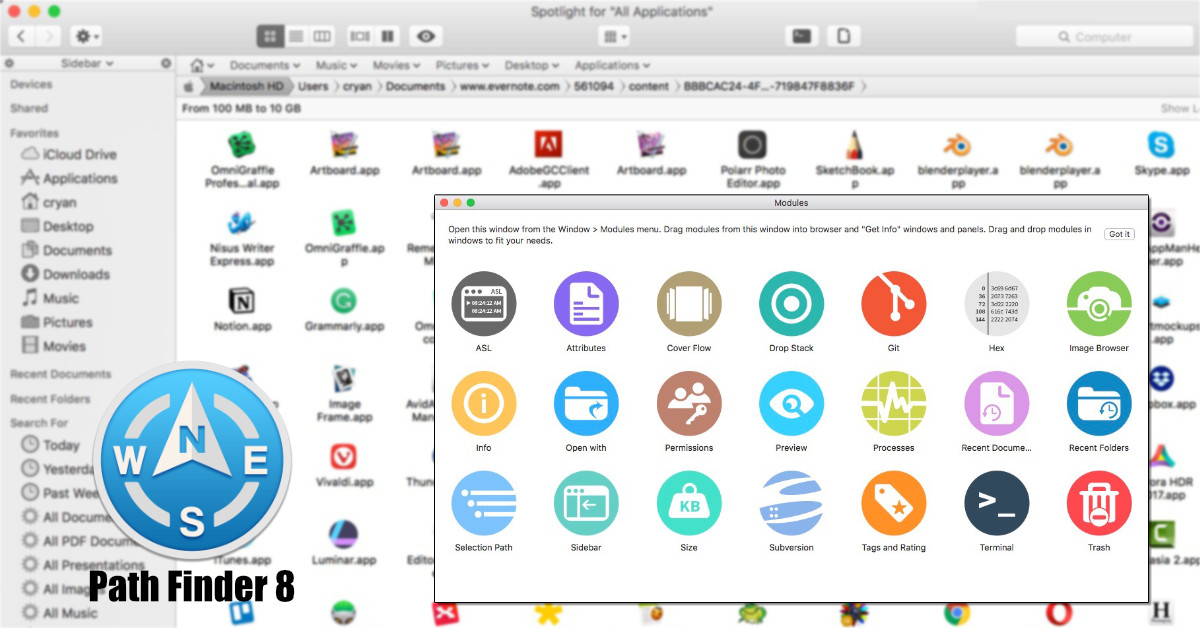
In Path Finder 8, it's all about the Modules. Path Finder was written so that you can customize the Browser window how you want. You can now place various modules in positions that work best for you.
Modules functionality includes: ASL, Attributes, Cover Flow, Drop Stack, Git, Hex, Image Browser, Info, Open With, Permissions, Preview, Processes, Recent Documents, Recent Folders, Selection Path, Sidebar, Size Subversion, Tags and Rating, Terminal and Trash.
Simply drag and drop the modules where you would like to see it. It's great when you're doing certain tasks, such as disk cleaning where the Info Module may come in handy or when your working on a software project and Git and Subversion would be handy.
According to the Path Finder Blog, Modules is just one step of many exciting changes coming to Path Finder. Expect to see more features and enhancements.
What I Like About Path Finder
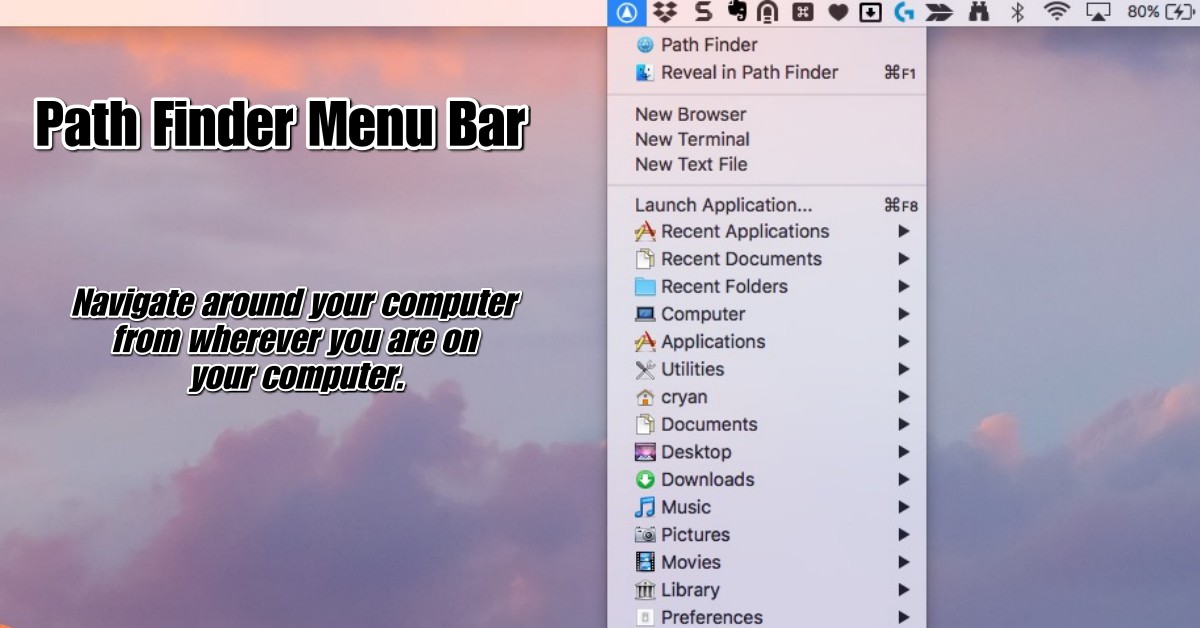
Menu Bar Functionality
Path Finder has an icon in the menu bar, which gives you quick access to various computer points - such as Active Applications, Open a new Terminal Window and a Quick way to launch any application via the Command - F8.
If you don't like using the Command-Space functionality, using Path Finder menu bar is yet another way to open up applications. The launch application functionality gives you a Browse and Search Application window to make open up your favorite App. This is useful when you may know about the app by its icon but not necessarily by the name.
Ability to Add/View additional Columns to the Grid
You can add an 'Info' column to the browser grid which will give you some information about each object, for images you get the image dimensions. Which is extremely helpful when you're browsing around looking for a particular image. Videos objects will show the length.
Once you find the right image, You can right click, and select the 'Image Size' and now you have the image dimensions in your clipboard.
Personalize it to work for You
There's a lot more configuration in the Path Finder Browser than what's in the Finder. Path Finder gives you the ability to customize the Mac experience to your needs.
Basically if you want more power and configuration with the Mac OS Finder, Path Finder is certainly the way to go.
Remember Path Finder has been around since Mac OSX first came out. So they know a thing or two about what people need in a good file management application.
PermalinkCofeShow Video Slideshow Maker
18 Slideshow Designs to bring your photos to life
Video Slideshow Maker CofeShow is the quickest way to create professionally looking slideshows. Simply select the theme, add the photos, add music, and then build the slideshow. The final video can be uploaded to YouTube or added as a clip to iMovie or Filmora.
18 Designs Available
Current available designs: Mint, Bokeh, Summer Holiday, VintageSparks, Chalkboard, Watercolor, Roller, Blurry, Pan and Zoom, Baby, Corporate, Vanilla, Blue Denim, Black, Brown Wood, Birthday Party and Magic Tree.
You can preview the designs on cofeshow's website.
Five Things I Learned Using CofeShow
- You can add Text before each photo. (Useful to describe a scene or event)
- You don't have the ability to customize the length of the slideshow.
- Each photo is shown for 3.5 or 4 seconds depending on the theme selected
- You can add music to the slideshow, however the show will not play to the length of the clip.
- You have an option between 1280x720 (HD) or 1920x1080 (Full HD)
- Each theme has to be downloaded the first time you use it.
- After the video is created, you need to manually upload it to your favorite video network (YouTube, Vimeo, Dailymotion, etc..)
Example Video
This is a quick video that I put together using Video Slideshow Maker CofeShow. I haven't purchased the license - yet. But I plan too in the near future.
Apple Photos Slideshow
There is a slideshow functionality in Apple Photo. However, there are only seven designs to pick from. The seven slideShow designs in Photos are Ken Burns, Origami, Reflections, Sliding Panels, Vintage Prints, Classic and Magazine.
Vintage Prints is the only design that I really like in Apple Photos. I haven't been able to find anyone else have a similar style.
PermalinkKeyboard Shortcuts
Handy reference on popular Finder shortcuts
There are a few Finder 'Go' keyboard shortcuts that everyone should be familiar with. These are the most common places that you will go when using the computer.
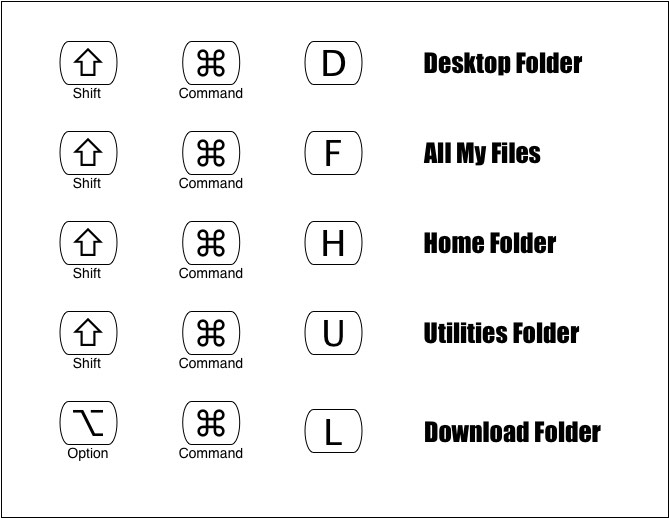
The one that I always get confused about is the Download folder. Why didn't Apple keep the same keyboard convention? Afterall Shift-Command-L doesn't do anything.
Mac OS X Shortcuts
I found the following graphic that was once posted on http://iam-gini.blogspot.com, apparently the site doesn't exist anymore and get's redirected to techbeatly.com.
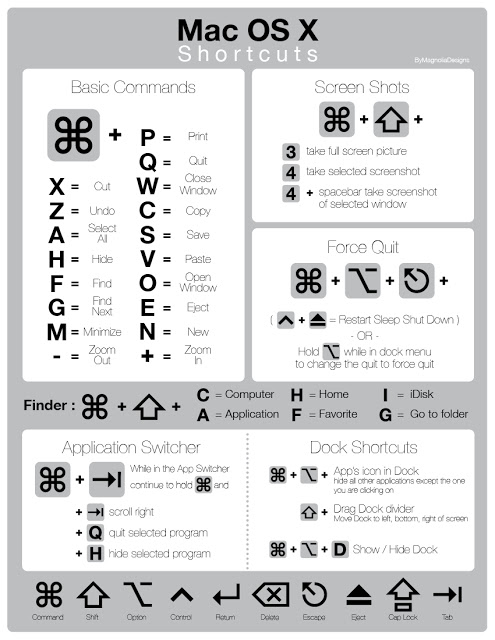
If you know of any other cool keyboard shortcut graphics, let me know in the comments below.
PermalinkGif Brewery
Quickly create animated GIfs on your Macintosh
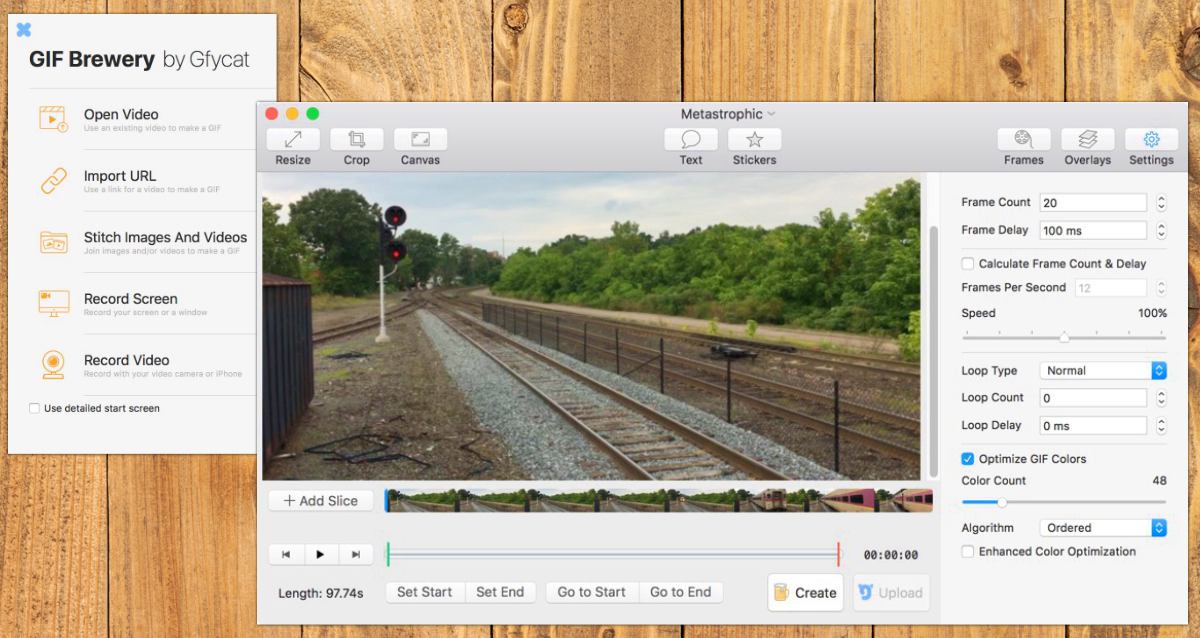
Gif Brewery is the easiest way to create GIF images from any type of videos, especially those taken with the iPhone. You can open up a video file, import one via URL (including YouTube), Stitch images and video, Record Screen actions or record video from the computer camera.
The nice thing about Gif Brewery is that you get a lot of flexibility to create animated GIFs. If I needed more flexibility I can use Wondershare Filmora and then import it to Gif Brewery.
It took a while to understand how to work the timeline settings - but once you play around with it for a bit it is fairly straightforward.
Gif Brewery is free and definitely worth downloading and adding to your collection.
Things I have Learned from using GIF Brewery
- By default, when you add a video the frame rate is set to 20, which makes the video go quickly.
- You set the length of the GIF by dragging the start and end point. The bigger the points the larger the video. (Try to keep the Gif less than 10 seconds)
- Clicking on the 'Create' button is how you can preview the image before saving the image.
- None of the settings are applied instantly in the main video area.
- You can preview the loop by typing the Shortcut Option-Command-L, you can add a "Preview Loop" shortcut to the toolbar, simply Control-Click the toolbar, and select 'Customize Toolbar' and then drag and drop the 'Preview Loop' to the toolbar.
- You can extract the clip as PNG files, by Typing Command-P. (This is useful if you want a preview image.)
Four Key Things about Creating Awesome Gifs
- Keep the GIfs content simple
- Keep the file size as small as possible - in Slack, any GIF that is ove 5 MB won't be displayed
- Faster Frame rates are one way to have a longer GIF with a smaller file size.
- Check the gfycat collection to see if it was already done or someone created a better gif.
Sample GIFs created in Gif Brewery

Gas Prices in the Bay Area in 1999.

Train Arriving in Framingham
Puzzle Effect in Photoshop Elements
How to use Photoshop Elements to transform an image into a puzzle.
Photoshop Elements has lots of cool features, one of which is the ability to add various photo effect using a guided wizard. In the Photo Play category you can add Out of Bounds, Picture Stack, Pop Art, Puzzle Effect, Recompose, and Reflection.
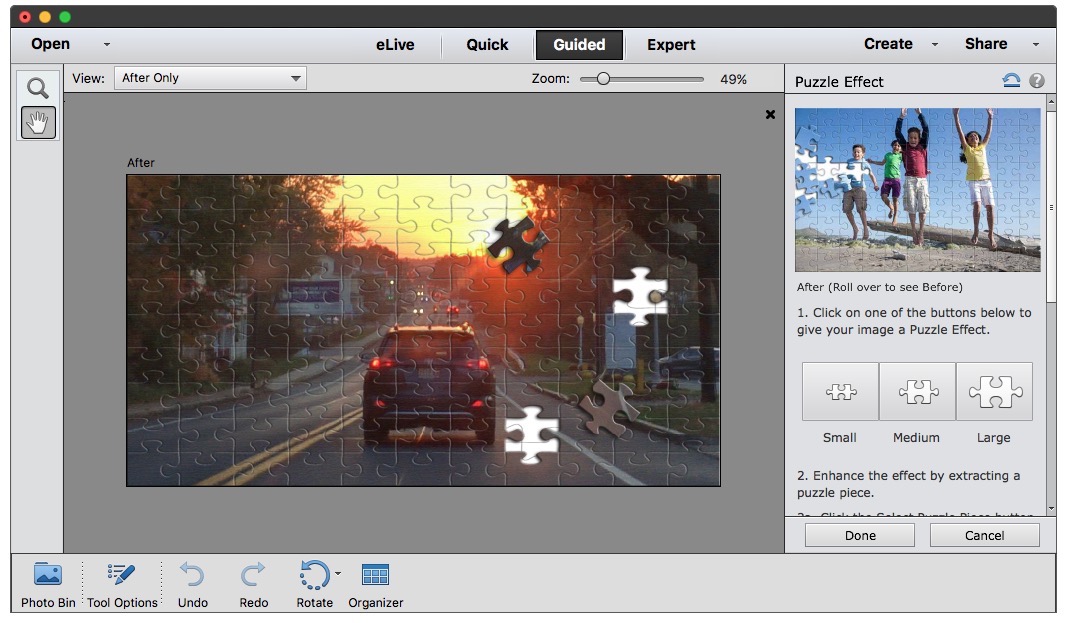
If you open up Photoshop Elements and then select Photo Play and then Puzzle Effect. You can have a cool puzzle effect on your image:
Manipulating the Image
You have a choice of puzzle effect: small, medium or large. (The best image appears to be the 16:9 format type.) Photoshop Elements allows a user to change the photo effect choice if you don't think the right type is selected.
After you select the effect type, you can then select the puzzle piece and then extract it from the image. You can then move the piece around wherever you want.
What's neat about Photoshop Elements is that you have a choice of what puzzle size is best for your design;
PermalinkQuickly Turn off Notifications
Easy way to turn off the email alerts.
On the Macintosh, at the top right-hand side of the screen is where notifications are sent. You'll get notified if you have the new email or if someone slacked you a message. You'll also get notifications about upcoming meetings.
Every once and a while, it's nice to turn off the notifications. Especially if you're in a meeting and you're showing your computer to someone. You don't want to be distracted because someone sent you Spam about some financial stock tip .
Disable All Notifications
Did you know that you can disable the notifications?
When you click on the notification icon, the top right icon in the toolbar, you'll see a history of notifications. If you scroll down you can see a lot of notifications.
If you scroll up, you'll see two options - above the "Today" category. Don't stop at 'Today' keep scrolling up. You should see this:
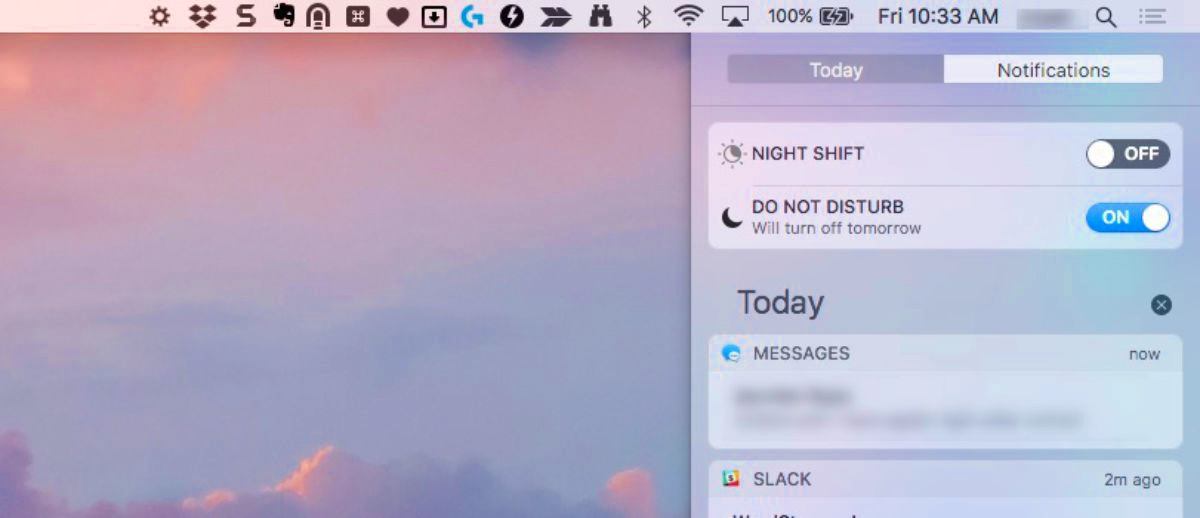
Now you can quickly disable the notifications and not get any alerts.
What is Night Shift?
Night Shift will adjust the monitor colors for better viewing at night. This is ideal when you have the computer on and there are no other lights on in the room.
PermalinkPosterino postmark Effect
Best way to customize the post mark on images
Posterino is a Macintosh application that makes very cool looking collages. Check out my previous blog post on creative things to do with the application. Basically it the fastest way to make trendy photo collages on a Macintosh.
Hidden Feature in Posterino
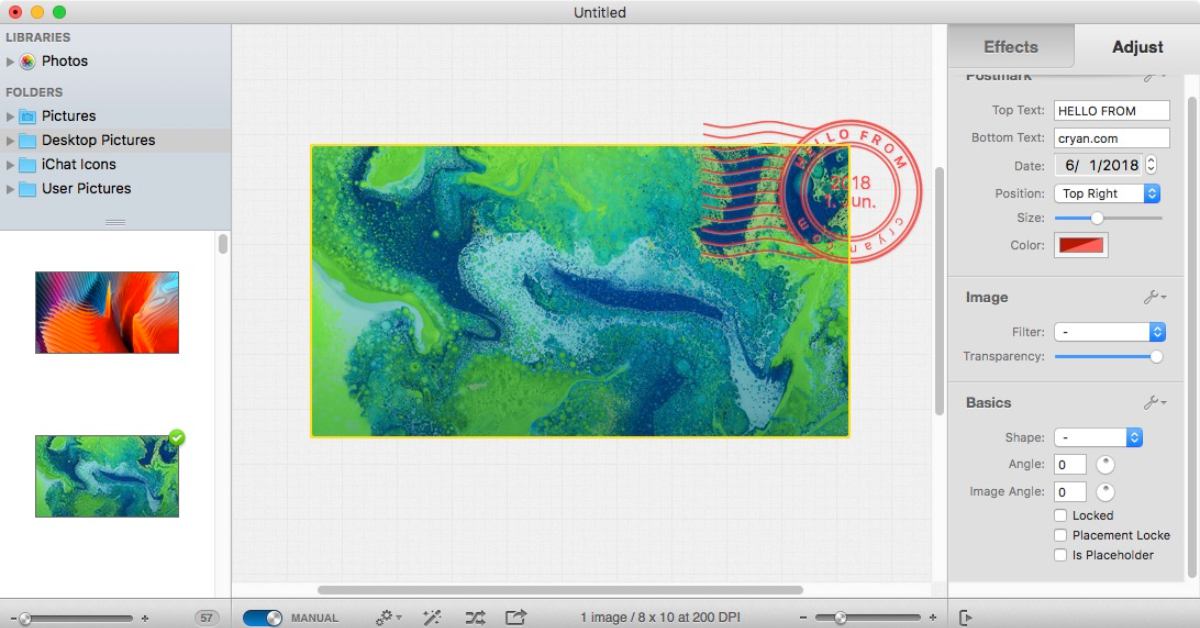
One cool feature of Posterino is the ability to add Frames, Filters, and Decorations to any image. One of the image decorations is the Postmark Effect tool - it adds a cancel postage stamp on your image. It's unique because Posterino gives you the ability to edit the text in the stamp, something I haven't seen in other applications or cloud service.
What's neat is that you can apply the effect to a single image, then export to be used elsewhere.
Tips and Tricks on using the Stamp Effect
- Start off with a large blank image at 72 DPI.
- After the file is created, and you see the "Drop your Image here", type in Command-L to make the layout Manual.
- Drag and drop an image and resize the image in the canvas area.
- While the image is selected, select the Effect tab and click on the Postmark in the Decorations section.
- Click on the Adjust Tab and make the PostMark changes (Postmark position, color and text)
- Then mouse click on the regular canvas (anyplace in the center screen, just not on the image or postmark)
- The Adjust tab should change, and you should see Grid category.
- Scroll all the way to the bottom of the Adjust tab and deselect Draw Background and Draw on Export
- Type in Command-E to export your Image to Disk
- Select PNG format
Now your image will be on top of a transparent layer to be used in any application!
Whoa! That's a Lot of Work
It's a lot of steps to get a simple effect, but sometimes having a postmark effect makes the image stand out a bit more.
If you know of another way to add a stamp/postmark effect and is configurable, let me know in the comments below!
PermalinkAcorn 6
Good Photoshop Alternative to get things done.
There are many alternatives to Photoshop: Pixelmator, Affinity Photo, Gimp, PhotoScape and GraphicConverter to name a few. Acorn, by Flying Meat is another popular photo tool.
This week I decided to download it to see what makes it unique among the other Photoshop alternatives.
Things I learned about Acorn 6
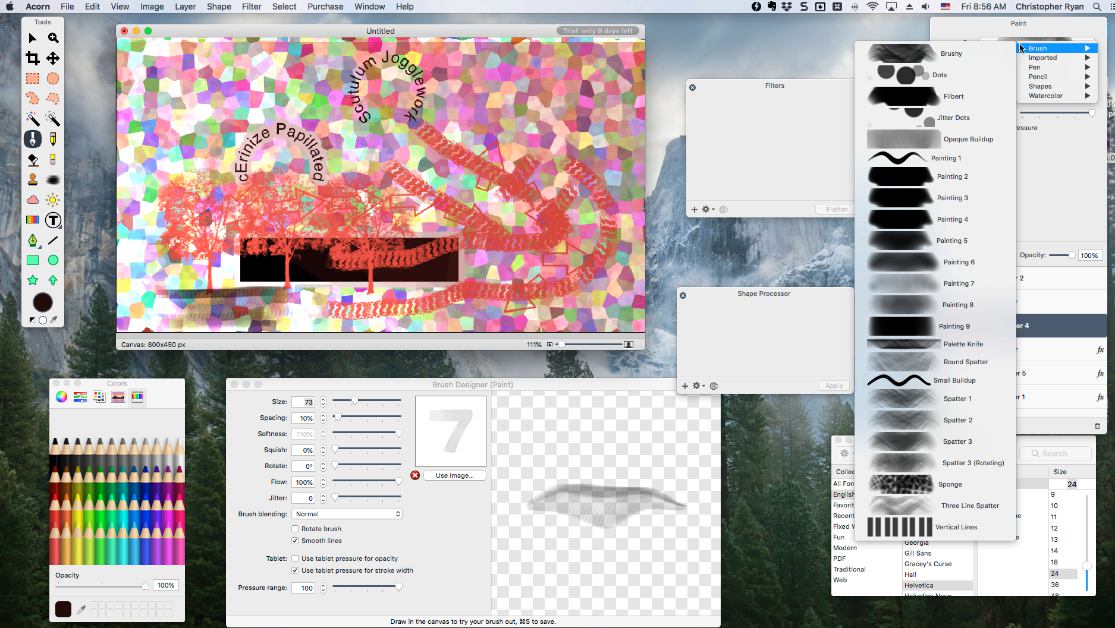
Acorn uses the power of Apple's Metal 2, which means you fully utilize the computer graphic processing unit. You also get a lot of the common filters such as Blur, Color Adjustments, Distortion Effects, Gradient, Stylize and more.
There are 32 Tools that are available and all are easily accessible via the toolbar or using a keyboard hotkey. For example, to use the Paint tool simply type B.
There are three text tools, Text, Text Circle, and Text Path. The text circle is pretty cool, its a fast way to type text on a circular path. You simply define the size of the circle and then type your text. It's a lot easier than other applications.
There is a Shape Processor which creates a shape layer where you can do all sorts of things to shapes, which is useful for a background or object fill. It's a cool feature to play around with and discover different design ideas.
There isn't that many pre-defined shapes. However, you can make your own shape by drawing a selection and convert it to a shape.
Acorn supports Photoshop Brush file format. Simply drag-and-drop any '.abr' file to the Acorn icon in the dock. Then select the Brush tool, and then the imported brush.
The Layers filter dialog makes it really easy to see what filters have been applied to a layer and make adjustments. You can easily change the order of the layer filter - something that isn't available in other image editors. The filters are non-destructive, so you can change it up anytime you want.
Acorn doesn't support importing EPS files, but you can open SVG files.
You can create a new image from your camera - making it easy to touch up an Avatar.
Acorn Help has a lot of great tips and tricks for using Acorn. Many of the tips come from other users to show how to cool things in Acorn. There are Tutorials for Beginner, Intermediate and Advance users.
PermalinkPhotoMill X
Good Application to edit multiple images.
PhotoMill, by Overmacs, is a handy photo utility to use anytime you need to make changes to multiple images. The application is easy to navigate and has a great way to manage multiple images.
Description from Website
PhotoMill helps you convert a bulk of images into the most popular image formats, give your files meaningful names, watermark with text and image, adjust photos (brightness/saturation/exposure/grayscale/etc.), fit geometry (scale/crop/trim/etc.), remove private metadata, add your own copyrights etc.
Also, PhotoMill is a great batch metadata editor, image file renamer and photo browser.
Notes on my Evaluation
Seems to be a good solution if you manage a lot of photos. For example, if you have a lot of old pictures that you want to convert to JPG from BMP or TIFF scans.
PhotoMill might be a good tool when creating an online photo gallery. (Quickly create thumbnails)
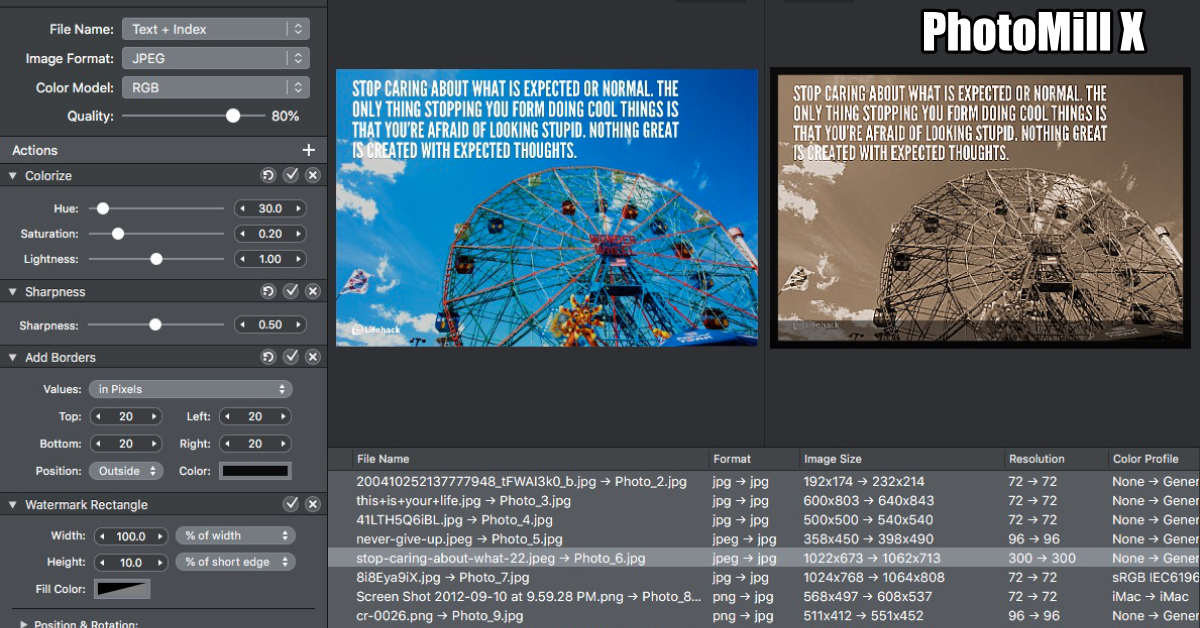
You can do multiple actions, such as add a Watermark Rectangle and then add a text above the rectangle. It is a cool effect that I haven't seen used in other applications.
You can get a side-by-side preview of the change you're about to apply, so you know what impact your changes will have on the image.
The Info Panel is a good way to get detailed information about images without actually having to open it.
There is a preset for "Prepare for Facebook" with the long edge being 2048 and the method is resized to fix long edges. Originally I thought that 2048 was too big for Facebook, as I thought 1200 was the standard size. However, Facebook own documents recommend using the 2048 width to have the best quality.
The search and sorting features was pretty impressive. I can easily drop a folder full of images and work on ones that meet certain criteria. For example, I can drop a large folder of pictures but only work on the pictures that had the wrong orientation.
This application would be very handy when viewing old DVD data. You can pick and choose which images are worth keeping and convert to today's format.
Try Before You buy
PhotoMill has a free 7-day trial with no limits. After that, the cost to purchase the application is $12. (There is a discount if you purchase the application after your trial)
You can download the trial application from their website.
PermalinkAbout
A Mac veteran since 1989, I'm here to share my experience with tips and tricks every Friday. Witnessing the evolution of Mac software and hardware firsthand, I've gained a deep understanding of how these machines work and can help you troubleshoot any issues that may come up.
Check out all the blog posts.
Blog Schedule
| Thursday | Business |
| Friday | Macintosh |
| Saturday | Internet Tools |
| Sunday | Open Topic |
| Monday | Media Monday |
| Tuesday | QA |
| Wednesday | Veed |
Other Posts
- Photolemur 3
- iTerm2 Shortcuts
- Setting up a Better Display on your Retina Computer
- iMazing
- Image2icon
- Filmora Audio Key Frame Marker
- All-in-One Snag-it Capture
- Private File
- MacinCloud
- Round Corner Images in Affinity Designer
- Bootstrap 4 BBEdit Tools
- Puzzle Effect in Photoshop Elements
- iCloud Drive
- Keyboard Maestro 10
- Quickly Turn off Notifications