
Calendar in Swift Publisher
Swift Publisher ($19.99) is a pretty cool application for anyone looking for fundamental desktop publishing tools. While Apple Pages, does have some desktop publishing functionality, Swift Publisher takes it to a whole new level. In the Apple Store Swift Publisher has 38 five-star rating, giving a total of 4.5 stars.
Making Custom Calendars
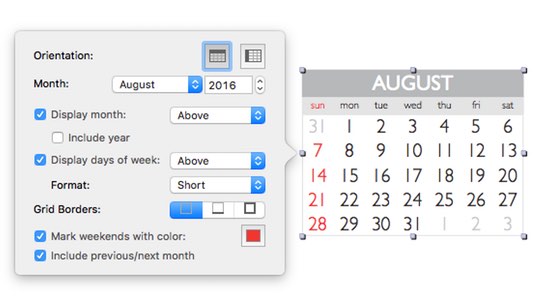
One of the features that I like about Swift Publisher is how easy it is to integrate Calendars into Designs. Swift Publisher has a Calendar functionality that let you add a month whenever you want, or you can simply use one of the six templates.
The Calendar button is very cool since you don't have to build some complex tables. Simple add the calendar and then right click on it and make the adjustments you need. Saves a ton of time.
Adding Events to Calendars
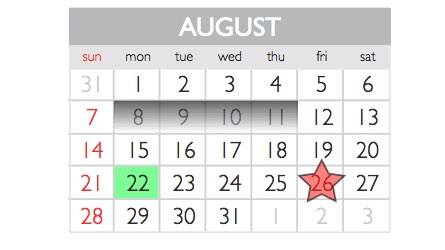
One of the downsides to using the calendar tool functionality is that you can't modify the dates. You can't highlight holidays or mark special days with a color text or change the background. Well not using Swift Publisher dialog box. However, you can add objects to the calendar, after all, this is a desktop publishing tool.
How I updated the Calendar
The 5-Point star is one of the included smart shapes in the library. I simply selected a red color fill, 1 point stroke and changed the Opacity to 61%. I then resize the star to fit over the date.
The 8th to 11th highlight was using the rectangle tool and change the fill to Linear Gradient Fill and set the Opacity to 62%. I then align the rectangle to fit in the range that I wanted to highlight.
The 22nd was also using the rectangle tool, changed the color to green and the Opacity to 49%. I then align the rectangle to the day I wanted. I then right clicked on Order and the 'Send to Back.' That allowed the text to appear in front of the image.
Note: When you add objects to the calendar, you should group them together if you need to move the calendar around. Otherwise, you'll loose the formatting.
Overall
It would be nice if there was a better way to manipulate the calendar. For example, it would be great if each day was its own object. Since I don't add calendars every day, a few minutes of alignments isn't going to bother me. Having the ability easily add a Calendar month is awesome.
PermalinkCapto
If your job requires doing any type of screen capture using popular tools such as Skitch, MonoSnap, Snagit or Snapz Pro X - you should certainly check out the newest player to the party - Capto ($29.99) by Global Delight.
Capto was officially launched on April 26, 2016. This application is a step up from their previous screen capture tool - Voila. Voila was a basic screen capture tool that had some cool tools and effects.
Instead of adding new features and functionality to Voila, Global Delight rebuilt their screen capture tool solution and came up with Capto. They wanted a powerful screen capture application that had awesome video capabilities.
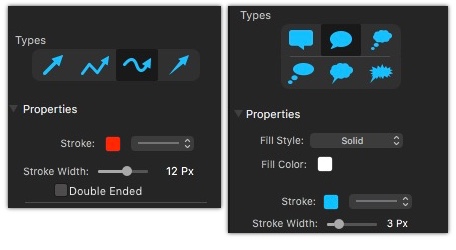
Editing Tools
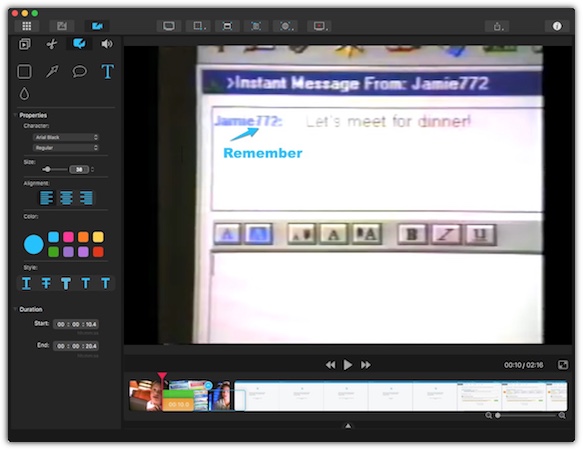
Capto has 15 editing tools to touch up any screen capture: Pencil Tool, Paint Tool, Text Tool, Shape Tool, Arrow Tool, Callout Tool, Highlight Tool, Line Tool, Blur Tool, Eraser Tool, Marquee Tool, Crop Tool, Spotlight Tool, Numbering Tool.
The end results is that Capto helps present your screenshots better. Instead of a basic arrow to point at something, you can have four different ways to point to the feature. The Callout Tool comes in handy when you want to point something out.
Missing Annotation Tools from Voila
Several annotation features didn't make the transition from Voila to Capto:
- Stamp tool - Ability to add 'Confidential, OK, Fail, Quality' and 14 others stamp text
- Effects - Edges, Skew, Filter, Adjust, and Crop
I don't know if any of the above will appear into Capto in future releases. The stamp and edges features seemed pretty cool in Voila.
Video Editing Tools
I don't use many videos in my bug reports, but that might change because of Capto. The video editing clearly gives you more control and makes reporting bugs fun. (Is that really possible?)
Capto makes it easy to add text, simple arrow, callout, blur, and Marker. You can define where it appears in the video and how long it appears. It's very easy to move the objects around and position them exactly where you want. The video timeline shows you where the objects are. You can easily overlap various object within the video.
Capto allows you to import other videos so that you can combine videos captures into one complete video.
Comparison to Other Apps
I had a chance to compare the features of Capto with other screen capture tools that I have looked at in the past:
Snagit ($49.95) by Techsmith - A strong competitor to Capto, and many ways better application. Capto is $20 cheaper with much more powerful video capabilities.
The big advantage that Capto has is video Editing. Snagit only allows you to trim videos and not add any annotation to video. In addition, Capto has a built-in web browser, allowing you to do full page screen captures.
Skitch (Free!) by Evernote - Skitch doesn't support video capture. Skitch have very simple annotations and there's not a whole lot of control or options with the text tool. Skitch does have a cool, 'Previous Snapshot Area' functionality which is nice when you are looking to capture a change of something in the same area.
MonoSnap (Free!) by Monosnap - Basic Annotation Tools. You can capture video and trim, but not add any annotation. Monosnap supports exporting video to .mp4 and .gif. Capto supports .m4v and .mov format and will compress video for mobile devices.
Snapz Pro X ($69) by Ambrosias Software - One of the oldest screen capture tools. No screenshot library, no image or video annotation tools. Much more expensive than Snagit and Capto.
Missing Tools in Capto
With all the tools that's included with Capto, you would think it would be complete. However, there are some other tools that I would like to see, in addition to the missing Voila tools:
- Magnifying Tool - Included in the Preview App.
- Measure Tool - Ability to show spacing issues.
- Different Arrow heads - Would be nice to see something than a basic arrow head.
Summary
I find Capto very practical to use. You can download it and try it yourself download a trial version. If you need a add annotations to videos then Capto is the way to go.
If you don't do much video capture, you may want to see what Snagit offers for just a bit more money. I was impress with their annotation toolset.
PermalinkRogue Amoeba's Fission
If your doing any basic audio editing on a Macintosh and looking for a powerful tool that won't break the budget - check out Rogue Amoeba's Fission.
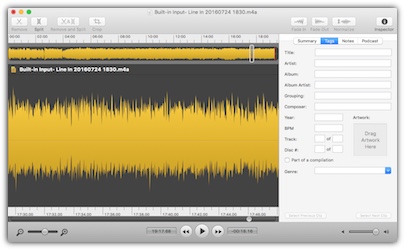
I have been using Fission to modify my audio files since 2006 and find it incredibly easy-to-use to clean up my audio files.
The three things I use Fission for:
- Trim Audio Files recorded in Audio Hijack
- Normalize the audio - Make the audio quality the same throughout the clip
- Convert audio clips from one format to another
Why pay $29 for an Audio Program?
Sure there's some free audio programs out there such as Audacity which is free. Why pay for application?
What makes Fission great is that you can use it to read/write to all sorts of audio formats such as MP3, AAC, Apple Lossless, FLAC, AIFF, and WAV. Audacity doesn't support AAC and Apple Lossless formats. ACC is designed to be the successor of the MP3 format, AAC generally achieves better sound quality than MP3 at similar bit rates.
The smart split feature in Fission created breaks in the audio clip based on silence. This is a great tool when you are digitalizing cassette tapes and makes it easy to split a very large audio file.
Stereo Audio Support
When I first started using I was a bit concern because I only see one track. In other applications, such as Audacity and Sound Edit Pro, there would be separate tracks for left and right audio.
However, Rogue Amoeba's Fission does fully support stereo sound. You don't see it the left/right tracks. When you save the file and play the audio clip you will still have the same stereo sound. You will not loose any stereo sound quality or functionality.
Create Custom Ringtones
Fission has the ability to convert any audio clip to your very own ringtone. How cool is that! Now you can make your favorite clip as a ringtone. Why should you pay Apple $1.29 for a thirty-second ringtone when you can make your own!
Apple requires that all ringtones must be 40 seconds or less.
In Fission, simply select the 40 seconds of audio that you want to use then click on File > Save as iPhone Ringtone. Fission will work it's magic and put the clip right into iTunes ready to merge the next time you sync your iPhone to the computer.
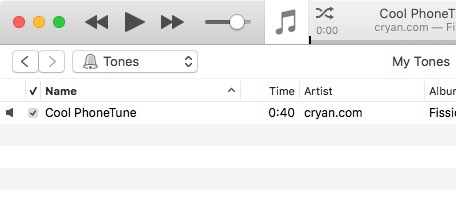
To see your Ringtone in iTunes, make sure that the 'Tones' menu is selected.
Download and Try it Out
You can download Fission on Rogue Amoeba's website and try it out for 30 days. Find out for yourself all the cool ways that you can make your audio clips better.
PermalinkPosterino
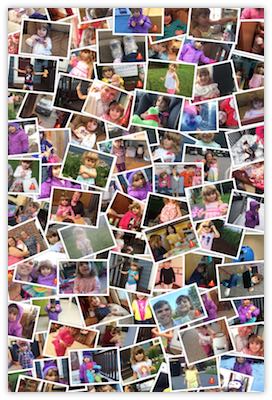
Do you have a bunch of digital pictures that you would like display at your desk? Why not create a cool photo college? You can easily do this with Posterino by Zykloid Software.
There are 46 templates to choose from - including a blank canvas where you can layout your own images anyway you want. There's lots of effect options including circular, grid, grid lines, random and title. You can identify how many images that you want to display and the page layout (Landscape or Portrait)
Simply select the template, and then let your creativity go to work. Posterino syncs to your iPhoto and Photo databases, or you can drag and drop images from the desktop. There's even a feature where it will fill in the image placeholders randomly. Simply adjust the images so that it looks perfect.
Got Pictures?
One of Posterino's templates is called 365. It's your chance to create a 20 x 30 poster of 365 of your best pictures of the year. That's a lot of pictures in one poster. (They put the current year on the bottom right, but you can change that.
This is pretty easy to do, simply go through your pictures in Photos, and rate them. Then you can create a Smart Folder containing the highest rated photos. Select the Album in Posterino and have it randomly place the images in the grid. (Its a lot easier than manually doing it.)
Remember how I said you can adjust the year, well you can change it to name a recent vacation. For example, you can display 365 of the best Disney pictures on a 20 x 30 poster!
Create and Share
You can export the final results to Facebook, Flickr, Twitter, iPhoto and email. You can also make the final product as a desktop image. I like to create 5x7 photos at CVS and have the pictures display on my desk.
A few years ago I created a Random Over Board layout and created a "car door" magnet at Vistaprint. Instead of placing it on the car door, I just put the magnet on my file cabinet.
Mosaic Crop
New in Posterino 3.2 - Mosaic Crop! It give you to display one big image as if they were smaller images. Check out this layout of a recent trip to Boston. This took about 20 minutes to create, with most of the time trying to figure out 16 of the best pictures taken on the trip:
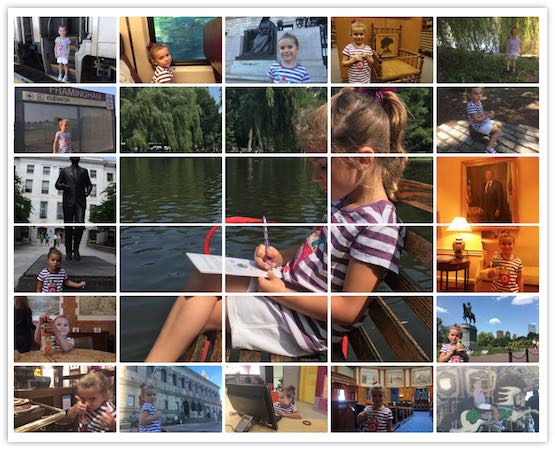 A trip to Boston, Massachusetts displayed Posterino style.
The Mosaic Crop feature appears to work better when you have a single object to focus on. To create a Mosaic-Crop, simply select all the images, and drag an image to one of the selected images.
Worth Buying?
I have been using Posterino off and on since August 10, 2011. It has come in handy during Christmas as I have created some cool posters for gifts. I have upgraded to the latest version and it's so much easier to use than when I got it.
Single-User License is $19.99, while a household license is only $29.99. Download a trial from Zykloid Software and see what creative colleges you create!
PermalinkBBEdit: Process Lines Containing
Using the 'Process Lines Containing' functionality in BBEdit, I can quickly filter out unwanted lines in a log file:
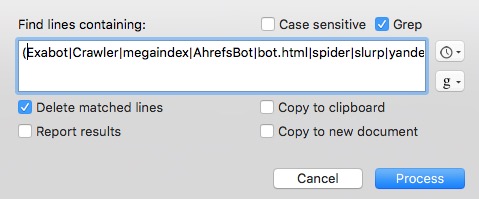
(Exabot|Crawler|megaindex|AhrefsBot|bot.html|spider|slurp|yandex|bingbot|majestic12)
I use this when I am looking at the Apache's HTTPd server logs and want to filter out Bots and Google hits to my site.
This will look for each line containing any of the matching text, and if one word is found the line is removed from the file. This saves a ton of time of running multiple grep statements.
You can find the 'Process Lines Containing' under the Text menu in BBEdit. I use it so much that I just assigned a custom Menu key equivalent.
PermalinkPrinted List of Applications
I am going to do some summer computer cleaning and remove some applications from my computer off of my iMac computer. Before doing this, I want to get a hard copy of all the applications that I currently have on the computer.
Apple has a nifty way to print out all information about all your apps that you have, even if it’s not in the Application Folder. It’s the Application Software section of the System Report. Check it out:
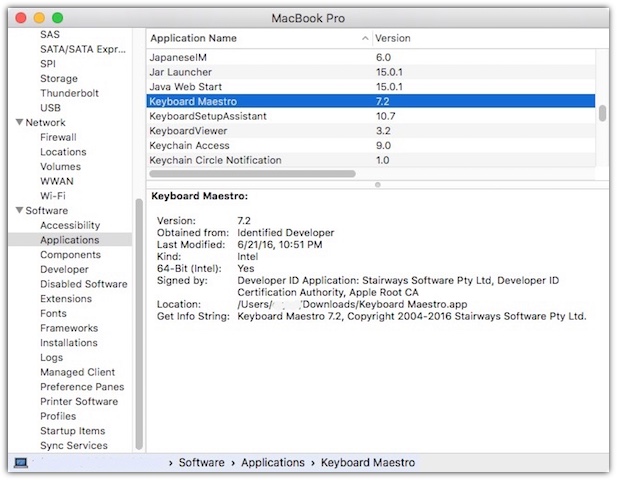
Getting the List of Computer Apps
- Select the Apple Menu and “About this Mac"
- Click on “System Report"
- In the left side, scroll down until you see Applications under Software and click on Applications.
- (It may take a minute or so to load)
- Once completed, Type in Command-P to Print. (You could always save the output to PDF, so you have a good soft copy of the list.)
The output is sorted by the last modified date. This means that best place for me to start is at the last page, as that would contain a lot of older applications that I don’t use much.
Once I printed it out, I'll add it to my circa notebook. Now I havea good record of applications that I had on my computer before my summer cleaning.
Remember not all applications are in the Application folder, some might be in the Document folder or in the Download folder.
Got Too Many Apps?
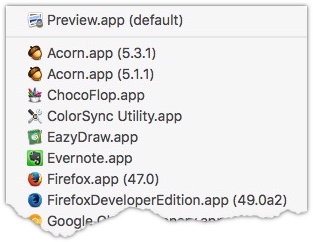
One way to tell if you have too many apps installed, is to right-click on an image file on the Dashboard then select "Open With." If you see a long list of applications, you should consider streamlining your computer.
In my example, I can see that I have multiple versions of Acorn application installed. I don't even use the application! Most of the applications that I have are one-time use applications for a particular task/functionality that I needed.
Bonus: Finder Search
When you search for Application (Kind is Application) you can sort the results by 'Date Last Opened.' This is a great way to audit my computer applications. I discovered that I have "FirstClass Client 2.5.1" and "SimCity2000" on my computer - applications that I can't even use on the computer, so why should I keep them?
Try the Application Finder search and see what unused applications you have on your computer.
PermalinkLocation Base Smart Albums in iPhoto
This weekend, I was backing up some of my old photos/videos from iPhoto to SmugMug. I was doing this because we recently signed up for the Basic plan and wanted an off-site location to backup our photos and videos. The Unlimited Photo uploads is a great plan.
It's been a while since I used iPhoto, and the location feature is very cool. You can easily create Smart Albums based on locations. This makes it easy to upload a group of photos that I took in a certain location, such as Boston, Ballet or visiting Davis Farmland.
Setting up Location Base Smart Albums.
- Open up iPhoto.
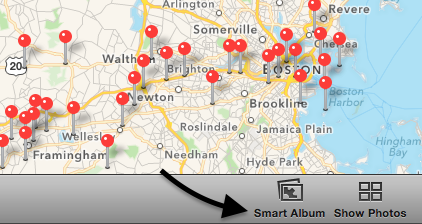
- Under Library select Places.
- You should see a map with red points marking where photos are available. On the bottom of the window you see two options, Smart Album and 'Show Photos' these will show all photos for any point visible on the screen. Use the Zoom and Move tool to adjust the map the way you want.
- Click on 'Smart Album' to create a smart Album from your map view.
Once you set this up when use choose the 'Open' dialog in Chrome/Firefox, click on Photos in the sidebar, then iPhotos and you'll see your new Smart Album, making it super easy to access a large group of similar photos.
The 'Location' feature and the 'Smart Album' by Location was removed in Apple Photos. Not exactly sure why it seems like a cool feature to have.
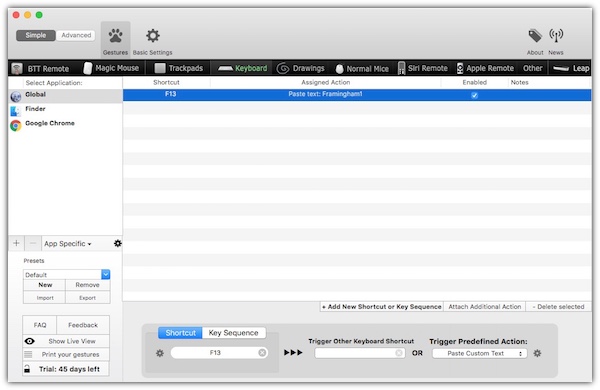
PermalinkKeyboard Maestro
Last week I wrote about how awesome BetterTouchTool was. Well there was one thing missing - I wanted a way to run Unix shell commands from a key press. I wanted to have some Bash commands that I wanted executed when I clicked on the F19 key.
I discovered that there is another keyboard tool that bridges the "Unix Shell" gap - Keyboard Maestro by Stairways Software. This is far from a new tool on the market - it's been around for a long time.
Keyboard Maestro
With keyboard Maestro you can assign Unix commands to keys, something you can't do with BetterTouchTool. You can assign all sorts of actions to all your F keys, something that you can't do with TextExpander.
With Keyboard Maestro, I have now had a "random word" key. Anytime that I need a word, I simply press the "F 19" key. This makes testing so much easier, if I need a word, simply hit the F19 key.
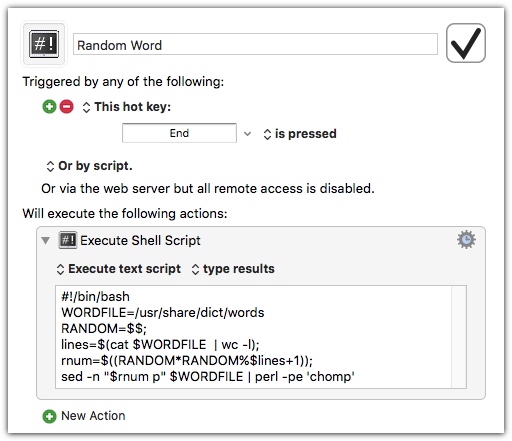
Creating a "Random Key" Macro
Here's how to configure Keyboard Maestro so that you can have your own random key: (I assume that you downloaded the software and have it properly setup.)
- Click Command - N to create a new Macro
- Call it whatever you want, "Random Word" is a good choice.
- Click the green plus icon to add a New Trigger, and select the 'Hot Key' Trigger
- Type in any Key, F13 or F19 are good options, as well as the 'end' button.
- Click on the green Plus icon next to the 'New Action'
- With 'All Actions' selected in the Categories, search for 'Shell' and select the 'Execute a Shell Script'
- Click on 'Display results in a window' and change it to 'type results'
- Paste the following text in the text area box:
#!/bin/bash
WORDFILE=/usr/share/dict/words
RANDOM=$$;
lines=$(cat $WORDFILE | wc -l);
rnum=$((RANDOM*RANDOM%$lines+1));
sed -n "$rnum p" $WORDFILE | perl -pe 'chomp'
- Click Edit
- Try it out! You'll need to have the cursor in a text field, Why not try the browser search.
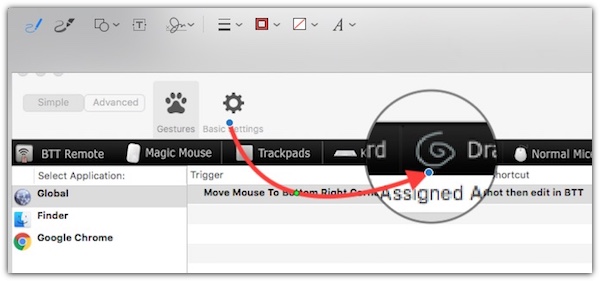
Why Use BetterTouchTool?
While Keyboard Maestro does a lot of similar things that BetterTouchTool does, I really like the screenshot capabilities in BetterTouchTool. I can capture screenshots superfast, simply by moving the mouse to the bottom right of the screen. Then I can edit the screenshot as needed. I have yet to see a "Move Mouse to Bottom Right Corner" trigger action in Skitch or Monosnap. Both are great tools and have their advantages but BetterTouchTool Trigger action is cooler and the Editor suits my needs.
BetterTouchTool isn't all that expensive, so it's worth keeping around. Perhaps they will add Unix Shell capabilities in future releases.
I am still a big fan of TextExpander and use it all the time. It's nice to see some other tools fill in some gap that I am looking for in a keyboard tool:
- Ability to assign commands to all the keys on the extended Apple Keyboard (Availble in BetterTouchTool and Keyboard Maestro)
- A decent built in screen capture tool. (Only in BetterTouchTool)
TextExpander does have a good suggestion tool - it notifies you when you type something over and over and suggest you make it a keyword snippet.
About Keyboard Maestro
Keyboard Maestro cost $36. You can download the software for 30 days trial. It's a very powerful Keyboard/Mouse tool. I certainly recommend checking it out.
PermalinkBetterTouchTool
BetterTouchTool is a must have tool for anyone that has an Apple Keyboard with Numeric Keyboard (MB110LL/B). Finally you can can make use of the F13,F14,F15,F16,F17,F18 and F19 keys!
BetterTouchTool is a keyboard replacement tool, it allows you to re-assign functionalities to different keyboards and mouse actions. This is great when you have a keyboard that has unused keys.
The BetterTouchTool has a lot of configurable options. For example, you can now assign the 'Paste' function to the F15 key, no more Command-V in any application! You can even change the 'Home' button to be an actual browser home button. How cool is that!
If your a Web Developer you can assign the the F16 (Or any F Key) to open FireFox WebConsole and Chrome Developer Tools - depending which application is currently active. Now you don't have to remember the different keyboard shortcuts when your debugging a page.
There's all sorts of configuration that you can do with the Magic Mouse, Trackpads, Drawings, and Siri Remote. There's lots of possibilities to spread your trigger actions.
BetterTouchTool has a built in Screen Capture functionality with an image editor. It's pretty good. My only complaint is how the arrow get drawn on the image. When you select the arrow in the top menu the arrow automatically appears in the middle of the image. The user then you have to move it to where you want. I do like that the arrow has a better curve style than what's in Skitch and MonoSnap. The magnifying glass tool is pretty cool.
Screen Capture with the Magnifying tool.
I configured BetterTouchTool so that when I "Move Mouse to Bottom Right Corner," the computer acts as if I did a Command-Shift-4. After I selected the capture area, I then can edit in BetterTouchTool. Once done editing, I have multiple options: I can save to a file, upload to my imgur.com account, create a new email with attachment, copy to clipboard and so much more!
Logitech Mx518
I have been trying to get BetterTouchTool to work with my Logitech Mx518 mouse with very little success. There are three buttons that are on the top of the mouse that I would like to use. There is a "Volume Up, Volume Down" and some "Power" button.
I installed the latest Logitech Gaming Software, which has the latest drivers, but BetterTouchTool still doesn't recognize the buttons when I try to assign a Trigger action.
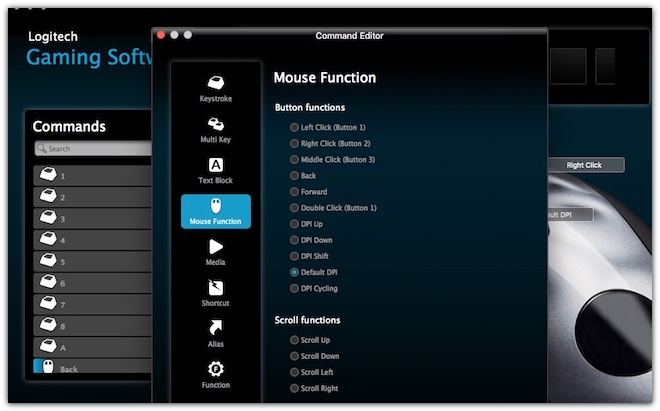
It turns out that you can actions to the mouse using the Logitech Gaming Software. While not as fancy as the BetterTouchTool, it still has some basic actions that make it worth while. There is a work around and that's to use the keyboard assignment and then use BetterTouchTool's Keyboard Shortcut tab to further configure it.
There is some discussion on the Logitech Forum about configuring the device to work with third party apps: MX Master Logitech Options SW Feature.
Overall view of BetterTouchTool
While I am disappointed that I can't easily configure my Logitech Mouse, I am excited that I have five new keys on my keyboard. Now my hands can move to the other side of the keyboard more often.
BetterTouchTool use to be free, but it's now a very active application and Andreas Hegenberg, the Developer, has changed it to a "Pay what you want." The current minimum bid is $4.50. I highly recommend at least covering the cost of a a couple cold beers, as an appreciation for all his hard work.
Google has a updated table of the Cost of Living in Munich. You can see how much Domestic Beer, Cappuccino is.
I did try out BetterTouchTool and will certainly be purchasing it.
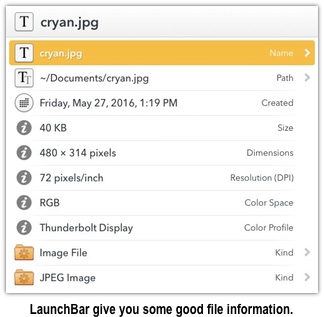
PermalinkLaunchBar 6
 If you like using Apple's Spotlight Search, then you'll love LaunchBar.
The whole idea behind Spotlight/LaunchBar is to navigate everything from the keyboard. Users shouldn't need to open applications by using the mouse and clicking on the Application in the dock. A simple Command-Space from any application and type a few letter and you're on your way. It's just a more productive way to open applications.
Objective Development's LaunchBar has been in production long before Mac OS X, it started as a series of shell scripts for NeXTSTEP. It became a real application around 2001 as Launcher 3. Apple saw the potential value of LaunchBar and came out with Spotlight in 2005.
Objective Development continues to improve on the functionality on LaunchBar. It's a setup to what Apple provides as a default. I feel that LaunchBar is perfect for any Macintosh power user that bounces around the different application. LaunchBar works well with multiple monitors.
LaunchBar learns how you use the service, so if you type 'T' and select 'Thunderbird,' the next time you type T at the LaunchBar the first item under the search bar will be 'Thunderbird.' That's pretty cool!
Some cool features that I have discovered using LaunchBar:
Clipboard History
Use Clipboard History to access recently copied items. It not very to reuse any previously used clipboard item, simply by doing Command-Space then Command-K and select the item that I want to use. I can configure it to save the last 100 clipboard items.
Recent Items
I can switch between recently used applications. This is better than the application switcher (Command-Tab) because that only shows current items. To get the list of most recently items, simply Command-Space, then Command-B.
LaunchBar Index Control
You can easily control what content displays when you use LaunchBar. For example, you can exclude applications, categories, and actions. This allows you to make LaunchBar work for your needs.
What's cool about the LaunchBar Index window is that you can see all the different ways that LaunchBar works for you. There are 144 Built-in Actions, 6 Workflows, 73 services, 195 Categories to customize, and so much more. There's a
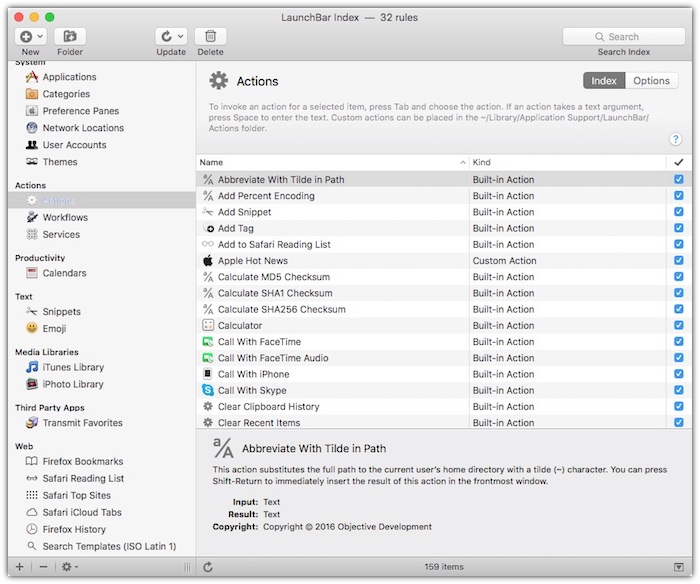
LaunchBar Index dialog box gives you lots of information.
Custom Actions
After playing around with LaunchBar for a couple of days, I ventured to create my own actions. LaunchBar gives you a lot of flexibility to make some pretty cool actions.
I spent time reading their API document and checking out some examples. There're some really cool featured actions in the LaunchBar library.
I thought it would be cool to have an action that would allow me to search the company Jira database in the Atlassian cloud. I was able to create a simple search action in about 15 minutes. Not bad for someone with minimal AppleScript experience.
Now when I need to search for a Jira issue, I type in Command-Space, then Jira then the issue number.

In Summary
I don't use Spotlight all that much and didn't think that I needed a third party tool to make it better. Once I started playing around with LaunchBar, I began seeing the potential. It really makes finding things on the computer much easier.
I like that there's a Usage tracker. It shows how much value you really are getting from the software.
If you are used to the Application Switcher (Command-Tab) and Spotlight (Command-Space), then you should see what LaunchPad brings to your productivity.
LaunchBar single license is $29 and a family license is $48. There is an eBook available ($10) that teaches you how to get the most use out of LaunchBar.
LaunchBar was last updated on June 11, 2014.
PermalinkAbout
A Mac veteran since 1989, I'm here to share my experience with tips and tricks every Friday. Witnessing the evolution of Mac software and hardware firsthand, I've gained a deep understanding of how these machines work and can help you troubleshoot any issues that may come up.
Check out all the blog posts.
Blog Schedule
| Thursday | Business |
| Friday | Macintosh |
| Saturday | Internet Tools |
| Sunday | Open Topic |
| Monday | Media Monday |
| Tuesday | QA |
| Wednesday | Veed |
Other Posts
- Gif Brewery
- Adding Hyperlink in Apple Numbers
- Outlook in Apple Mail
- Launchbar Clipboard History
- OmniGraffle 7
- Year On A Page
- All-in-One Snag-it Capture
- Snagit 2023
- Adding Custom Songs and Clips to the Apple Loop Library
- Unlock the Power of Audio: Exploring the World of AUs
- Shapes vs OmniGraffle
- FFMpeg
- Font Awesome Filter
- Keyboard Maestro with Slack
- TRRS Cable and iMac