
Sips

Sip is cool utility when you need to track colors for design purposes. This is handy if you need to always have the corporate color pallet handy.
How Sips Works
On the side of the screen is a color bar that shows you the colors that you have in that pallet set. You can have as many color pallets as will fit on the side of the screen, and you can put the pallets on any side of the display. The color pallet is always available, except when an application is in full screen mode.
When you want the Hex value of a color click on the pallet, then the color you want. You'll see the color appear briefly in the menu bar. The color Hex value is now available to be paste into any application.
In the menu bar is a color selector magnifying glass. This makes it easy to grab a pixel color any time that you want - regardless of the application that happens to be open. This is handy when your browsing a website and see a color that you like to add to a design.
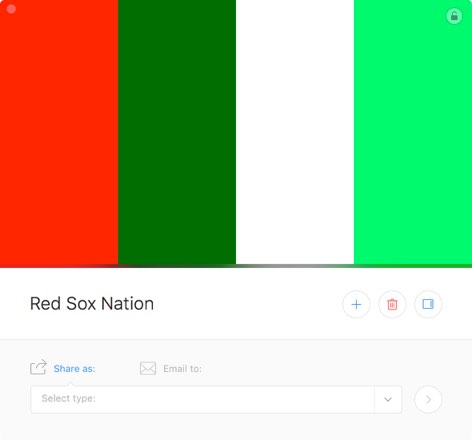
Sample color pallet that the Red Sox might use.
To change a color
- Open the Pallet
- Click on a color
- Change the Hex Color to something else
- Click Return
Overall Assessment
Sips is a pretty cool application. It works really well and found it very easy to use. I don't work with colors that much to justify spending $9.95 on it, but can see that this would be a great tool for anyone doing work for UI.
When playing about with the Sips application, I learned a lot about the various colors that I have on this website. I finally got a pallet of all the website colors. I did this by simply browsing the site and using the menu bar color magnifying glass to get the Hex value of the website.
I think it's very handy to know what colors that I am using, and can help keep things simple.
Check it Out
You can download a 14-day trial from their website.
Sip cost $9.99, and you can purchase it from their website. It's also available as part of the SetApp collection. SetApp is a group of applications that you can use by paying a simple monthly fee.
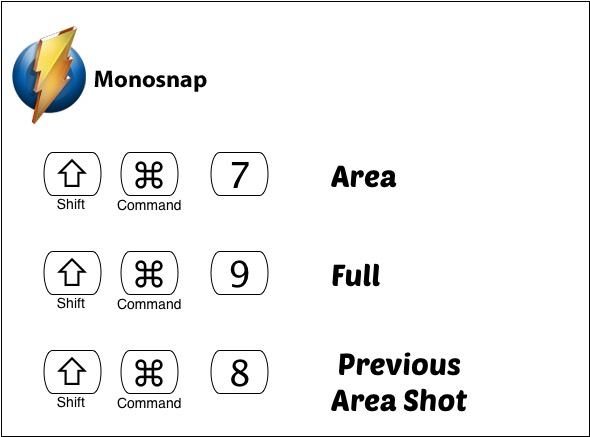
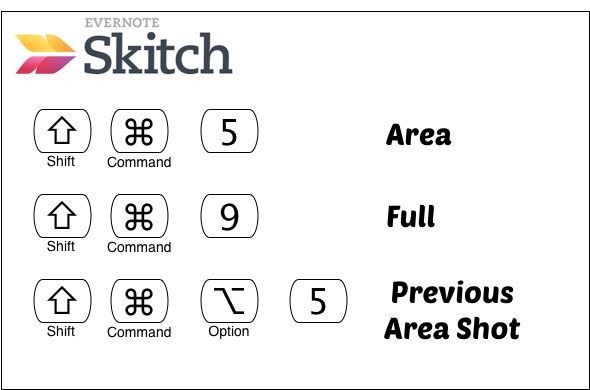
PermalinkScreen Capture Help
I am using both Monosnap and Skitch for my screen capture. I decided to create a quick handy cheat sheet infographic to remember which key combination performs what actions.
Why two Screen Capture Apps?
Skitch integration with Evernote is great, but I don't want to capture every screenshot into Evernote, and that's when Monosnap comes in handy. Monosnap does have a few more tools for those shots that I need to touch up.
The key combination that I have in Monosnap is something I created. Use whatever works for you.
I kept this cheat sheet guide as simple as possible. I wanted something where only the critical functionality is shown.
Finder Search Techique
If you're a long term Macintosh User - i.e. before MacOS X. You may have some files on your computer that you can't use anymore as they only will work in Classic OS mode. Apple create a 'Rosetta Background Utility' that allowed Intel-based computers to read PowerPC applications.
Rosetta was discontinued in Mac OS X Lion, which was introduced in 2011 (5 years ago!) These PowerPC applications won't work on any computer less than 5 years old.
Finding the Classic Applications.
Using the Finder, change the Kind type to Other and type in: Application (Classic)
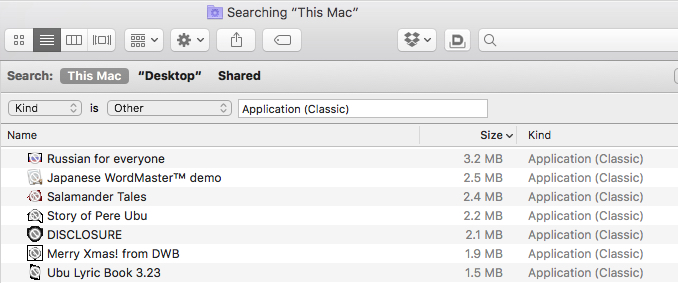
Example of some files on my computer.
These are all the applications that you can't use on your computer. You might be better off moving them to a CD and then removing them from your computer since they are just unusable files taking up space.
PermalinkKeynote Slides for iMovie
iMovie comes with 48 different templates to display title in your video.
Did you know that you can create your own template design? Using software that you already have on your computer.
You can use Apple's Keynote to generate some professional looking text graphics.
It's very easy to do and can make your YouTube videos stand out. I suggest practice doing this a couple of times and before you know it, you'll be adding more text overlay to your videos.

Steps to create a Lower Third text box
Setting up the Document
- Open up Keynote
- Create a new Document
- Select 'Wide' Black Theme
- Change the Background to Blue
The background has to be blue because it acts as a Blue Screen in iMovie and will be transparent.
Creating the Text Field
- Type in Command-A, to select all the objects. Then hit the delete key to remove it.
- Click the Text box in the Header to add some text
- Add some text, such as "My Cool Video"
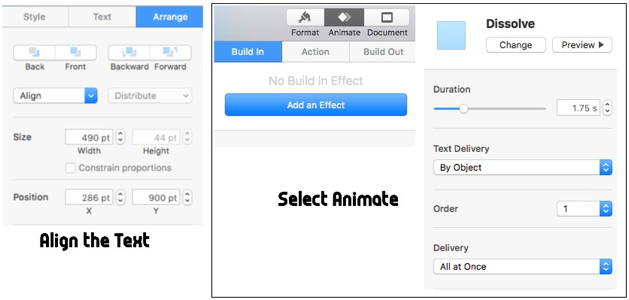
- With the text field still selected, Change the Position of the Text by selecting the Format - Arrange - Position. I suggest 900 pt.
- Click on Animate, and then Click on Add an Effect Button.
- Choose whatever effect that you want, I suggest starting with Dissolve, and keep the basic settings
Now to Export the Slide to Video
- Select File->Export to->Quicktime
- I recommend to change the Format to 1080p and Click Next
- Save the Name as anything you want, recommend saving to the Desktop for now.
In iMovie
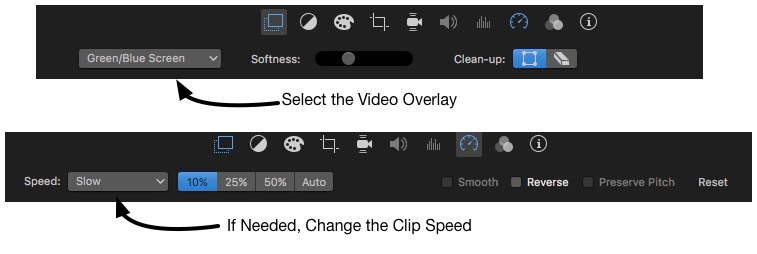
- With your iMove Project in Edit Mode, Drag and Drop the Keynote Movie to a location in your timeline.
- In the Preview Header, change the Video Overlay style to Green/Blue Screen.
- If the Text appears to slow or fast you can always change the speed.
That's the basics to get this done. You can experiment with various Text/Font sizes, in addition, you can always add background shapes.
Download Sample
You can download the Sample Lower Thirds Keynote File as a starting point. The background box flys out from the left and a second later the text appears.
PermalinkUsing Microsoft Shapes and Smart Art in Affinity Designer
Microsoft has some pretty cool looking Shapes and Smart Art. These are available in Microsoft Word and Microsoft Powerpoint. Check out some of the designs that are available:
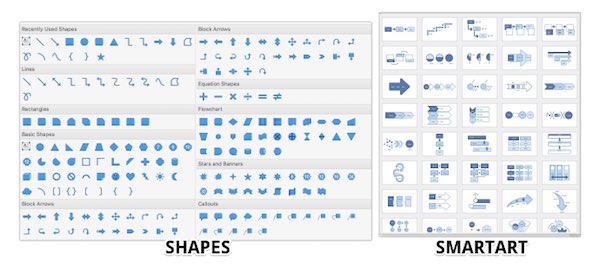
There are 190 SmartArt practical designs and 181 Shapes to choose from!
These are great when you want to visually display data relationships or list items in a nice graphical form. Microsoft does provide some nice editing capabilities, but applications like Affinity Designer have more power tools.
You can start the basic design in Microsoft Word or Powerpoint and then use Affinity Designer to touch it up. Why limit yourself to the capabilities of what's possible in one application?
Example Touch Up
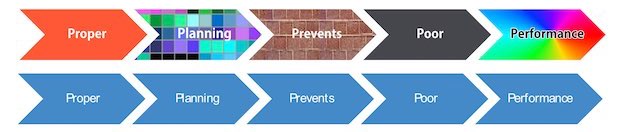
Top image is the touch up version that was created in Microsoft.
Getting to other Apps
If you are using Affinity Designer or other Apps, it's a bit tricky to get these designs into a document via copy and paste. For some reason when you copy and paste a Microsoft Shape or Smart Art, it copies as a text object.
The best way to get the shapes is to 'Save As' a PDF Document
- With the Microsoft Document open, go to File -> Save As
- Select PDF as the File Format
- Save it any place you want, Desktop is good choice.
- In Affinity Designer Open the PDF document.
- You will see that the shapes will be in Curve format, which will allow additional editing and staying in Affinity Designer.
Alternative Way: Use the Preview.app
- With the Microsoft Document open, select the Shape or Smart Art that you created.
- Copy the Object (Command - C)
- Open up the Preview App
- Create a new document, Use the shortcut (Command - N)
- Copy the Contents of the window. (Command - C)
- In your Affinity Designer document paste the content.
The downside of the alternative way is that it pastes as a single image. You can't edit the object as easily. This is a good solution when you don't need to edit the Shape or Smart Art and just want to put it in some Affinity Designer file.
Getting Microsoft Office for Mac
Office 2016 is available online, or at the Apple Retail Store. The home version cost $99 a year for 5 users and includes 1 TB of OneDrive cloud space. If you only plan on using Office on one machine it cost $69 a year.
PermalinkDropZone 3
DropZone is a very cool utility that makes it easier for Macintosh users to take action on files. For example, you can easily move files to your favorite cloud service.
Description from the Website:
Dropzone is a productivity app for the Mac that makes it faster and easier to move and copy files, launch applications, upload to many different services, and more.
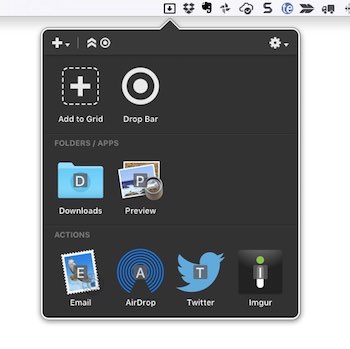
Dropzone comes with several pre-installed actions that will satisfy most users:
|
|
As if that's not enough, you can download the following actions from their website:
|
|
Installing the additional actions is super easy, Simply click on the Install link on the website and it's done in no time.
I was hoping that there would be one for Smugmug and Evernote. The nice thing about Dropzone is that it's fully expandable. I'll be reading the developer documentation to see if I can add additional actions that can help out my team.
Slack Advantage
If your using Slack, and haven't upgraded to a paying tier, you may know that there is a file storage limit. You are only allowed 5GM total file storage for the entire team. Once you reach that limit you will need to delete files before you can upload any more images.
This file storage limit can be achieved pretty quickly if your team likes to upload a lot of files.
So how can DropZone help?
Instead of dragging the image to Slack, you drag the file up to DropZone and then to the Imgur icon. The file will get uploaded to Imgur.com. Once completed, your clipboard will have the URL to the image.
You then just paste the URL into Slack. Bam! No more file upload limits.
Other users will see the image that you uploaded within Slack as if you uploaded into Slack.
Here is the difference between an uploaded file and a link file at Imgur:
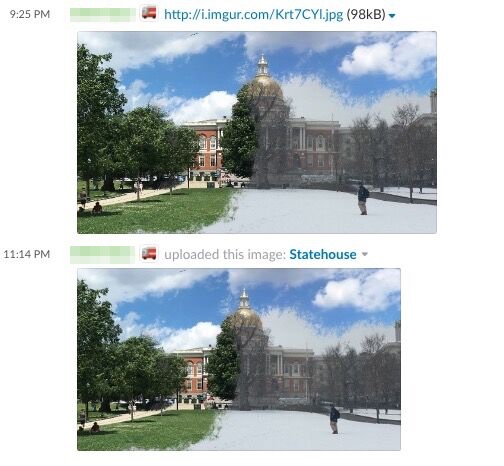
Basically you loose the ability to have a custom title. You certainly can go wrong with the DropZone way.
There's a great animated GIF on Imgur on how this all works.
Download DropZone
DropZone is available in Apple Apps store or from their website. If you're unsure, the version on their website offers a 15-day trial which is plenty of time to test the functionality.
Permalink3 Quick Preview App Tips
 Most people use Preview App as the go-to app to open up PDF files and Images. There are a few hidden features that you make not know about. Here are three cool things that you can do with Preview App.
Sort the Order of Photos in the Sidebar
When you open up a bunch of pictures in Preview, by default the pictures appear in alphabetical order. If you right click on any of the images, you can change the sort order to be by Name, Path, Date, Size or Kind.
After you change the sort order the text under each of the images will show additional information, such as the size of the photo or the date it was taken.
Sort the Order of the Contact Sheet
Did you know you can create a Contact Sheet in Preview. Simply drag a drop photos or folder on the Preview App. Select all the images in the sidebar, using Command - A, then type in Command - Option - 6 to open the images in the Contact Sheet.
Just the tip above, simply right click on any image and you can change the sorting order.
In the Contact Sheet you can change the orientation of multiple images, simply select the image that needs to be rotated Right or Left, then type in Command - R to adjust the image right or Command - L to adjust the image to the left.
Combine PDF Documents
You can easily combine several PDF documents into one document. This is useful when you may create a bunch of documents in Pages, for example, envelopes in a mail merge.
Simply open up the document to be on the first page. Then type in Command - Option - 2 to open up the Thumbnails sidebar. Now you simply Drag and Drop the PDF files you want to add to the PDF document. So from the Finder (or Desktop), drag the file to the sidebar of the open Preview window.
You don't need to worry about the order because after you complete, you can reorder the thumbnail images in the PDF document.
Once your done Save.
I find this useful when I need to print a bunch of documents at FexEx Office or Staples. I simply combine the printable documents into one and send it off. It makes it simple when there's only one document that you have to deal with.
Lots more to Explore
Apple packed a lot of features in Preview, including a simple Annotate tool, Adding Keywords to Images, Magnification, Bookmark and more.
A good place to learn is the Apple support section:
- Highlight, underline, and strike through text in Preview
- Use the Preview app to view and edit images and PDFs - Apple Support
- Resize or rotate an image in Preview
- Add notes and speech bubbles to a PDF in Preview
- Preview (El Capitan): Preview keyboard shortcuts
If there's any cool tips/tricks you like to do in Preview, please share!
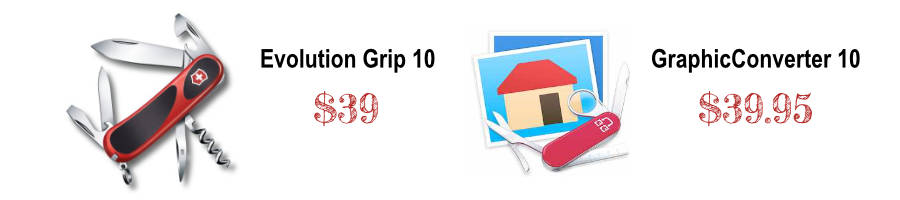
PermalinkGraphicConverter 10
There is a reason why the Swiss Army knife is in the icon of Graphic Converter. Graphic Converter is your go to application when you need to open up a file created in a different format.
Thorsten Lemke created GraphicConverter in 1992 out of a need to open graphic files created on his Atari. He just switched from Atari to Macintosh and found it frustrating that there wasn't a single app that could handle simple image conversions.
Over the years, customers requested support for additional graphic formats. In version 10, the application can open files in over 200 graphic formats. Users have the option to save images in at least 80 different format types.
Thorsten Lemke has looked for new ways to improve the functionality of GraphicConverter to be more than just a basic image converter application. The application can now touch up and enhance files.
Today the application is one of the most popular shareware applications with a very loyal subscriber base.
Yet Another Graphic Application?
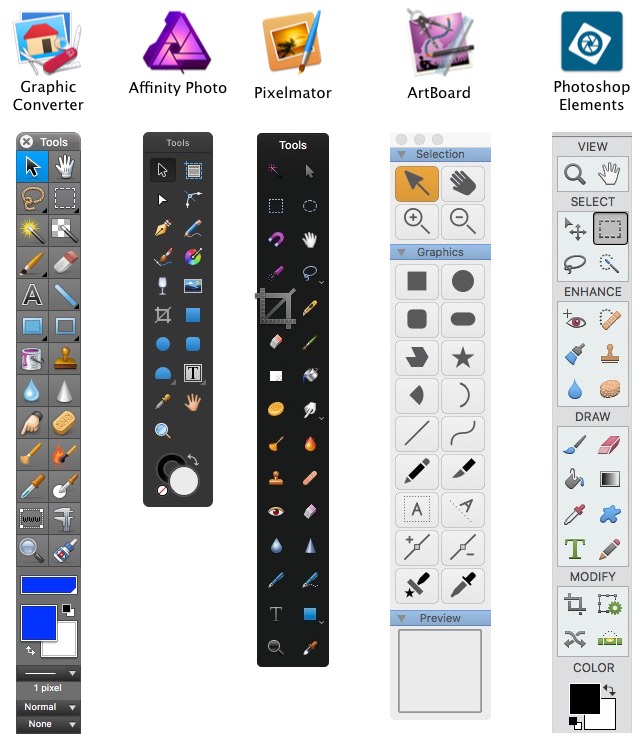
You may be wondering if you have Affinity Photo, Pixelmator, Artboard, do you really need another Graphic Application?
Simple Answer: Yes.
Graphic Converter has the ability to open graphic files that were created in other applications. It will be there when you need it.
For example, I recently downloaded a file with a .xps file extension I tried all my usual graphic applications and couldn't open the file. Graphic Converter opened the file without a problem. I was able to save it in a different format so that I could use it later.
Cost just as much as a Swiss Army Knife
Just like that Swiss army knife that people carry around, It will be there when you need it. Incidentally GraphicConverter cost the same as a Victorinox Swiss Army knife.
GraphicConverter might be the better long-term investment, at least you won't have to worry about losing it at the airport.
Toolbar Views
Here's a look at the toolbars in various applications that I have on my computer:
Opening Apple QuickDraw
If you used a Macintosh before OS X, chances are opening up some graphic files can be challenging. I was disappointed that Quickdraw images are still distorted when I open them in GraphicConverter.
Check out my previous post on how to fix images in Apple QuickDraw format.
Collage Functionality
New in version 10 is the ability to create collages from images. You don't have as many layout options as you would in TurboCollage. However, it's a nice feature when you have a few images and want to make a quick collage
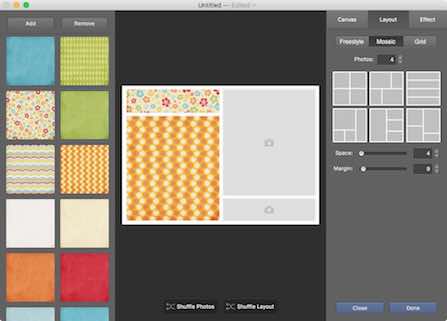
You can find the collage button in the top of the folder browser window. Simply drag and drop a folder to the GraphicConverter icon and select the images that you want.
TurboCollage costGetting GraphicConverter
As noted earlier, GraphicConverter cost $39.99. You can download and purchase GraphicConverter 10 from their website.
There's a lot of cool things that you can do with GraphicConverter, check out their full list of features.
PermalinkData Storage Backup
One of the important lessons that I learned in 2017 is the value of always backing up data. Its critical to have an active backup strategy because a computer crash can happen at any moment.
Recovering a failed Hard Drive could cost $799!
Thumb Drive
I have a 128 GB thumb drive where I keep a lot of my active files. I use this to move files between my Powerbook G4, iMac and my work MacBook Pro.
I found that SanDisk Cruize Glaze works the best for transportation and reliability. I have several of them and for a while it was hard to figure out which is which.
My quick solution was to use a Nite Ize Gear Tie Clippable Twist Tie Bright Orange. It easily clicks in the back of the Sandisk drive. Now I know what disk is what.
Don't Forget the Fonts!
If you buy fonts from Creative Market, InkyDeals or Adobe Type you should backup your ~/Library/Font folder. This folder contains all the fonts that you installed on the computer.
If you have a lot of designs made in Affinity Designer and Omnigraffle you'll want to make sure to save the fonts you used!
Cloud Storage
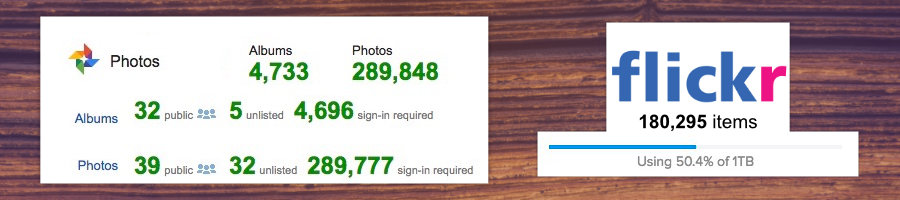
All of my photos are backed up to Google Photos. I have it sync set so that it uses the "High Quality (Free Unlimited)" option. Most of my photos are simply for sharing online. I really don't think that I will ever need print quality versions.
For the 1% of the photos that are phenomenal awesome, I back those up to my Flickr accout. They are backed up in the original quality, so that some day I can print those outs.
Always Be Backing up
Make sure to implement some backup strategy and stick to it. A few dollars today can save a lot of trouble in the future.
PermalinkLaunchbar Clipboard History
One of the cool features of LaunchBar is the ability to access previous clipboard objects. With a simple keyboard shortcut I can access previously copied contents.
This is very useful when I am copying and pasting text different text. For example, I may copy a Jira Issue number and will reference it in Slack, Email and in another ticket later.
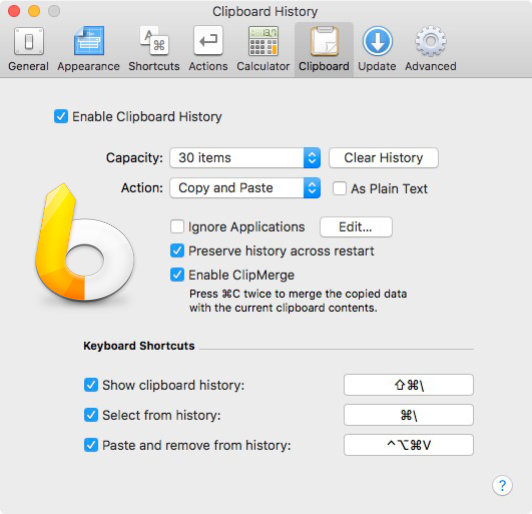
ClipMerge!
The ClipMerge functionaltiy is pretty cool feature. ClipMerge allows you to combine subsequent Copy operations into one single clipboard object.
This is useful when you want to build a list of things; such as Jira Issues, or use it to create a list of websites people should visit.
LaunchBar Clipboard History
There are a lot of other software options when it comes to Clipboard History, such as Clipboard Center, but LaunchBar is packed with a lot of other powerful features. You do get a lot of bang for your buck - or in this case $29.
Checkout my previous post about Launchbar. It's a very powerful tool, that keeps your fingers productive on the keyboard.
PermalinkAbout
A Mac veteran since 1989, I'm here to share my experience with tips and tricks every Friday. Witnessing the evolution of Mac software and hardware firsthand, I've gained a deep understanding of how these machines work and can help you troubleshoot any issues that may come up.
Check out all the blog posts.
Blog Schedule
| Thursday | Business |
| Friday | Macintosh |
| Saturday | Internet Tools |
| Sunday | Open Topic |
| Monday | Media Monday |
| Tuesday | QA |
| Wednesday | Veed |
Other Posts
- Burning Music CDs in 2025
- iCloud Clean up
- Explore GarageBand's Vocal Effects: 25 Unique Voice Options for Creative Audio Production
- Best way to go full screen using Chrome
- TabLauncher Lite
- MacWeek Review
- WC command
- Macintosh Spring Cleaning
- SD Card iMac Speed
- Arrows in Affinity Designer
- Black Friday Watch
- iTunes ArtWork
- All-in-One Snag-it Capture
- CofeShow Video Slideshow Maker
- GIF Annimation Resize