
iMazing
Great software to manage your devices
I have heard about imazing software for a few years - and didn't think much of it.
For those that don't know, iMazing allows you to manage your iOS devices without the need for iTunes. It's a great single-source application that lets you manage your Music, Ringtones, Books, Photos, Messages and more.
I recently purchased it in the October BundleHunt deal. It was a good deal for $6.
This use to be called DiskAid, but was changed to iMazing in 2014 to better reflect the value of the application.
Five Things I like about iMazing
I like that I am able to move over Music and Movies onto the iPhone from my MacBook Pro and iMac.
Now that Apple split Music and Movies to different Apps, it is no longer fun to manage my device. iMazing makes it easy to manage the device in one application.
I can sort the Photos/Video listing by size. Now I can remove the larger files that are taking up too much space on my phone. A really good way to manage the iPhone.
I can now better manage files in the Books section. I can finally get rid of outdated books and add important PDF manuals. That I can read when I have no internet - such as BBEdit and the Affinity Photo Manual.
Backing up messages is cool! But backing up Voicemail is awesome. Now I can completely clear out all those old voice messages. I can also save the transcript to a CSV file - something that isn't possible in any Apple application.
My Recommendation
Get iMazing if you want more control with your iOS device. It really gives you a lot more control on backing up your device.
Getting iMazing
You can download iMazing 2 for Mac and PC on iMazing website.
A single license cost $44.99 - however, you can usually find the software bundle with other apps for a much cheaper price.
PermalinkViper FTP
Should I switch from Panic Transmit to Viper FTP ?
Last month when I was setting up my new iMac, I was thinking if it was time to move on from using Panic Transmit. So I spent time looking for alternative FTP client software.
One of the applications that I encountered was Viper FTP. This was interesting because I hadn't seen it before and thought it would be worth checking out.
Eight Key differences between Transmit and Viper FTP
I played around with Viper FTP for a couple of days, and here are my observations:
There is a free version of Viper FTP which has limited capabilities. This is a perfect solution if you only have one FTP connection and need basic functionality.
There is a setting in Viper FTP that preserves the system date of downloaded files. This is neat. When I want to back up a production file, I want to keep the date of the last modification. In Transmit, this was possible with Transmit Disk mode was enabled - that feature has been discontinued in Transmit 5.6.0.
In Viper the connection favorites are kept on the left side of the window. This makes it easy to jump around on the server. In Transmit, it's in a small bookmark-type bar on the top of the listing.
In Transmit, you can assign custom icons to servers, making it really easy to see the AWS servers from the DropBox servers. You can't do that in Viper.
In Viper, you can put servers in the Toolbar. Which makes it really quick to access critical servers.
Transmit has the ability to connect to a lot more different server types. You are limited using Viper. Viper FTP Lite doesn't have access to Google Drive or DropBox.
Viper FTP Lite, the free version, only allows you to save 3 servers at once.
Panic Transmit costs $24.99 via subscription price or a one-time price for $45 per user for all your Macs. Viper FTP costs $18.99 for one user on one computer. To install it on multiple computers it cost $79.99.
Sample Screenshots
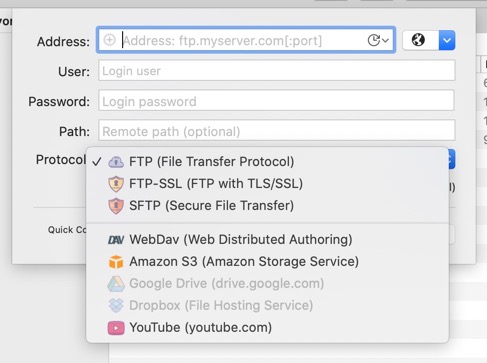
Panic "Create New Connection" Dialog. This shows all available options.
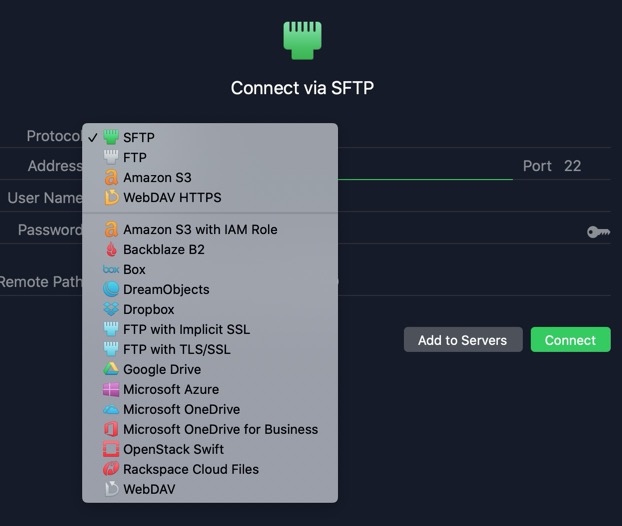
Viper FTP "Quick Connection" dialog. Pretty cool that you can upload videos to YouTube!
At the End of the Day
While Viper FTP looks cool and has a few bells and whistles that isn't available in Transmit, I'll be sticking with Transmit. I think Transmit is a cool
PermalinkNew 27-inch iMac
Experiences with the new 27-inch iMac
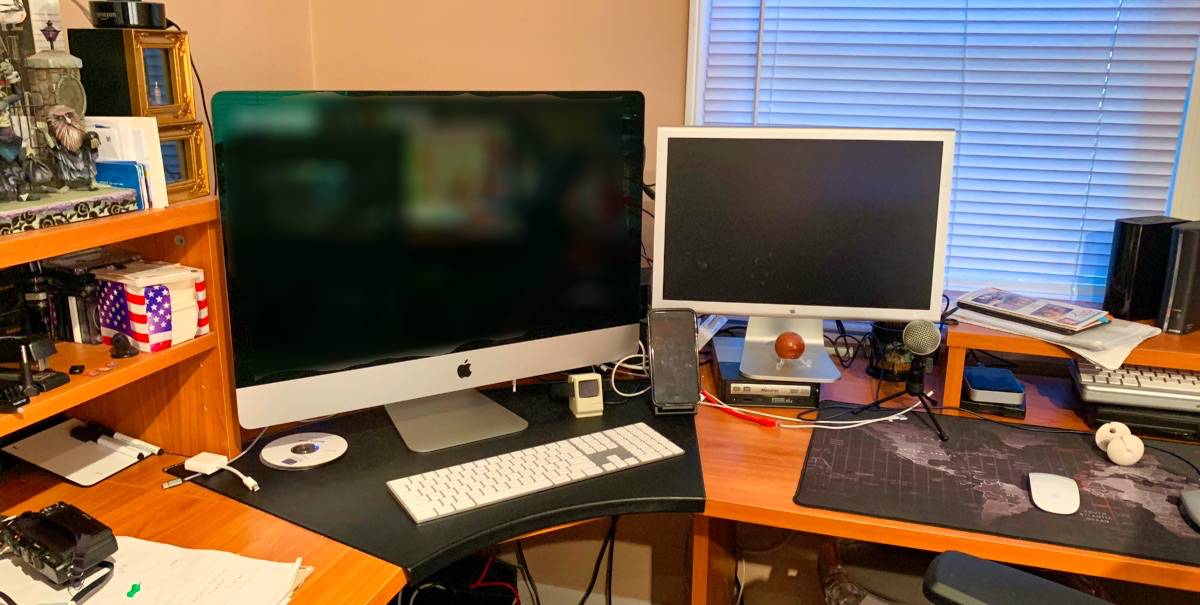
Last month I upgraded my iMac (21.5-inch, Mid 2011) to the 2019 27-inch iMac with Retina 5K display.
I spent a lot of time investigating the perfect computer, spent time researching different configurations and machines. Is the Mac Mini a better computer to get? How about a MacBook Pro?
After much research and talking with friends, I selected this configuration:
3.7GHz 6-core 9th-generation Intel Core i5 processor, Turbo Boost up to 4.6GHz
8GB 2666MHz DDR4 memory
Radeon Pro 580X with 8GB of GDDR5 memory
512GB SSD storage
Magic Mouse 2
Magic Keyboard with Numeric Keypad - US English
Accessory Kit
Five Things I learned about the iMac
- I ordered the computer with an SSD drive and they had to customize it. It was scheduled to be delivered on October 14th, it actually arrived on October 4th.
- I gave up space for performance. As this computer has 1/2 the disk space than my old computer - this means that I have to manage my space on my hard drive better.
- Instead of having Apple install additional memory, I installed it myself. Doing it myself saved me about $450. It was incredibly easy to do, and it took about 3-minutes to install the memory cards.
- It's so nice to have a 27-inch screen vs the 21.5-inch screen. The extra screen space really makes a difference on multitasking various applications.
- Someone suggested that I upgrade to the wireless full-size keyboard - instead of the mini-keyboard. I do like the full-size board and found that it was a great idea. I like that it's wireless and that to charge it up, I just plug in a lightning cable.
Reference Page
I am actively updating my 27-inch iMac 2019 page on the ins and outs of using this computer. (Think of it as a mini-blog)
My goal is to update the site on my experiences using the new computer.
I have been a Macintosh user for a long time, and I have a lot of old gadgets and software - such as FireWire, and SCSI disks.
This this the first computer that I owned that doesn't have a built in CD/DVD drive. I already have an external USB DVD drive. (It supports both Firewire and USB2)
Luminar 2018
If you get the chance to get Luminar 2018 at a discount - get it!
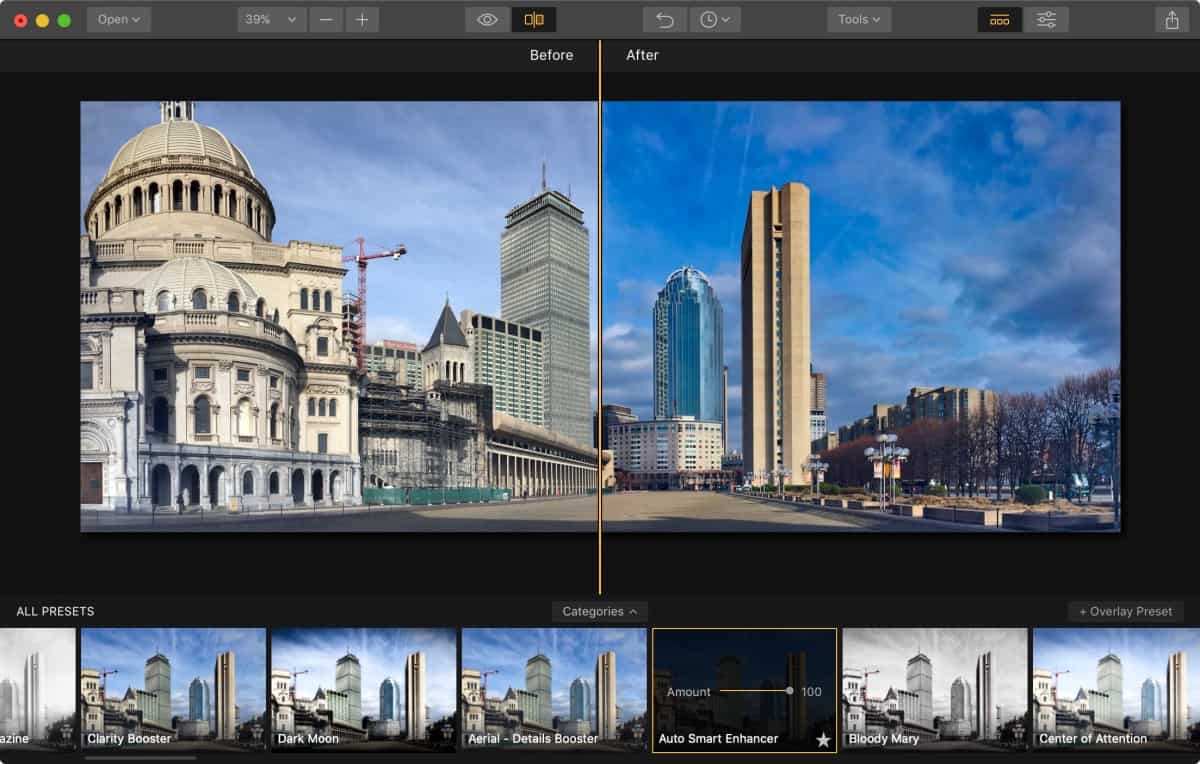
Luminar 2018 is a cool application that makes it super easy to stylize and image to the way you want it to look.
Sample Screenshot:
Things I Learned About Luminar 2018
There's a Sky Enhancer which allows you to get a better sky via artificial intelligence.
Out of the box, there are 60 one-click presets to quickly touch up the photos. You can always purchase more on seklum.com website - there are some free presets while others cost between $10 - $20.
When you select a preset, you can change all the options - to one that works best for your image.
Luminar 2018 gives you a bit more power than what's in Photolemur 3. For example, with Luminar I can alter a photo to look.
Batch Processing is pretty cool. This is where you can apply Presets, Format and resize all that the same time. For example, you can apply the Sky Enhancer to a set of common images. For example, you can make a bunch of Black and White thumbnail version of images as previews.
Batch processing is great for those RAW images that you have. You can use the technology in Luminar to render the images and then back up to various cloud services such as Google Photos.
The Luminar 2018 document is 155 pages long. There is a lot of information about all the various configurations. The nice thing is that the PDF document is searchable. If reading manuals isn't your thing there's a large collection of video tutorials available.
Replacement for Photolemur 3?
Luminar 2018 doesn't replace the need for Photolemur 3 - it just another image enhancing tool in the toolbox. Photolemur is great when I want a quick touch up, but when I want to be fancy or have more control, I'll use Luminar 2018.
Photolemur and Luminar 2018 are both created by Skylum.
Getting Luminar 2018
The best way to get Luminar 2018 is via the BundleHunt collection. You can get it for about $4 - about a $60 savings. This is a good price for the value that you get using the software.
PermalinkHoliday Search in Spotlight
Apple Allows you to search via Holiday
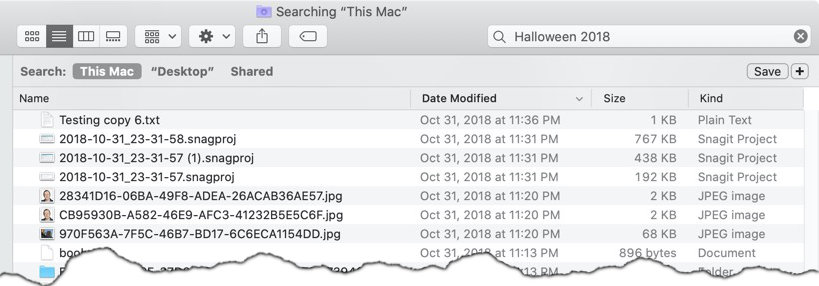
I am not sure if this is unique to MacOS 10.15, but I noticed something cool about the Spotlight search. You can put in holidays and it will find files that were created on that day.
Here's an example of Halloween:
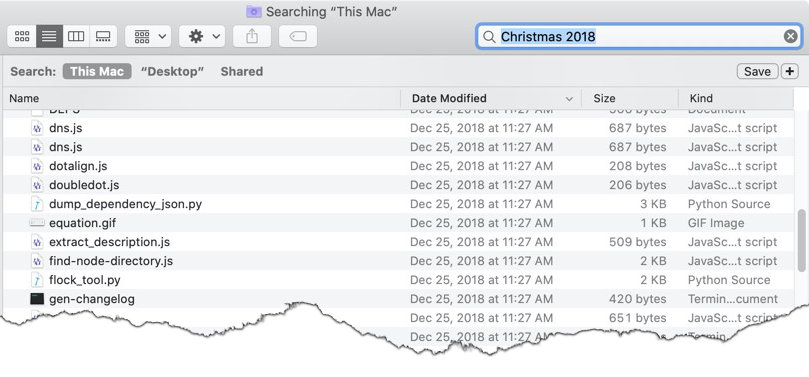
Here's an example of Christmas:
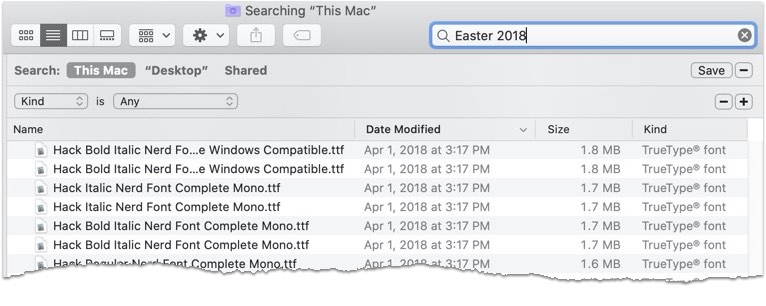
Easter 2018:
How Cool is that?
None of the files found have the "Halloween, Christmas or Easter" text in them. So Spotlight had to have matched the event with the date.
I tried other dates such as my Birthday - to see if Spotlight would interpret contact data as part of the Spotlight search. That didn't work.
What do you think? What other "Easter Eggs" are being used by Sportlight?
PermalinkRecent Applications in the Catalina Dock
Bring back the Recent Applications folder in the dock.
One of the features that Apple changed in macOS Catalina is the Recent Applications in the Dock. You can no longer see a grid of Recent Applications. In Catalina, you can only a select number of recent applications appear in the dock.
It's really easy to bring back the "old" look.
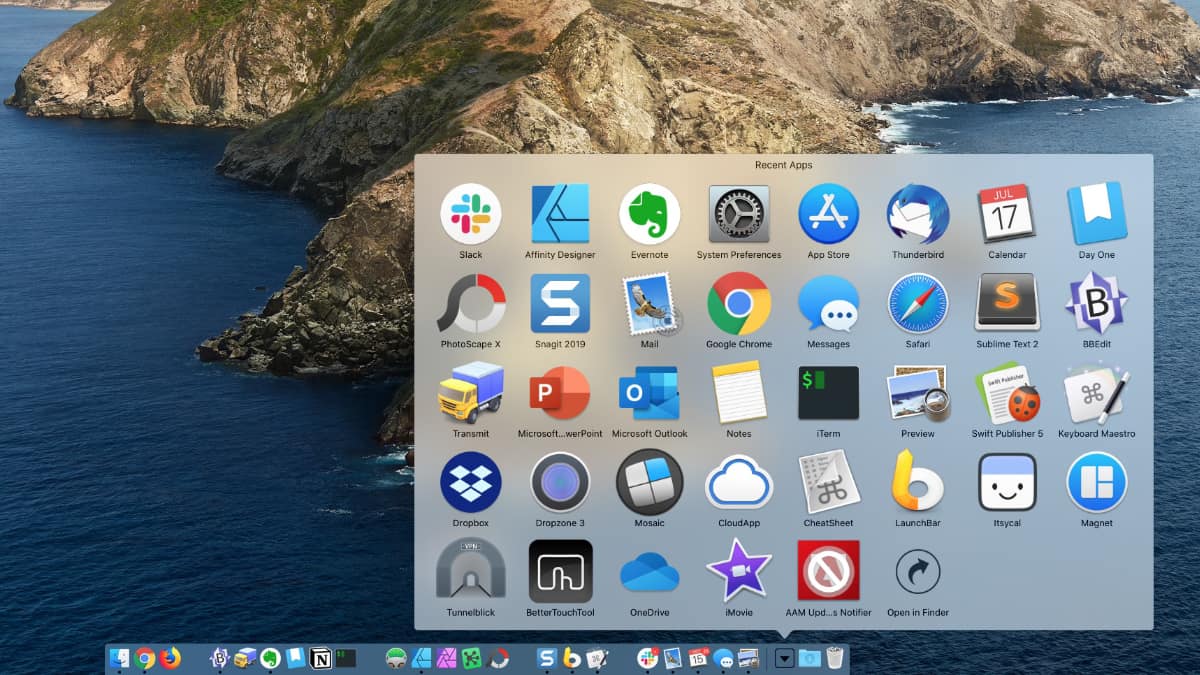
How to Enable the Recent Application Back in the Dock
Here are the simple steps:
- In the Finder type Command - F (This brings up the Spotlight Search.)
- Next to the 'Kind' drop down menu, select 'Application'
- Click on the '+' to the right of that row
- Select 'Last Open Date' and then 1 day
- Click the Save Button, which is located just above the '+' that you click before.
- You can name it anything, but "Recent Apps" would be good.
- Make sure the check box next to the "Add to Sidebar" is checked and click Save.
- Now you should see the "Recent Apps" in the Sidebar.
- Drag and Drop the "Recent Apps" icon to the Dock - just to the left of the Trash Can.
- Right Click on the icon in the dock and select "Grid" under "View Content As"
Bonus: Try Tags with Applications
The nice thing about this tip is that now you know you can put any Smart folder in the dock.
So for example, one thing you can do is tag certain applications that you use - for example, applications use to modify Images. Then create a Smart Folder that searches for that Tag. Then place the Smart Folder in the Dock for easy access.
PermalinkMosaic
Great Window Management Utility
Light Pillar's Mosaic is a window's management utility. It makes it easy to organize various windows that you may have open. For example, you can easily layout Chrome Window and Evernote, so they layout evenly on the screen.
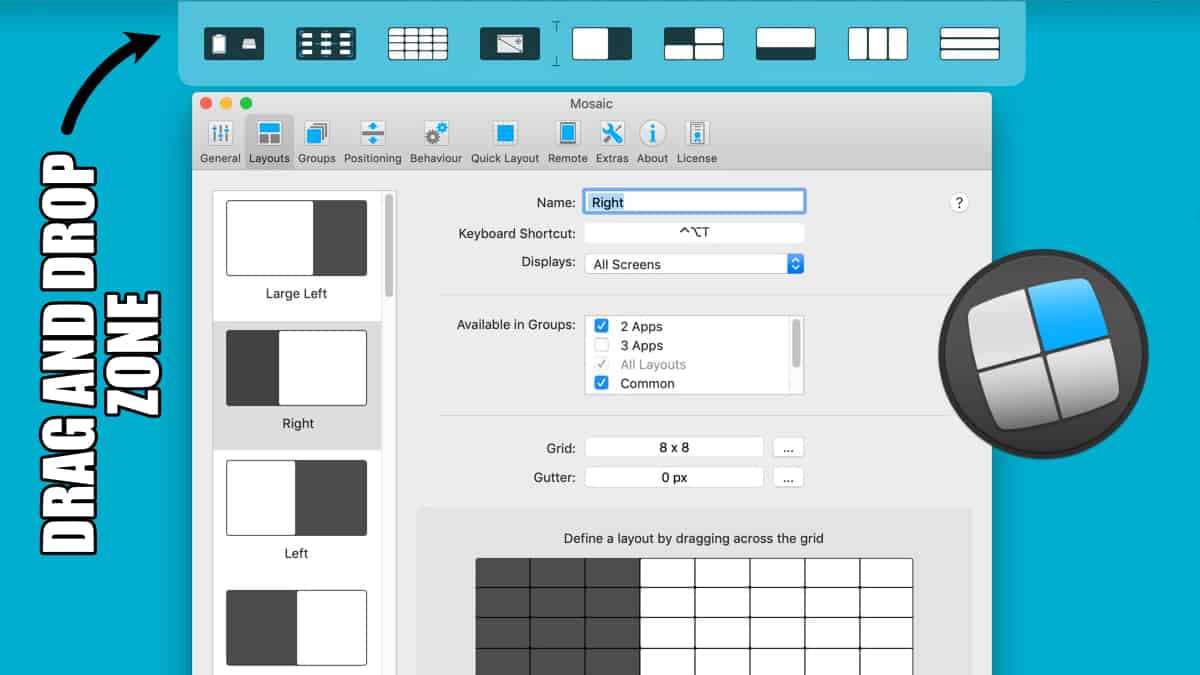
Five Things I have Learned Using Mosaic
- When you move a window, you can see a Drag and Drop Zone where you can position the window on the screen. (There's a setting where you can change the Drag and Drop Zone so that it only appears when you have the option key down.)
- You can also assign keyboard shortcuts to different layouts - avoiding the need to use the Drag and drop.
- One of the first things I did was remove the default Gutter. I never really need to see my desktop when I position the windows.
- Groups are a good way to only show layouts that matter in the Drag and Drop Zone.
- When I was changing the layout on a 5K display I was getting Resizing Window warnings. In the General Setting, there's a checkbox to disable the warning.
Shapes vs OmniGraffle
Some key differences between the OmniGraffle and Shapes
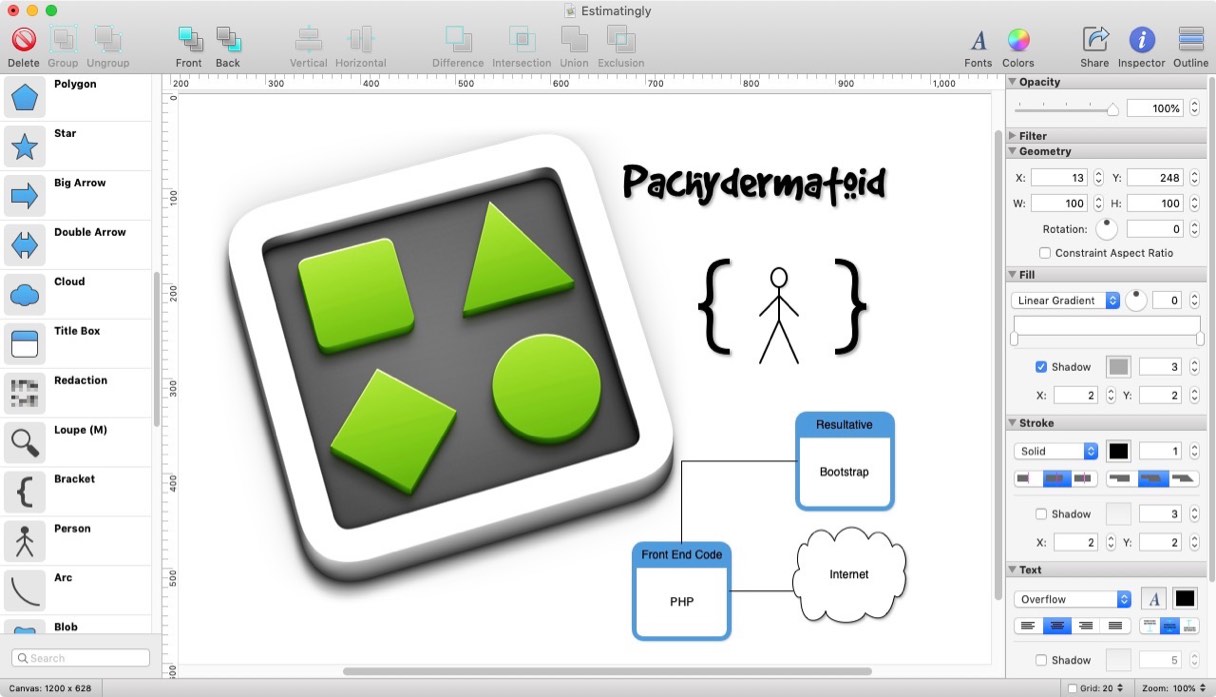
If you're looking for a quick way to create simple diagrams, Shapes might be the right tool for you. It's a good application that makes it easy to create diagrams and flow charts.
Product Description
Description from the shapesapp.com website:
Shapes is an elegant Diagramming app for Mac OS X, that is both simple and powerful. Shapes give you all of the most important features you need in a Diagramming tool without all the extra cruft, at an affordable price.
Shapes is great for Programmers and Web Designers looking for a simple tool for quickly designing Charts, laying out wireframes, or visualizing Model Relationships.
Five Things I Learned about Shapes
- I wasn't able to test how Shapes handled opening EPS files since you can't open files during the trial.
- There's plenty of tools that I haven't seen anyplace else, such as a Dialog Window, Person and Double Tearaway. What is the purpose of the bracket tool?
- It's very easy to connect objects. When an object is selected, simply click on the circle below and choose your line type: Line, Segmented Line, Smart Path, or Arc.
- I discovered if you drag the main window edge, by the tools, you can see the tools names and the short cut keys to access them. I wasn't able to find the shortcut keys in any documentation.
- There's a search box to search for tools, some good queries are 'box', 'house', and 'line.' It makes it easy to have like tools available as your working. However, there no documentation on available queries.
OmniGraffle vs Shapes
OmniGraffle has a lot more capabilities and certainly in't fair to compare the two apps. If your just creating basic chart diagrams and don't need a lot of flexibility, then Shapes is your tool.
Some differences between OmniGraffle and Shapes that I found while exploring:
- OmniGraffle has large library of reusable objects, there's no library in Shapes.
- OmniGraffle has the ability to control line hops. Which is nice when you have points that cross.
- With OmniGraffle, I can control of how objects are connected. For example, I can add additional anchor points on an object.
- OmniGraffle has nine fill types, while Shapes only has three.
- Shapes doesn't offer any help pages to explain tips and tricks
- Shapes is much cheaper than OmniGraffle $9.99 vs $149.99.
Trying Out Shapes
Shapes is available on the Apple Store for $9.99.
You down download a fully functional version of Shapes from their website and try it out. During the trial you can not import or save changes.
PermalinkType Styler
Type Styler vs Art Text 3
Type Styler is an application that makes it easy to create logos and text graphics.
I learned about this application from a post in the Affinity Photo Forum and thought to check it out. I was curious to see how this compares to Art Text 3 -(Which I already Own).
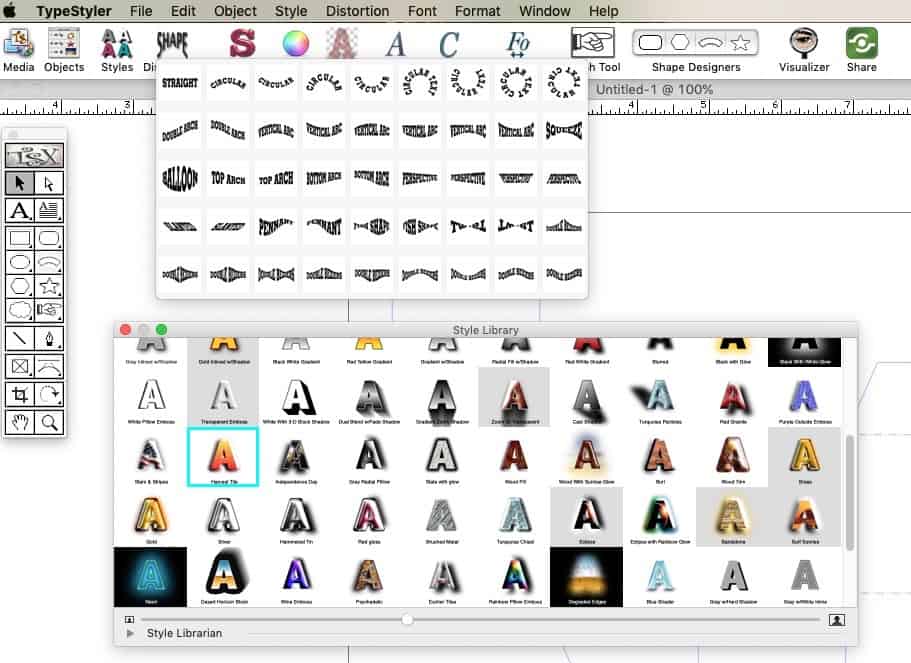
Some of the options with TypeStyler.
Nine Things I Learned About Type Styler
There are 95 Text Styles in the library. (That's the colorful A's above.) Simply select some text then choose your text style. You can then configure the style afterward.
There are 45 distortions that can be made.
There are different document presets available such as Page, Poster, Banner, CD, Bag, Box, 3D Model, and Video. (The Video seems very interesting to explore.)
The Glyph Tool allows you easy access to all 4,613 glyphs. I didn't realize that there were that many in the Apple Symbols.
The Body text tool allows you to create new text body. There are 45 different text body types.
The Style Workshop is a creative way to play around with different effects for the text, such as Full, Shadow, and all sorts of effect.
Objects can be clip to the clipboard and paste into OmniGraffle, Affinity Designer, Affinity Photo and other apps. The final results
You can export to Photoshop, PDF, Illustrator, JPEG, PNG, TIFF, EPS, PICT, GIF.
When you export as Photoshop, all the objects are on their own layer as Pixel format. You have the option to set the resolution, the default is 261 dpi.
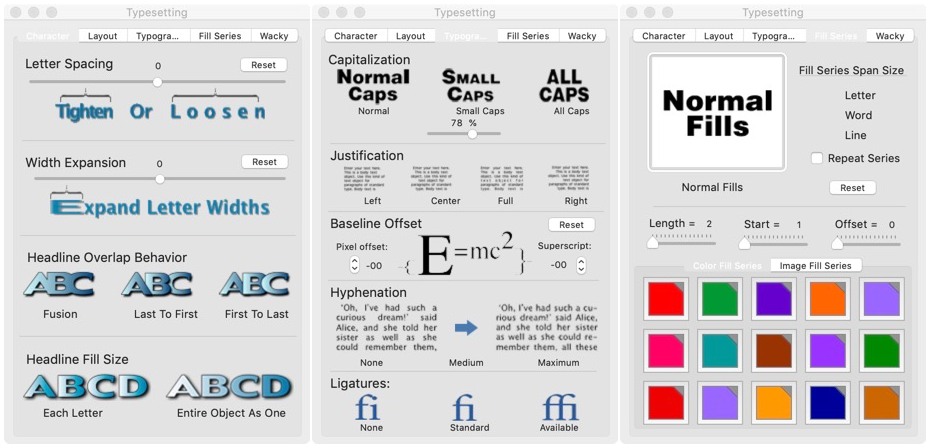
Type Styler Type Settings dialog box shows some of the options you have.
Type Styler vs Art Text 3
The big difference I can see between the two apps is that Type Styler allows you to format a lot of text.
Art Text 3 is great if you need a logo or text style design. It's a very powerful application with a lot of capabilities. Great when you want to create eye-catching text.
Type Styler is great if you're designing a brochure or a bag and want to apply creativity all over the document. So if you're looking to create an eye-catching brochure - Type Styler would be your best option.
Type Styler Demo
Type Styler on the Apple Store hasn't been updated in a few years. Its last update was to support Mac OS 10.11 (El Capitan) - nearly 3 years ago. Their website has the latest version 10.6 - certainly the best place to get the latest version that works.
If you want to try the application you can from the Strider Software website.
PermalinkOmniGraffle 2020 Calendar
OmniGraffle Stencil for the 2020 Calendar
OmniGraffle is a popular design tool. You can create flow charts, graphic designs, page layouts, process charts, easy-to-read diagrams, and quick drawings to present your points in a clear and concise manner.
I use the application off and on to illustration flow layouts and to illustrate points. The most popular use has been creating quarterly calendar planning.
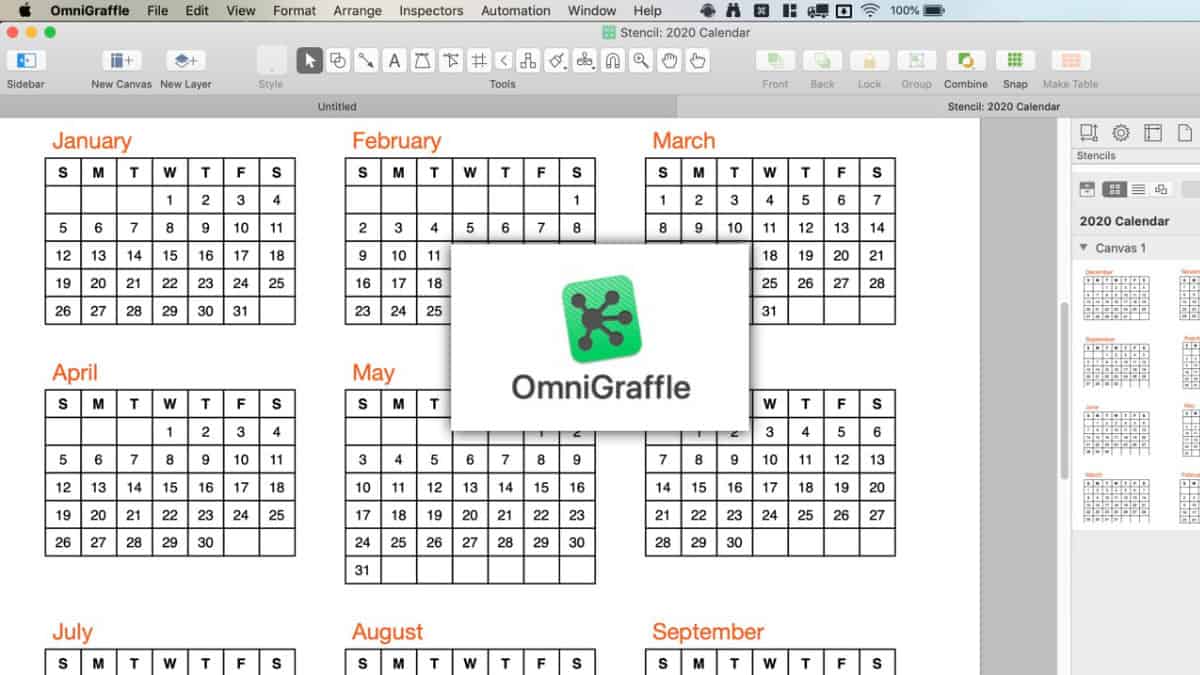
Sample layout of the 2020 Calendar
2020 Calendar
The year 2020 is right around the corner, it's never too early to start thinking of the new year. So I decided to create a 2020 monthly calendar stencil for Omnigraffle. This is useful when you need to figure out software releases, dance schedules, or birthdays throughout the year.
Simply download the 2020 Calendar GStencil, it's pretty easy add it to your Stencil collection:
- Double click on the file to decompress it.
- Double click on the "2020Calendar.gstencil" file.
- When OmniGraffle opens it will ask if you want to move the file to OmniGraffle Stencils folder. Click on Move and Edit.
- You can close out of the file.
Now the file is in your personal collection for whatever you want to do with it!
FYI: I did submit this to Stenciltown, when it get's approved I'll add the link here. This will allow you to search and install the calendar within the app!
PermalinkAbout
A Mac veteran since 1989, I'm here to share my experience with tips and tricks every Friday. Witnessing the evolution of Mac software and hardware firsthand, I've gained a deep understanding of how these machines work and can help you troubleshoot any issues that may come up.
Check out all the blog posts.
Blog Schedule
| Thursday | Business |
| Friday | Macintosh |
| Saturday | Internet Tools |
| Sunday | Open Topic |
| Monday | Media Monday |
| Tuesday | QA |
| Wednesday | Veed |
Other Posts
- Luminar
- Panoramic Photo Challenge
- iMac FaceTime Camera Quality
- Top 8 Macintosh Post of 2018
- Resize Image via LaunchBar
- Wondershare FIlmora 13
- Quadro Sync
- Free Up 30GB in 30 Minutes
- iTerm Tips and Tricks
- Managing the Mac Dock
- Triggers with Hot Corners
- Quick Camera
- 2019 iMac vs 2025 MacBook Pro
- Skitch
- Xcode Training Suggestion