
Managing the Mac Dock
Some tips and tricks to enhance your Apple Dock experience
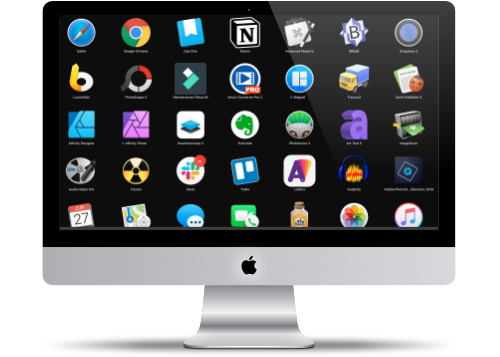
The Apple Dock is a great central resource to launch popular applications. Back in 2016, I wrote a blog post of what applications I have in my dock and a way to add spacers to the dock.
My Dock needs have changed a lot since 2016, today my dock contains:
Google Chrome, FireFox, BBEdit, Brackets, Transmit, Evernote, Dayone, Notion, iTerm, Affinity Designer, Affinity Photo, PhotoScape X, Snagit 2018, LaunchBar, Keyboard Maestro, Slack, and Apple Mail.

More Great Apple Doc Tricks
Here are some additional tips to manage your Apple Doc:
How to add a ‘Recent Applications’ folder to your Apple Dock
defaults write com.apple.dock persistent-others -array-add '{"tile-data" = {"list-type" = 1;}; "tile-type" = "file-tile";}'; killall Dock;
How to add a ‘Recent Items’ folder to your Apple Dock
defaults write com.apple.dock persistent-others -array-add '{"tile-data" = {"list-type" = 1;}; "tile-type" = "recents-tile";}'; killall Dock;
How to Highlight Hidden Applications
When you select to “hide application†the icon in the dock will be slightly transparent. So you know which Apps are hidden.
defaults write com.apple.Dock showhidden -bool yes; killall Dock;
Only Show Open Applications in Dock
When you only want to use the Dock to show active Applications. This is useful when your using LaunchPad or LaunchBar.
defaults write com.apple.dock static-only -bool true; killall Dock;
Trick with LaunchPad
How to easily bring your key applications to the first LaunchPad screen.
The Apple Launchpad is a one way many Macintosh users find and launch their applications.
Apple's Launchpad is where you can find most of your computer's applications. It shows the applications in a very similar layout that users see applications on their iPhone. You can access the Launchpad by clicking on the F4 key.
Organizing the First Page
Like the iPhone, the first page of the LauchPad should contain your most popular applications. This can be tricky because as you add applications, the icon can appear on different pages, If you have a lot of applications, it can be time-consuming to find the files.
Quickly Sorting Your Icons
The trick to getting icons to the first page is to search for the application first in LaunchPad. Once you find the application, click and hold to cause the icon to wiggle - similar to what you do on the iPhone.
Once it starts to wiggle move it to the left, and then keep it on the left side of the screen until you get to the first screen, then drop it where you want.
Simple but Effective
This is a much easier way to organize the first page of the LaunchPad. Do this for a few minutes, and presto your first screen becomes a productive way to access your applications.
Now you can get quick access to the top 35 applications on your computer. You may find that you don't need to have as many applications in your dock since you can easily get access to them in the Launchpad
PermalinkBrackets vs BBEdit
Highlighting some cool features of Brackets and BBEdit
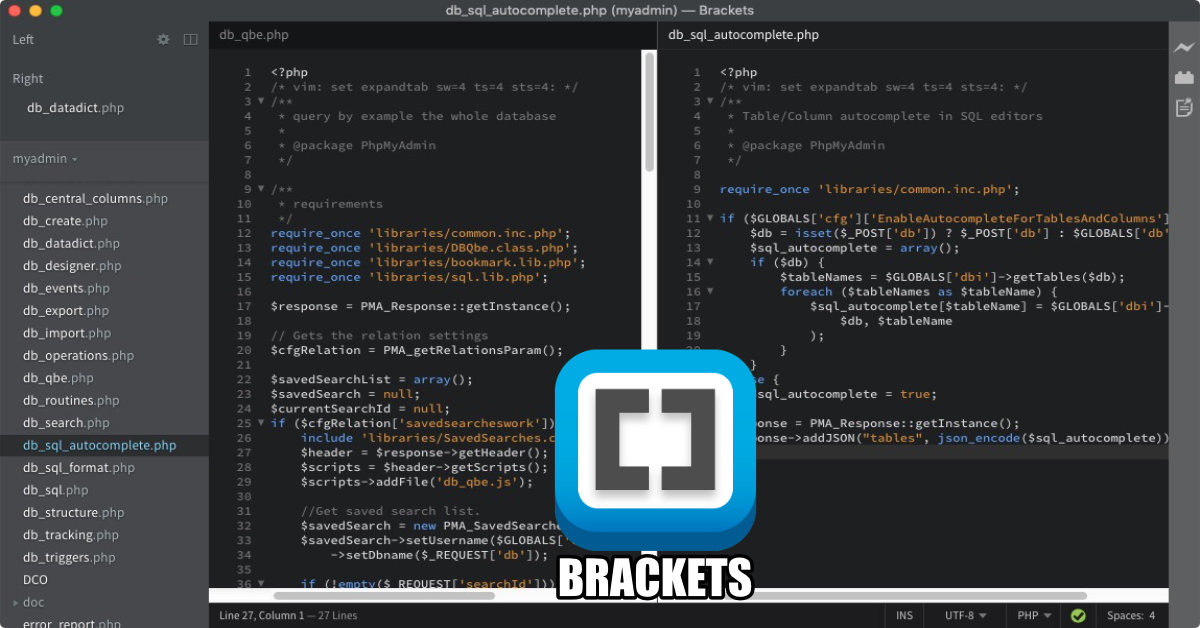
Adobe Brackets is becoming popular because it's open source and has a pretty active community writing some cool extensions. It's a pretty cool tool that makes it easy to edit code and text files.
Should you not upgrade BBEdit? Is it time to say goodbye to BBEdit?
While Brackets is pretty cool text tool, there's are some features that makes BBEdit still a strong resource for developers.
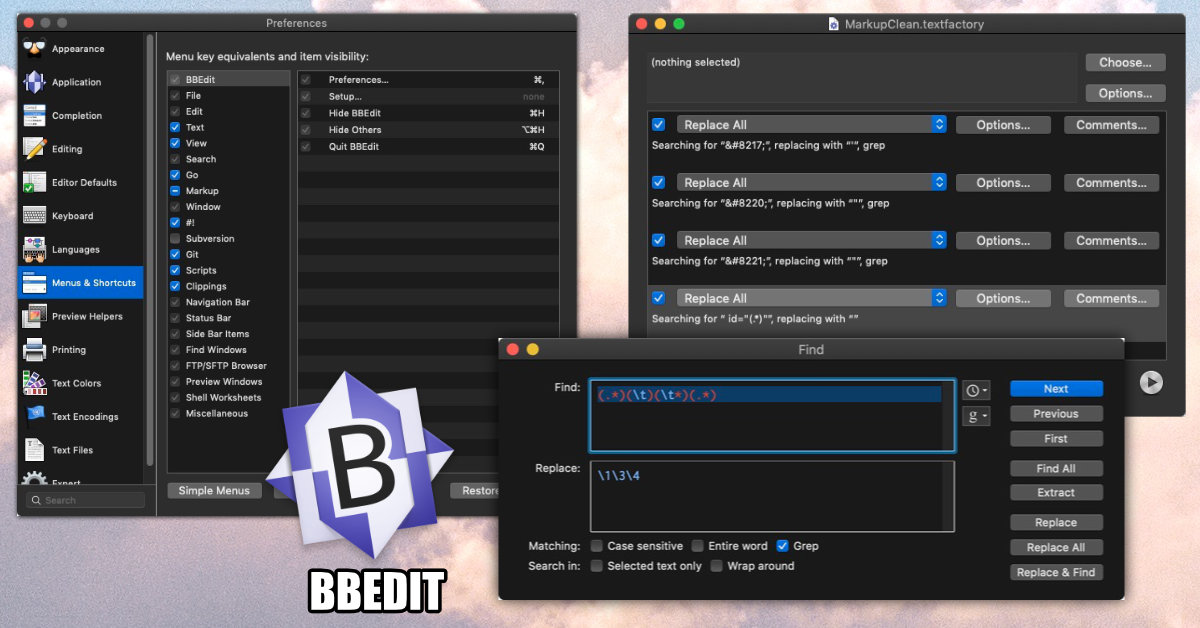
Some BBEdit Features
Three things I like about BBEdit
Text Factory - Ability to save and reuse Search/Replace commands.
This is essential when you need to run multiple search/replace over multiple files. Text Factory allows you to perform 27 different action types - including running Unix Filter which essentially gives you a lot more options. This is a great way to clean up a large number of files.
Ability to Add Shortcuts to any Menu Item - You can add your own short cuts to any menu item. Which is great when you want to easily add HTML to any elements. Customizing menu options is every complex in Brackets.
In addition, you can easily customize what menu items display. So if you're not using Subversion, Git, or various HTML elements, you can remove them. Now your not distracted from getting things done, This is all done in a standard preferences window. In Brackets, you need to edit a json file to make configuration changes.
Search and Replace - The search and replace functionality has a lot more functionality: such as Grep, Search in Select Text and case sensitive.
In addition, you can extract matches, so if you're looking at a log file and want to see only lines matching certain phrases - it's a lot easier to do in BBEdit than Brackets.
BBEdit saves previous searches so you can reuse them later. There's a "history based" search - saving the last 16 searches, or you can save a common pattern to reuse later.
Three things I like about Brackets
Split View - You can look at two files at once. This is great when your coding a new site and want to have a JavaScript or CSS file open up at the same time. While you can open two windows side-by-side in BBEdit, it's just easier to manager when everything is under one document window.
Emmet Support - Emmet makes it really easy to add new HTML. Emmet provides shortcuts to making HTML/CSS from classes and IDs. It's a must-have for anyone coding up a new HTML site.
There's lots of great short cuts to make coding HTML,CSS and JavaScript a whole lot easier
Multi Line Edit - You can make similar changes to multiple lines at the same time. This is convenient when your editing similar changes over multiple lines, for example adding a new CSS class to DIV.
PermalinkFilmora Audio Key Frame Marker
Adjust Audio files using Filmora Key Frame markers
Wondershare Filmora is a great video editor, certainly a step up from using iMovie. In version 9, you can now have multiple tracks - which is great when you want to mix sounds or clips to create some cool effects.
Audio Trick
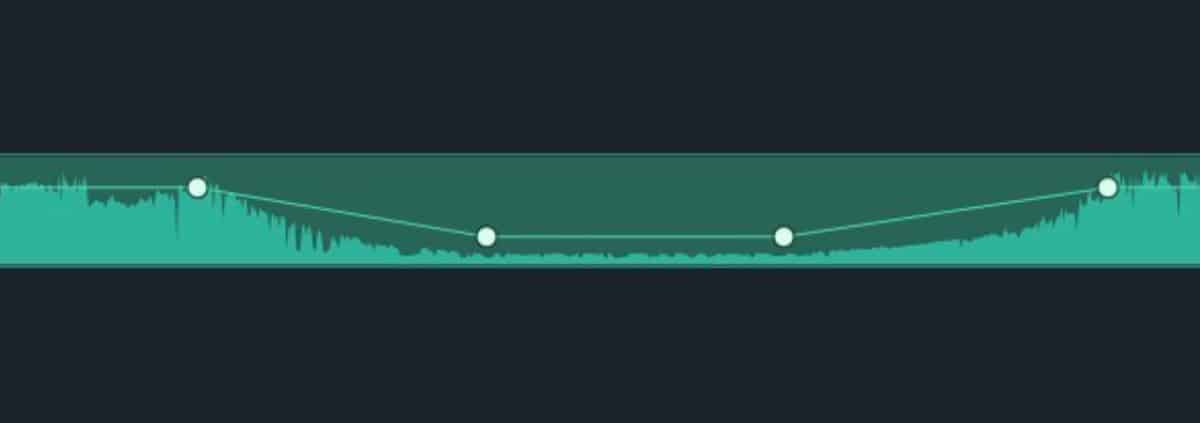
There's one trick that a bit hidden in Filmora and that's the ability to add Audio Key Frames. With Audio Key Frames you can alter a particular area of the sound track. For example, if parts of track 2 are too loud you can use Key Frames to lower the volume.
Here's an example of using Audio Key Frame in Filmora Wondershare 9:
Creating Audio Frames
Here's the simple way to add Audio Key Frames:
- To add a new Key Frame Marker simply find a spot on the audio timeline and Control Click.
- You should see a white dot underneath the mouse.
- To Remove, simply Control Click on the same spot
Tips on using the Key Frame
- You can add Key Frames wherever you want. You don't need to have to be listening to the audio to add the key frame markers
- You need at least four point to impact an area. If you use less, and make changes to the volume, it will impact the entire audio timeline.
- Adding multiple Key Frames can help add a nice smooth fade effect.
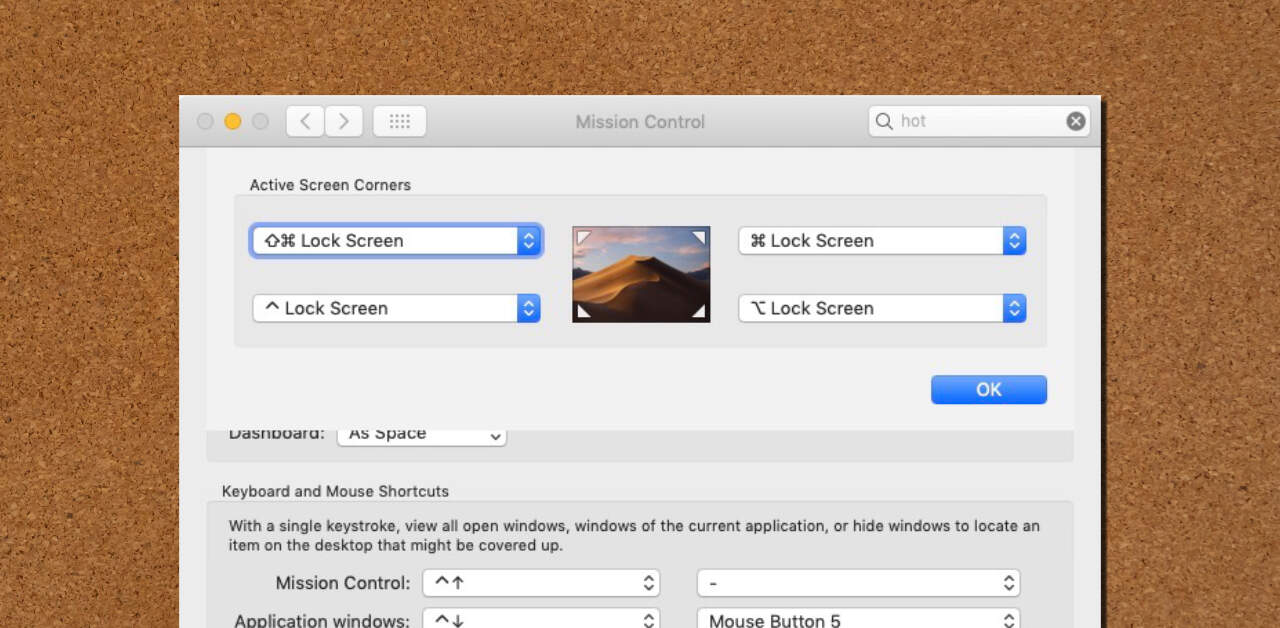
Triggers with Hot Corners
You can use Keyboard Triggers with Hot Corners
A few years ago, I wrote about an easy way to put your computer to sleep. The whole point of the post was to show that there was an easy way to put your computer to sleep.
The problem is that it's too easy. In fact, you may accidentally trigger the hot corner more that you would actually use it.
Fortunately you can add keyboard modifiers so that you couldn't accidentally trigger the hot corner.
Just a sample of different triggers to add.
Using the Modifiers
- Go to Apple Menu, then Preferences
- Select Mission Control
- Click on the Hot Corners button on the bottom left
- Click on any of the Active Screen Corners
- Then hold any combination of Shift, Control, Option, Command and you'll see the shortcut icon appear next to the actions.
- Select the action you want to use.
Now there's no reason to use all the hot corners to Lock your screen or any of the of ten actions that Apple provides.
Want more actions? Try BetterTouchTool or Keyboard Maestro. They have the ability to trigger more actions.
PermalinkDash
Get Macintosh App to make search documentation easier.
Dash is an Macintosh application that gives you local access to hundreds of documentations. You can download the documentations that you need and search for information.
Product Description
Dash is an API Documentation Browser and Code Snippet Manager. Dash stores snippets of code and instantly searches offline documentation sets for 200+ APIs, 100+ cheat sheets and more. You can even generate your own docsets or request docsets to be included.
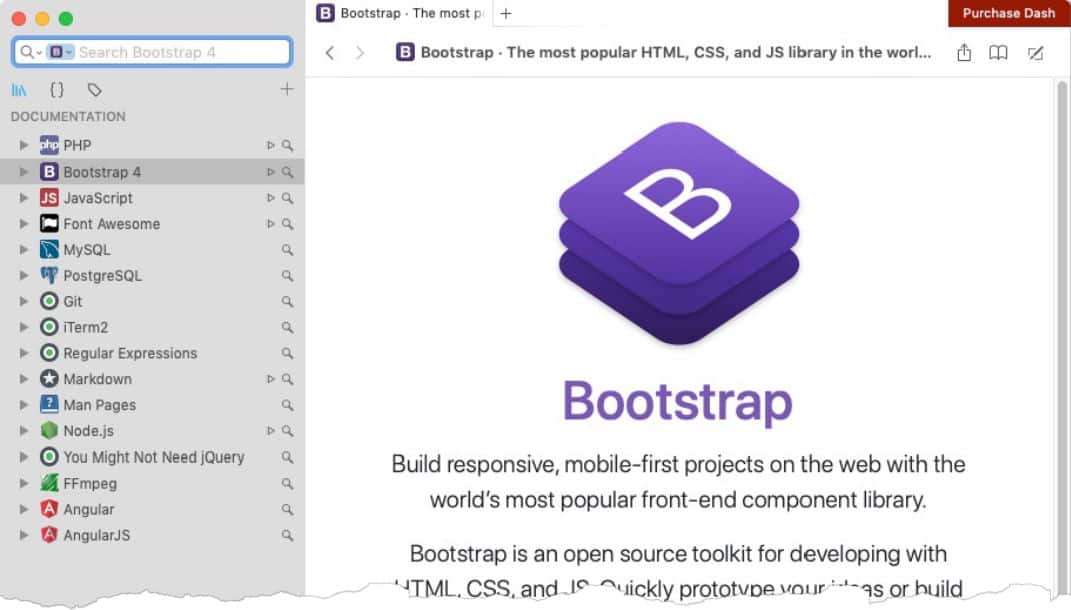
Dash is a useful tool to have when your heads down on a project and want to stay focus when searching for programing help.
Nine Things I Learned About Dash
- The trial version has all the features of the full version, just will get notified to purchase everyone in a while. The full version cost $29.99 for all computers. (Not a yearly cost!)
- You can bookmark pages, making it easy to switch between documentations. (For example you can easily switch between MySQL and Postgres date formatting.)
- I found it really easy to search the FontAwesome icon collection. When updating a website icon set. You can't copy/past content like you can on Font Awesome's website, but it's certainly easier to use when you want to quickly add an icon.
- There is a snippet functionality, but I found that Keyboard Maestro has a lot more functionality.
- You can integrate Dash with Bbedit. What this does is link the BBEdit's "Find in Reference" command to Dash. Simply select any command, such as "mysqli_connect" and then right click and select "Find in Reference." Dash will open up with that search query. It's a great way to find more information about a particular command.
- There is an iOS app, that allows you to have remote access to your desktop Dash app. This is handy because search queries made in the desktop will now show in the iOS. This makes it easier to minimize Dash on the desktop and read the documentation when trying to implement a code.
- Some of the Documentations have a "playground" area, where you can test the code using CodePen.
- With some Docsets, you can specify the version of the doc. For example, you can download MySQL 5,5, 5.6, 5.7 or 8.0 docsets. (Yes you can download all of them if you want.)
- You can learn a lot from reading some of the available docsets. For example, there's a Docset called "You Might Not Need jQuery" which shows you similar ways to perform certain jQuery tasks.
Cool Feature to Add
One feature that would be cool to have is a personal code library; sort of like the snippets, but noninteractive. Just a place to store re-usable code - and searchable like any other Docset.
PermalinkChalkboard in Art Text
Easily create the Chalk effect in Art Text 3
Art Text 3 is a pretty powerful text tool. I wanted to learn how to create a cool chalkboard effect, similar to designs that I saw in BeLight Letter application.
Belight claims that all the Letter designs can be done in Art Text 3. What they don't tell you is that it is just a bit tricky to make it work.

How I got it To Work
For the Background, I created a new background layer, Selected Fill, then Grunge, then gruge_29. If you want more realistic chalkboard backgrounds check out the Chalkboard Textures created by BMACHINA Labs. It cost $5 and you get 16 different variations.
For the Text, it's a bit tricky. There is a Chalk 2D Text, but it's only in Purple. (Not exactly sure why Belight did that.) So the secret is to create your own Brush in White so that it will have the chalk edge effect. (Note: I tried to figure out how to change the color from purple to while but the following steps is the only way I could get it to work.)
To get you started, download my 200 x 200 white image and add it to your collection:
- Download the Smoke Image that I created.
- In Art Text 3, go to Fill, then Shading, then pull down the menu to you see "Create a Material."
- Click the button that says, "Create from Image"
- Find the image that you just download.
- Then Click Apply
- Now the Smoke Image will appear in the "Custom Materials" section, ready to be applied whenever you want.
So now you can still select the Chalk 2D text as a Font Template, then switch it over to the Custom Shading that you added.
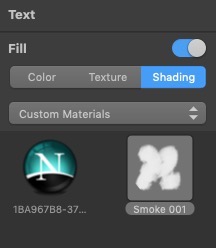
You can see the new "Smoke" Custom Fill.
Bonus: You can easily create different color smokes effects for different color chalk effects. Simply create a 200x200 image in Affinity Designer or Pixelmator and use the paint brush to create your own creative design. Don't forget to save it as a PNG file!
Permalinkiterm2 Status Bar
General information about iterm2 Status Bar
One of the neat features of the Iterm2 is the Status Bar. This is available in the 3.3.0 build - which is still in beta as of this post. The Status Bar is a thin bar at the top of the command window which displays useful information.
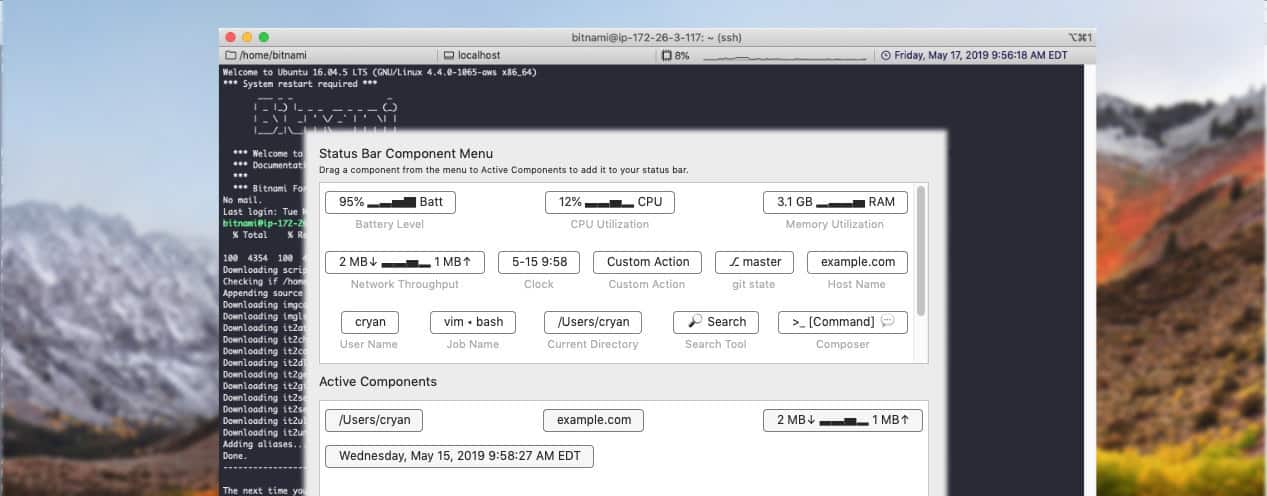
Status Bar Options
The status bar has 11 built in configurable components, with more sure to be added. You can configure the Text Color and Background color. These are the components in the current beta:
- Battery Level - How your laptop battery is doing.
- CPU Utilization - Is your computer getting maxed out?
- ​Memory Utilization​ - Check out your computer Memory Utilization before running a process.
- ​Network Throughput​ - If downloading files is taking a long time, perhaps its too much network traffic.
- Clock -System Clock, with a customizable date format settings. ( I like the following date format:
EEEE, MMMM d, yyyy h:mm:ss a z) - Custom Action - Easily Select any Menu item, great for those actions that you want to implement right away - such as 'Split Horizontally with a Profile' or
- git state - Once you install the command utility 'it2git,' you'll be able to always know what branch you're working on.
- Host Name - Show the current host that your working on
- User Name - What the current user is - useful if you do a lot of user switching.
- Job Name - What job/process is currently running.
- Current Directory - Avoid typing 'pwd' and instantly know where you are.
- ​Search Tool​ - Find something on the current window, and that search term stays as you do work in the window - so you can make 'Exceptions' or 'Errors' will stand out as they occur.
- Composer - Prep up a command before executing it. for example if you have a large SQL Statement but need to change a value in the middle, use this as a staging area before you execute it.
- Fixed-size Spacer - Add flexible amount of space between components.
- Empty Space - Just an empty space.
- Interpolated String - Show some custom text with variables (See the document on some ideas.)
- Call Script Function - Run a Python Function. (See the document on some ideas.)
Finding the Status Bar
If you're using iTerm2 3.3, you can enable the status bar using the Profile Preferences.
- From the iTerm2 Menu select Preferences (Or use the shortcut Command ,)
- Select Profiles
- (The Default one should be selected)
- Select the Session tab
- Enable the check box next to "Status bar enabled" (Its the last item under Miscellaneous)
- Then Configure your bar!
After you install the bar, you can right click on the bar and select 'Configure Status Bar.'
You will need to do this for each of your profiles that you have setup.
Installing Shell Integration
Some of the commands work better with installing Shell Integrations on remote servers. You can easily install the Shell Integration tool to get the most out of iTerm2:
- SSH to any box
- Select the iTerm Menu and then select "Install Shell Integration" which is the second to last menu item.
- You'll be prompt if you want to install the Utilities tool. The additional tools allow you to see inline images via 'imgcat' command, List files with a thumbnail view using the 'imgls' command., Upload files via the 'it2ul' command among other utilities. (Full details on the iTerm2 Documentation page.)
- You will need to login to try out the tools and see the effect of the Shell Integration.
Iterm2 is pretty powerful application and very useful to have if you doing a lot of shell commands on your Mac.
PermalinkDragThing
End of the Road for a Classic Macintosh App
There are very few Macintosh applications that have been around since System 7.5. BBEdit, StuffIt , DragThing are some that I can think of off hand. Many of these applications are still running strong.
Sadly DragThing is being discontinued. This is because Apple has decided to stop supporting 32-bit code. Perhaps you seen this alert when opening up some applications:
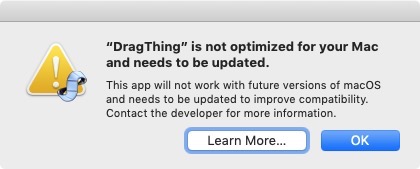
Apple has announced that it will no longer support 32-bit applications. This means in the next major release 32-bit applications will no longer work. This is very similar to when Apple started discontinue supporting Classic Apps from pre-OS X days.
DragThing Story Ends
After 24-years, the developers have decided to retire the application. According to the homepage message, this is because the application will have to be completely rewritten and they don't think there's any real value into that.
I haven't used DragThing, as I got use the Apple Dock, and other applications that made navigating the Macintosh easier. I thought it would be good to check out what I missed in DragThing all these years.
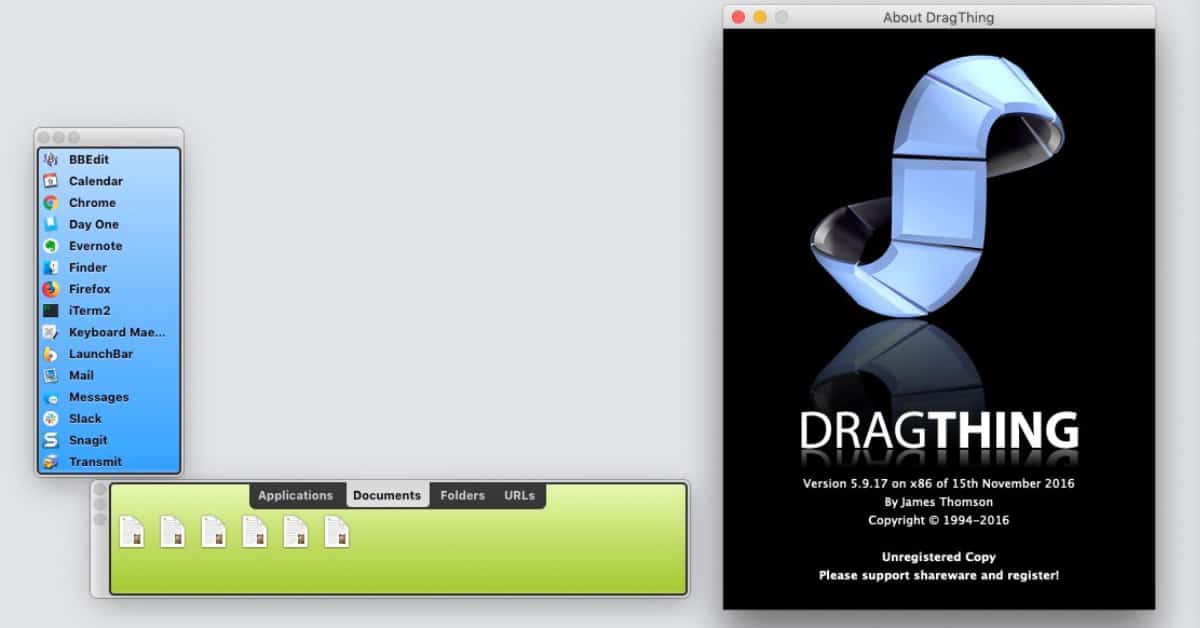
DragThing with the default setup
Five Things I learned Playing Around with DragThing
- DragThing first shipped on May 1st, 1995. ( Steve Jobs would return to Apple a couple of years later. )
- DragThing was shareware and cost $29 to register. (It's currently free since it's being discontinued.)
- You can create docs for different tasks, for example if you in the Photo Mode, you can have a row of all your Photo Apps. This actually makes it really easy to navigate between different apps. Especially if your using certain apps together only when doing tasks.
- There a ton of configuration options available. It's great to customize the dock anyway you want. The only thing I couldn't figure out is how to keep the dock always on top.
- The ability to add code snippet was cool, I like how LaunchBar handles Snippets. It's a lot easy to navigate and search for snippets.
Some Alternative Solutions
Along with LaunchBar, Tab Launcher Lite are good alternative solutions.
- LaunchBar - makes it really easy to switch around applications. You can easily running applications and switch around. I use the snippet feature all the time.
- Tab Launcher Lite - Allows you to groups applications into folders, much how DragThing works. So you can have folders for Dev, Design and Play.
Caboodle
Forget about Caboodle, not with the time or effort.
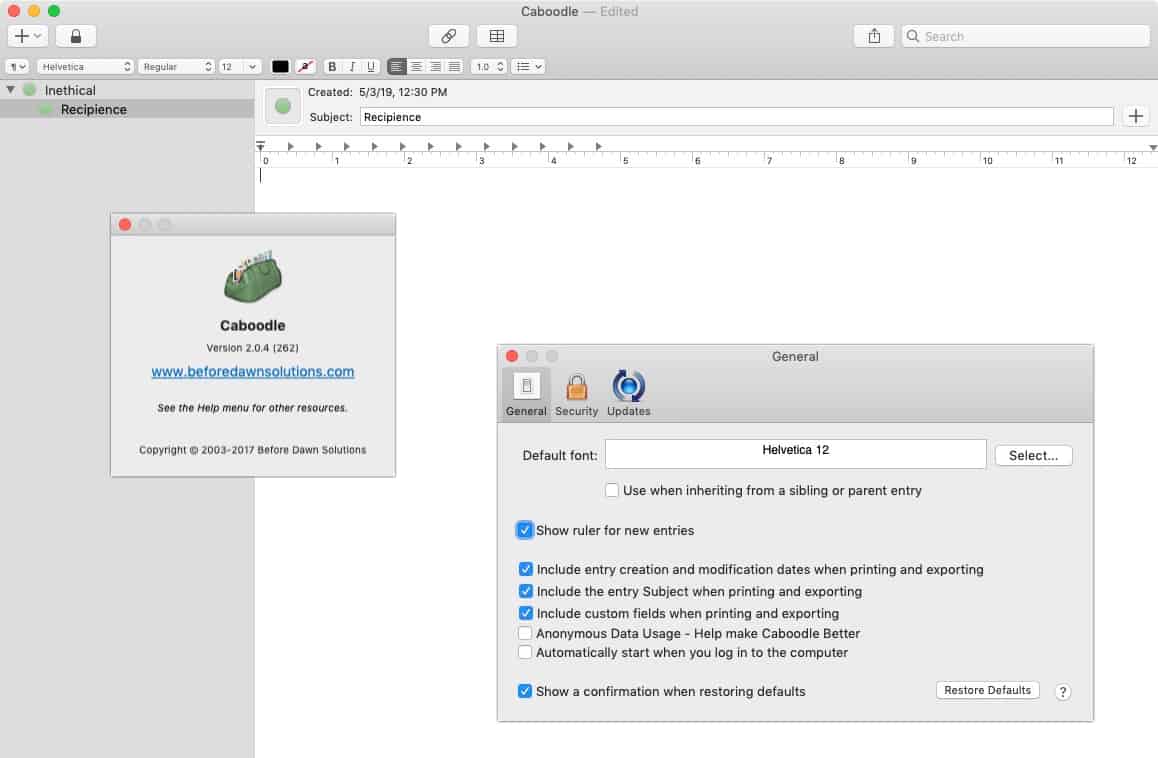
Last year I purchased Caboodle as part of Mac App Bundle from TNW Deals. This is one of 15 applications that I purchased for $25. I am a big EverNote fan, I didn't think Caboodle would replace it, but thought it would be nice to add to the collection. (I had to pick 15 apps to get the deal.)
I hadn't installed Caboodle when I purchased, so this week I thought I install it and see how it compares to Evernote and Notion.
Description from their Website
Caboodle allows users to store and organize varied bits of info. Everyone comes across information that they want to refer to later. Maybe gifts you've received or sent, product serial numbers, recipes, directions to someone's house, a photo of your pet, or anything else.
Eight Things I Learned About Caboodle
- Cost $12.99 and available in the Mac App Store, where as on the Before Dawn Solutions site it cost $19.99
- Last updated 1 year ago - current version is 2.0.4
- The menus/options seem very basic. There's no "back up to cloud" support, so if your computer crashes - oh well.
- Under the Help menu it references the #bdsCaboodle twitter handle with no tweets. (Strange for an account that is 2 years old.)
- Many of the other Help menus reference documents on the Before Dawn Solutions Website, and are broken links. (Frequently Asked Questions is one example)
- Caboodle is not AppleScript friendly - the application doesn't show up in the Script editor.
- You can create child entries, which is pretty cool.
- When you drag and drop an image into a note you can't resize it within the note.
- You can export notes in HTML, Plain Text, Rich Text and Microsoft Word
Worth Getting?
I would recommend not getting Caboodle. The application appears to be abandoned. There are many good alternative solutions available.
PermalinkAbout
A Mac veteran since 1989, I'm here to share my experience with tips and tricks every Friday. Witnessing the evolution of Mac software and hardware firsthand, I've gained a deep understanding of how these machines work and can help you troubleshoot any issues that may come up.
Check out all the blog posts.
Blog Schedule
| Thursday | Business |
| Friday | Macintosh |
| Saturday | Internet Tools |
| Sunday | Open Topic |
| Monday | Media Monday |
| Tuesday | QA |
| Wednesday | Veed |
Other Posts
- Mastering Final Cut Pro Audio: A Comprehensive Guide to 49 Logic Effects
- Tilt-shift
- Always view Image dimensions in Finder
- SmartMockup
- Wondershare FIlmora 13
- Brackets vs BBEdit
- Luminar AI Crash
- PhotoScapeX 4.0
- Transmit 5
- Advantage of Snagit 2020 over MonoSnap
- SoundConverter for Alexa
- Capto
- Best Macintosh Apps
- LaunchBar Actions
- Test Audio Input Quality