
Using UNIX in BBEdit
Expand the capabilities of BBedit
Friday - BBEdit UNIX
BBEdit is a powerful text editor for macOS that offers a wide range of features, including the ability to use Unix commands in Text Factory. This can be a great way to automate tasks and perform complex text transformations.
To use UNIX commands in BBEdit, you first need to create a Text Factory. To do this, go to the Text menu and select New Text Factory. In the New Text Factory dialog box, select the "Run Unix Filter" option from the Type drop-down menu.
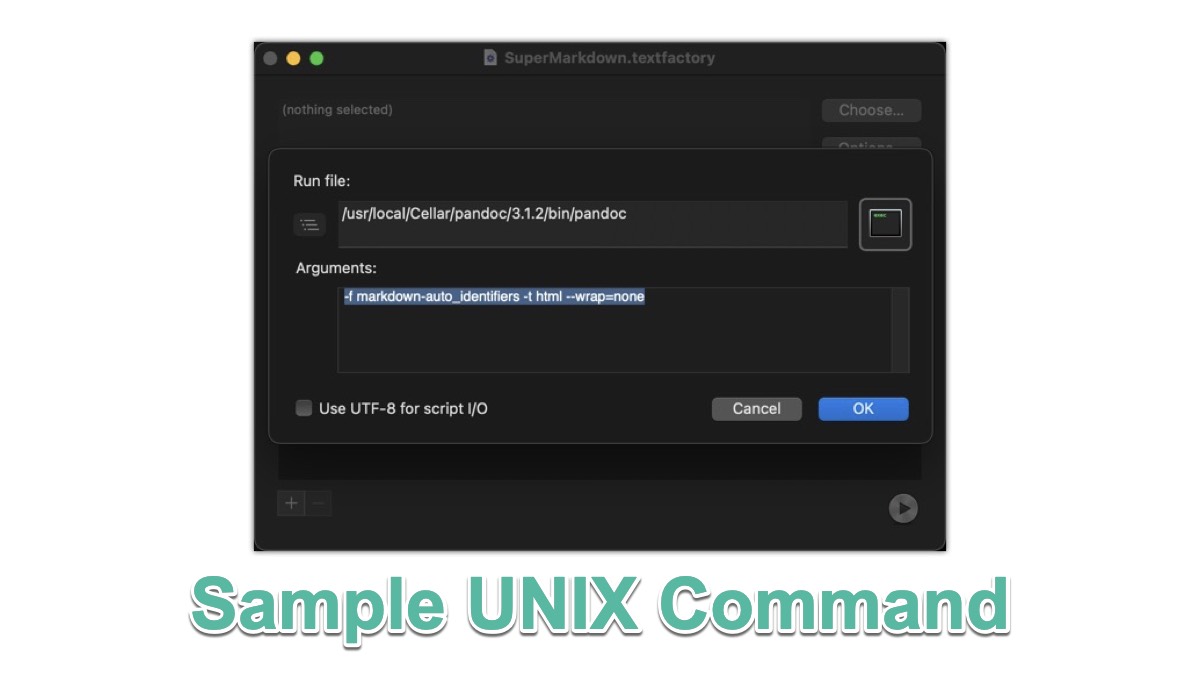
Click on the Option button to the right of the "Run Unix Filter" meni, you can enter your UNIX commands in the text box. You can use any valid UNIX command, including grep, sed, and awk.
When you are finished entering your commands, click OK. Once your done, use Command - S to save the change. You should save this in the Application Support > Text Filter directory.
Your Text Factory will now be available in the Text menu.
Using Text Factory
To use a Text Factory, simply select it from the Text menu. BBEdit will run the UNIX commands in the Text Factory and replace the current document with the output.
You can also use TextFactories to perform complex text transformations. For example, you could use a Text Factory to convert all of the links in a document to a different format, or to remove all of the comments from a document.
TextFactories are a powerful way to automate tasks and perform complex text transformations in BBEdit. If you are not familiar with UNIX commands, there are many resources available online that can help you get started.
Things I Learned using Unix Command in Text Factory
In the "Run File" text box, make sure to put the complete path of the UNIX command you want to run. (Unless the command is available system wide.)
The arguments should contain everything to the right of the application. No parameters should be in the "Run File" text box.
If you have multiple UNIX commands that you use, you are better off just adding them as different "Run Unix Filter" commands.
PermalinkXXD
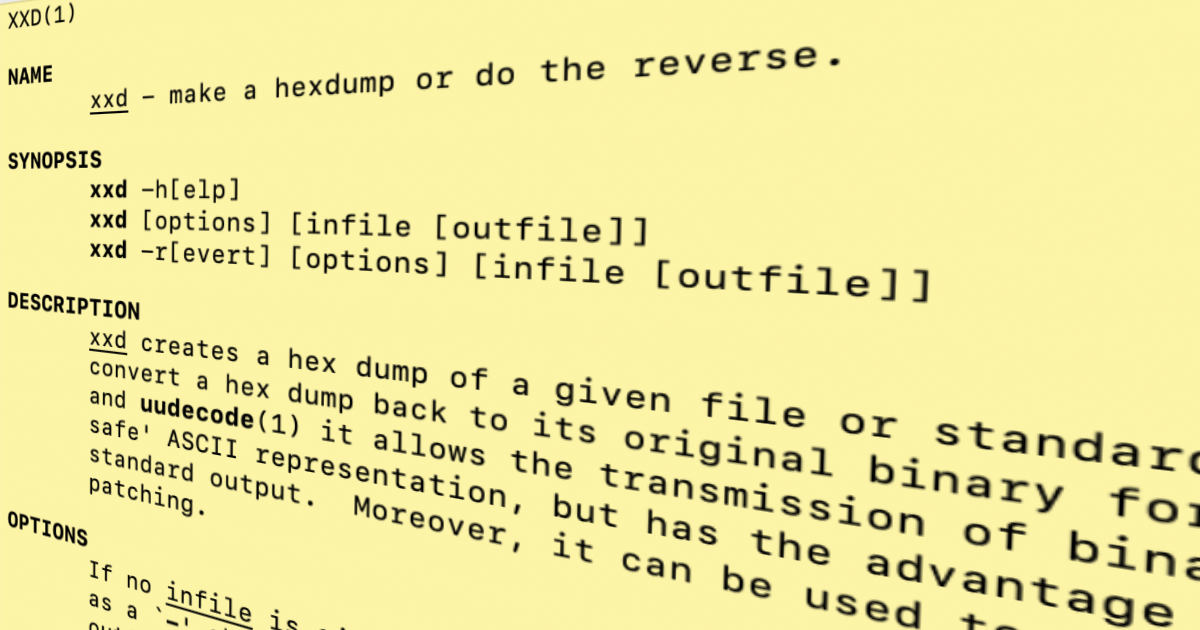
Command-line tool that is used to create or edit hexadecimal dumps of binary data.
xxd is a versatile tool that can be useful for a variety of purposes, even in 2023. Here are some examples:
- Debugging: xxd can be used to inspect binary files and debug issues related to their content. The hex dump output generated by xxd can be useful in identifying specific byte sequences that may be causing problems.
- Data analysis: xxd can be used to analyze the content of binary files or network traffic by generating a hex dump output. This can be useful for understanding the structure and format of the data being analyzed.
- Forensics: xxd can be used in forensic investigations to analyze the contents of hard drives, memory dumps, or network traffic. The hex dump output generated by xxd can be used to identify patterns or anomalies that may be relevant to the investigation.
- Encoding and decoding: xxd can be used to convert binary data to and from hex-encoded text. This can be useful in scenarios where data needs to be transmitted or stored in a human-readable format.
Overall, xxd remains a powerful and widely-used tool for working with binary data, and is likely to continue to be used in various contexts in 2023 and beyond.
Example
Here is an example of using xxd:
Suppose we have a file named "example.txt" with the following content:
Hello, World!
We can use xxd to generate a hex dump of this file by running the following command in the terminal:
xxd example.txt
This will produce the following output:
00000000: 4865 6c6c 6f2c 2057 6f72 6c64 210a Hello, World!.
This output shows the hex representation of each byte in the file, along with the corresponding ASCII characters on the right. The first column shows the byte offset in the file, while the second column shows the hexadecimal representation of the bytes. The third column shows the ASCII representation of the bytes, with non-printable characters represented as dots (.).
PermalinkRefurbished Macintosh
Get a Refurbished Computer to Save some money
If you’re in the market for a new Mac, you may want to consider purchasing a refurbished model instead of a brand-new one. Refurbished Macs can offer various benefits, including cost savings and environmental benefits. In this post, we’ll explore some of the reasons why you might want to consider a refurbished Mac over a brand-new one.
Cost savings
One of the primary benefits of purchasing a refurbished Mac is the cost savings. Refurbished Macs are typically sold at a lower price point than brand-new models, making them an attractive option for budget-conscious shoppers. Depending on the model and condition, refurbished Macs can often be found for hundreds of dollars less than their brand-new counterparts.
Like-new condition
Contrary to what some may think, refurbished Macs have not simply used computers that have been wiped clean and resold. In fact, refurbished Macs are often in like-new condition, having been thoroughly inspected, tested, and restored to their original factory settings. Many refurbished Macs come with a warranty or guarantee, providing peace of mind and protection for your investment.
Environmental benefits
Purchasing a refurbished Mac can also have positive environmental benefits. By opting for a refurbished model, you are giving new life to a previously used computer, reducing the amount of electronic waste in landfills. Additionally, purchasing refurbished electronics helps to conserve the natural resources that are required to manufacture new products.
Availability of older models
If you’re looking for a specific model of Mac that is no longer being produced, a refurbished model may be your best bet. Refurbished Macs are often available in a wider range of models and configurations than brand-new models. This can be particularly useful if you need a specific model for work or personal use.
In conclusion, purchasing a refurbished Mac can offer a variety of benefits over a brand-new model. From cost savings to environmental benefits to the availability of older models, there are many reasons why a refurbished Mac may be the right choice for you. Before making your next Mac purchase, consider browsing refurbished options to see if a model fits your needs and budget.
PermalinkLetters
Using Letters with Affinity Designer and Pixelmator
Text is an essential element of any graphic design project. It can be used to convey information, create a mood, or simply add visual interest. However, creating beautiful text effects can be time-consuming and difficult, especially if you don't have any design experience.
That's where Belight Software Letters comes in. Letters is a powerful text design app that makes it easy to create stunning text effects in minutes. With Letters, you can choose from a variety of pre-made templates, or create your own custom designs from scratch. You can also adjust the text color, font, size, and position, as well as add effects like shadows, glows, and textures.
Once you've created your text design in Letters, you can export it as an image or a vector file. This means that you can use your text design in any other graphic design app, such as Affinity Designer or Pixelmator Pro.
![]()
Affinity Designer is a powerful vector graphics app that's perfect for creating logos, illustrations, and web designs. With Affinity Designer, you can easily import your text design from Letters and add it to your project. You can then resize, rotate, and transform the text as needed.
Pixelmator Pro is a powerful raster graphics app that's perfect for editing photos and creating graphics for social media. With Pixelmator Pro, you can easily import your text design from Letters and add it to your project. You can then adjust the color, contrast, and brightness of the text, as well as add effects like blurs and filters.
By combining Belight Software Letters, Affinity Designer, and Pixelmator Pro, you can create stunning graphics that would be impossible to create with any one app. So if you're looking for a powerful and versatile text design solution, be sure to check out Belight Software Letters.
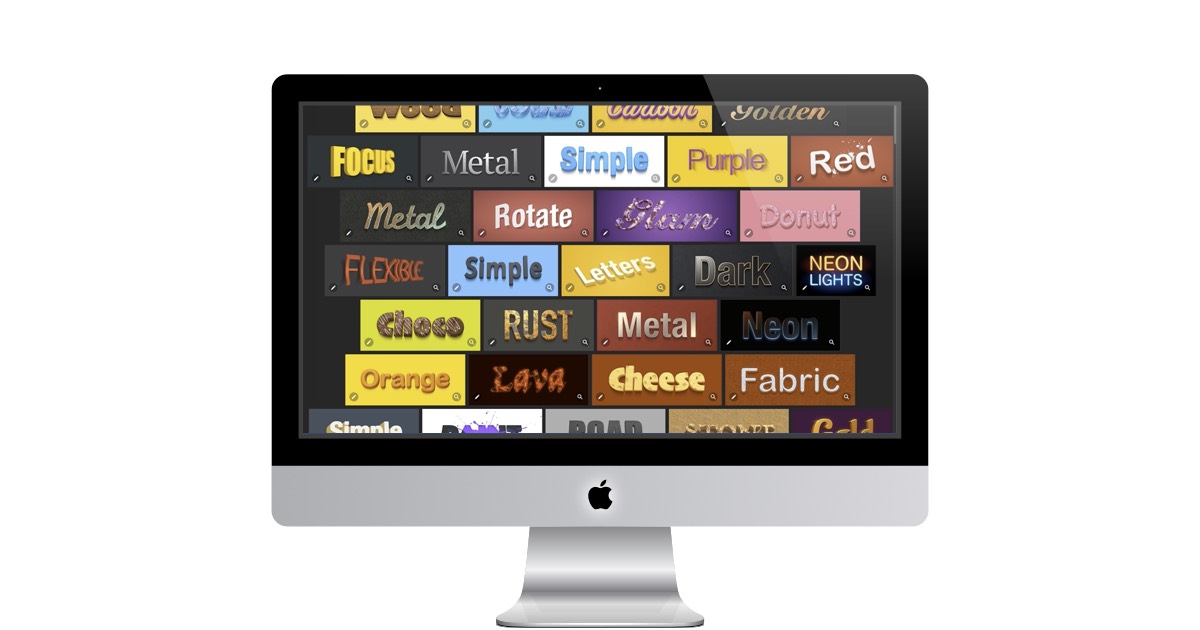
Belight comes with a lot of great designs right out of the box!
When you download Letters, you'll see a lot of great designs to pick from. There are great paid designs too, I personally like the "Artistic Stamps" collection with the chalkboard designs.
Here are some additional tips for using Belight Software Letters, Affinity Designer, and Pixelmator Pro to create awesome graphics:
- Use a variety of fonts and sizes to create visual interest.
- Don't be afraid to experiment with different effects.
- Use a consistent color scheme throughout your design.
- Export your text design in a high-resolution format.
- With a little practice, you'll be creating stunning graphics in no time!
BBedit's Find Scrap
Enable the System Wide Find Scrapbook
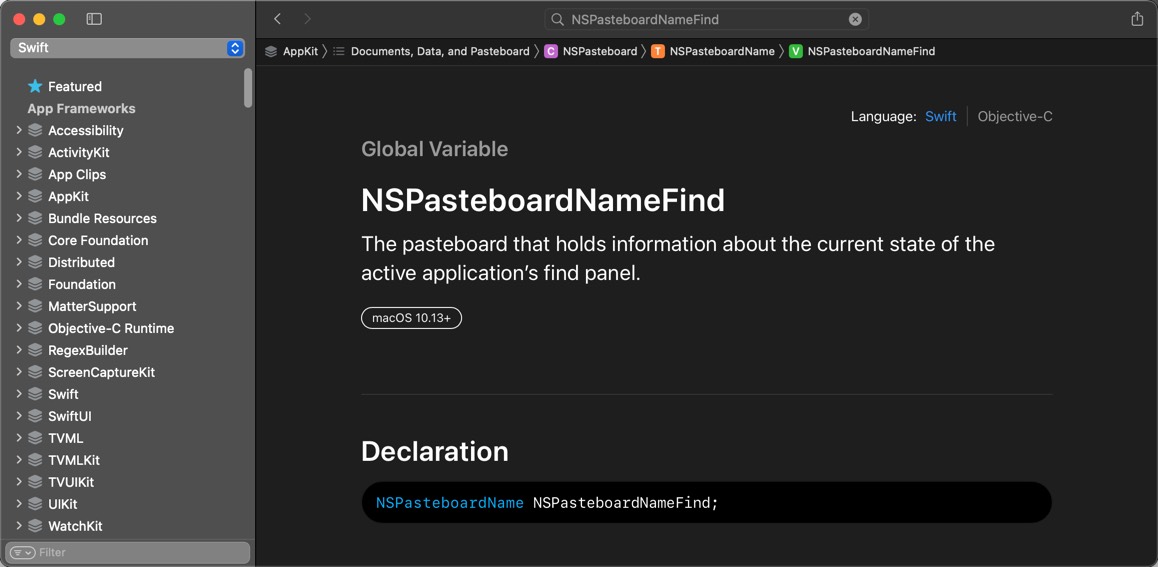
If you're a regular developer of macOS, you may have heard of NSPasteboardNameFind. This pasteboard holds information about the current state of the active application's find panel. While this may seem like technical jargon, understanding what NSPasteboardNameFind does can help you use macOS more effectively and efficiently.
What is NSPasteboardNameFind?
NSPasteboardNameFind is a system-level pasteboard that is used by macOS to store information about the active application's find panel. This includes the search string, search options, and other settings related to the search functionality.
How does NSPasteboardNameFind impact regular users?
For regular users, NSPasteboardNameFind has a few important implications. Firstly, it means that you can easily copy and paste search terms between different applications. For example, if you're searching for a particular term in Safari and want to use the same search term in another application like TextEdit, you can simply copy the search term from Safari and paste it into the find panel of TextEdit.
Finally, NSPasteboardNameFind allows developers to build more powerful search functionality into their applications. By leveraging the information stored in NSPasteboardNameFind, developers can provide users with a more seamless and integrated search experience.
BBEdit "Find Scrap"
There are several advanced features available in BBEdit. One of them is the option of turning on auto-filling for NSPasteboardNameFind when you open the Find dialog box. There is, however, a growing number of users who do not wish to see the same items that they searched for in Safari in the Find field of BBEdit that they searched for in Safari. That is why BBEdit defaults to not showing the feature.
BBEdit calls the NSPasteboardNameFind "Find Scrap" in the documentations.
The Find Scrap option prevents the cached information of Safari from automatically populating the Find field, enabling users to search for something new without having to manually delete the previous information that has been cached.
By default, NSPasteboardNameFind in BBEdit is off. If you wish to turn it on:
Open up Terminal, or BBEdit Shell Worksheet and type in:
Then restart BBEdit for the new setting to take place.
In conclusion, NSPasteboardNameFind is an important system-level pasteboard that enables a variety of search-related functionality in macOS. By understanding how NSPasteboardNameFind works, regular users can take advantage of features like copy and paste search terms and saving and recalling search settings. Whether you're a power user or just getting started with macOS, knowing about NSPasteboardNameFind can help you use your Mac more effectively.
PermalinkLock Transparency in Pixelmator Pro
Avoid painting on the transparent part of the image
Pixelmator Pro is an excellent image editing software that provides powerful tools to enhance your images. One of the many features of Pixelmator Pro is the ability to preserve transparency on images. By doing so, you can maintain the original background of your image while editing it. In this blog post, we will discuss how to preserve transparency on images in Pixelmator Pro.
Note: In Affinity Designer/Photo this is call Protect Alpha.
Why Do This?
I have been trying to find a way to change the black color of a text image from black to white, and I thought that the best way to do this would be to use the paint brush, but I only wanted to paint the text and none of the background.
The best way would be to lock the transparency and then paint away. Locking the transparency will allow you to only paint the text and not the background, because the paint brush will be confined to the boundaries of the text. This will make sure that the text is painted, while the background is left untouched.
Enabling Transparency
Here are the steps to lock the transparency on a layer in Pixelmator Pro.
Option 1:
- Select a Layer
- In the top menu bar, select Format, then Image then "Preserve Transparency"
![]()
Option 1
Option 2:
- Select a Layer
- Right-click on the layer and select "Preserve Transparency"
![]()
Option 2
Test Audio Input Quality
How to test your Microphone to see if it works
Macintosh users have a powerful tool at their disposal for testing the quality of their audio input - Quicktime. This versatile application, which comes pre-installed on every Mac, can be used to record and playback audio, making it an ideal choice for testing and fine-tuning your microphone settings.
Here's how you can use Quicktime to test your audio input quality:
Step 1: Open Quicktime
To open Quicktime, click on the Spotlight Search icon (the magnifying glass in the top right corner of your screen) and type "Quicktime". Click on the Quicktime icon when it appears.
Alternatively, you can find Quicktime by navigating to your Applications folder and clicking on the Quicktime icon.
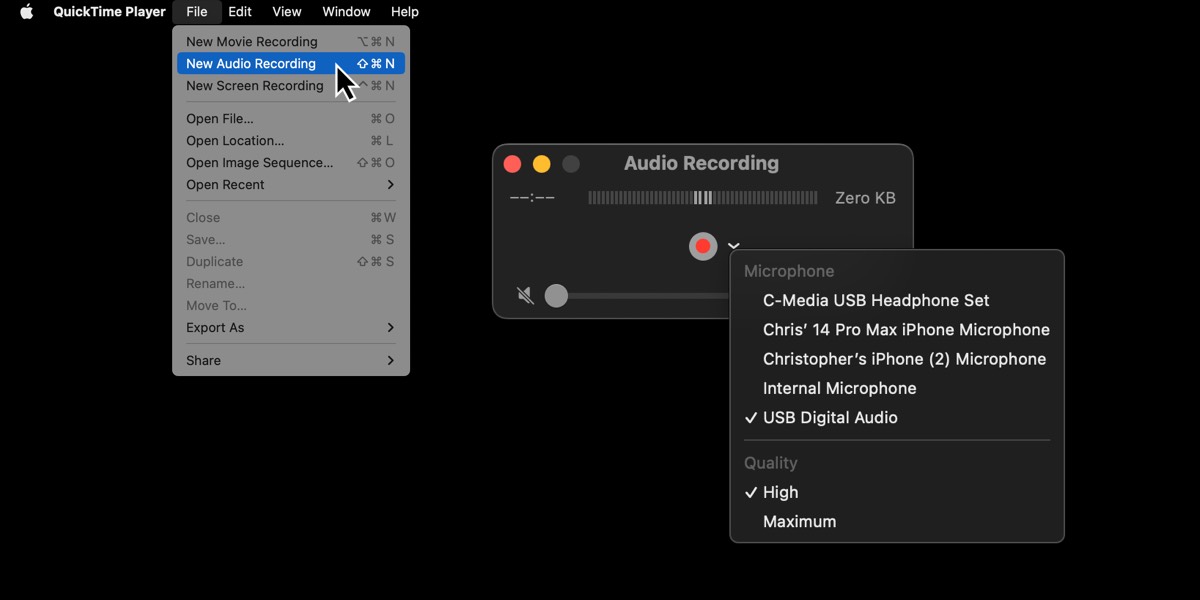
Step 2: Start a new audio recording
Once Quicktime is open, click on the "File" menu at the top of your screen and select "New Audio Recording". This will open the audio recording interface.
Step 3: Adjust your microphone settings
Before you begin recording, make sure your microphone is properly connected and set up. To adjust your microphone settings, click on the small arrow next to the record button in the Quicktime window. This will display a dropdown menu with options for selecting your input device and adjusting input volume.
Step 4: Start recording
When you're ready to begin testing your audio input quality, click the red record button in the Quicktime window. Speak or make noise into your microphone for a few seconds, then click the stop button.
Step 5: Play back your recording
To listen to your recording, click on the play button in the Quicktime window. This will play back the audio you just recorded, allowing you to hear the quality of your microphone input.
Step 6: Make adjustments as needed
If you're not happy with the quality of your audio input, you may need to make adjustments to your microphone settings. Try adjusting the input volume or selecting a different input device to see if this improves the quality of your audio.
Repeat steps 4-6 until you're satisfied with the quality of your audio input.
In conclusion, Quicktime is a powerful tool for Macintosh users who want to test the quality of their audio input. By following these simple steps, you can quickly and easily record and playback audio to fine-tune your microphone settings and ensure that your audio is crystal clear.
PermalinkApple Pages vs Google Docs
Great Features That I Like
When it comes to productivity tools, there are two big players in the game: Apple Pages and Google Docs. Both offer powerful word processing features, but they have their differences that set them apart. In this blog post, we will take a look at some of the key differences between Apple Pages and Google Docs.
Collaboration
One of the biggest differences between the two tools is collaboration. Google Docs was designed with collaboration in mind, making it easy for multiple people to work on the same document at the same time. Users can see changes in real-time and leave comments for others to see. Apple Pages, on the other hand, is a bit more limited in terms of collaboration. While it does offer the ability to share documents with others, it is not as seamless as Google Docs.
Integration with Other Apps
Another area where Google Docs shines is in its integration with other apps. Google Docs is part of the larger Google Workspace suite, which includes tools like Gmail, Google Drive, and Google Meet. This integration makes it easy to switch between different apps and work seamlessly across them. Apple Pages, on the other hand, is primarily a standalone app, which can make it more difficult to integrate with other tools.
Templates
When it comes to templates, Apple Pages has the edge. It offers a wide variety of professionally designed templates for everything from resumes to newsletters. Google Docs also offers templates, but they tend to be more basic and less customizable.
Design Features
In terms of design features, Apple Pages has the upper hand. It offers a wider range of typography options, as well as more advanced design tools like layering and opacity controls. Google Docs, while it does offer some basic design features, is primarily focused on text-based documents.
Three Things I Like About Pages
Quick Notes - Apple Pages make it easy to take quick notes and save them to your Cloud Drive. This makes it easy to access those notes from any device, at any time, from anywhere. The notes can be quickly jotted down, edited, and organized in folders, making them easy to find later. You can even sync your notes across all of your devices so that you have the latest version of the notes. This makes it easy to keep track of ideas, tasks, and to-do lists.
PDF Creation - It’s really easy to save a Pages document to PDF with just a few clicks. You can even customize the PDF to include options such as password protection, bookmarks, page labels, page scaling, page orientation, page cropping, and smart annotations. You can also add metadata to the PDF, including title, author, subject, and keywords. Additionally, you can specify the initial view settings, such as magnification, page layout, and page transition effect.
Toolbox for Pages is a third-party extension that gives you access to a variety of templates for all your design needs. With this toolbox, you can easily create professional-looking Infographics, Diagrams, Logos, Elements, and more with a few simple clicks. With the help of this toolbox, you can quickly create high-quality designs that will make your Pages documents look stunning.
Three Things I Like About Google Docs
Great for quick documents - When I need to quickly put together a document, my go-to solution is Google Docs. It is a powerful and user-friendly platform that allows me to create, edit, and collaborate on documents with ease. With its straightforward interface and various tools, I can quickly format and structure my document, add images, and share it with others. I can also access and edit my documents from any device, making it a convenient and reliable choice.
Lots of Extensions! There are 100+ extensions to choose from. These expand the capabilities of Google Docs. You can add GPT-3 API to print your own labels to export Docs to Markdown format. This allows you to leverage the power of the GPT-3 API to generate text in a format optimized for publishing on the web. It also makes it much easier to export documents from Docs to other formats, such as Markdown.
Bullet Points! Google Docs does a better job with list items. The bullet points and sub-points looks so much better in Google Docs than in Apple Pages. Google Docs offers more customization options when it comes to bullet points and sub-points, which allows users to create more visually appealing lists. For example, Google Docs allows users to choose from different shapes, sizes, and colors of bullet points, while Apple Pages only offers one size and color of bullet points.
Pricing
Finally, there is the matter of pricing. Google Docs is free for personal use, and there are paid options for businesses that want to use the full Google Workspace suite. Apple Pages, on the other hand, is only available on Apple devices and requires an Apple ID. While it is free for Apple users, it is not available for other platforms.
In conclusion, both Apple Pages and Google Docs offer powerful word processing features, but they have their differences. Google Docs excels in collaboration, integration with other apps, and pricing, while Apple Pages offers more advanced design features and a wider range of templates. Ultimately, the choice between the two tools will depend on your individual needs and preferences.
PermalinkAppleScript Sample
Getting the current active URL in Google Chrome
AppleScript is a scripting language that automates tasks on Apple devices. It is a powerful tool that can control various applications on your Mac. In this blog post, we will discuss how to use AppleScript to get the URL of the current tab in Google Chrome.
Getting the URL of the current tab in Google Chrome
Here is a sample AppleScript that can be used to get the URL of the current tab in Google Chrome:
tell application "Google Chrome"
	set sedCommand to "s/"- Jira"//g"
	set broswerurl to get URL of active tab of first window
	set browsertitle to get title of active tab of first window
	set myecho to "echo " & browsertitle & " | sed `" & sedCommand & "`"
	set mytitle to do shell script "echo " & browsertitle & " | sed " & sedCommand & ""
	set the clipboard to "[" & mytitle & "](" & broswerurl & ")"
end tell
This is an excellent piece of code because it filters out the word "Jira" when you are getting the current Jira Issue.
This works for Slack, but you can easily modify the "set clipboard" to whatever output that you want.
PermalinkCreating Round Corners on Images
Using Affinity Designer or Affinity Photo
Creating round corners on images is a common design technique that can add a professional and polished look to your designs. In Affinity Designer, there are several ways to create round corners on images, each with its own advantages and disadvantages. In this blog post, we'll explore the simple method for creating round corners on images in Affinity Designer.
Corner Tool
The Corner Tool is a powerful and precise way to create round corners on images in Affinity Designer. Here's how to use it:
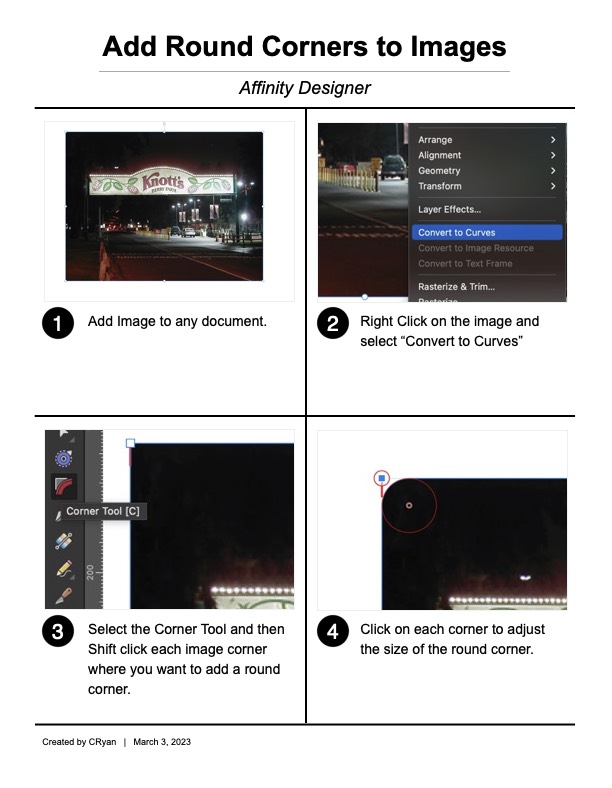
- Open your image in Affinity Designer.
- Select the image layer.
- Convert the image layer to Curves. Right-click on the image and select "Convert to Curve" or simply use the Command Return shortcut.
- Go to the toolbar and select the Corner Tool. (Use the keyboard shortcut: C)
- Click and drag the tool over the corners of the image to create round corners.
- Adjust the radius and shape of the corners as needed.
- You now have an image with round corners.
About
A Mac veteran since 1989, I'm here to share my experience with tips and tricks every Friday. Witnessing the evolution of Mac software and hardware firsthand, I've gained a deep understanding of how these machines work and can help you troubleshoot any issues that may come up.
Check out all the blog posts.
Blog Schedule
| Thursday | Business |
| Friday | Macintosh |
| Saturday | Internet Tools |
| Sunday | Open Topic |
| Monday | Media Monday |
| Tuesday | QA |
| Wednesday | Veed |
Other Posts
- BBEdit Randomize Order
- NSMenuItem
- New 27-inch iMac
- Removing Color in Affinity Photo
- 2018 Black Friday Watch
- Location Base Smart Albums in iPhoto
- Swift Publisher Labels
- BBEdit 14
- Luminar AI
- Garageband
- Wondershare Filmora's Auto Reframe
- Classic Macintosh: Sherlock
- Snagit 2020
- Skitch and Evernote
- Master Ocenaudio Filters: Unlock the Power of Professional Audio Editing