
Image Conversion Shortcut
Quickly resize convert HEIC image to JPG and
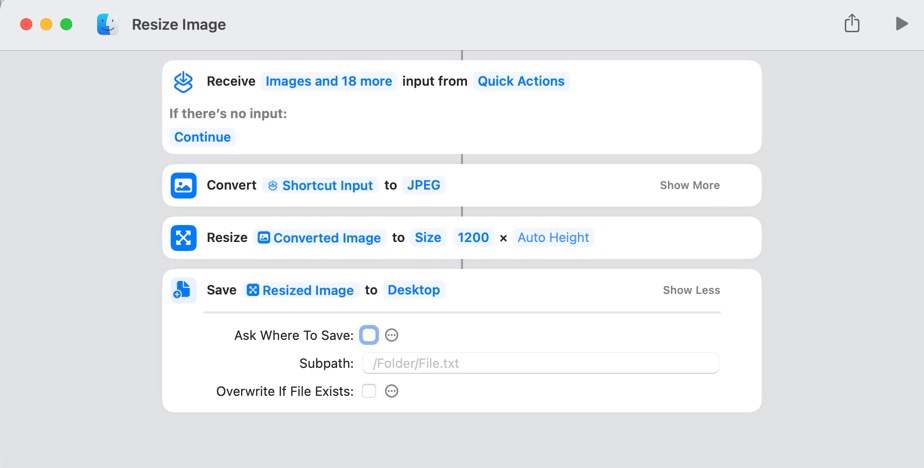
This week, I conducted offline testing, which required me to send pictures illustrating the issues I encountered. I transferred the photos via Airdrop and then used Photoscape X to change the image size and convert the format from HEIC to JPG. Although this method worked, I believe there might be a more efficient process.
Apple Short Cuts
I decided to utilize Apple's ShortCuts application to create a new Services command to perform the action. Here's the quick action that I came up with:
Why this is Practical
In macOS Monterey (version 12), there was a new shortcut added to the Services menu called "Convert Image." This makes it easy to convert an image to JPEG format. I tried that but it didn't resize the image and the file extension became JPEG which I didn't like.
Photoscape has a batch process but I would need to run the application every time, it's so much quicker to just right click and convert the image.
Using the Apple Short Cut makes the process so simple and easy. I am just uploading the files to Teams/Slack so I don't really care about the quality. If quality did mater to a particular photo, I know to go to another app to better convert the image.
PermalinkFive Finder Search Attributes
Fun Ways to Search in the Finder
Finder's search bar is like a superhero for finding files! It lets you ditch the endless scrolling and jump straight to what you need.
Forget just searching by file name. We're going to explore some hidden superpowers built right into Finder search. These are like secret filters that help you narrow down your search and snag those files in a flash.
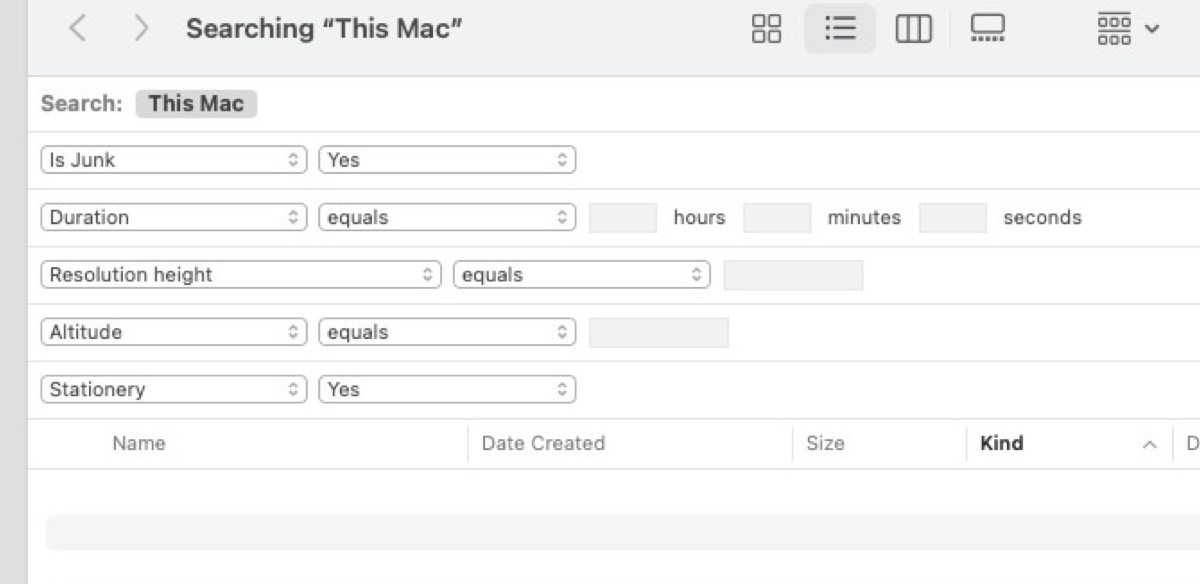
Five Finder Search Attributes You May Have Not Know Existed
We'll crack open the top five of these super-search options, turning you from a file-finding fumble into a Finder search master!
Is Junk - Whether the file is likely to be considered a junk file.
Pro Tip: I didn't find any junk on my computer - maybe I keep a clean shop? This could also be an easter egg put in by a developer to see if anyone actually looks at the search attribute menu.
Duration - Duration of this item in Seconds. This attribute works great when your looking for video or audio files of a certain length. You can use this to find videos downloaded from TikTok or YouTube Shorts.
Pro Tip: Really useful to find YouTube Shorts that I have created that I may want to upload to other platforms.
Resolution height - Find image files that are particular height. This is useful if your looking for images to use as a wallpaper. (There's also Resolution Width too.)
Pro Tip: Great way to find files that I have blogged about. Also good to find 1080p images that I might have used as YouTube templates.
Altitude - The altitude of the item in meters above sea level, expressed using the WGS84 datum. Negative values lie below sea level. This is a fun way to find images that you might have taken on that hiking trip or down Death Valley. More Fun: Use this to find out what photo you taken from the highest Altitude, start with 800 then keep moving the height. (Obviously not all photos will have Altitude info, but this is a fun thing to use on things that do.)
Pro Tip: I found a lot of high altitude files were created by other people. I didn't have anything below sea leve.
Stationary - Whether the file is stationery. Stationery files are documents that can be used as templates to create similar documents. This means that you can open and modify the template to suit their needs. The Stationery setting in OS X Finder tells an app to open a copy of the file when it opens the file. This means that the user won't accidentally change the original file.
Pro Tip: Apparently labels are throwing off the search results. I got a lot of files returned but when I checked the file info the Stationary Pad checkbox wasn't enabled. I did find a few actual files, so this was pretty cool.
PermalinkXcode Simulator
Great Tool to Test Mobile Devices
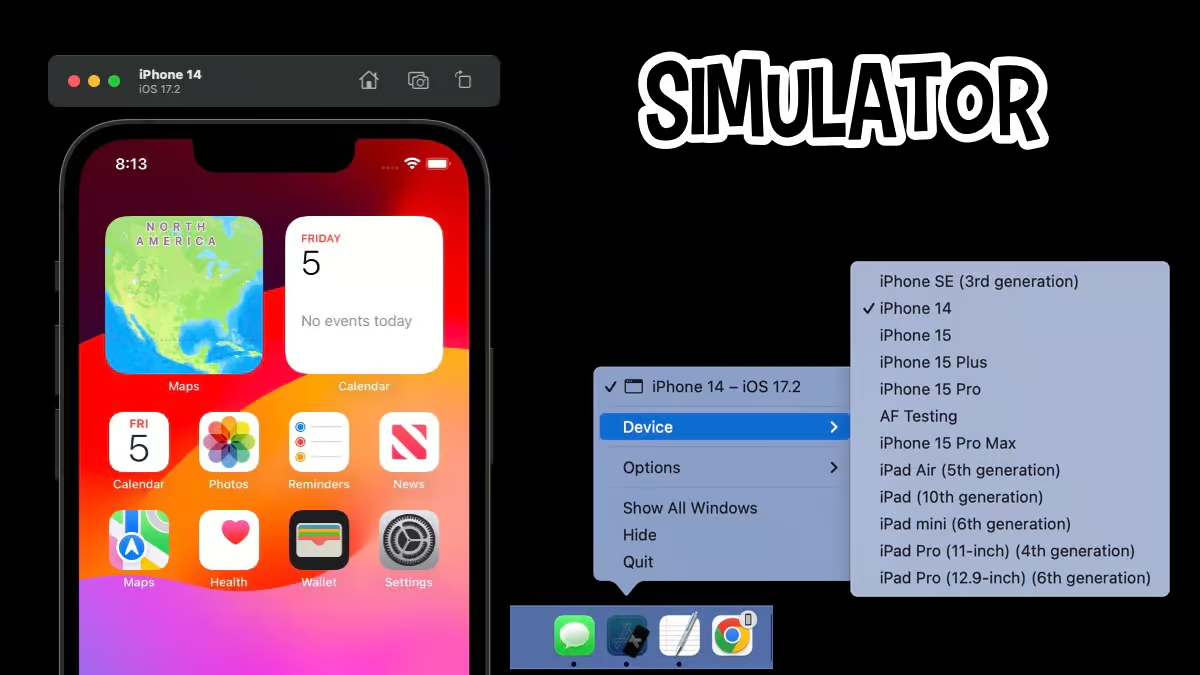
As a seasoned Macintosh enthusiast with a decade of experience, I'm thrilled to share some insights about a powerful tool that every app developer should have in their arsenal: Xcode Simulator. Whether you're building apps for iPhone, iPad, Apple Watch, or Apple TV, the Simulator is your trusty companion for rapid prototyping and testing during the development process.
What Is Xcode Simulator?
Xcode Simulator is an integral part of the Xcode development environment. It allows you to simulate various Apple devices right on your Mac, providing a realistic environment for testing your app without needing physical hardware. Here's why it's a game-changer:
Device Simulation: You can choose from a wide range of simulated devices, including different iPhone models, iPads, Apple Watches, and even Apple TVs. This flexibility ensures that your app looks and behaves correctly across various screen sizes and resolutions.
Speedy Iteration: With Simulator, you can iterate quickly. No need to deploy your app to a physical device every time you make a change. Just hit "Run" in Xcode, and the Simulator launches instantly.
Debugging and Profiling: Simulator provides powerful debugging tools, including breakpoints, console logs, and performance profiling. You can catch issues early and optimize your app's performance.
Tips for Effective Use of Xcode Simulator
1. Testing Different Devices
When testing your app, switch between different simulated devices. Pay attention to layout, font sizes, and touch interactions. Remember that what looks great on an iPhone 12 might not translate well to an older iPhone SE.
2. Simulating Real-World Scenarios
Simulator allows you to simulate various scenarios, such as changing the device orientation, enabling dark mode, or triggering notifications. Test how your app responds to these changes.
3. Performance Monitoring
Use the built-in performance tools to monitor CPU usage, memory consumption, and frame rates. Identify bottlenecks and optimize your code accordingly.
4. Network Testing
Simulator lets you simulate different network conditions (e.g., Wi-Fi, cellular, slow connections). Test how your app handles data fetching, image loading, and API requests.
5. Safari Rendering Issues
Now, let's address your observation about Safari rendering discrepancies. You're absolutely right - Simulator doesn't always perfectly mimic real devices. Here's what you can do:
Double-Check: When you encounter rendering issues, double-check on an actual device. Sometimes, Safari behaves differently due to subtle differences in rendering engines or hardware acceleration.
Color Overlays: Use Simulator's color overlays to identify graphics and animation issues. For example:
- Blended Layers: Views drawn on top of each other with transparency may cause blending issues. These appear in red overlays.
- Copied Images: Core Animation sometimes copies images instead of using the original. These appear in blue overlays.
- Misaligned Images: Images not aligned to destination pixels may be blurry or mispositioned (magenta overlays).
- Off-screen Rendering: Content rendered offscreen appears in yellow overlays.
Slow Down Animations: When debugging animations, slow them down in Simulator. Examine them closely to pinpoint any unexpected behavior.
Remember, Simulator is a fantastic tool, but it's not a perfect replica of real devices. Always validate issues on physical hardware when in doubt.
PermalinkWondershare Filmora's Auto Reframe
Best Way to Convert videos to TikTok Format
The rise of social media platforms like TikTok and Instagram Reels has made vertical video a must-have for any content creator. But repurposing horizontal footage for these spaces can be a tedious task. Thankfully, video editing software is stepping up with intelligent cropping tools. In this post, we'll be diving into Wondershare Filmora's Auto Reframe and comparing it to Final Cut Pro's Smart Conform, highlighting why Filmora reigns supreme for vertical video reframing.
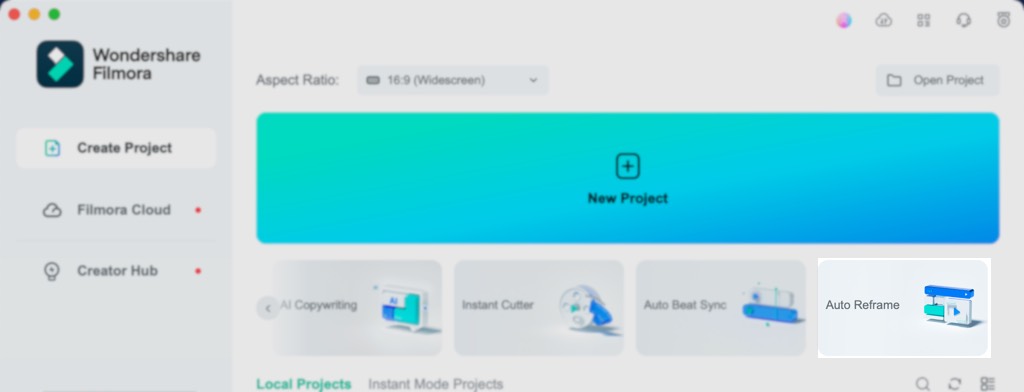
Auto Reframe: Smart Cropping Made Simple
Filmora's Auto Reframe is a breeze to use. With a dedicated workspace, you simply import your video, choose your desired aspect ratio (including popular options like 9:16 for Instagram Reels), and click analyze. Filmora's AI takes care of the rest, intelligently cropping your video to keep the most important subjects in frame throughout, even during scene changes. This is a massive time-saver compared to manual cropping, which can be finicky and error-prone, especially for longer videos.
Smart Conform: Designed for Different Workflows
Final Cut Pro's Smart Conform offers a more flexible approach. It allows you to choose specific crop regions within your frame and apply them throughout your video. While this offers greater control for experienced editors, it can be cumbersome for quick social media edits. Additionally, Smart Conform sometimes struggles with fast-moving content, occasionally cropping out crucial elements.
The Vertical Video Verdict
When it comes to specifically repurposing horizontal footage for vertical video, Wondershare Filmora's Auto Reframe shines. Its AI-powered approach ensures your subject stays in focus, even during scene changes, making it ideal for social media content creation. While Final Cut Pro's Smart Conform offers a more customizable workflow, it requires more user input and can be less effective for fast-paced vertical video reframing.
So, if you're looking for a user-friendly and efficient way to adapt your videos for the ever-growing world of vertical content, Wondershare Filmora's Auto Reframe is the clear winner.
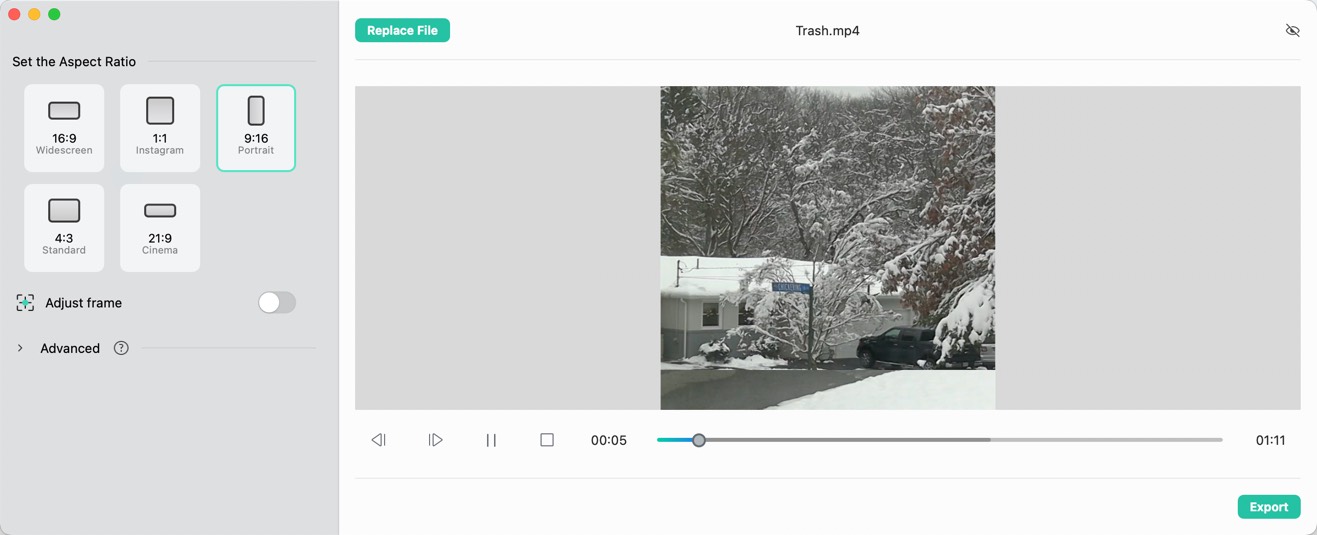
AutoReframe Dialog box. Basically you set the ratio and let Filmora do the magic.
Additional Considerations
It's important to note that no automatic cropping tool is perfect. Depending on the complexity of your video, you might need to make minor adjustments after Auto Reframe does its work. However, Filmora offers intuitive manual cropping tools within the editing interface for these situations.
If you're a professional editor working with complex projects, Final Cut Pro's Smart Conform might be a better fit for its granular control. But for most creators looking to effortlessly repurpose footage for vertical platforms, Wondershare Filmora's Auto Reframe is the smarter choice.
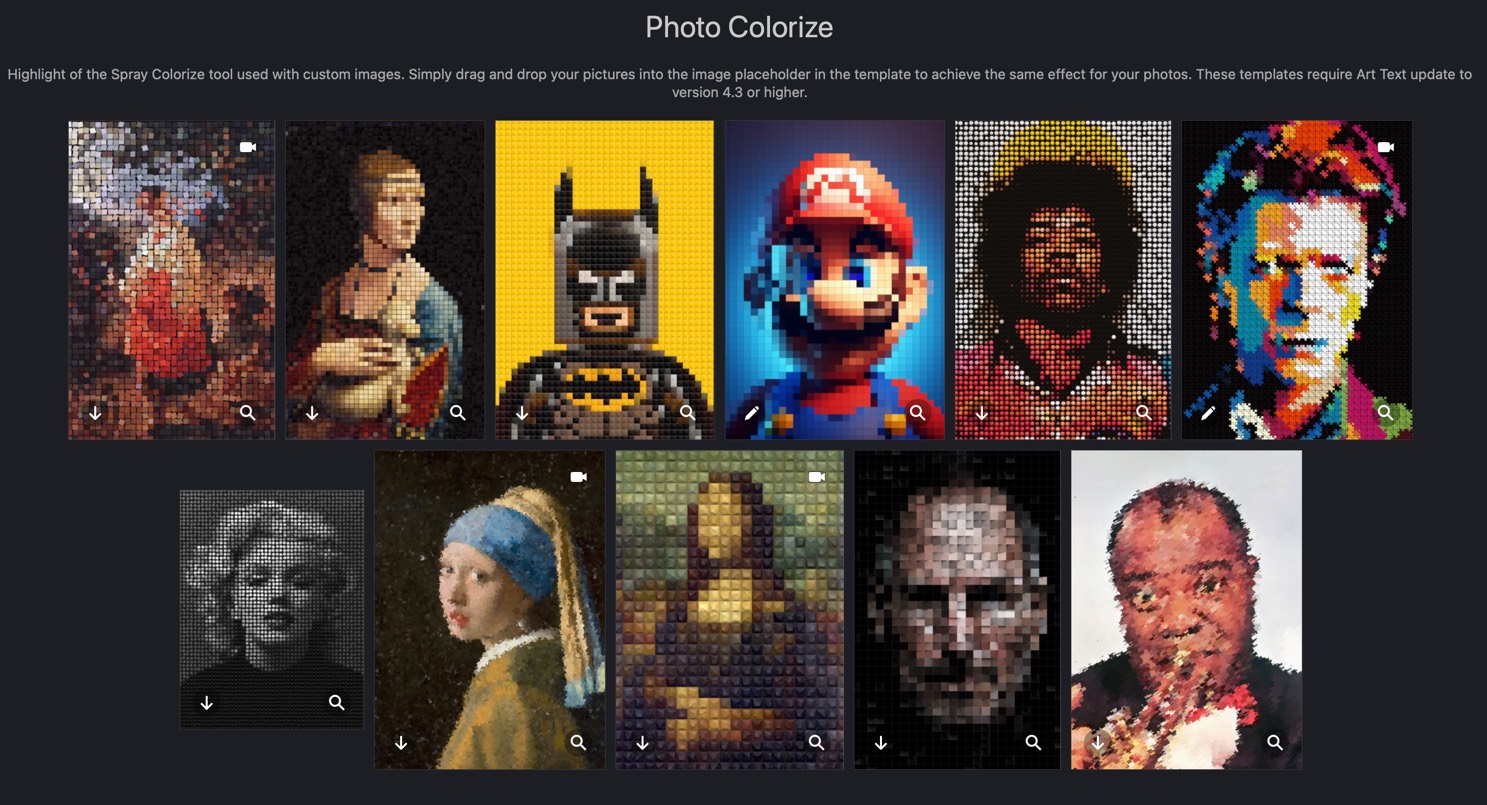
PermalinkArt Text 4: Photo Colorize
Make an Ordinary Photo be Extraordinary
In the latest update, Art Text 4 included a new tool to make images look like art. This is done by using the Spray Tool to match the color of the image. It's a cool way to make an ordinary image to stand out.
BeLight Software includes 11 different Photo Colorized designs in the Typography Templates in Art Text 4 and in Letters. Simply select the style you like and then replace the image with your own.
How to Change the Colorize Image
- Select a Photo Colorize Template from the template gallery
- Select the Image and in the RIght Menu click on fill
- Scroll down and click on the Gear next to Colorize
- Click on the Placeholder Image
- Choose the folder that has the image you want to use, for example Desktop.
- In Art Text 4, you can may all sorts of changes to the Density, Size and Angle. Each change creates a different effect.

Boston's Back Bay in a nice Colorized image. This looks like something you would see on the wall at a T-station.
Five Things I Learned About the new Colorize Tool
- Available in Letters and Art Text 4. Art Text 4 is better because there are a lot more configurations. Letters just has some basic setup.
- There's not much documentation on how to use the Colorize fill to make your own design from scratch. I found that it's best to use the templates that are provided as a base.
- After you replace the image, you can resize the Colorized image. This is useful if you have a landscape photo or wanted a smaller version of the portrait.
- Once I was done with the image, I selected the image and copied the image to the clipboard and pasted it in Photoscape X to resize it and compress for the Internet.
- Art Text tool is a tool to make text look awesome. This isn't a image editor, so the spray tools may look limited - but that's what I would expect from a Text Tool. I checked other applications, Affinity Photo, Photoscape X, Graphic Converter, and Inkscape and couldn't duplicated the functionality that Art tool provided.
Sample Image

GoPro Quick Macintosh
Quick Review of the Macintosh Version
GoPro has shaken things up with an update to their subscription offerings. They've introduced a new tier called "GoPro Premium" that replaces the older subscription plan. This new premium plan offers a more comprehensive feature set, including valuable benefits for both GoPro camera owners and users with footage from other sources.
What's New with GoPro Premium?
The key perk for GoPro Quik for Mac users is that the application is now bundled with the GoPro Premium subscription. This means that if you subscribe to GoPro Premium, you'll gain access to the full functionality of GoPro Quik for Mac as part of the package.
But the benefits extend beyond just desktop editing. GoPro Premium also unlocks unlimited cloud storage for all your GoPro footage, ensuring your action-packed memories are securely backed up. On top of that, GoPro Premium throws in an additional 25GB of cloud storage for videos captured with cameras or devices other than GoPros. This makes it a handy option for creators who want a centralized location for all their video projects, regardless of their source.

This week I played around with GoPro Quik for Mac. Here are some things I learned.
GoPro Quik for Mac offers a user-friendly platform to transform your GoPro footage into shareable social media snippets. Here's a closer look at what it offers and where it falls short:
Subscription Holds the Key to Saving
Before diving into edits, be aware that saving your creations requires a subscription. The price is $4.99/month through Apple (check for potential variations on other platforms). This subscription unlocks a valuable perk: unlimited cloud storage for all your GoPro creations. It even throws in an additional 25GB for videos captured outside your GoPro.
Editing: Focused on Speed, Not Surgical Precision
While GoPro Quik excels at creating short, engaging clips, it doesn't cater to in-depth editing needs. Here's what you might find limiting:
- Interface Hiccups: Editing longer videos can be a bumpy ride. The app sometimes prioritizes opening the preview window instead of the editing tools, leading to frustration.
- Limited Text Options: Craving fancy intros or detailed captions? You might be disappointed. Text effect options are scarce.
- Cropping and Transitions Left Out: GoPro Quik keeps things simple and doesn't offer control over how your video is cropped for different platforms or the transitions used between clips.
Where GoPro Quik Shines: Speed and Creative Themes
Despite the editing limitations, GoPro Quik holds its own in specific areas:
- Swift Snippet Creation: Quickly transform lengthy GoPro videos into bite-sized content ideal for platforms like TikTok or YouTube Shorts.
- Theme Library for Inspiration: Breathe life into your videos with a selection of 15 pre-made themes. These themes can add polish and a touch of creative flair to your social media clips.
The Verdict: Ideal for Effortless Social Media Content, Not a Replacement for Advanced Editing
If your goal is to create quick, shareable content to promote longer videos or showcase GoPro highlights on social media, GoPro Quik is a solid choice. However, if you require granular editing control over every aspect of your video, you might need a more robust editing software solution.
PermalinkLogitech H390 Wired Headset
Microphone Compression is too strong.
As a seasoned Macintosh enthusiast, I'm always on the lookout for peripherals that enhance my daily workflow. This week, let's dive into the Logitech H30 USB Headset, a versatile audio companion that promises excellent sound quality but comes with a caveat.

The Good: Sound Quality That Hits the Right Notes
The Logitech USB Headset doesn't disappoint when it comes to audio performance. Here are some highlights:
Rich Sound Profile: Slip these headphones on, and you'll be greeted by a warm and well-balanced sound. Whether you're listening to your favorite tunes, editing audio files, or participating in virtual meetings, the headset delivers clear highs, punchy mids, and satisfying bass.
Comfortable Fit: The over-ear design ensures a snug fit without causing discomfort during extended use. The plush ear cushions and adjustable headband make it suitable for those marathon work sessions.
USB Simplicity: Plug-and-play convenience is a Mac user's dream. The USB connection ensures seamless compatibility with your Mac, and you won't need to fiddle with drivers or complicated setup procedures.
Noise Isolation: The closed-back design effectively blocks out ambient noise, allowing you to focus on your tasks without distractions.
The Not-So-Good: Microphone Blues
Now, let's address the elephant in the room - the microphone. While the Logitech USB Headset shines in sound quality, the microphone isn't without quirks:
Strong Noise Compression: The microphone's noise compression can be a double-edged sword. On one hand, it minimizes background noise, ensuring your voice comes through clearly. However, it can also make your voice sound slightly robotic or overly processed.
Microsoft Teams Compatibility: Ah, the eternal struggle! Getting the headset to play nicely with Microsoft Teams can be a bit finicky. Some users report issues with recognition or configuration. Fear not - I've got a workaround for you.
Microphone on the Left: The microphone has to be on the left ear. This may not be a deal break for some people, but I am use to having the microphone on the right.
Tips for Taming the Microphone Beast in Microsoft Teams
Adjust Microphone Sensitivity: In Teams, navigate to your audio settings. Tweak the microphone sensitivity to find the sweet spot. Sometimes a slight adjustment can make a world of difference.
Test Different USB Ports: Sometimes, the port matters. Try connecting the headset to different USB ports on your Mac. You might stumble upon the magic combination.
Firmware Updates: Check if Logitech offers any firmware updates for your headset. These updates often address compatibility issues.
Fallback to Computer Microphone: If all else fails, stick with your Mac's built-in microphone for Teams calls. It's not ideal, but it gets the job done.
In Conclusion
The Logitech USB Headset strikes a balance between sound quality and microphone quirks. If you're primarily using it for music, podcasts, or video editing, it's a solid choice. For Teams calls, keep experimenting until you find the right setup. And remember, even Mac pros like us encounter a few bumps in the road - just consider them part of the adventure!
PermalinkOrganizing Your Mac's Launchpad
Help Your Futureself find files
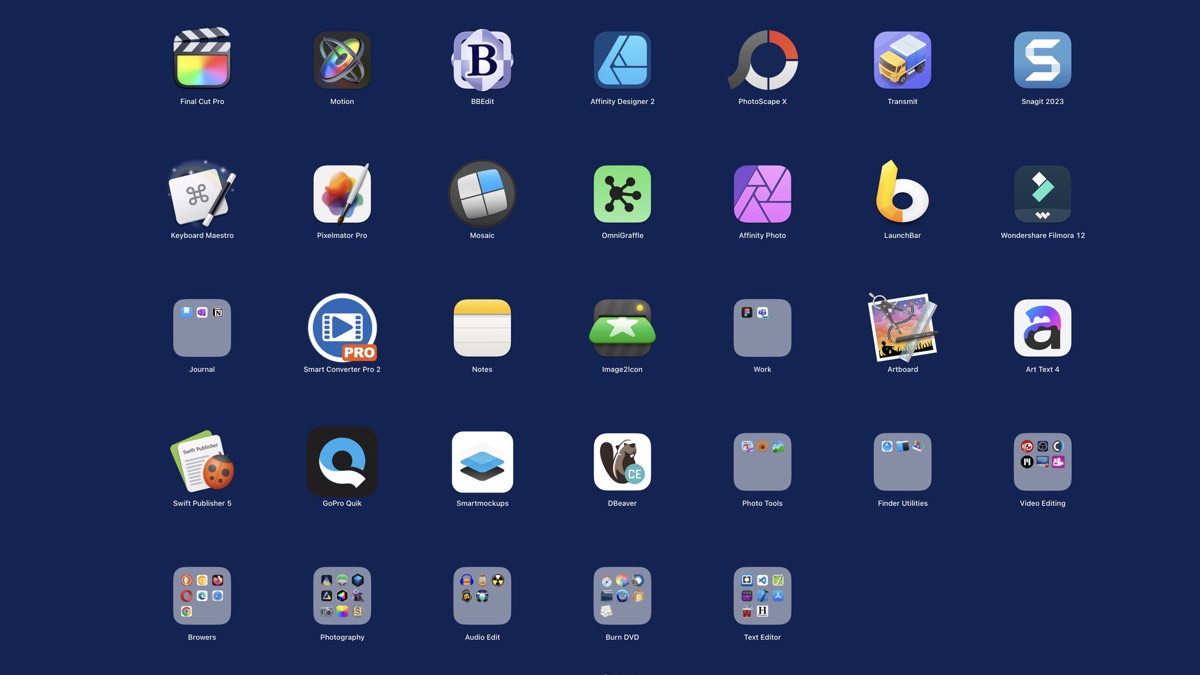
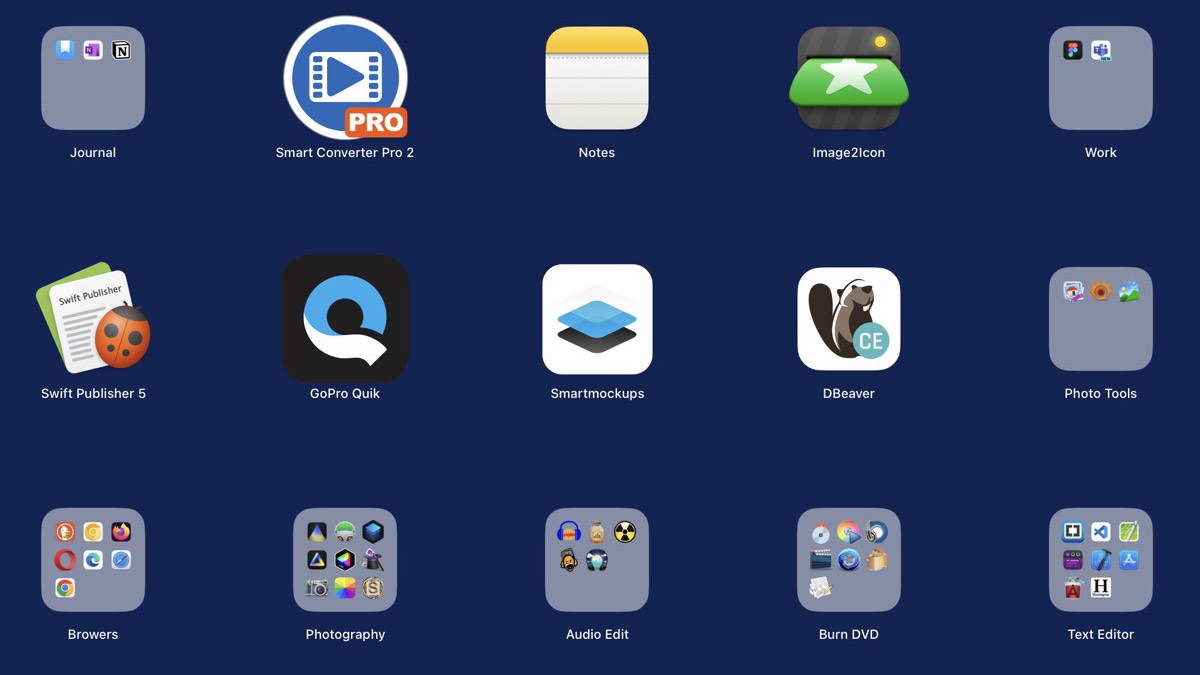
As a avid Macintosh user, I've accumulated quite a collection of apps. Over time, my Launchpad has become a bustling metropolis of icons, making it challenging to find the right app when I need it. If you're in the same boat, fear not! Let's roll up our sleeves and declutter that Launchpad.
Why Organize?
Before we dive into the nitty-gritty, let's talk about why organizing your Launchpad matters:
- Efficiency: When you're in the zone, you don't want to waste time hunting for an app. Organized folders will speed up your workflow.
- Task-Based Access: Imagine having a "Video Editing" folder with all your video-related apps neatly tucked inside. No more guessing which app to use!
- Spring Cleaning: It's like tidying up your digital house. You'll rediscover apps you forgot existed and maybe even uninstall some you no longer need.
Step 1: Assess Your Apps
First, take a deep breath and open your Launchpad. Scroll through the chaos and mentally categorize your apps. Here are some functional categories to consider:
- Productivity: Office suites, note-taking apps, project management tools.
- Creativity: Graphic design, video editing, music production.
- Utilities: System tools, disk cleaners, password managers.
- Communication: Email clients, chat apps, video conferencing.
- Entertainment: Games, streaming services, e-book readers.
Step 2: Create Folders
Now that you've mentally sorted your apps, let's create folders. Here's how:
- Click and Hold: Click and hold any app icon until they all start jiggling (like they're doing a little dance).
- Drag and Drop: Drag one app onto another to create a folder. Name it something descriptive that means something to YOU. (e.g., "Home Productivity").
- Add More Apps: Drag related apps into the folder. Repeat for other categories.
Step 3: Refine Your Categories
Don't be afraid to tweak your folders. Maybe you realize you have too many note-taking apps. Combine them into a single "Notes" folder. Or perhaps you're a photography enthusiast--create a "Photography" folder for all your editing tools.
Step 4: Spring Cleaning
Now that your Launchpad is organized, take a moment to evaluate each app:
- Use Frequency: When was the last time you opened that app? If it's been years, consider saying goodbye.
- Duplicates: Do you have three PDF readers? Keep the best one and bid adieu to the rest.
- Uninstall: If you're sure you won't need an app again, uninstall it. Your hard drive will thank you.
Conclusion
By organizing your Launchpad, you're not only making your life easier but also gaining a sense of accomplishment. Plus, the next time someone asks, "What app do I use for video editing?"--you'll have the answer at your fingertips. Happy organizing!
PermalinkAdd Comments to Images/Movies
Make it Easy to Find Your files
Welcome back to our weekly dive into the world of Macintosh! With a decade of exploring, tinkering, and optimizing the Mac under my belt, I've discovered countless tricks to enhance your Mac experience. This week, we're focusing on a feature that many overlook but is incredibly powerful for organizing and retrieving your media files: adding comments to files for Spotlight searches.
Why Add Comments to Files?
Spotlight is a robust search feature on macOS that allows you to quickly find documents, folders, apps, and more. By adding comments to your files, you're essentially tagging them with searchable keywords or descriptions. This practice transforms Spotlight into an even more powerful tool, especially for media files like audio clips, images, and videos.
Adding Comments to Your Media Files
Audio Clips: Capture the Essence
Imagine you have an audio clip of a significant event or a recording that holds sentimental value. By adding comments, you can include details about why it's important, the people involved, or any fun facts related to the recording. This way, searching for "family reunion" or "first guitar solo" in Spotlight can bring up those precious moments instantly.
Images: Tagging Memories
For images, comments can act as tags. If you've scanned an image taken at a specific location or event, adding that information as a comment turns your Mac into a personalized photo album. Type "Paris 2018" or "birthday bash" into Spotlight, and voila, the memories are at your fingertips.
Videos: Tell the Story
Instead of struggling to remember that "MOV_25020.mp4" is your child's first steps video, why not add a comment to tell its story? Describing the video file with "first steps in the living room, sunny afternoon" makes it easily retrievable. Spotlight becomes not just a search tool but a storyteller.
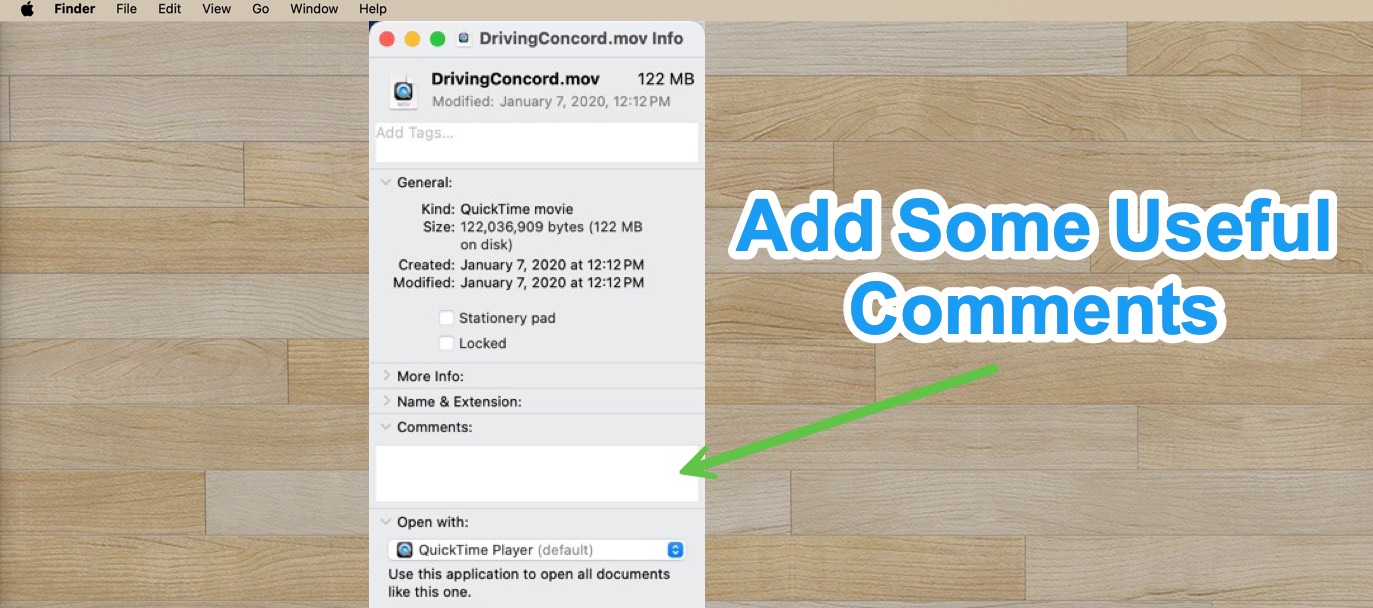
How to Add Comments to Files on macOS
Select the File: Navigate to the file you want to add a comment to in Finder.
Get Info: Right-click on the file and select "Get Info" or press
Command + I.Add Your Comment: In the Info window, look for the "Comments" section. Here, you can type in your tags, descriptions, or any information you find pertinent.
Close the Info Window: Your comments are saved automatically. Close the window, and your file is now tagged for easy Spotlight searching.
Tips for Effective Commenting
- Be Descriptive: The more detailed your comments, the easier it will be to find the file.
- Use Consistent Tags: Develop a system of tags that you use consistently across files for more efficient searches.
- Combine with Other Features: Use comments in conjunction with other file organization features like folders and color tags for a truly optimized system.
Five Things I Learned
Website that are saved from Safari or Chrome automatically has the Meta-Data Description saved in the comments. Also any Meta-Data keywords are saved in a Keywords category in the Info box.
Third Party apps like Path Finder and Commander One do not have any functionality to add text to the comment field.
When you use the Finder Find command there is an option to search only the comments field. You can access this by:
- Use the Find Command in the Finder.
- Under the "Kind" select and then select Other
- In the popup dialog box, called "Select a search attribute" search for Comments
- Use the "Comment" attribute not the "Spotlight comment"
- Now you can search the comments of any object!
You can use Automator to add the same comment to multiple files. This is handy if you want to add a location to a much of images that you may have scanned in. [ More Details ]
You can use Apple's Preview app to leave keywords to images.
Conclusion
Adding comments to your files is a simple yet incredibly effective way to enhance your file management and retrieval system on macOS. It leverages the power of Spotlight, transforming it from a basic search tool into a personalized, highly efficient organizer. So, take a moment to annotate those important files, and make your digital life a bit easier and much more organized.
PermalinkMission Control Tips and Tricks
Fun Things I Learned This Week
As a seasoned Macintosh enthusiast with a decade of experience, I've come to appreciate the layers of functionality and elegance macOS offers. Among its plethora of features, Mission Control stands out as a pivotal tool for boosting productivity. This week, let's dive into how Mission Control can transform your workflow, making multitasking not just manageable but genuinely enjoyable.
What is Mission Control?
Introduced back in OS X Lion, Mission Control is essentially the command center for macOS. It provides a bird's-eye view of all your open windows, desktop spaces, and full-screen apps, allowing for swift navigation and organization. Think of it as your digital desk, where you can spread out your work and easily grab what you need without the clutter.
This week, I have been using Mission Control to manage my work on my computer. It seemed to make it much easier to separate personal from work tasks. Along the way I learned a few things. Here are two things I learned using Mission Control this week that are worth sharing
Gaming Mouse Configuration
Navigating between multiple desktops on your computer doesn't have to be a chore--especially not for gamers who are accustomed to quick reflexes and even quicker decision-making. This week I dove into a game-changing setup for my Z-7900 Gaming Mouse that turns desktop management into a breeze, allowing you to switch between Desktop 1 and Desktop 2 with the mere click of a button. This method not only streamlines your workflow but also integrates seamlessly into your gaming setup, making multitasking smoother than ever.
Setting the Stage: The Z-7900 Gaming Mouse
The Z-7900 is renowned for its customization capabilities, boasting programmable buttons that can be tailored to suit your every need--be it gaming, productivity, or anything in between. By dedicating two of these buttons to desktop navigation, you'll unlock a new level of efficiency in your digital life.
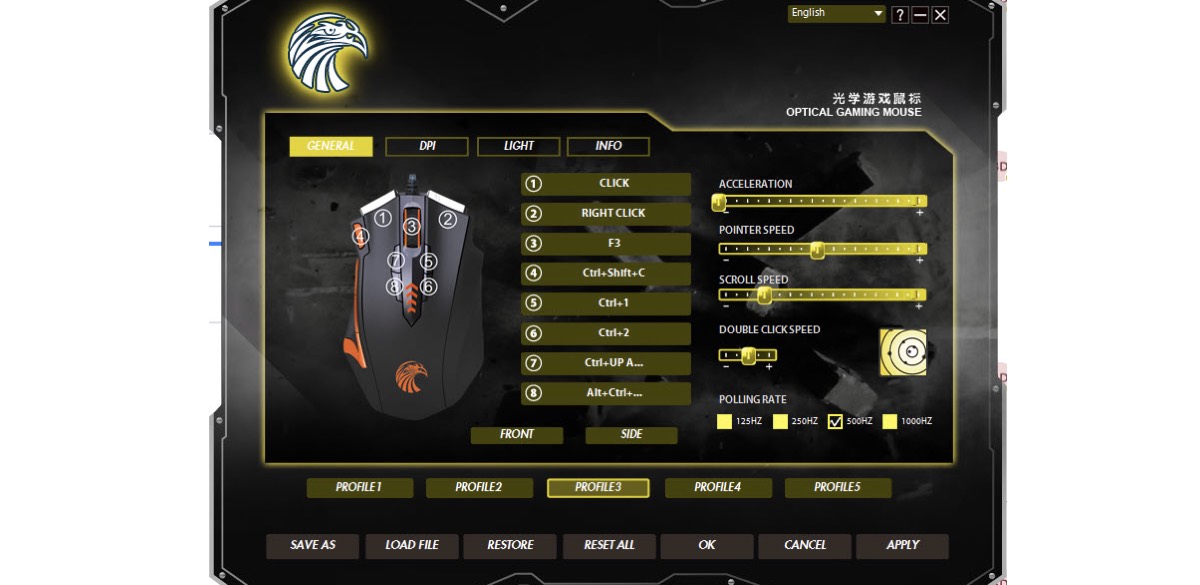
My mouse setting with #5 and #6 buttons set to go to Desktop 1 and Desktop 2
Unfortunately there's no Mac Drivers for the Z-900 mouse, I had to setup the configurations on a Windows computer and then just plugged the mouse in the iMac and it accepted the configurations.
Using Desktop Wallpaper to identify Desktop
Apple's macOS has always been at the forefront of combining sleek design with intuitive functionality, creating an operating system that's both powerful and a pleasure to use. With the release of macOS Sonoma (version 14), users have enjoyed a host of new features and improvements that continue to enhance the Mac experience. However, one feature request that has been consistently voiced by the community remains unaddressed: the ability to name virtual desktops.
Despite the lack of this feature, there's a clever workaround that not only serves the purpose but also adds a layer of visual flair to your workspace organization--using unique desktop wallpapers to distinguish between your virtual desktops.

Why Name Your Desktops?
The ability to name desktops can significantly improve productivity and organization for power users, professionals, and anyone who relies on multiple virtual desktops to compartmentalize their digital workspace. Names like "Work," "Personal," "Projects," or specific project titles can make navigation faster and more intuitive. You can even use your full name (e.g., Andy Moody) to label a desktop, which can be helpful for identifying your space if multiple people are using the same Mac.
The Visual Solution: Unique Wallpapers
Since macOS Sonoma still doesn't allow users to rename their desktops directly, the next best solution is to use distinct wallpapers for each desktop. This method not only circumvents the naming limitation but also adds a personalized touch to each workspace.
PermalinkAbout
A Mac veteran since 1989, I'm here to share my experience with tips and tricks every Friday. Witnessing the evolution of Mac software and hardware firsthand, I've gained a deep understanding of how these machines work and can help you troubleshoot any issues that may come up.
Check out all the blog posts.
Blog Schedule
| Thursday | Business |
| Friday | Macintosh |
| Saturday | Internet Tools |
| Sunday | Open Topic |
| Monday | Media Monday |
| Tuesday | QA |
| Wednesday | Veed |
Other Posts
- Wondershare Filmora's Auto Reframe
- Data Storage Backup
- Art Text 4 Designs
- Top 6 Graphic Design Apps Every Macintosh User Should Know About
- Five Finder Search Attributes
- Photo Size Optimizer
- If this, than That
- Fun Fact - Tags in macOS
- Install Font Suitcase on macOS
- Resize-Image vs PhotoScape X
- Apple at the Smithsonian
- ParticleShop
- XnView MP
- Firefox Developer Edition
- Quadro Sync