
Panic Nova
Quick review of Panic Nova
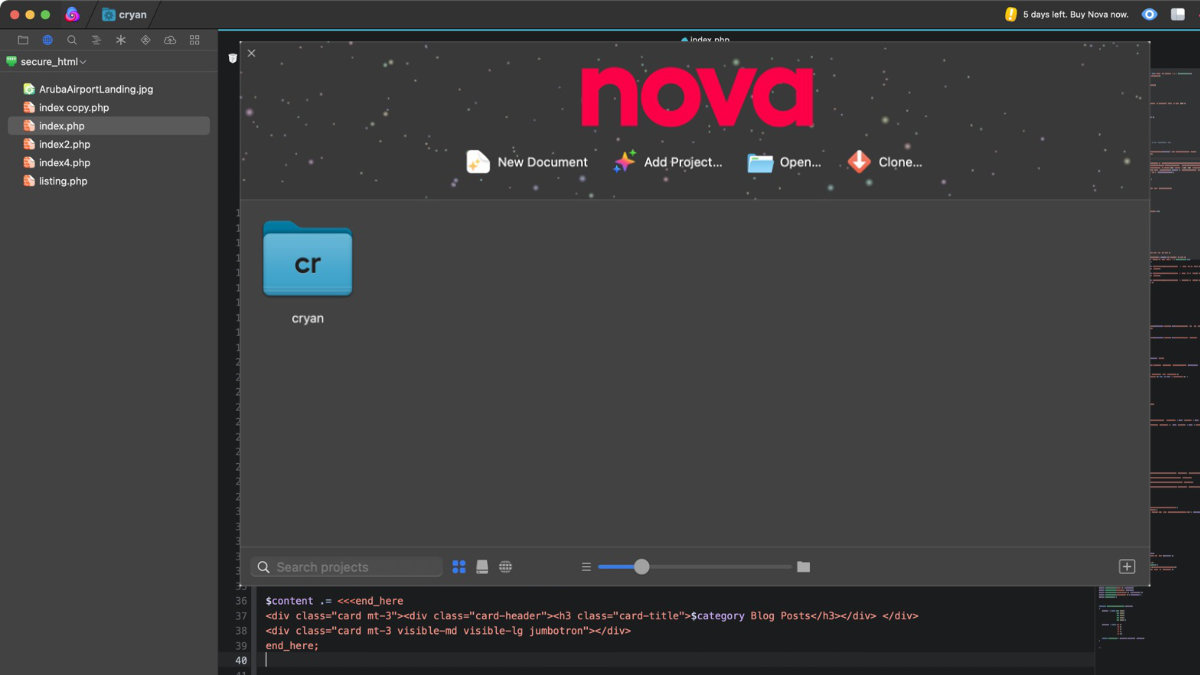
Last month, I thought I would experiment with Panic's Nova application.
Nova is a modern text editor that focuses on being the best Macintosh text editor. It's built for developers and design for the Macintosh.
Five Things I Liked
- Minimap - Great way to get a high level visual of a code.
- Split screen - Ability to see different files anyway that works best for you.
- In Product Preview - You can add preview to the split screen. When you save a file the preview window refreshes and you see your change instantly.
- Remote Access - You can easily load up connected remote files. This made it easy to open up multiple files and make changes. You can break down destinations to different directories. In my case, I was able to separate public_html and secure_html - making it easy to see what's in what section.
- Extensions - There are a lot of extensions written by loyal Nova users. If you don't see what your looking for, you can always create your own.
Four Things I Didn't Like
- No Shortcut Commands - I didn't find a way to apply HTML Anchor to the selected text. The closest functionality would be the "Wrap Selection in Tag"
- Saved Search Queries - There wasn't a way to save common search/replace queries.
- Wrap Selection in Tag - In my test I found it difficult to apply a style sheet to an object while using the "Wrap Selection in Tag." I would see my classname being entered in the closing part of the tag.
- Expensive - Hard to justify spending $100 for another text editor. I already purchased BBEdit and use it as my default text editor.
In Summary
For now, I am not going to purchase Nova. It's a pretty cool application, but I think the tools in BBEdit are good for me.
I'll keep an eye on updates, especially since September 23 is the one-year anniversary of the launch.
PermalinkArt Text 4.1 Update
Where to find all the new features
Last week Belight Software updated the popular Art Text Tool with some cool new features.
What's new in Art Text v.4.1
- Vector drawing tools: Pen, Move, Convert Anchor Point, Reverse Path Direction.
- 20 new badge and logo design templates.
- 300 new vector icons and shapes.
- 137 shapes for badge design.
- Export to vector images for graphics with no raster effects.
- Introducing Convert to Shape that lets you edit text using vector drawing tools.
- Various other program improvements.

Graphic made possible by Art Text 4.1 update!
What Does All this Mean?
Here's where you can discover all the changes in v.4.1.
Vector Drawing Tools - These are located in the '+' in the bottom of the main window. Simply select the Shape option. You'll see the 'Pen Tool,' 'Move Tool,' 'Convert Anchor Point Tool.'Reverse Path Direction.' These are great when using existing vector designs.
Badge and Logo Design Templates - These are located in the "Design Gallery." On the bottom of the main window, click on the icon to the right of the plus sign. Once the gallery opens, click on the category called "Badge Logos." There are lots of great designs to help inspire the imagination.
New Vector Icons ahd Shapes - These are located in the content panel, which is the left side of the main window. On the top bar, click on the icon that has a circle and a square. You'll see the 17 new categories - Animals, Architecture, Arrows, Business, Flora, Food, Leisure, Media, Music, Nature, People, Science & Technology, Signs, Stars, Symbols, Tools, and Transport & Travel.
Shapes for Badge Designs - These are also located in the content panel, which is the left side of the main window. On the top bar, click on the icon that has a circle and a square. Look for the Badges category. There are 137 options. Wow, great collection of badge designs. Better than some packages I have seen on CreativeMarket.com.
Convert to Shape - Now you can convert your text to shapes! Simply right-click on any shape, and select the Convert to Shape option.
PermalinkKeyboard Maestro Date Macro
Cool Macros to make Date Calculations Easy.
Every now and again I need to figure out a simple date calculation. For example, I am writing up a wiki page and want to reference something next Thursday. I don't want to say next Thursday but I want to say the simple date format.
I encounter this enough times, that I decided to write a simple Keyboard Maestro macro. There are three types of date scripts that I wrote:
- Simple Date - Display the date x days from now. Added built in for Tomorrow, 2, 3, 4, 5, 7, 30, 60, 90, 100, 180 days
- Advanced Date - Put a number in the Clipboard and use that to display the date.
- Days Until - Put a date in the Clipboard, and then display the number of Years, Months, days until the event. If its in the past, then show the number of days that has past.
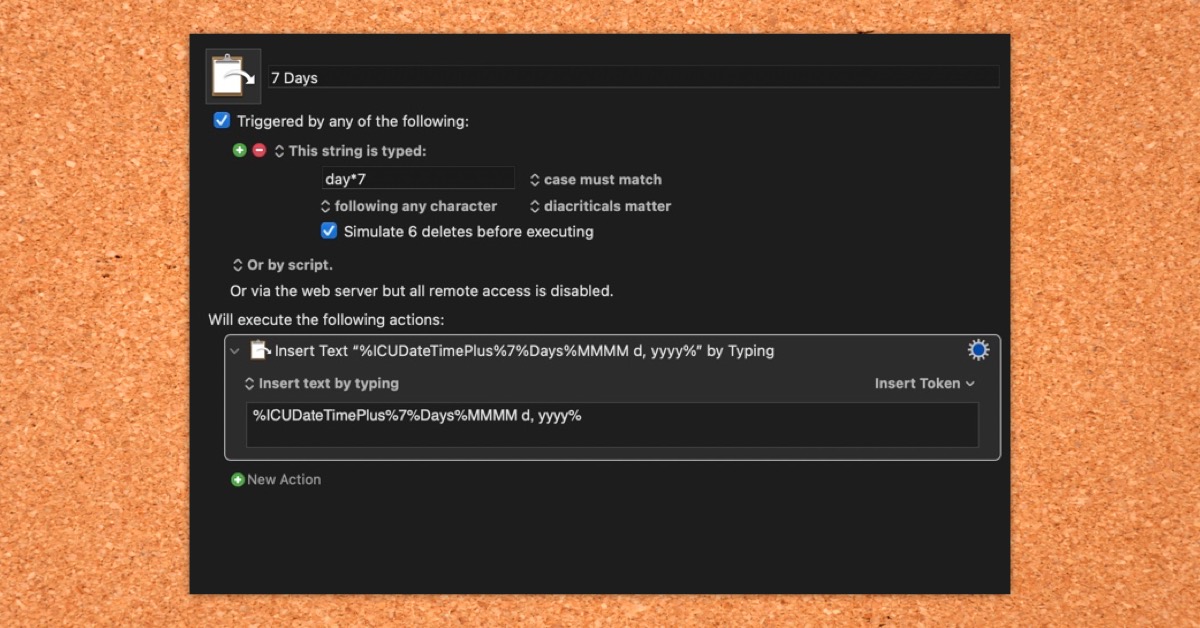
Simple Date
This set of macros are built-in date calculations. Simply by using the generic hotkey: day* and some number I can display that date. So if I wanted tomorrow, I would type in day1. If I wanted 100 days from now I would type in day100.
This macro makes use of the ICUDateTimePlus functionality that is part of Keyboard Maestro.
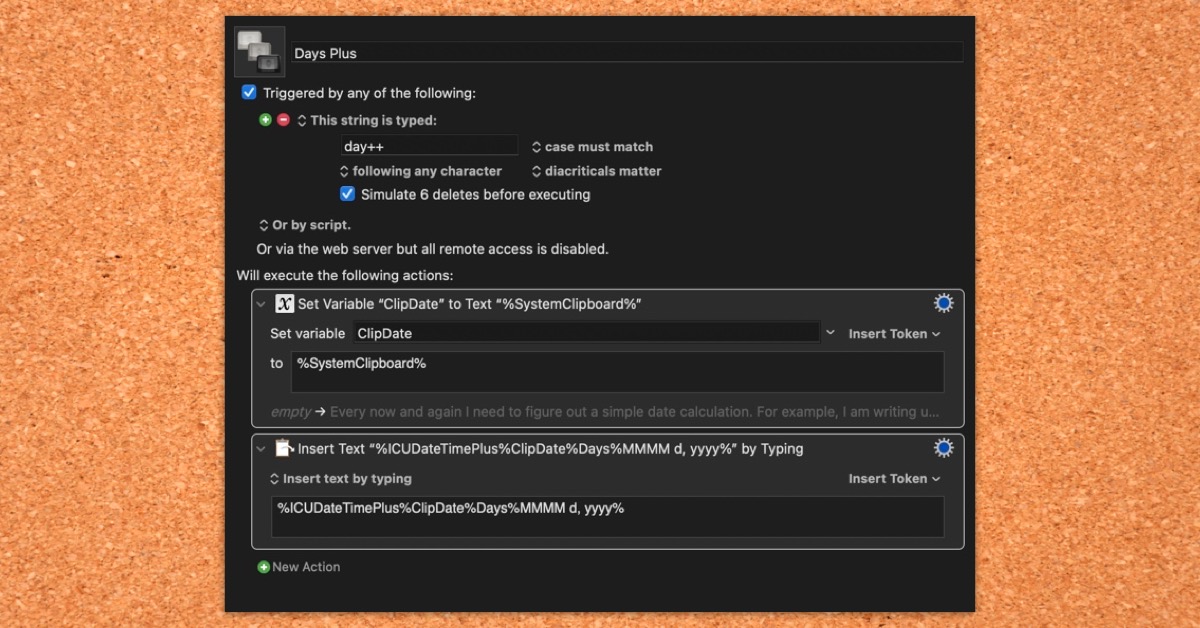
Advance Date
This single macro makes it easy to put in any number of days. Simply type in a number, copy/paste, and then type in day++. This also makes use of the ICUDateTimePlus function. The return display shows the Month, Day, and Year.
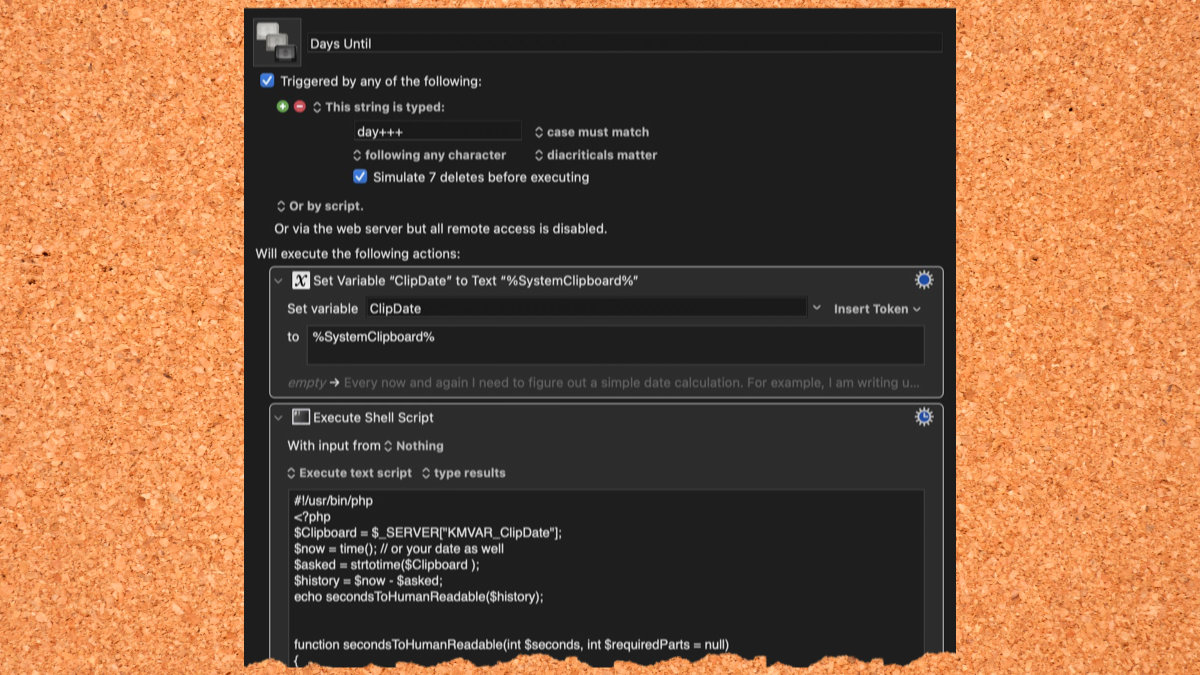
Days Until
This macro is my date count down. If I want to know how many days until an event, I simply type in a date, copy/paste and then type in the trigger: day+++. The return value will show Years, Months, Days, Hours until the event. This also works for events in the past. So I can see how many days past since I graduated.
The PHP secondsToHumanReadable function, used in this example, can be found at stackoverflow.com.
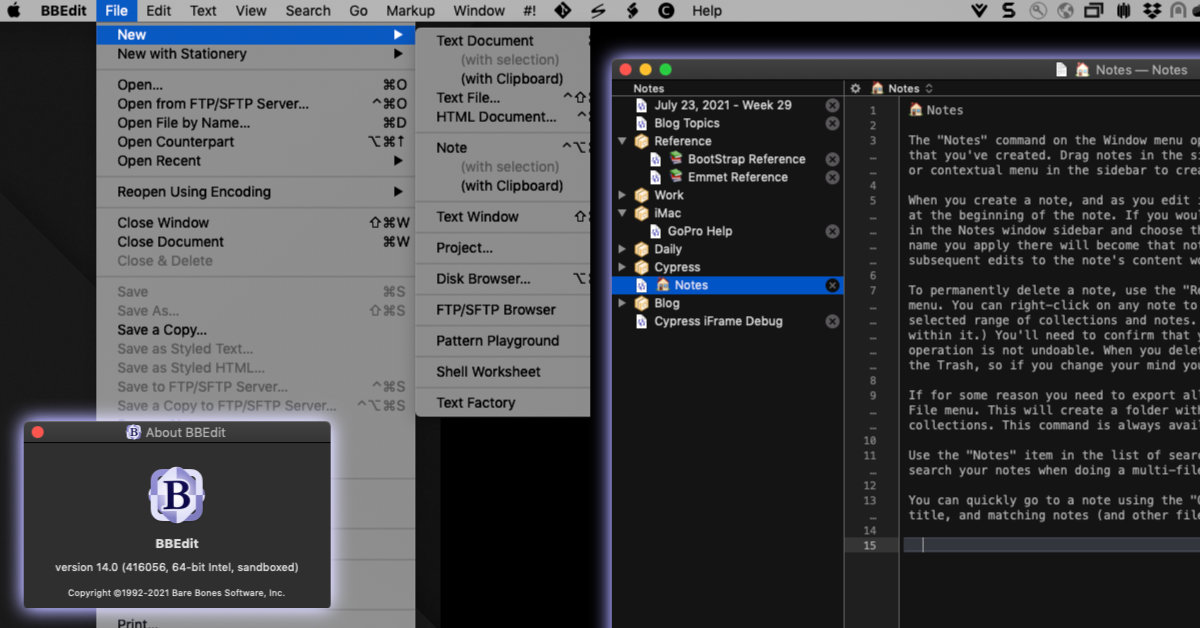
PermalinkBBEdit 14
Great Update with Notes
This week Bare Bones released an update to BBEdit - bring the application to version 14.
It took 9 years to go from version 10 to version 14. So when BBEdit does a major update - it's a big deal. In this update, the big new feature is Notes.
New: Notes
One of the biggest features in this update is a Notes section.
For years BBEdit users would open up a blank document and just type away. When it came to saving the document, if they remembered, they would use the default name "untitled."
With BBEdit Notes, you can simply write away and don't have to worry about saving - it does it automatically! The name of the file is the first few words on the first line.
You can organize your notes into collections. (otherwise called folders) This makes it easy to view your data.
Seven Things I Learned about BBEdit Notes
Filename: While the name of the file displayed in the sidebar is the first few words of the first line. It's actually stored as a Globally Unique Identifier (GUID). The notes are not accessible in the Finder, they are in a package file in the finder in the BBEdit settings library. You can always use a simple trick to view the package file content - but why would you do that?
Emoji Filename - You can have Emojis in your filename! This is a creative way to make your notes stand out.
Dropbox Setup: If you are using BBEdit Dropbox sync configuration, you'll share the same Notes database between Macs. This is pretty useful. The problem is that notes created on a different Mac will show up in the Notes section using the GUID instead of the "friendly name." The workaround is to right-click on the note and select "Rename Note…" and assign a name. This name will carry over to the other Mac.
Collections: The Note collections works great on different Macs. You can nest collections. I setup up the notes to have two collections for the two computers that I use. This makes it easier to focus on the notes that may be important to me on a particular computer.
Search by Name: You can search for notes using the "Open File by Name." Only Noted created on the currently used computer will show up in the listing.
Search by Content: Use the new Notes check box in the Muti-file search dialog box to search through all your notes.
Opening Notes: You can open Notes in any BBEdit window. You don't need to use the Window->Notes feature to view a particular note. I find this useful as I have some reference documents and its great to have them available in the same window. The downside is that there's no indicator in the sidebar of what's a note file type and what's a plain file. I identify any filename that doesn't have an extension as a BBEdit note file.
Markdown: When you create a new Note it uses Markdown by default. If you are not familiar with the format, there is a Markdown Cheat Sheet in the Windows -> Palettes -> Markdown Cheat Sheet. This isn't new in 14, but useful to have when starting with Markdown.
Great Shortcuts to remember
Control - Option - Command - N -> Create a New Note (When you use this a few times, the keyboard combination makes sense.)
Shift - Command - F -> Multi-file search (Find Content in your Notes)
Lots of Other Changes
BBEdit 14 has a lot more changes other than Notes. Here are some other notable changes that I am excited about:
- Remove Blank Lines: One simple menu item to quickly cleanup those blank lines.
- Emmet Support: Simply install the Node.js and you can finally use Emmet within BBEdit.
- Markdown Images: When you drag images to a Markdown document, BBEdit will insert the correct image tag format - like it does for HTML.
- Text Factory: Replace All - Nice to see the history option. This makes it easy to implement a recent search/replace into a Text Factory action.
- Application Icon - Bare Bones has a new icon for BBEdit, but you can change it back to the old style in the Preferences.
- Pattern Playground - You can adjust the Search Pattern section. Now you can see more of crazy search pattern.
Go For the Upgrade!
BBEdit 14 is worth the upgrade. Still not sure? Why not try the the 30-day trial to explore how BBEdit can help you manage text easily.
Permalink"there isn't enough free space" error
Strange Solution for this Error Message
Have you ever run into this kind of error message:
“There isn’t enough free spaceâ€
Usually this occurs when trying to save a change. The weird thing is that when you look at the disk space there’s plenty.
The lack of disk space can’t be the reason.
What’s Going On?
The other reason for the error is when the system clock is not set. Especially if the date is around 1970.
This may happen if your computer battery drained and it’s not connected to the internet.
Quick Easy Solution
Simply fixing the clock will fix the error.
PermalinkQuickly Put the Computer to Sleep
Fastest Way to Put your Computer to Sleep
Sometimes you need to put the computer to sleep without using the mouse. This happens when you're charging the mouse - or the mouse battery died.
Did you know that there’s a keyboard combination shortcut to quickly put your computer to sleep? This is a very useful combination to remember.
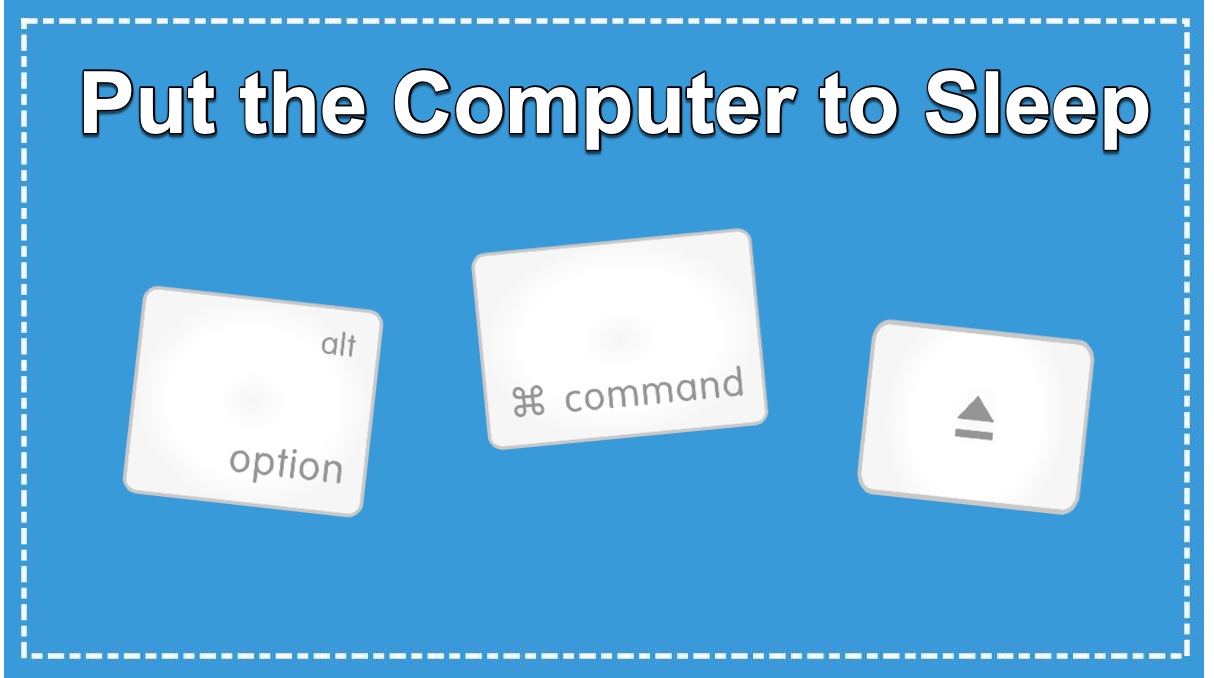
Download this graphic and use it as a quick reference to putting your computer to sleep.
PermalinkFont Awesome Filter
Same Use of Keyboard Maestro
Font Awesome is one of the popular online icon fonts. Web designers use it to make websites a little better.
You can easily search their collection for all sorts of creative icons. There are 7,865 icons in their collection - of that 1,609 are free.
One Bad Thing About Font Awesome Search
There is one downside to the Font Awesome search. When you find an icon, there's only one way to copy the HTML class - by clicking on the name. When you do this you get the whole style prefix not use the class name: Sample:.
That's useful when you want to add it for the first time. What if you only wanted the font class name to replace an existing font awesome style? You would have to paste the content and then delete the remaining class info. This can be a pain if you're replacing a bunch of icons for a redesign.
Keyboard Maestro to the Rescue!
I decided to write a Keyboard Maestro Macro to fix this situation. It's basically a regular expression that filters out everything outside of the quotes.
Here's the Macro:
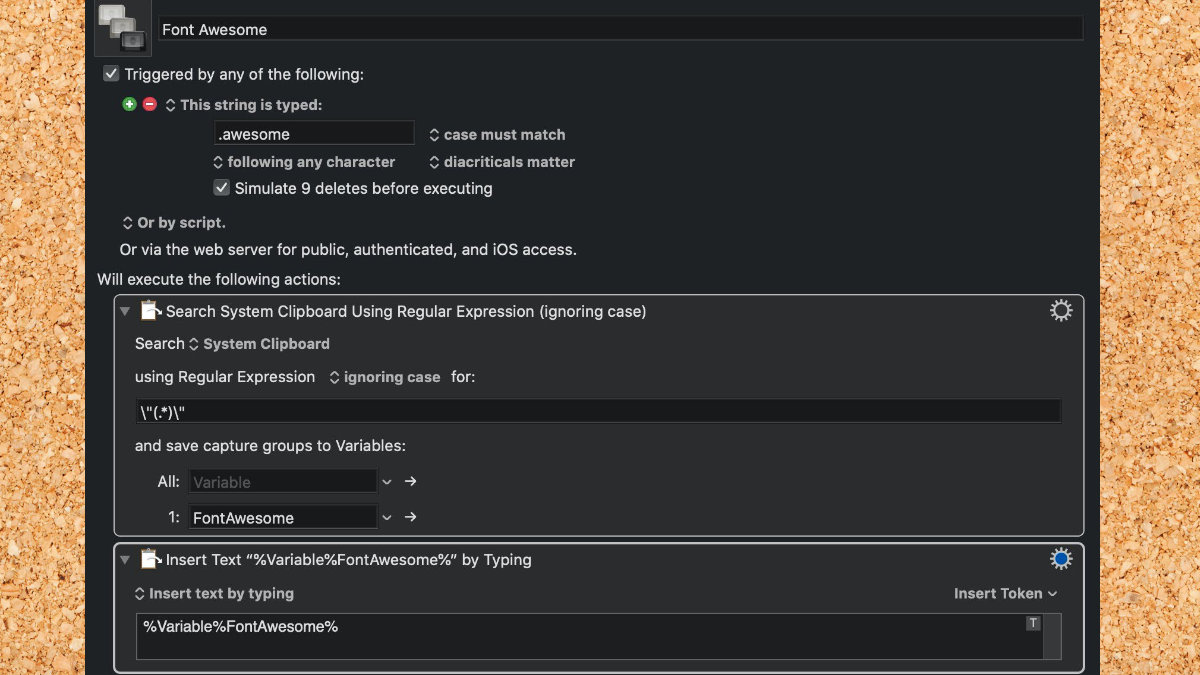
Regular Expression Used
"(.*)"
The nice thing about this Macro is that it can be executed by typing in the keyword: ".awesome " or using the filter menu in the Clipboard Switcher.
So now I can easily replace icons on a page with ones that I find on Font Awesome.
If there's a time when I am doing a lot of icon changes, I can change the macro to be easier to execute.
Not Using Font Awesome?
This is just a tip of how to use Keyboard Maestro for one instance. You may find another use of how this may help you have better copy/paste.
PermalinkTurn off Notifications
Simple Steps to turn them off in Big Sur
Have you ever gotten those Notifications when you are sharing the screen? Perhaps you are sharing your computer and don't want people to peek into your text message notifications.
There's a simple way to fix that in macOS Big Sur
Big Sur Notifications
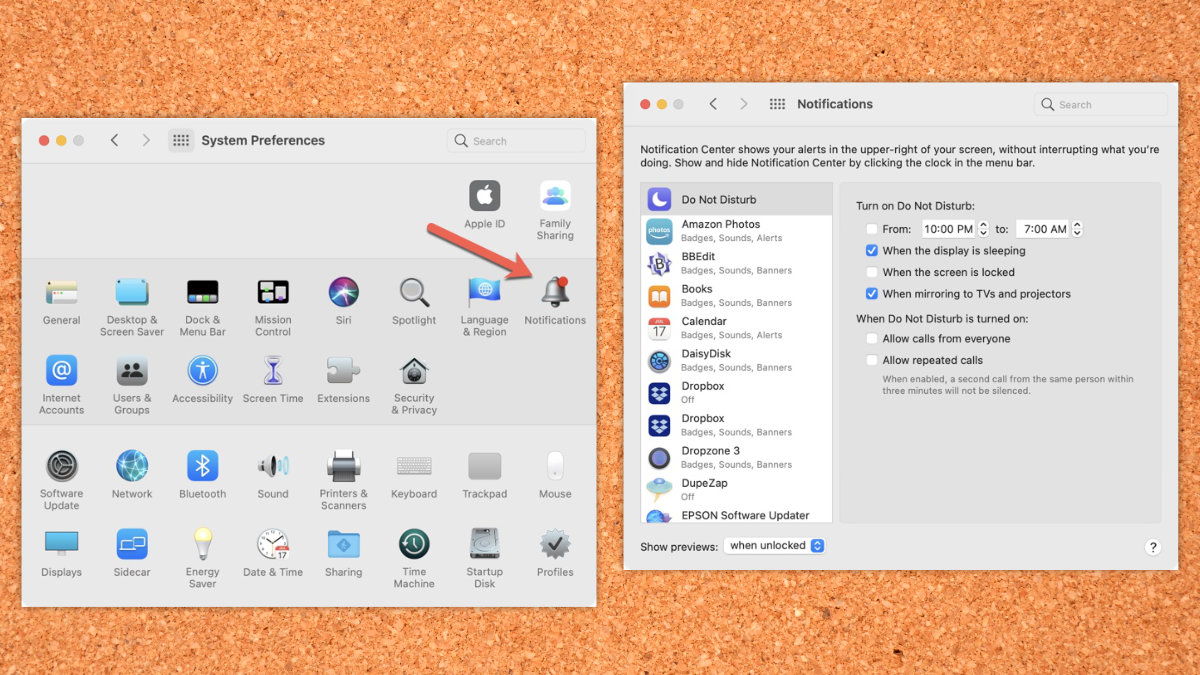
Turn Off Notifications
- Open up the System Preferences…
- Select Notification ( Located on the right side of the dialog under Family Sharing.)
Now you can turn off all notifications for a particular durations. Alternatively, you can turn off the notifications for particular apps.
Suggestion: turn off Notifications for Slack, Messages and Mail.
PermalinkKeyboard Maestro Chrome Macro
Easily Launch Chrome Browsers
w has a lot of functionalities that can be enabled from the command line. This is handy when you want to launch Chrome with certain functions.
Using Keyboard Maestro, I can set up a taskbar menu of various configurations. This makes it easy to launch Chrome with a particular setting whenever I want. I don’t have to memorize commands and I don’t have to launch a terminal editor to run these commands.
I simply select the chrome action that I want and instantly Chrome launches.
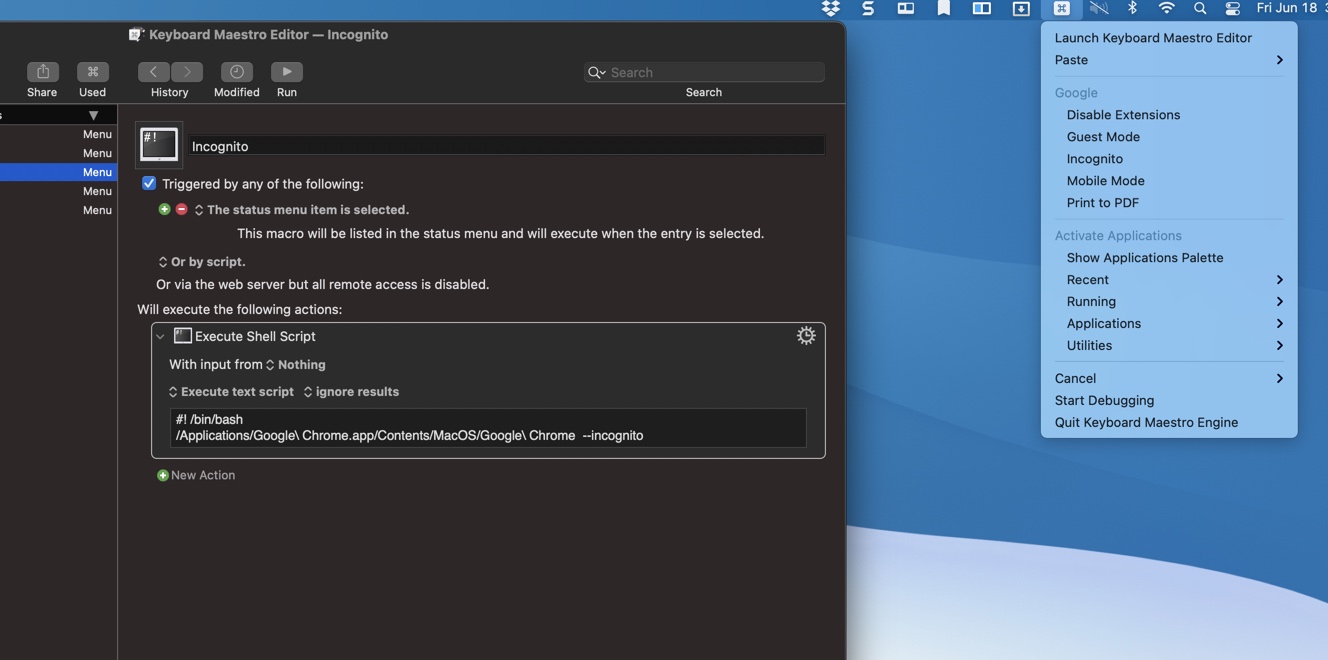
Sample Keyboard Maestro Action
Here is an example of one of the macros.
Bash Command:
#! /bin/bash
/Applications/Google Chrome.app/Contents/MacOS/Google Chrome --incognito
List of Chrome Command line Commands
You can get a list of all the Chrome Command options with some explanation on this site:
List of Chromium Command Line Switches « Peter Beverloo
PermalinkWord Count LaunchBar Action
Easily Count the selected text
Sometimes I need a way to count a selected group of text. Usually, it’s to see if it’s long enough for a particular field.
If it was on a website, I would copy that text into BBEdit or another text editor. Then I would look at the status bar to see the number of words or length of the copied text.
There has to be a better way,
So I decided to create a LaunchBar action. It was really easy to do and a good task to brush up on my JavaScript skills.
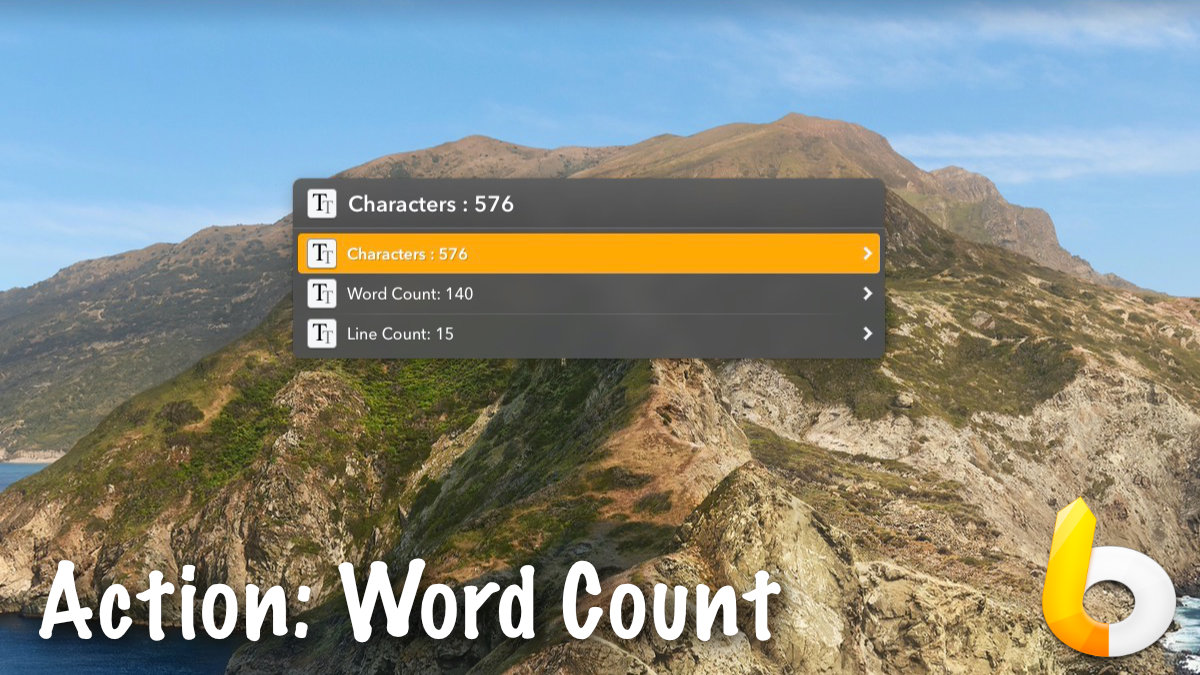
Using the Action
Now when I need to get the information, I just follow these steps.
- Select the text
- Use the “Instant Send†keyboard short cut
- Click Tab
- Then type in “Word†and then click return.
I get instant info on my selected text.
Download the Custom Action
I figured other people may want to use this so I am making it publicly available.

Download the action. After downloading, double-click on the zip file to uncompress it. Then double click on the file to install in LaunchBar
PermalinkAbout
A Mac veteran since 1989, I'm here to share my experience with tips and tricks every Friday. Witnessing the evolution of Mac software and hardware firsthand, I've gained a deep understanding of how these machines work and can help you troubleshoot any issues that may come up.
Check out all the blog posts.
Blog Schedule
| Thursday | Business |
| Friday | Macintosh |
| Saturday | Internet Tools |
| Sunday | Open Topic |
| Monday | Media Monday |
| Tuesday | QA |
| Wednesday | Veed |