
SoundConverter for Alexa
Quickly convert a bunch of audio to Alexa SSML settings
If you need to convert any audio file SoundConverter is the quick go-to app. All it does is convert sound from one format to another format. There's no editing capabilities and may crash if you try to convert a very large file.
Alexa Audio
I was working on transcribing a bunch of Real Audio files so that I could play them on the Alexa. I simply set the desired output format and dragged and dropped the files on the SoundConverter Window and within a minute all the audios were successfully covered to the recommended format.
Amazon's own documentation recommends only has two methods to convert sound files: ffmpeg and Audacity. While you can write up a quick bash script to convert a bunch of files using ffmpeg, it's so much quicker to use SoundConverter.
Alexa SSML Settings
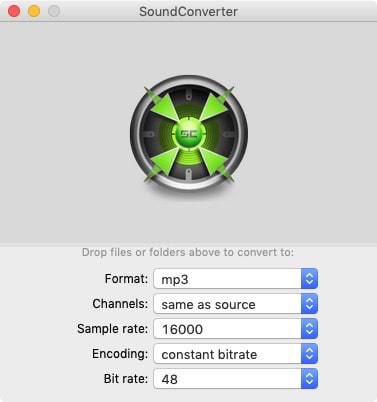
This is the recommended setting to play audio on the Alexa devices when playing it through a skill.
Getting SoundConverter
SoundConverter is available on the Apple Store for free. There are other applications that can convert sounds, but this is the quick app to convert a bunch of audio files in a batch mode.
The application is a bit old, and hasn't been updated in a few years - six years to be exact! It still works, it may crash every once in a while, but just restart the App and it just keeps on working.
After converting the sounds, I used Fission to check the audio and Normalize some of the clips.
PermalinkPhotolemur 3
Great Photo touch up tool using AI technology
Photolemur is a great application that will make digital pictures look much better. You don't have to configure anything - there's no figuring the color temperature, tone or saturation / vibrance. Simply drag and drop any image and be amazed at the transformation.
Description from the Site
The world's first fully automated photo enhancer that makes all your images great automatically with the help of Artificial Intelligence.
Who says you need loads of free time and expensive software to perfect your images? Photolemur does all the heavy lifting, so you can spend more time having photo-worthy adventures!
Sample Before/After Images
Check out these two before/after examples:
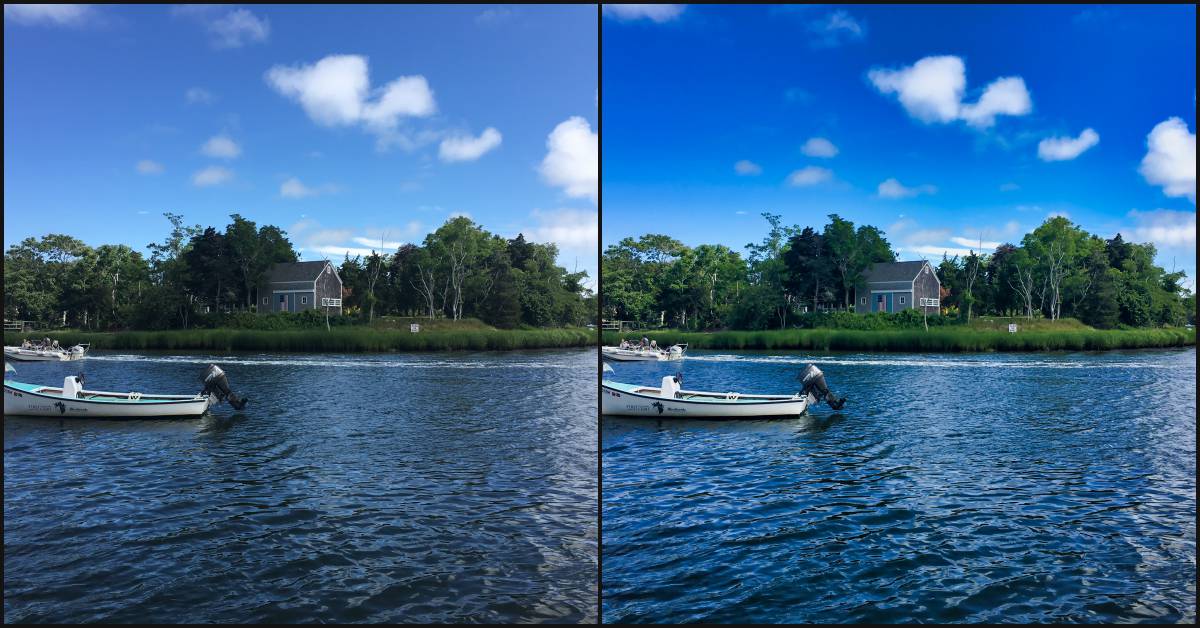
Cape Cod Shore - Original on the left, Photolemur version on the right. I like how blue the sky is and the bring green color of the trees.
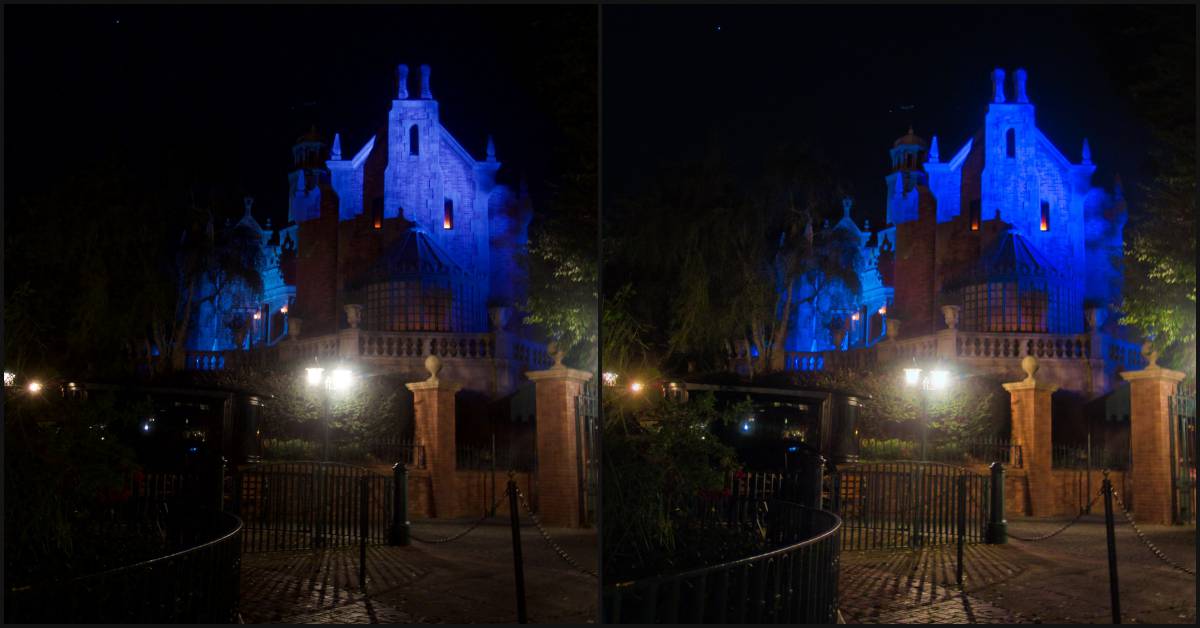
Disney Haunted Mansion at Night - Original on the left, Photolemur version on the right. Notice, in the Photolemur version, you can see more of the tree on the left of the haunted mansion. Also, notice that you can see more of the walkway brick under the light.
Five Things I Learned using Photolemur
Simply drag an image, and the software does all the work enhancing the photo. It might take 10-15 seconds. Afterward, you can see the before/after and then if you like it to save the image to your desktop, email or smugmug.
When exporting, there's advanced settings button. This is where you can set up presets to common settings - such as file location, naming, format and resize.
You can add additional Export Options by adding accounts to the 'Internet Accounts' in the System Preferences. This will allow you to export to Twitter, Facebook etc.
There are additional styles available that help enhances photos better in certain situations, such as fashion, street photography, sunsets, and landscapes. I have found that the default "No Style" had the best results. I did find it difficult to figure out which styles work best for which images situation.
The File Size minimum is 800 by 600. If you try to transform a smaller image you will get a warning.
Very Cool Application
I had this application in my app folder since July and finally paid for it during the Black Friday promotion. I have found that it's a great way to bring images to life. Pictures that I thought were just 'okay' transformed into amazing photos.
Applications like Luminar give you a lot more options, but if you want a quick image fix. I would highly recommend adding Photolemur
Photolemur cost $35 for a single license, there is a trial version where you have all the image enhancement capabilities of the full version. You're only limited to batch processing multiple images.
Permalink2018 Black Friday Watch
Deals that I am watching for this Weekend
Every year I put out my list of things I am seeing if they offer any special deals during Black Friday or Cyber Monday. Most of my “watch” items are centered around the Macintosh.
Check out the past year’s watch: 2017 and 2016.

Macintosh Applications
Notion - Great App. Some people think it’s a substitute to Evernote, but I think it still lack key features - such as a web clipper. They are working on making it awesome. They may have some great incentive this weekend.
PhotoStyler - Cool application, but it hasn’t gotten an updated in a few years. At $29.99 it’s a pretty steep price.
Photolemur - I have seen deals around $35, I might pick it up if it goes just below that amount.
Wondershare Filmora - I have the application, but they may have some deals around the pack subscriptions
Services to Watch
uDemy - I have several courses that I have on my wishlist and if the price is right then I will sign up for them. They are running a $9.99 deal, which is pretty much the same deal they run several times a year.
Flickr - Earlier this month Flickr announced some changes to their membership plans. Who knows if they will have any Thanksgiving Deals. Worth a watch.
Dropbox - They haven’t had deals in the past, but who know’s this year could be different.
Creative Market - Haven’t purchased anything this year. Might have some good deals. Great place to find stock art and vector designs. They are a great source for font and templates.
envatoMarket - Large selection of graphics, audio and code. They do have some unique files that can’t be found any place else.
Fiverr - Thinking ahead to 2019 and to a new video intro for my YouTube channel. Fiverr is a great place to find it.
Hardware
These are some of the things I am looking at in 2018:
- Mini-Tripod - Amazon is the place to find, but BestBuy or Target might have some deals.
- Levenger Circa Paper - My Annotation Rule paper supply is running low. They are currently running a 30% Black Friday sale.
- 128 GB Flash Drive - While I don’t really need one, but the prices have dropped a lot over the past year, so there might be some excellent deals. SanDisk Cruzer are currently selling for $24.99 on Amazon. Places like Walgreens and Best Buy are places to find the deals.
Not Everthing a Deal This Weekend!
Be sure to check out LifeHacker’s “When is the Best time to Buy Anything.” While you might see a lot of good deals this weekend, you can find good deals all year long.
Have a fun 2018 Black Friday shopping!
PermalinkConvert Multiple markdown to HTML
Easiest way to convert Markdown to HTML on the Mac
MultiMarkdown is now showing up in more an more applications. It's an easy way to write content when you just want to focus on the content. It's also popular because you copy the content to different applications and keep the layout/formatting intact.
Easiest Way to Convert Markdown to HTML
Brett Terpstra wrote an excellent Service tool to make it easy to convert Markdown to any style that you want. Here's his description of the tool:
The Markdown Service Tools are a collection of OS X Services designed to make writing Markdown text that much easier. Services work in any Cocoa-based application (which is most of the apps on your Mac). The Services are prefixed with "MD" to keep them grouped in your Services menu.
Installation of the tool is pretty simple, and Brett does a good job explaining how to use it on the Markdown Service Tool page.
What's nice is that once you install the service tool, you can assign your own universal keyboard shortcut to trigger the service with the select text.
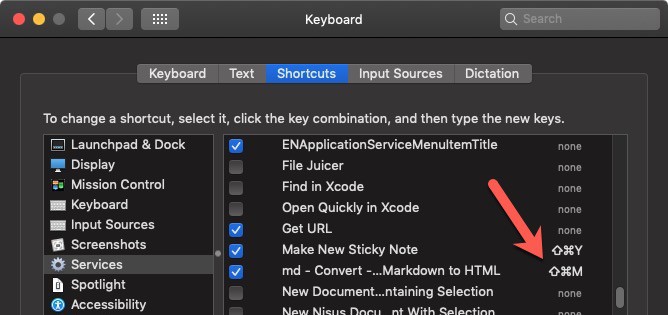
Easy to configure a shortcut, and use it where ever and whenever you need it!
What about Utility Applications?
There are many applications that can also convert Multiplemarkdown to HTML, and they may be a better option if your day-to-day job depends on converting then an application might be a better long-term solution. One of the "downsides" to Brett's Service tool is that is works based on the selected text. So if you're converting a bunch of Markdown file, this may not be the best choice for you.
Notion and Bear
This tool is very useful if your writing blog content in Notion or Bear, and need to convert it to HTML before posting it.
PermalinkDelicious Library
Use Delicious Library to Monetize your Inventory
Having a lot of DVDs and Books can be overwhelming. You may not what books you have and where they are - what is in the box in the basements or attic?
Delicious Library 3 solves that. It super easy to track inventory and find the books that you have.

Create Smart Group Shelves and always know which books you have!
Seven Things I learn about Delicious Library
- iOS Scanner App is a quick way to scan books in a library. If you have a lot of out-of-date books Delicious Library may not have an image for it.
- In Delicious Library, you can set up shelves to where the books are located. This is how you can separate books in the attic and the basement. You can also create ‘ virtual shelves’ so you can have a quick view of all your business books.
- There is a ‘ Charts’ feature so that you can see your current inventory levels. Here’s where you can find the items that are worth the most on the market.
- Delicious Library is useful to determine what should be sold at a yard sale (in a $5 box) and what should be sold on eBay.
- The Wishlist is a good feature to track things that you may want for the birthday, simply drag items from Amazon.
- You can share shelves with friends, so they know what you have and can borrow books your not reading.
- Delicious Library isn’t just for books and DVDs, you can tag tools, which is great when you're looking for a blade for a particular saw.
Not Free - But Worth the Cost
Delicious Library cost $39 and worth the money in time savings. Also, you may find that you have some valuable books that could easily offset the cost of application.
Not sure if it’s right for you? Try the demo and see how useful it is to digitally organize all your stuff.
PermalinkAdd Signature in Preview
Add your Signature to Preview App to use it when you need it.
Did you know that you can electronically sign PDF documents? Simply add your signature to Apple's Preview application and you can sign off on documents without having to print them!
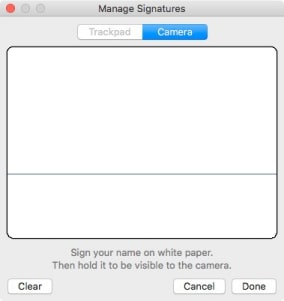
Adding Your Signature
You don't need fancy software or hardware to add your signature, this can be done using your camera and a plain white piece of paper.
- Get a clean white paper (any size) and sign your name as you would regularly do. Use a dark pen or pencil for your signature.
- Open up the Preview Application
- Go to Tools, Annotate, Signature, Manage Signatures then click on Create Signatures
- Follow the instructions on the Manage Signatures dialog box. Tip: I would recommend putting another while sheet of paper behind the signature sheet so that you get a nice clean scan of your signature.
The whole process is very quick and probably takes longer to brew a cup of Nespresso coffee than it takes to create your signature file.
You can add as many signatures as you want. For example, you can have a professional business signature and a regular signature.
Adding a Signature to a PDF Document
To add your signature to any PDF document:
- Open up the PDF Document
- Go to Tools, Annotate, Signature and pick your signature (There is no Keyboard Shortcut)
- Drag your signature to the correct location.
- Save your file.
Note: You should save your file as a different name, for example, expense-signature.pdf. That way you know which documents have a signature file.
Set it and Forget it
Take a few minutes to do this now and you won't need to think about it in the future. This is because your signature image is saved in the Cloud. So when you log into your iCloud drive, you'll always have access to the signature.
How cool is that?
PermalinkAdding Hyperlink in Apple Numbers
Easy way to add Dynamic Hyperlinks to Apple Numbers
When opening up a CSV file from Jira, you may want to add a link to the tickets. The easiest way to do this is to create another column and then add the following Hyperlink function.
Easy way add a link using Apple Numbers
=HTPERLINK("https://company.atlassian.net/browser/"&B1,B1)
What the formula does is take the value in Column B and then appends it to the standard URL for your company Jira account. The final linked text is also the value in Column B. (Simply change the URL to point to the correct location.)

Apple Converts the formula to identify the columns.
Couple of Basic Notes
Right-click the column that contains the values that you want to have links to and select the 'Add Column After'Simple do the first item, then use the cell fill down functionality (Yellow dot in the bottom cell, and drag down)
Once completed, Hide column B so you don't see duplicate ticket ids.
I wasn't able to find a way to apply the HYPERLINK formula so that it uses an existing cell data. If you know of a way, let me know!
PermalinkiTunes ArtWork
Easy way to get unique ArtWork into iTunes via Google
If your adding songs to iTunes, from outside the iTunes store, such as importing from CDs or something that you created in GarageBand, chances are that you'll need an Artwork.
The official way to add an artwork is to using the "Get ArtWork" functionality:
- Select the Song
- Go to File > Library > Get Album Artwork
That's great, but iTunes may not find an Artwork for your song, especially if it's a custom audio clip.
No album ArtWork really shows up when viewing albums in iTunes.
Google Images for ArtWork
The better way is to use Google Images to find the perfect artwork image.
This used to be a complex task, as I would have to search and then save the image to the desktop and then drag the image to the song. I then end up with a bunch of images on my desktop, where I would save them in a folder for "future" usage. In fact, I really don't use them again because it would be just as efficient to search for them image in Google.
I found a simple way.
Simple Tip on using Google to Add ArtWork
Here's what I do now:
- Go to Google Images and search for a particular image.
- Click on the Image.
- Right Click on the larger image, and select 'Copy Image'
- Go to ITunes, find the song I want.
- Select the Image and do a Command-I
- Then past the image in the box in the top left of the dialog box.
Doing this method, I can quickly get 10-15 songs added in minutes - especially with dual monitors.
Good tip on the image size of a Song ArtWork:
Here's an interesting tip from Apple on the size of the Artwork to use in iTunes. This advice is for Podcast, but it probably a standard convention for any iTunes artwork:
"Artwork must be in the JPEG or PNG file formats and in the RGB color space with a minimum size of 1400 x 1400 pixels and a maximum size of 3000 x 3000 pixels at 72 DPI."" - itunespartner.apple.com
This is good to know so that your artwork will look good today and for a while.
Example ArtWork
Based on the suggested size from Apple, here's a few links to popular searches that I perform:
Remember: Images searched for through Google Images may be subject to copyright. Just don't steal people images and take credit for them. The above tip is good for personal use.
PermalinkLaunchBar Reminder Action
Setup location base reminders to increase productivity
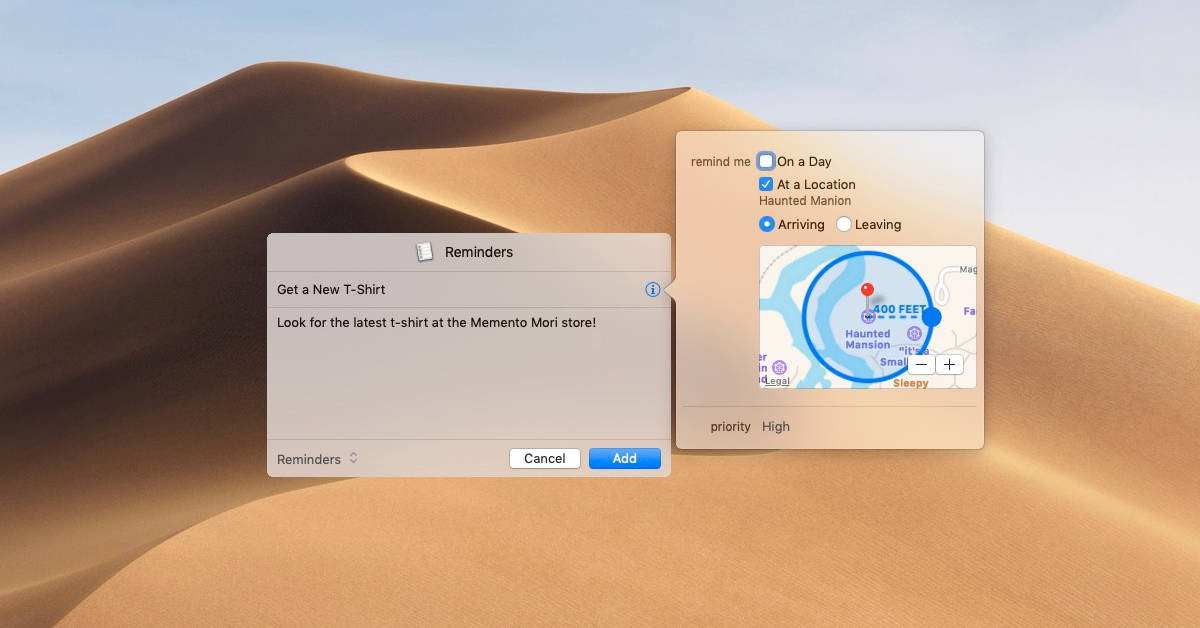
Using LaunchBar, you can easily set up all sorts of Location based reminders. Since they don't fire until you're near the location, feel free to add whatever you want!
It's very simple to use the 'Add to Reminders' action in LaunchBar. This is much easier to use than opening up the Reminder Application.
Example of Location Reminders to Set
- Did someone give you a gift from their vacation? Remind yourself now, so when you're on your vacation you get them something. You could use the departing airport as the location point.
- If your driving down route 1 in Maine, remind yourself on where the best Lobster Roll is.
- Like Popcorn? Remind yourself about which movie theater has the best popcorn. That way you'll be reminded as you pull into the parking lot.
- Remind yourself to get things at stores you may not shop at frequently - such as getting a 100-foot outdoor cable at Ocean State Job Lot.
- Need something at the mall but don't want to go now, set up a reminder so you don't forget the item next time you're there!
- Set up a reminder when you get home to do certain tasks so you don't forget about them.
Couple Location Reminders to Set
Click on the title to download the .ics file that has the reminder set up for you!
- Largest Hidden Mickey - Look for Disney Solar Panels as you drive by: 1400 World Dr, Orlando, FL 32830
- Geographic Center of the United States - if your driving by Lebanon, KS, might as well check it out!
LaunchBar Action is Very Handy
LaunchBar's 'Add to Reminders' action is very powerful. Just spending a few minutes with it now can save a lot of headaches in the future.
PermalinkItsycal
Cool menu bar calendar tool
Itycal is a cool desktop utility that displays the current date in the menu bar. You can customize what actually gets displayed in the menu bar. When you click on the date, you get a view of the current month.
Five Things that Make Itsycal A Cool Tool
You can add Exchange and Calendar events to the calendar, the current day events also appear below the monthly calendar.
You can add a custom format, such as EEEE, MMMM d, y for Friday, October 5, 2018. Full details on the Unicode Locale Data Markup Language format support is available. You can hide the icon if you just want the full month to be displayed.
Using the Arrow keys you can navigate between months, making it easy to find dates in the future. For example, if you install this in October, click on the icon, then the arrow key twice, then the down key to see what days Christmas will appear in the future.
If you plan to reference the calendar a lot, you can set up a global shortcut to open up Itycal calendar. This is set in the General section application preferences. I have setup Shift-Command-0 as my shortcut on my computer
Once Itycal is open, type Command-N to quickly add an event on your calendar. This makes it easy to set a reminder when you on the phone and wants to add an entry right away.
Itycal is free, so there's no excuse on why you shouldn't get it.
PermalinkAbout
A Mac veteran since 1989, I'm here to share my experience with tips and tricks every Friday. Witnessing the evolution of Mac software and hardware firsthand, I've gained a deep understanding of how these machines work and can help you troubleshoot any issues that may come up.
Check out all the blog posts.
Blog Schedule
| Thursday | Business |
| Friday | Macintosh |
| Saturday | Internet Tools |
| Sunday | Open Topic |
| Monday | Media Monday |
| Tuesday | QA |
| Wednesday | Veed |
Other Posts
- Macintoshman Song
- macOS Ventura
- Filmora 9
- Holiday Search in Spotlight
- Top 8 Macintosh Post of 2018
- Mission Control
- Smart Converter Pro
- Remove Background using PhotoScape X
- Burning DVDs - Final Cut Pro
- Organizing Your Mac's Launchpad
- 360 Photo Viewer
- Apple Magic Mouse Problems
- Setting up a Better Display on your Retina Computer
- Colorful Icons on my External Drive
- Xcode Training Suggestion