
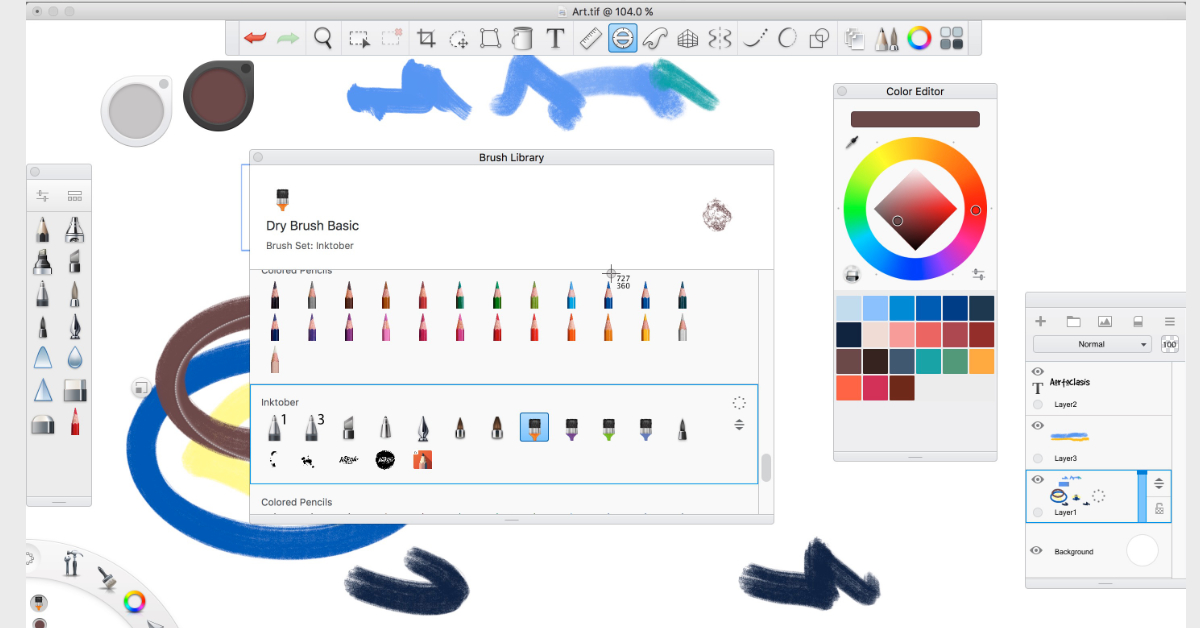
AutoDesk Sketchbook
AutoDesk Sketchbook is now free
On April 30th, Autodesk announced that SketchBook is now free for everybody, previously it was $25/yr. This includes both the Macintosh and Android editions.
The only thing that you will need to do is to signup for an Autodesk account - and that is also free.
What is Sketchbook?
Autodesk Sketchbook Pro drawing and painting software provide designers, architects, and concept artists the tools to sketch ideas quickly and create beautiful illustrations. Available for most platforms and devices.
Sketchbook 7 Features
- Natural drawing experience
- Unlimited brushes
- Import/Export Photoshop Formats
- Predictive Stroke
- Four Symmetry Dimensions
- Rulers and Guides
- Custom Perspective Guides
Affinity Photo vs Sketchbook (Unique Features)
Here's a few things that make Sketchbook a great companion to Affinity Designer:
- Lots of brushes with a lot of different effects - more than 90 customizable brushes that can incorporate both textures and shapes. Make your design in Sketchbook then transfer it to Affinity Designer.
- Scan Sketch imports your line art with a transparent background, ready for inking and coloring. You can then import that sketch design into Affinity Designer.
- Works on your Smartphone. Now you can do some Sketching when your waiting in line for your morning coffee ( or wherever inspiration happens) and then touch it up when you get to the office.
- Copic Library - Lots of great color ideas.
- Flipbook Automation - Create simple animation videos for Social Media.
Getting AutoDesk Sketchbook
You can download Sketchbook free from the Apple Store.
Even if you don't need a drawing program, it's good to have to use and play around. It does take some time to understand the interface and how to navigate between brushes and colors. However, once you play around with it for a while you'll see that it's a pretty cool application.
If you have a Lynda.com account, you can take Veejay Gahir's Sketchbook Pro 7 Essential Training and learn how to use the software.
Getting additional brushes
After you download Sketchbook, make sure to get the bonus Painting brushes.
- Open up Autodesk Sketchbook
- Go to Window -> Sketchbook Extras (Third item from the bottom)
- Click install on each of the items.
- After the installation is done, it will be quick, check out the cool brushes.
Spotlight in MacOS High Sierra
Ways to fix Spotlight Issues in High Sierra
There have been reported problems with how Spotlight search is working on the latest version of MacOS (High Sierra). For some people it isn't working or that it's slowing down their computer.
Clearing the Spotlight Database
According to Apple, the best way to zero out the Spotlight Database is to put the drive in the Privacy section of Spotlight. When you do this, Spotlight will remove all information relevant to that location.
Steps to "Officially" Clean out Spotlight
- Go to 'System Preferences' then select Spotlight icon
- Select the Privacy Tab
- Click on the '+'
- On the left scroll down Devices and click on computer name, then select your hard drive, probably named 'Macintosh HD'
Once that is done, you remove the entry from Privacy and then Spotlight will reindex the data from scratch - like it didn't know it existed. I would recommend waiting a few minutes for the database to get cleared.
Steps to "Officially" ReIndex Spotlight
- Go to 'System Preferences' then select Spotlight icon
- Select the Privacy Tab
- Click on the item in the Privacy menu - probably 'Macintosh HD'
- Click the '-' just below the list of Privacy items.
- Close out the 'System Preferences' window
Obviously the index is going to take some time to work. The amount of time that it takes will depend on the size of your data and what you have set to Index in the Spotlight Control panel. Your better off letting this run overnight so that indexing process isn't flighting resources with other computer activity.
Using MDUTIL Services
If Apple's official way doesn't work then try the mdutil way...
The mdutil command is at your service. The command manages the database used by Spotlight. If you're doing anything with Spotlight, you have to go through the mdutil command.
Some of these commands you need to be the computer root user. Which for most instances, the primary user that logs into the computer.
Check the Status of Spotlight
The mdutil -s command checks to see if Spotlight Index is on. That is will search inquiries return a search results.
mdutil -s /
Two Responses you can get:
- Indexing enabled. This meeans that Spotlight Index is on.
- Indexing disabled. This meeans that Spotlight Index is off.
Alternative Way to Erase and Rebuild the Database
Using the 'E' flag with running mdutil will Erase and Rebuild the Index. The same caveat as before, it will take some time for the index to get rebuild.
mdutil -E /
Stopping Spotlight Services
This is useful Spotlight indexing is taking too much of your computer resources.
mdutil -i off /
This is what you should see if the process was successful.
mdutil[96409:6557235] mdutil disabling Spotlight: / -> kMDConfigSearchLevelFSSearchOnly
Indexing disabled.
Restarting Spotlight Services
If you're not going to use the computer for a while, why not turn on indexing. Remember you can always exclude documents and folders by using the Spotlight Control panel.
sudo mdutil -i on /
This is what you should see if the process was successful.
/:
Indexing enabled.
Things I learned
- Spotlight handles the Smart Mailboxes in Apple Mail. So when you rebuild, it will take a while for the Smart Mailboxes to show current data.
- One of the new features of High Sierra is that Spotlight now can show flight status information. You can disable this feature by unchecking 'Spotlight Suggestions' in the Spotlight Control Panel. (So if you're having Spotlight issues after upgrading to High Sierra, certainly turn off the 'Spotlight Suggestions' to see if it helps.)
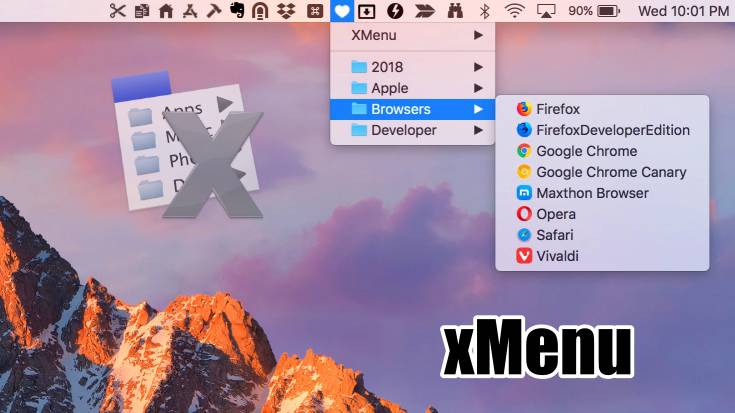
XMenu
XMenu allows you to add custom drop down menus
XMenu is a neat utility that put allows you to put up to six addition menu items in the menu bar.
Six Menu Possibilities with xMenu
There is the type of menus that you can add, each category has their own unique menu icon.
Applications
This menu item displays all the applications that you have in your Application Folder. This is an alternative approach to using the LaunchPad.
The downside is that if you have a lot of applications, it can take a while to find it. There's no searching and the applications are displayed by there name.
Developer
This menu item displays all the applications that you have in the Xcode Applications folder.
If your not a hardcore developer, you get Accessibility Inspector, Application Loader, FileMerger, and Instruments.
Tip: Probably not very useful menu item if your not a Developer.
Home
All your Home Folders at your fingertips!
This is a great way to access common folders you use every day. Files in your Dropbox, Photos, Music, and Desktop can be accessed very easily.
Documents
This is just you user Document folder, which is located at ~/Documents
Most files that you save are kept in the Documents folder.
User-Defined
Create your own set of application/files that you want in the menu bar. This a very cool feature since you can put anything you want and it will be displayed in the drop-down menu.
Personally I think this is the best feature of xMenu.
This is a great way to declutter your System Dock, simply put "rarely" used applications in here. You'll still have quick access via the menu bar instead of the System Dock. You can create folders of like items so they might be easier to find.
Snippets
Access common text snippets from the menu bar. However, with tools like LaunchBar and Keyboard Maestro, this doesn't really seem very useful. There's no scripting capability - you only display raw text.
This is neat to have feature, but for better productivity use Keyboard Maestro or TextExpander.
Description from Devon Technology Website
XMenu adds one or more global menus to the right side of the menu bar. They give you access to your preferred applications, folders, documents, files, and text snippets. Launch any application with a single menu choice or insert text snippets into your documents. XMenu is a real app, no hack, no extension. And it's free.
Getting xMenu
You can download XMenu from the Mac Apple Store. Devon Technologies has provided the software free of charge.
PermalinkResize-Image vs PhotoScape X
Which is the Better Batch Application
Resize-image is an application that most people might have seen in a Bundle Hunt bundle. On the service it looks to be a good practical application that will help batch process a bunch of images.
Description from the Website
Macsoft's Image Resizer for Mac is specially designed Mac image editor software for Mac users to combine, resize and revolve photos, add watermarks to them freely. And it allows you to change the image format from one to another without any difficulty.
General Overview
The application allows you to do multiple image actions at once, you can resize, add text and add text and image watermarks.
It's a good basic application for the functionality. However, there are a few drawbacks:
- You can't drag drop images to get added to the collection
- Your limited to only Scale, Rotate and adding Watermark
- You can't add any special styles to Text Watermark, such as drop shadow
Should you invest in Resize-Image?
If there's a current Bundle Hunt bundle going on, you can pick it up for a good deal. At least if you ocassionaly need an image batch program.
It does what it says - I think you're limiting yourself to features and functionality. It certainly not worth the $19.99 price.
Otherwise it's $19.99 on their website - not sure if it's really worth the price.
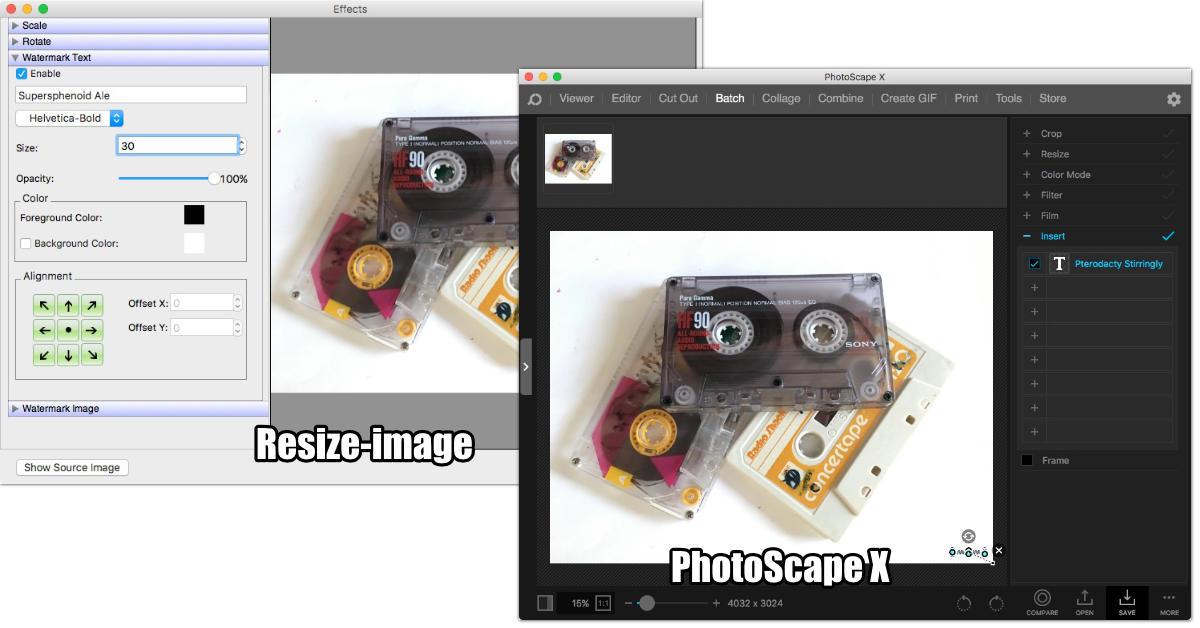
PhotoScape is Better
The Batch functionality in Photoscape X goes well beyond the capabilities of Resize-image. You can add a lot more effects and have more flexibility with existing tools in Resize-image.
While Photoscape X cost a bit more, it's certainly worth the extra cost because you get more than an app that does batch processing. You get a nice image toolbox.
Which means that you'll be using the application more often and at the end of the day get more value for your money.
Photoscape X Batch Features
Five things that make Photoscape X a much better application:
- You can click on the images to see how the batch changes will impact that particular image. For Example, You'll be able to tell if the text is aligned correctly.
- Add Frame effect to the batch set of images.
- Change the Color Mode. Perhaps the images will look better in black or white or Sepia
- Resize the image based on a particular Long/Short Edge size.
- Add multiple Text Fields or Image objects with different formating.
LaunchBar Actions
A look at three useful LaunchBar actions
LaunchBar is a very powerful tool that puts instant access to all sorts of actions at your fingertips. You can open applications faster, get to documents, set reminders and so much more.
There are a lot of very useful LaunchBar built-in actions - 152 of them to be exact. They expand the capabilities of LaunchBar to be way more useful than the standard Spotlight search.
Here are three example actions that are very useful. Granted it takes some time to get used to the new process, but you will see how it can improve your computer productivity time.
Searching using Google
The typical method to search using Google requires opening up a browser, typing a search term and hitting return. That's great if you're already working with the browser open, but if you're doing a paper it's a lot of extra steps.
Using LaunchBar, you can quickly get things moving by passing the search parameters to the browser. After doing this a few times, you'll see how using LaunchBar method is so much easier than a typical method.

- Type: Command Space
- Type: Google
- Click Space
- Enter Your Search Term and then click Enter
Join Lines with a Comma Separator
Whenever I have a list that I need to join, I usually end up opening up BBEdit and then pasting the text and then do a simple search and replace. After the search, I have to remove the last comma in the list. No so fun, and very time-consuming.
Using this trick in LaunchBar, I am able to work much quicker. Now I can quickly sort the list. There are other list tools in LaunchBar, but this is one that I use the most.

- Select some text and drag and drop it onto LaunchBar
- Click Tab
- Search for 'Join' and click Enter
- To paste it in the front most window with Shift Enter or using Command C
Copy as Tiny URL
Tiny URL is a great service to make URLs really shore, especially when the URL has a lot of parameters. This is useful when you want to post something in Slack or in a Jira. There's no need to have a huge paper trail link
The nice thing about Tiny URL is that it never expires, so you can keep using it for a long time.

- Command Space
- Type: Tiny
- Scroll to where you see 'Copy as Tiny URL'
- Type in or Paste in a URL
- Click Enter
- Now Your Clipboard has the TinyURL version of your URL. Paste it in where ever you need it.
Go Faster
You can make the process go even quicker by using custom abbreviations. The actions will appear quicker with abbreviations that you are more familiar with.

To make Searching Google faster, change the Google Abbreviation to search:
- Type: Command Space
- Type: Google
- Click Command Option A
- Enter your custom abbreviations, such as 'search' and click
File Juicer
File Juicer can get files from Powerpoint and Chrome
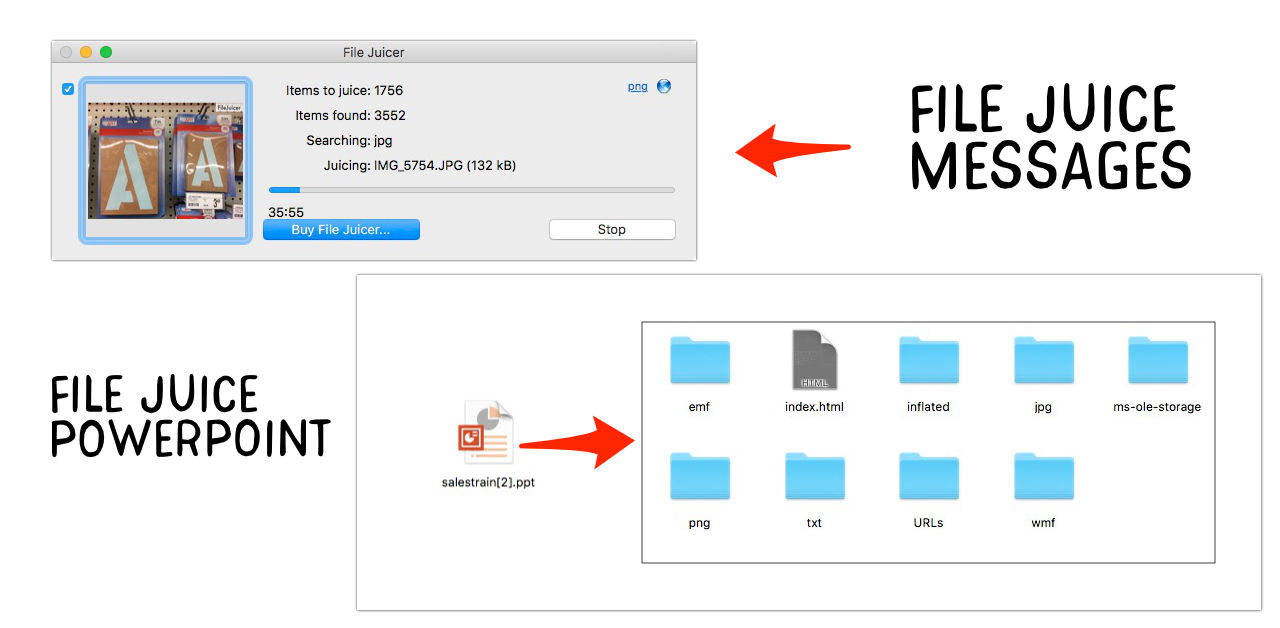
File Juicer is a cool program that extracts images from Powerpoint and PDF documents.
Description from the site:
With File Juicer you can
- Extract images from a PowerPoint slide show or presentation.
- Extract images and text from PDF files.
- Recover images and video from erased flash cards
- Recover text from damaged files
- Extract the images and HTML files in Safari's cache.
- Extract attachments from email archives.
and more...
I find this useful when I want to extract images from an old Powerpoint slide and use it in other presentations. I have a lot of old PDF documents that have images in them.
Eight Things I learned while Testing File Juicer
- Not all PDF documents will have images. Some graphics are encoded into the PDF document that File Juicer can't identify it as an image object.
- When File Juicer extracts data from a document it saves similar types in folders. (example JPG, Gif, TIFF)
- A index.html file is generated as a quick reference guide to all the images in that folder.
- In the File Juicer Preference section you can set up what type of objects should be extracted
- Can't extract Stuff-it archives
- This helped me identify some old files. I was able to determine some old files were PageMaker documents.
- You can extra Browser Cache from the File menu. This might be useful to do before deleting out the cache.
- You can also extract images from Messages (iChat). Very helpful if you want to keep a copy of photos people send you.
- When using the Message extraction, the extracted object will maintain the original file Modification Date, which makes it easy to sort images by date.
Good Application. But...
It was fun playing around with File Juicer but right now I can't seem to justify paying $17 for it.
I found the ability to extract Browser Cache and Images from Messages is way cool. The extracting messages are nice, was wondering how I could get a copy of images.
File Juicer will be placed on the short list of applications to buy - maybe this summer.
PermalinkPhotoScape Numerical Annotation & Hidden Mickey
Cool way to add Numerical Annotation in PhotoScape X
PhotoScape is a great all around graphic tool. It's very useful to touch up images and add a bit of touch that sometimes is needed.
Numerical Annotation
There are times when I have a graphic image and I need to point several things out, such as steps to perform a bug. This is where having a numerical annotation graphic can be handy.
There isn't a built-in numerical functionality in PhotoScape X. There are a couple of ways to get it done:
- Add a Figure Image
- Use a Text Symbol
I like using the symbol way versus the first way because I can duplicate the graphics and have all the numerical annotations be the same size, color, and effect.
Basic Steps to Add Numerical Annotation
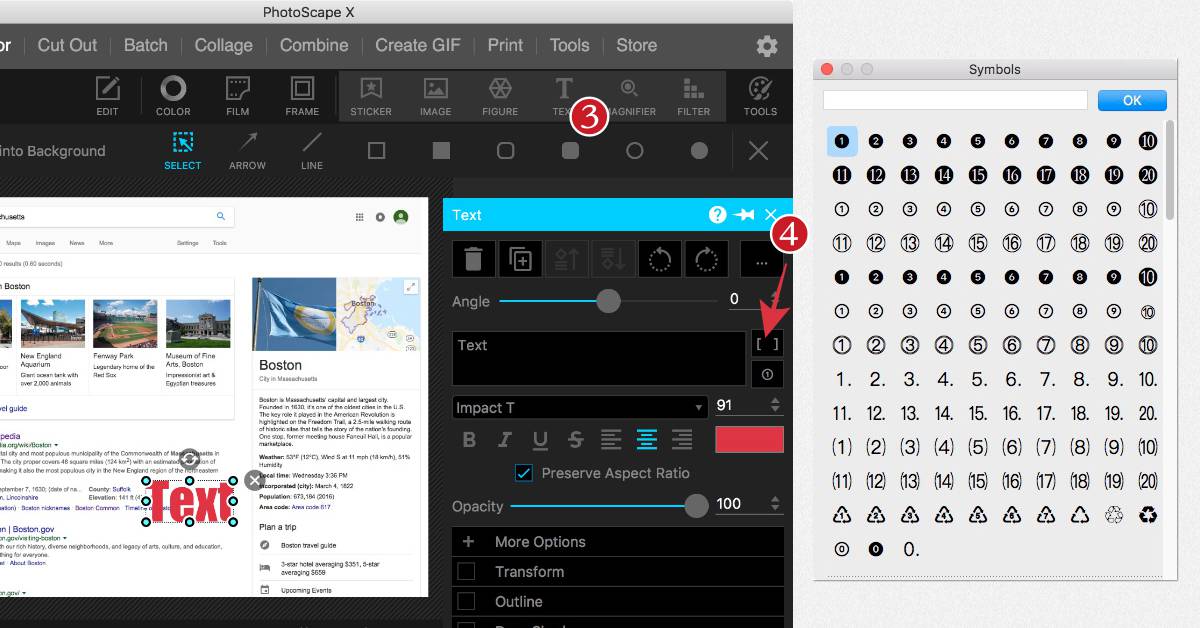
- Open up an Image in PhotoScape as Edit Mode.
- Click on the Insert icon in the top bar.
- Click on Text on the top bar
- To the right of the 'Text' box is a Symbol box (lower of the two boxes to the right of the "Text Box")
- Select one numerical that you would like to use and click 'Ok'
- Change the color so that it stands out.
- Now you can move the Symbol around the image and resize it.
- For multiple steps, simply duplicate the text field and change the graphic.
- If you have more than '20' items, as that is the highest symbol number, simply change the color
Hidden Mickey in PhotoScape!
While playing around with Photoscape, I found a real hidden Mickey!
When you insert an image to another image, you have the ability to define the inserted image shape. If you scroll about 2 thirds a way down, you'll see two Mickey Mouse images.
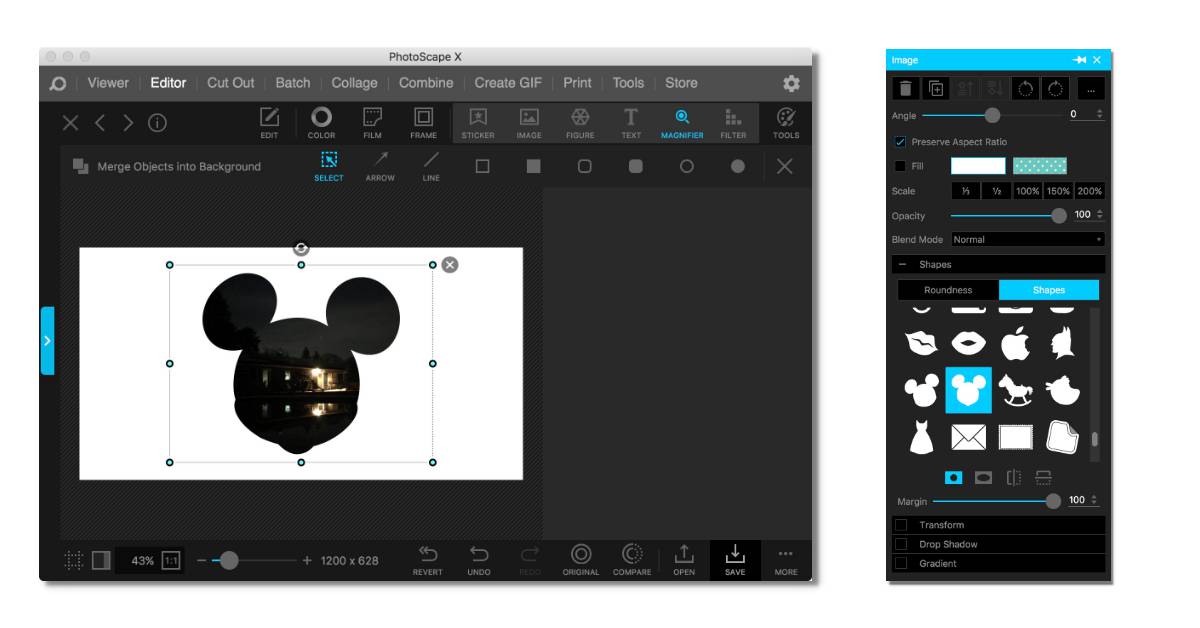
There's also a Macintosh logo there with Steve Jobs as the outline.
Very Cool.
PermalinkApple System Services
Using the System Services can save you lots of time.
When was the last time you looked at the System Services you have installed?
Some applications provide helper services so that you can interact with applications. You can access the services from any application menu.
Some of the service's functionality will only show up when you have something selected - text, image, file or folder.
There are four main categories for Services:
- Pictures
- Messaging
- Development
- File and Folders
- Searching
- Text
- Internet
- General
Services is a good way to be more productive with applications you use every day.
Check Out the Installed Services
It's worth checking out what services are available on your computer.
You can check out all the computer services available by looking in the System Preferences -> Keyboard -> Services
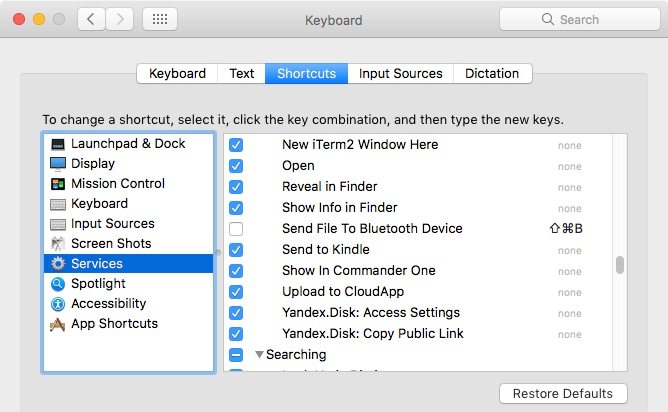
If there are some Services that look interesting, you can always assign a keyboard shortcut to make it easy to access the shortcut. Items that don't have a checkmark are not enabled. If there are applications that you don't use, you can always disable the Services by unchecking the services. (In my case, I don't use the Bear App, so I'll disable that.)
Service Example - Text to Speech
Did you know that you can easily convert a webpage text to spoken text to play on your iPhone? Yes, there's a built-in service called, "Add to iTunes as a Spoken Track."
There are four good speeches to select from Samantha, Victoria, Alex, Fred. These voices offers you the best realistic speech quality. (Whisper is also a good quality sound.)
For some reason, Chrome doesn't have the reading mode enabled by default, see How To Turn On Secret Reading Mode In Chrome Desktop Browser to get it working.
Sample Task:
- Open up a webpage ( Example: Tea Doors )
- Click on the Reader Icon in the Chrome or Firefox location bar (From now on I am assuming that your using Chrome)
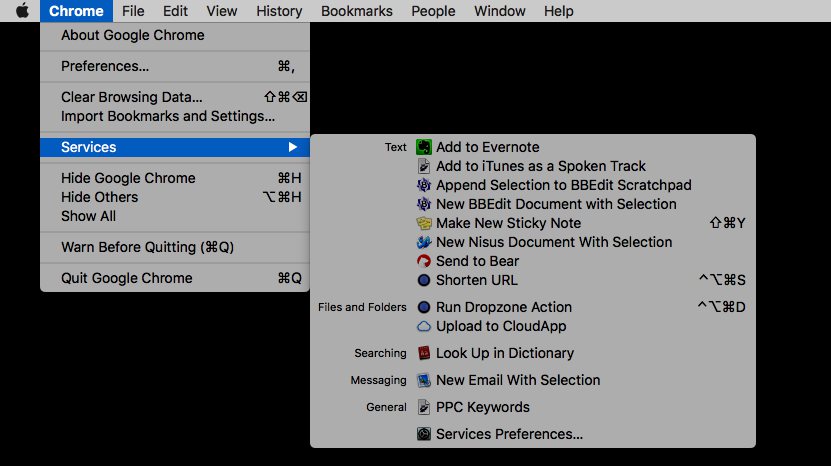
- Select all the Text
- Select the Chrome menu and Services
- Then Select "Add to iTunes as a Spoken Track."
- From the System Voice, pick Samantha, Victoria, Alex or Fred.
- Give it a good name, "Tea Doors" is a good choice.
- Keep the "Music" as the option, as that will make sure the clip appears in iTunes.
- Click Continue
- iTunes will open.
- Play your Clip!
- If you like it, add it to your iPhone.
How Cool is That
Now you can make your own "Books on Tapes" and listen to articles on your commute.
It's also a good way to proofread your blog or important emails.
PermalinkBBEdit Stye Text
Show Code Syntax in other Programs easily.
There is a popular online utility called GeSHi - Generic Syntax Highlighter which makes it easy to display Code in the same Syntax format in popular editors. You use this when you want to display code on a website.

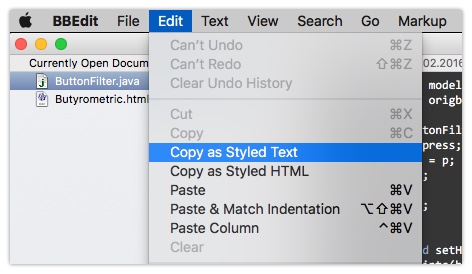
If you have BBEdit, you don't need it because there's a built in tool called "Copy as Styled" which will copy the selected text using the BBedit color scheme that you have selected.
Sample Output from BBEdit
    public void setHints(int hints) {
    super.setHints(hints & (~ImageConsumer.COMPLETESCANLINES));
    }
Copy as Styled Text
The other "Copy as" functionality is the "Copy as Styled Text" which copies the selected text as rich text. This is handy when you may want to paste the syntax code in a Microsoft Word document or Evernote note.
Cool trick with OmniGraffle
If you have OmniGraffle you can create a cool info-box using your code:
- Copy your Code in BBEdit as "Copy as Styled Text"
- Paste the content in your Clipboard into OmniGraffle
- Change the Fill to be whatever the background is (If Needed)
- Change the look and feel, and then export the image.
A few simple steps in OmniGraffle and you could make this:

It appears that this is easily done in OmniGraffle. I tried in Apple Page, Microsoft Word, and Affinity Designer and they all require some additional touch ups. For example, you may want to create a box object first and then paste the content from BBEdit.
PermalinkMacintosh Spring Cleaning
Useful tips on cleaning up your Macintosh
There's an old saying in the de-clutter world, "If you haven't used it in Six Month, throw it away." The same rule should apply to Macintosh Applications. If you haven't use the application in the past six months, you should consider removing it from your computer.
Use Spotlight to Find Applications that Your Really Not Using
Did you know that Apple's Spotlight can tell you when you haven't used an application for a while? Simple use the following search criteria to display icons that your not using anymore:
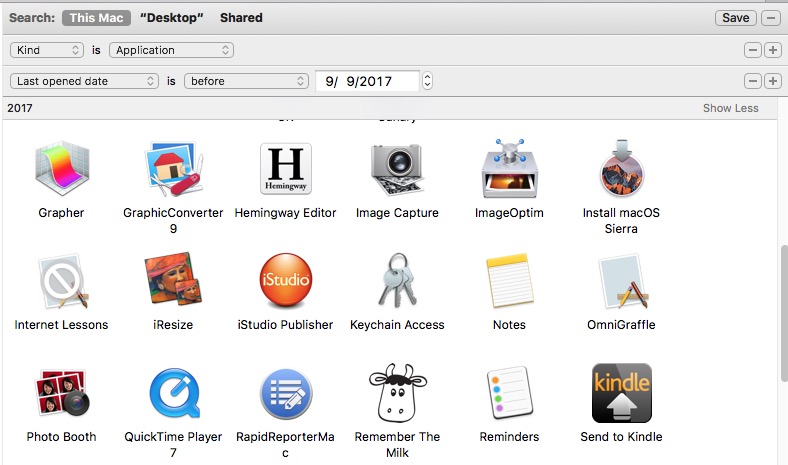
Just some of the Apps on my computer that I should remove.
Unused Fonts Cleanup
Did you know that having a lot of fonts install on your computer can actually slow down your computer?
Why not just removed unused and one-time use fonts and only have the fonts that you'll actually use. Not only will it help speed up your computer, even ever-so-slightly, you'll have a much better font list to navigate with.
One way to clean up the folder is to removed duplicated fonts. In Apple's Font Book there's a built-in tool that will look for duplicates.
- Open up Font Book
- Type in Command-L
- Go through with Duplicate Font Wizard.
Note: If you type in Command-L and nothing happens, it means you don't have any duplicate fonts. (Lucky You!)

Also in FontBook, you can disable Fonts that you don't need to have. This is a good way to manually manage fonts because you can't disable System Fonts - so there's no way to disable the default system font. You don't risk your computer acting weird.
For this to work you'll need to walk through all your installed fonts and make a judgment call on which ones are important. Don't worry, you can always enable the fonts for later. Unfortunately, you can't create a Smart Group of disabled fonts.
Itunes Cleanup
In iTunes, you can see what songs you're listening to the most. Each time you listen to an entire song, iTunes increments the play count. It's a good way to know what songs you really like, and what songs your not interested in listening to.
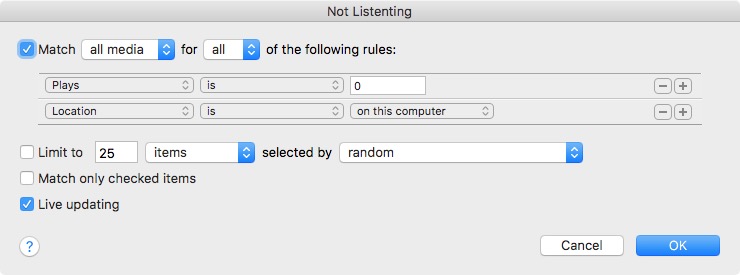
If you're not listening to it, why keep it on your computer?
One way to help sort out the non-played music, is to create a smart playlist of zero count plays. Here's an example of one I created:
To Remove the Song, simply right click on the track and then select, "Remove from this Computer"
Got any Tips?
Please share any other tips on cleaning out unused files on your computer in the comments.
PermalinkAbout
A Mac veteran since 1989, I'm here to share my experience with tips and tricks every Friday. Witnessing the evolution of Mac software and hardware firsthand, I've gained a deep understanding of how these machines work and can help you troubleshoot any issues that may come up.
Check out all the blog posts.
Blog Schedule
| Thursday | Business |
| Friday | Macintosh |
| Saturday | Internet Tools |
| Sunday | Open Topic |
| Monday | Media Monday |
| Tuesday | QA |
| Wednesday | Veed |
Other Posts
- Mastering Panic Transmit
- Fun Fact - Tags in macOS
- Office Layout
- Wondershare Filmora's Auto Reframe
- Gif Brewery
- Sips
- BBEdit Stye Text
- Filmora Audio Key Frame Marker
- Combine Similar Images
- Airport Express Setup
- OBS Studio
- Cheat Sheet Application
- Repeat Last Capture (SnagIt)
- Mission Control
- Calendar in Swift Publisher