
CameraBag Pro
Great Tool for Videographers
CameraBag Pro is a professional photo editing software for macOS that can help you to improve your photos with just a few clicks. The app offers an intuitive and easy-to-use interface, as well as a wide range of features and filters that will let you edit your photos to perfection. CameraBag Pro also includes support for RAW files, so you can get the most out of your images. If you're looking for an easy way to improve your photography skills, then CameraBag Pro is definitely worth checking out.
Product Description
CameraBag lets you instantly apply one of the hundreds of beautiful presets to your photos (and videos with CameraBag Pro), and then dive deeper with ultra-intuitive professional adjustments. It's no wonder Apple awarded it the #2 Mac App of the Year and Professional Photographer Magazine called it "a revolution for photo editing."

Five Things I Like About CameraBag Pro
Here are the five things that I like about CameraBag Pro - and why you should get it if you are a videographer.
Color Correct Videos - The Pro version has the ability to correct videos and images. Now you don't have to play around with Final Cut Pro color settings. You can touch up videos right in CameraBag Pro and save the changes. This feature is really worth the $50 by itself. Basically, you save a lot of time second-guessing how to make a video clip better.
Export Filter LUT - When you have found the color style you like for a particular situation, you can save it as a LUT. You can then easily apply it to similar shots in Final Cut Pro. So for example, you can take a short video before a major production shoot, and use CameraBag Pro to create a LUT that will work for that scene and lighting.
20+ Classic Motion Film Stock Filters - CameraBag Pro 20+ Classic Motion Film Stock Filters is a professional photo editing app that allows you to add beautiful and realistic film stock filters to your photos. With this app, you can give your photos an old-school film look with just a few taps. The filters are adjustable, so you can customize the effect to suit your own style.
Quick Look / Presets - You have the ability to preview at all the settings. This gives you a good visual of what setting works for your particular image. Maybe you need Grain, Dynamics, or a slight Tone Curve adjustment? No more second-guessing - that's what the Presets are there for. Check to see how your image/video will look - you can still make adjustments to make the image stand out.
Not a Subscription Service - No monthly/yearly software subscription fees. Instead, a one-time payment for lifetime use of the software. Just pay for it now and use it whenever you need it. A nice change from other MacOS apps.
PermalinkMacintosh ExFAT Format
Best Format for USB Drives
Macintosh ExFat Format is the best way to format your USB drive for use with a Macintosh computer. This format provides compatibility with both Mac and Windows operating systems, making it the perfect choice for cross-platform users.
If you're having problems copying large files to a USB, chances are it's because the USB is using an outdated file system. Unfortunately, the only way to convert to ExFAT is to reformat the USB.
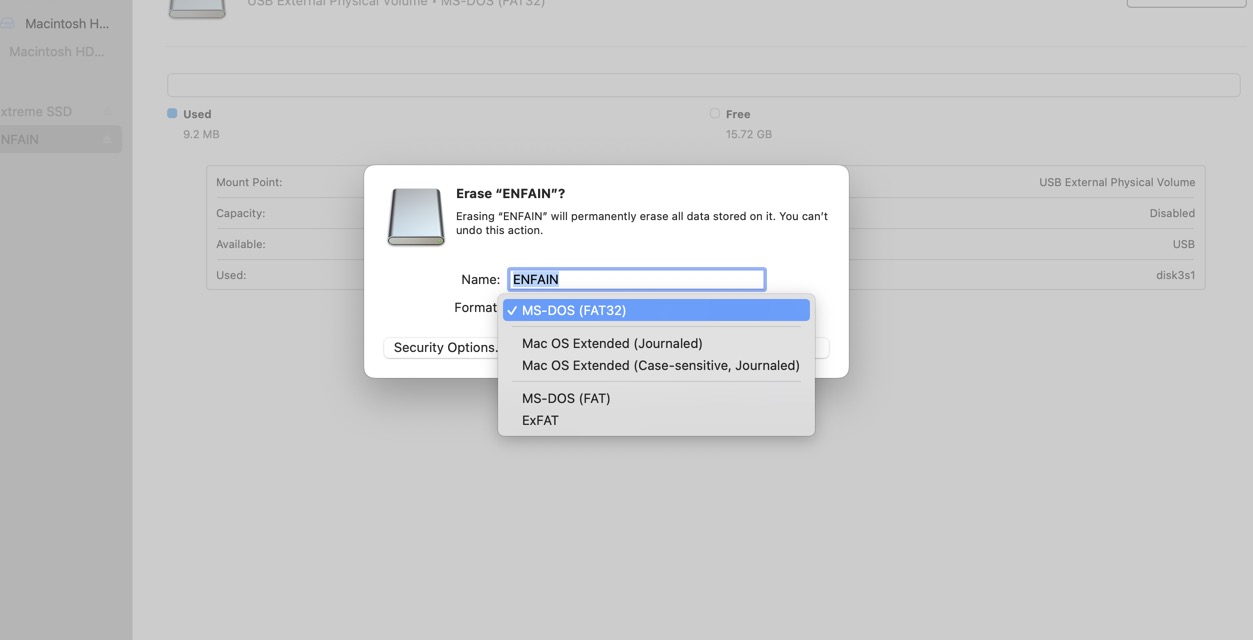
Use ExFat Format
USB thumb drives are a convenient way to move files between computers, but their size can be limiting. A USB thumb drive formatted with the Macintosh ExFat file system can store large files without running into the size limitations of other file systems.
The ExFat file system was designed for flash drives and other portable media. It supports files up to 16 terabytes in size, making it ideal for storing large video or image files. The ExFat format is also compatible with both Windows and Mac computers, making it a versatile choice for transferring files between different platforms.
Microsoft Patents
Microsoft owns the patents on several elements of the ExFAT technical design. This means that any company that wants to use this technology must license it from Microsoft. While this may seem like a burden, it is actually a good thing for companies. Microsoft has a strong track record of protecting its patents and ensuring that its technology is used in a responsible way. This means that companies can be confident that they will not face legal challenges from Microsoft if they use ExFAT in their products.
PermalinkAppleScript Script Menu
Make AppleScript Accessible in Any app
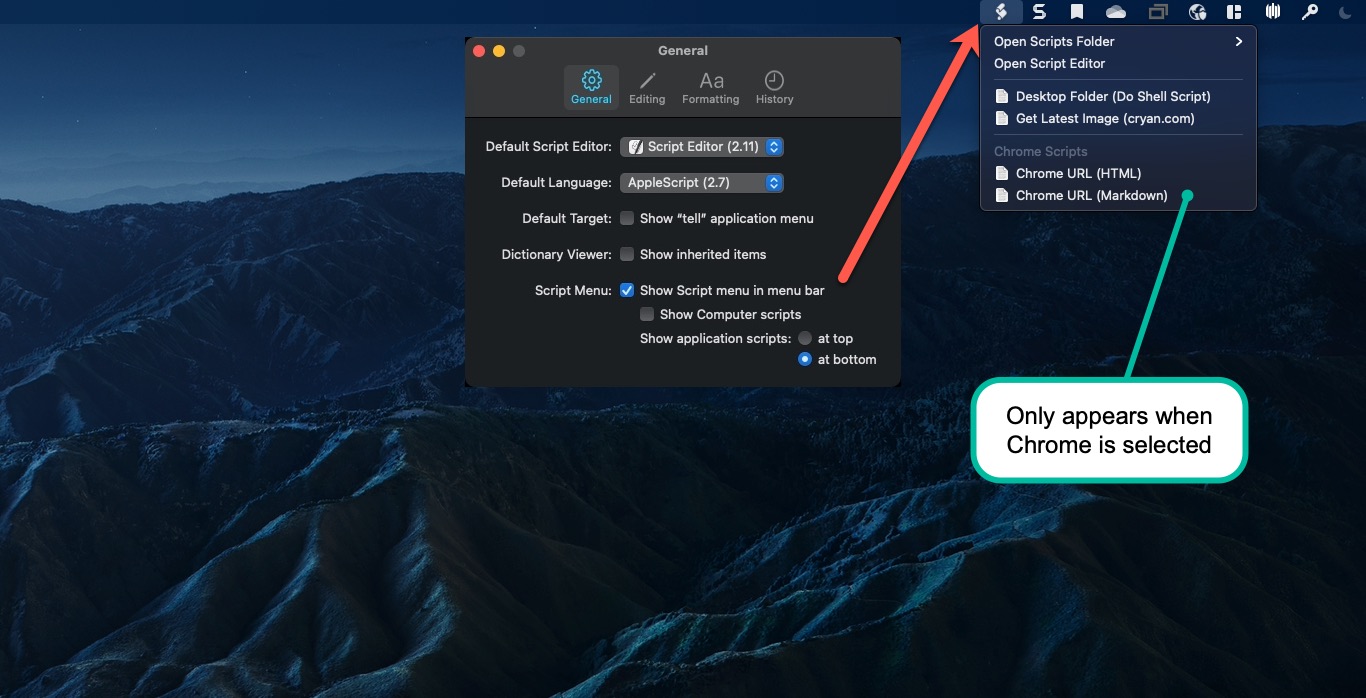
Adding a script menu to the menu bar is an incredibly useful feature that I recently discovered. This allows you to easily run AppleScript whenever you would like, without having to search for it in your Applications folder. This can be really helpful if you need to run a script regularly, or if you just want easy access to your scripts.
Five Things I Learned
Each application can have a specific set of AppleScript files. This helps declutter the menu and have only the essential scripts shown. Every application can have its own script folder - even if the Applicationdoesn't have built-in support for AppleScript.
In the example above, I have two AppleScripts where I generate an anchor tag for HTML or Markdown. The script output is saved to the clipboard - ready to be pasted in any application.
Do you code in PHP, Python, or BASH? No problem, you can always have AppleScript run your code! Here's a sample line:
do shell script "Python3 ~/scripts/something.py"
That one line of code will execute a Python Script. It can be modified to run any Shell command. Now you can run your code anyplace.
There isn't a way to assign shortcut keys to any AppleScript command.
This is the AppleScript that I wrote to generate the HTML tag of the active Chrome Browser:
tell application "Google Chrome"
	set broswerurl to get URL of active tab of first window
	set browsertitle to get title of active tab of first window
	set the clipboard to "<a href="" & broswerurl & "" >" & browsertitle & "</a >"
end tell
Permalink
Year On A Page
Posterino is the Best Option
There are several Macintosh applications that make it really easy to create a Year on a Page calendar. These calendars can be used as quick reference tools to help you plan your year.
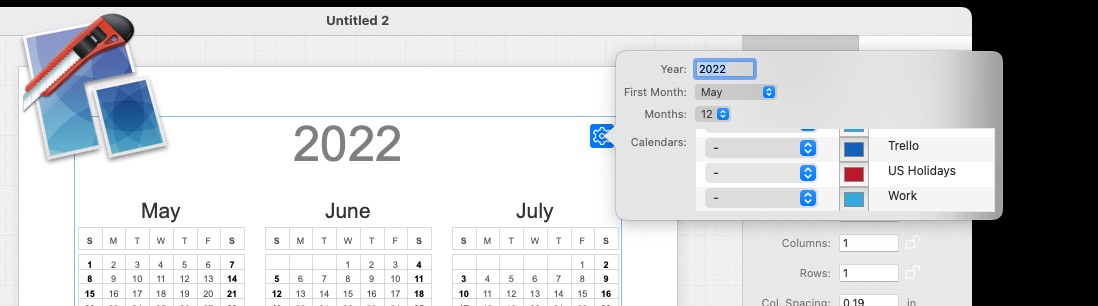
You can't create Year on a Page printout using Apple Calendar or Google Calendar. The best application that I found to create Year On a Page is Posterino. It's really easy to use and you can produce a simple customize calendar in a matter of seconds.
Posterino
Here are the steps to create a custom Year on A Page:
- Launch Posterino
- In the Template Wizard select Calendars and then double click on the "One Year - plain" Template
- Select whatever Page size you want. 8x10 is a good standard size to use.
- To make changes to the calendar, mouse over the months and you should see a cog wheel in the top right corner.
- Noe you can change the start year and month - making it easy to create a calendar whenever you need it. You can even create a layout for the next three months (quarters).
- Once your done - just print or save it as a PDF.
Some Notes
You can add references to Apple Calendars in your "Year on a Page Calendar." The only problem is there is no guide, on the page, to what color goes with the calendar.
There are all sorts of additional configurations in the Adjust panel. You can change the color of the Month, have Weekday have longer names, and more. You can even have adjacent days show up on the months too - in a lighter color. There's also a setting to draw the month frame and grid lines.
There are 11 different Calendar templates to select from in Posterino
Posterino cost $19.99 for a single user or $29.99 for the household. Obviously, there's a lot you can do with this application. The Year on a Page functionality is just one way to use the application.
Online Options
There are some online services that are available that you can use. These are free and don't offer the same customization that Posterino does.
TimeandDate - Create your own PDF Printable Calendar. You can create a login so you don't have to type in events every time you create a calendar. Very popular solution and they have good templates.
CalendarLabs - Quick and easy calendars. Just download the PDF and your on your way. There are some customization available.
PermalinkSentinelOne
Service Blocking Keyboard Maestro App

SentinelOne is the world’s first artificial intelligence (AI) powered cybersecurity platform that prevents threats at a faster speed, greater scale, and higher accuracy than humanly possible.
The platform uses AI to identify and prevent cyber threats in real-time, across all devices and networks. It does this by analyzing data patterns and behaviors to identify malicious activity before it can cause damage.
Since SentinelOne is powered by AI, it can detect threats that traditional security measures cannot see. This makes the platform incredibly effective at preventing cyberattacks from causing harm or stealing valuable data.
In addition to its threat prevention capabilities, SentinelOne also provides comprehensive reporting on all activity across your network so you can stay informed of any potential risks.
Keyboard Maestro
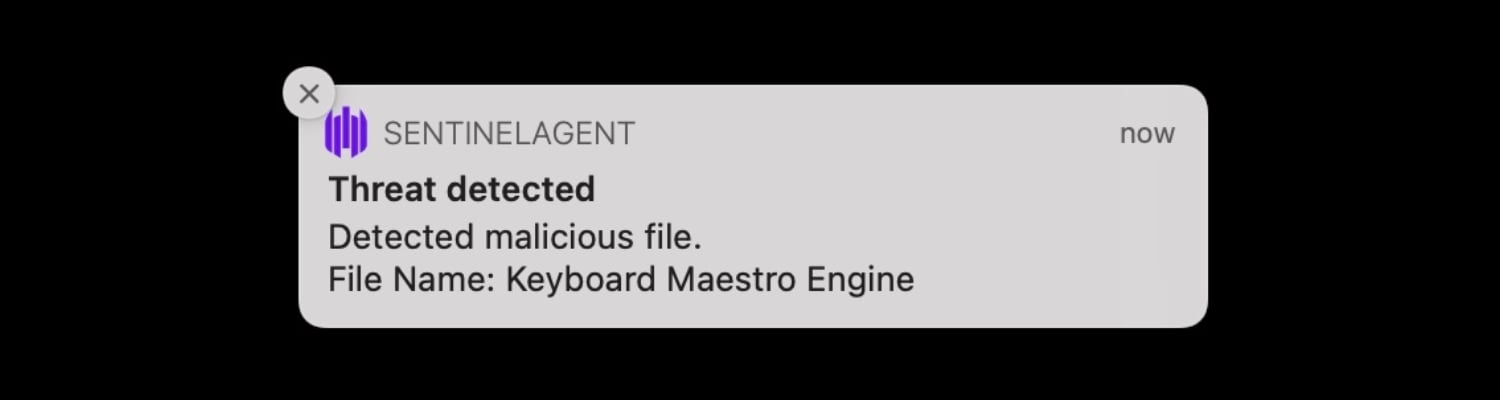
Apparently the Keyboard Maestro application is considered a threat in the SentinelOne world.
When you uncompress the keyboardmaestro-1002.zip file, immediately SentinelOne will remove the Keyboard Maestro Engine. There is no chance to override it. Poof! it's gone.
Without the Keyboard Maestro Engine you can't use the application. THere's no way around it.
You can get approval from Admin that the file is safe, but the file has been removed. Someone from IT will need to log in to the computer and disable the SentinelOne and unzip keyboardmaestro-1002.zip so that SentinelOne doesn't delete it.
It's one thing to protect a computer, but should you limit the productivity of the users?
Why Keyboard Maestro?
Keyboard Maestro is an automation tool that helps speed up personal productivity. Users can save a lot of time by not having to type repeated statements.
Keyboard Maestro has an excellent ClipBoard History manager that makes it easy to recall previously saved clipboard content - saving lots of time from copying common text and images. You can even save the content to be reused over and over again.
Keyboard Maestro has the ability to tap into Chrome. Users can parse URLs to be used in other apps. For example, if I am in Slack and I want to post the current Jira ticket that I have open, I can type a simple command and instantly have a Markdown parse version of the Jira page.
There's so much more that Keyboard Maestro can do to help users be more efficient in their day-to-day activities.
SentinelOne
According to the Developer, SentinelOne needs to fix its software. They have voiced their complaint and nothing happens.
I wonder what other applications are being prevented installed by SentinelOne.
PermalinkMeasure Tool - Epic Ruler
Unique Measure Tool for all Your Mac Needs
Epic Ruler is an impressive set of design utility tools to measure distance, dimension, position, pick colors, test contrast, and align on-screen elements. It's a great tool for web designers and developers who need to quickly check the dimensions or positioning of objects on the screen. With Epic Ruler you can easily select any color from your screen with a built-in color picker, and test the contrast between two colors. You can also use it to quickly align objects on your screen by selecting one or more points and clicking "Align."
Epic Ruler shows exactly how far objects are on a webpage.
Five Things I have Learn
The ruler is very cool. It works based on the screen elements and not windows. This means that you can use it to check the proper placements of objects on a webpage. You can type 'd' to save the measure tool. In addition, you can use the arrow keys to extend the boundaries of the measure tool.
Guidelines are a good way to make sure elements are properly spaced out. This might be useful when I need to validate that objects in tables are properly aligned correctly. What's nice is that's its an overlay, so you can keep it on the screen as you doing work.
Color Picker is a fast and easy way to identify the color of objects that you see on the screen. By default, the color picker will show RGBA values, but you can change that to HEX values in the appearance section in the preferences dialog box.
To capture the results of Epic Ruler elements you need to use the included screen capture tool. This captures all the saved rulers, guidelines, and color picker elements. You can then send the capture to any program such as Snagit or Slack.
Note: There is a bug in macOS Monterey and that sharing the capture isn't working. Luckly you can still access the capture files in in ~/Pictures/EpicRuler
Epic Ruler works in the background and you can trigger elements by using the shortcuts. Two useful shortcuts worth remembering is Option D to enable the Measure Tool and Option C to clear the screen.
Worth Getting?
The ruler functionality is certainly worth getting. I haven't seen rulers work the way that Epic Ruler works. Most applications are just based on the window edges - which can be useful - but to find the spacing between elements is pretty cool.
The nice thing is that isn't a browser plug-in. So you can use this in graphic and page layout programs too. This makes it a great universal app so you can use it no matter where you are on the computer.
I would recommend getting the application as a unique tool for your toolbox. It may come in handy someday when your trying to figure out if something is align correctly.
PermalinkGuarded macOS PDF Hack
Sneaky ways around the PDF Text Copy permissions
One of the things I don't like about macOS Monterey is the additional security features. When you try to copy text from some PDF documents you may encounter this dialog box:
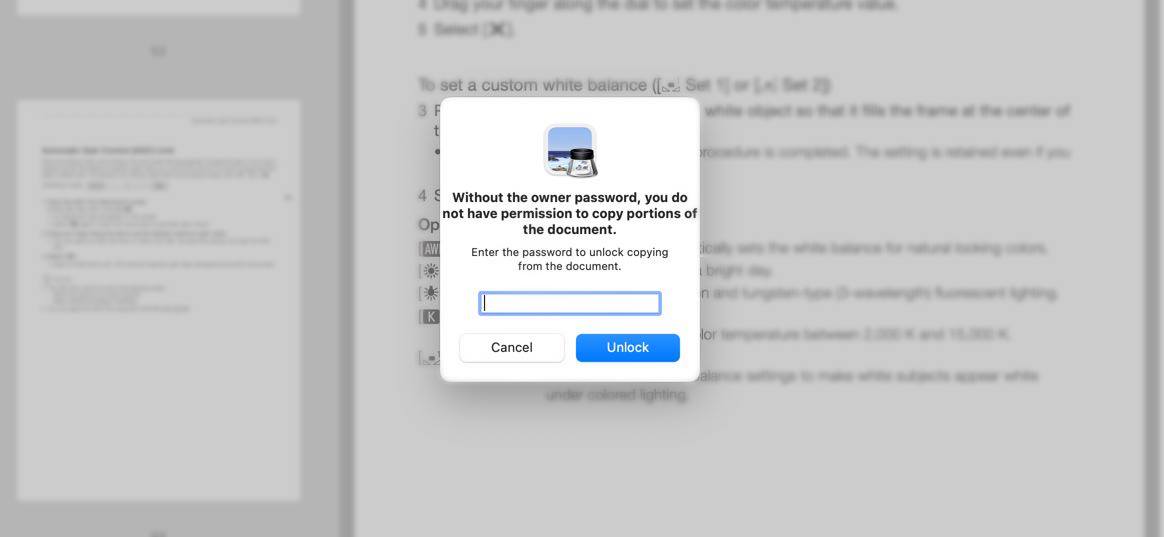
All I am doing is copying the text. Why should this be prevented? How do I know who the document owner is? Do you think that they would just give me the username/password to unlock this document?
This all worked fine in previous versions of macOS. But the new rules make a simple copy and paste a crime.
FireFox Solution
One creative way around this security restriction, is to open the PDF file in Firefox. You can open the PDF, go to the page and copy the text. You can then paste the content of the text into any document (as text data.)
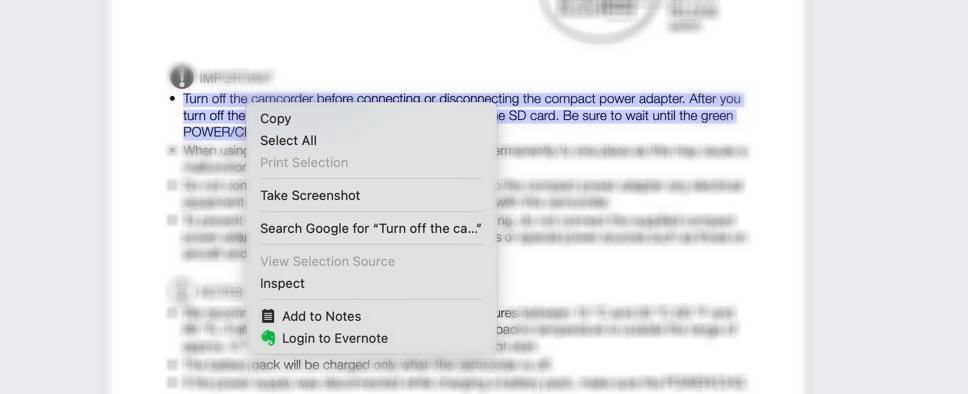
Duplicate File!
If you're going to be frequently referencing data from this PDF, you can bypass the copy/paste permissions by duplicating the file! Yup. Simply duplicate the file in Preview and you'll be able to copy text like it was macOS 11 (Big Sur)
Who knows if Apple will make future changes with the ability to duplicate PDF documents?
PermalinkAudio Commands from the Terminal
Some Audio tools available in the terminal

There are several UNIX commands that Apple provides to help with audio. These are executed from the terminal.
afplay
applay allows you to play audio files from the command line.
    Audio File Play
    Version: 2.0
    Copyright 2003-2013, Apple Inc. All Rights Reserved.
    Specify -h (-help) for command options
afinfo
afinfo allows you to get information on an audio file.
Sample output
File:           2004.mp3
File type ID:   MPG3
Num Tracks:     1
----
Data format:     2 ch,  44100 Hz, '.mp3' (0x00000000) 0 bits/channel, 0 bytes/packet, 1152 frames/packet, 0 bytes/frame
                no channel layout.
estimated duration: 53.916735 sec
audio bytes: 1294001
audio packets: 2064
bit rate: 191999 bits per second
packet size upper bound: 1052
maximum packet size: 627
audio data file offset: 1027
optimized
audio 2375680 valid frames + 576 priming + 1472 remainder = 2377728
For me the most useful information is the Data format. In the above example, the 44100 Hz is a common sampling frequency - so the audio should play fine on most devices.
afconvert
afconvert converts file from one format to another.
Supported formats:
3GP Audio, 3GPP-2 Audio , AAC ADTS, AC3, AIFC, AIFF, amrf, m4af, m4bf, caff, ec-3, MPG1, MPG2, MPG3, mp4f, NeXT, Sd2f, WAVE
Interesting formats that is missing: oog (Common for streaming audio)
Sample output
# Converts MP3 to WAVE
afconvert -f WAVE -d LEI32 2004.mp3 -o 2004.wav
# FLAC
afconvert -f flac -d flac 2004.mp3 -o 2004.flac
afclip
afclip checks to see if your audio file has clipped sound - which is audio that is too loud and caused a clip.
Sample output
afclip 2004.mp3
afclip : "2004.mp3"    2 ch,  44100 Hz, '.mp3' (0x00000000) 0 bits/channel, 0 bytes/packet, 1152 frames/packet, 0 bytes/frame
 -- no samples clipped --
afhash
afhash is an audio file hash
The purpose of the hashing at offsets close to the start and the end of the file is to ensure that if a TAG editing tool modifies either the beginning of the end of the file, at least one of the two hashes should survive and allow us to get meta-data on a specific file.
Sample output
afhash 2004.flac
2004.flac :
MD5 Hash in file       : 41004751cb6cb5219a51e6935ec97b66
MD5 Hash of audio data : 41004751cb6cb5219a51e6935ec97b66
Hashes match.
2022 Gift Guide for Apple Fans
Practical Gifts for Tech Users
If you're on the hunt for the best gifts to buy an Apple fan this year, we've put together a helpful guide to point you in the right direction. While personal preference always plays a part in gift-giving, sometimes it can be hard to come up with any ideas for someone in your life who loves tech and Apple products.

The gifts in this guide largely relate to products created by Apple and third-party accessories that work well with Apple's devices. We've divided things up by Apple Products; Cases, Skins, and Screen Protectors; Charging; Audio; TVs; Smart Home; and Miscellaneous. Be sure to save this guide and browse it throughout the year whenever you need to buy a birthday gift or other present for a loved one.
Apple Products
If your budget allows for it, Apple has numerous devices that make for solid gift-giving ideas. If the person you're buying for subscribes to Apple Music, AirPods and HomePod mini are great companions to the streaming music service. For anyone active on your shopping list, the new Apple Watch SE is a great workout companion at an affordable price point.

- HomePod mini - A smaller version of the HomePod at a much more affordable price perfect for holiday gift-giving.
- AirPods 2 - The cheapest AirPods are getting on in years, but still make a great gift for the holidays, particularly at lower prices.
- AirPods 3 - Redesigned in 2021, AirPods 3 are the latest version of Apple's most beloved accessory.
- AirPods Pro - This model of the AirPods Pro now comes with a MagSafe Charging Case.
- Apple Pencil 2 - Pair a new Apple Pencil 2 with the latest iPad Air and iPad Pro models for a smooth illustrating or note-taking experience.
- Apple Watch 7 - The newest Apple Watch has an always-on Retina display and 20% more display area than the 6.
- 10.2-inch iPad - If you don't want to spend as much on an iPad Pro, Apple's entry level iPad got a 2021 update as well thanks to the A13 Bionic processor.
- iPad Air - The new iPad Air with an edge-to-edge 10.9-inch display and Touch ID power button.
- MacBook Pro - The all-new 14-inch and 16-inch MacBook Pros are the best all-around notebooks on the market, equipped with Apple's M1 Pro and M1 Max chips.
Cases, Skins, and Screen Protectors
With their cheap prices and small sizes, iPhone cases and screen protectors make for great, quick gifts. Of course, if you're looking for MacBook protection, companies like Pad & Quill and Twelve South offer solid options, and the growing popularity of AirPods has caused third-party brands to introduce some case options for the wireless headphones as well.

Cases for iPhone:
- Apple's Leather and Silicone Cases with MagSafe - Apple's newest iPhone cases, now enhanced with MagSafe.
- Nimble's iPhone Cases - Stylish, sparse cases that protect your new iPhone 12 from drops, with proceeds going toward eco-friendly causes.
- iPhone LED Cases - Phone led phone case is a case with multiple built-in LED lights. LED back panel blinks when you have an incoming call or notification.
- BodyGuardz Pure 2 EyeGuard - Protect your iPhone from drops and your eyes from harmful blue light effects.
MacBook Covers:
- Incase Hardshell Case for MacBook - Incase is well-known for its hardshell MacBook cases, which provide durable protection to Apple's laptops.
- Twelve South BookBook - Twelve South's BookBooks make your MacBook look like a vintage novel.
- Pad & Quill Leather Valet Case for 13-inch MacBook Pro ($160) - Fit your MacBook Pro, iPad, iPhone, Apple Pencil, cables, and more in Pad & Quill's leather case.
iPad Cover:
- Logitech Folio Touch for iPad Air - Logitech's keyboard comes in under the price of Apple's and has a bunch of useful features like a touch pad and backlit keyboard.
AirPods Cases:
- Elago's Cases for AirPods 1 & 2 - Stylish dual-tone protection for your AirPods.
- Elago AW6 AirPods Case - Protect your AirPods in a case that looks just like an iPod.
- Elago AirPods Pro Slim Case - A sleek case to protect your AirPods Pro.
Charging
Portable chargers are one of the best go-to gifts since most people can relate to needing a quick charge on their smartphone at one point during the day. Anker's popularity and reliability in the market remain strong, so you can't go wrong buying from them, but look to Choetech, RAVPower, and the new brand Nimble for a few other notable charging accessories options.
USB-C:
- Kingston Nucleum USB-C Hub - Expand your MacBook's ports with Kingston's USB-C Hub.
- OWC USB-C Travel Dock - Add up to five ports of expansion onto a MacBook Pro or iPad Pro.
Portable Batteries:
- Anker PowerCore 10,000 mAh Battery - Anker's PowerCore batteries are a backpack and travel necessity, and 10,000 mAh is a perfect mid-range size.
- Mophie powerstation USB-C XXXL - Mophie's powerhouse portable charging station offers a 26,000 mAh portable battery.
Wireless Chargers:
- Anker PowerWave Wireless Charging Mat - Wirelessly charge an iPhone 8 and newer on Anker's cheap-but-reliable mat.
- Belkin Boost Up Wireless Charging Dock - Wirelessly charge your iPhone, along with your Apple Watch, on Belkin's convenient and useful dock.
- Twelve South HiRise Wireless - Wirelessly charge your iPhone on the stand, then pop out the puck for an on-the-go Qi mat that perfectly fits the AirPods.
- Moshi Lounge Q Wireless Charging Stand - With an adjustable-height design and aesthetic inspired by Danish furniture, this Moshi charger fuels up your iPhone in style.
Roy Hart
 | Web enthusiast. Enjoy writing tech reviews. All-around dev & writer, an on-air contributor to various websites & magazines. My job entailed show prep, YouTube management, writing segments, running tests on different tech. |
Fix UnicodeEncodeError with BBEdit
Quick Easy Fix
Have you ever gotten this error when running your Python code:
UnicodeEncodeError: 'ascii' codec can't encode character 'u2019' in position 16520: ordinal not in range(128)
      args = ('ascii', '<!DOCTYPE html>n<html lang="en">n <head>n <m...rigin="anonymous"></script>nnn </body>n</html>nn', 16520, 16521, 'ordinal not in range(128)')
      encoding = 'ascii'
      end = 16521
      object = '<!DOCTYPE html>n<html lang="en">n <head>n <m...rigin="anonymous"></script>nnn </body>n</html>nn'
      reason = 'ordinal not in range(128)'
      start = 16520
      with_traceback = <built-in method with_traceback of UnicodeEncodeError object>
This has been happening to me a lot when I convert code from PHP to Python. It was frustrating to fix the error. Someplace in my code is a piece of text that isn't translating well.
BBEdit to the Rescue!
The easy quick fix I found is in the Text Status Bar in BBEdit. The text status bar shows the file encoding,
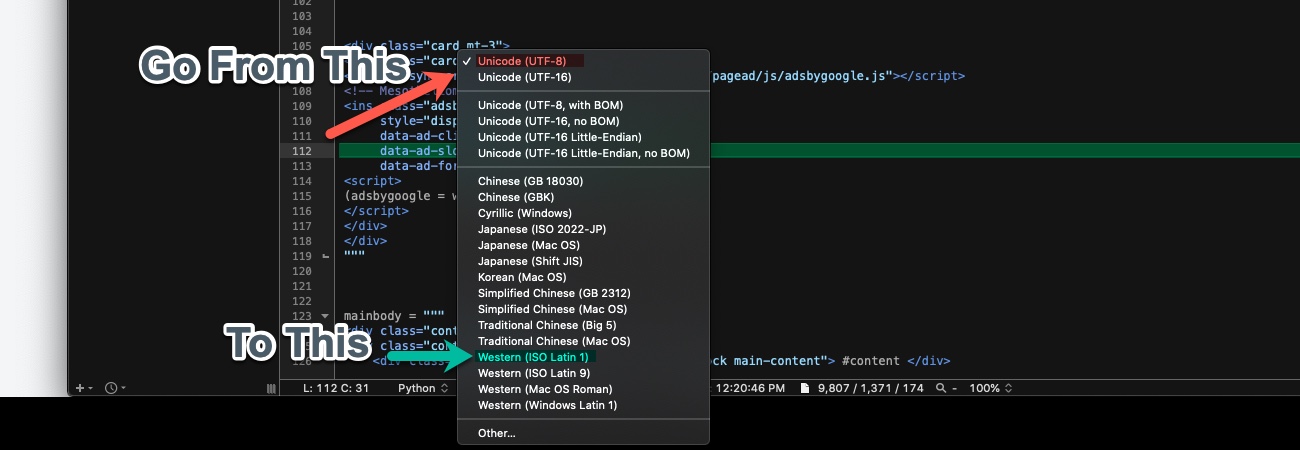
Change the Python File Encoding!
By default the coding is Unicode (UTF-8)
However, if you change the file encoding to Western (ISO Latin 1) something magical happens when you save.
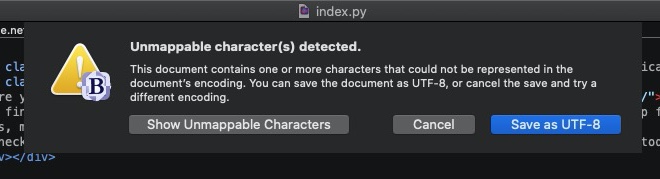
Unmappable character(s) detected.
If there's any Unicode in your file, it warns you and then tells you where the Unicode is so that you can fix it!
Once you fix all the errors the file will save and the UnicodeEncodeError should go away!
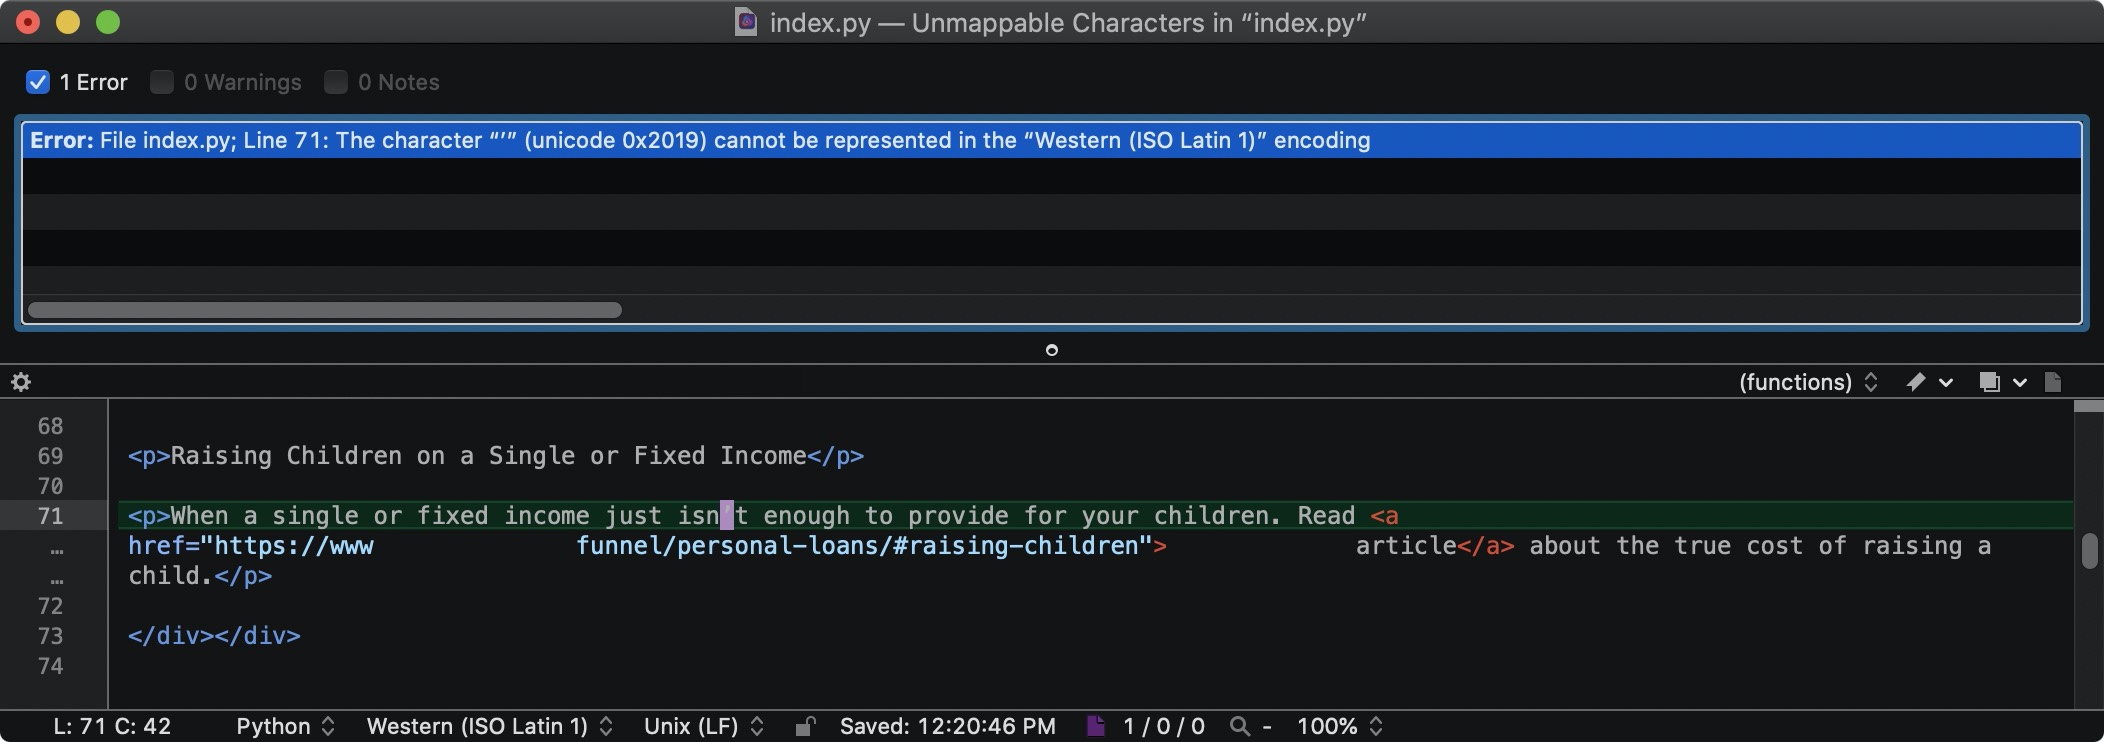
Sample Unmappable Characters dialog box that shows you what you need to fix!
Alternative Fix
If you get ordinal not in range(256) - Check out my solution.
If the error is results from a Database data, check out out this solution.
PermalinkAbout
A Mac veteran since 1989, I'm here to share my experience with tips and tricks every Friday. Witnessing the evolution of Mac software and hardware firsthand, I've gained a deep understanding of how these machines work and can help you troubleshoot any issues that may come up.
Check out all the blog posts.
Blog Schedule
| Thursday | Business |
| Friday | Macintosh |
| Saturday | Internet Tools |
| Sunday | Open Topic |
| Monday | Media Monday |
| Tuesday | QA |
| Wednesday | Veed |
Other Posts
- Using Automatic File Splitting in OBS
- Using UNIX in BBEdit
- BBEdit Anchor tag Changes
- Posterino
- BBEdit Stye Text
- Removing Color in Affinity Photo
- TurboCollage 6
- Installing legacy Font Suitcase files
- Lock Transparency in Pixelmator Pro
- TextEdit for Clipboard Content
- How to Use the Limiter in Ocenaudio to Make Audio Louder
- Create Video DVD from Disk Images
- iResize
- Turn off Notifications
- Universal Control