
Swift Publisher 5
This week Belight Software announced an update to Swift Publisher. This is the first major update since September 2015.
Last year I wrote about the cool use of the Calendar feature in Swift Publisher 4. It’s still there, apparently, nothing changed with that functionality in this update.

Exciting New Features in this Release
- Spread Mode is here!
- Deposit Photo Integration
- Art Text Integration
- Add Google Maps to Documents
- New: 2D and 3D Text designs
- Custom Grids
Some Thoughts
I like the page spread functionality. I need to remember to enable it when I create my documents.
Deposit Photo is a good image library. Over 60 million high-quality royalty-free stock images and high-definition footage at the best prices to fill all your creative needs. Pretty sure you'll find the perfect image.
The new 2D and 3D text designs are very cool. However, I didn't see any way to change the colors of the text. I can see why it's worth getting Art Text 3. They should do a package deal for Art Text 3 and Swift Publisher
You can add rendered EPS files and documents can be exported as EPS.
With all the changes, the price is only $19.99. Certainly worth the investment of making great printed documents.
Bottom Line
If your looking for a strong replacement for Apple Pages and don't need a heavy hitter like Indesign, Swift Publisher 5 is the way to go. I was a big fan of InDesign CS2, and think that this is a suitable replacement.
This would be perfect for anyone that needs to put together flyers for PTO Events and Fundraisers.
Visit Belightsoft.com and download a trial version.
PermalinkFluid App
Fluid App easily makes any website a regular Macintosh application
Fluid is a cool application that turns any website into its own Mac Application.
You can make Gmail, Facebook, Twitter and other websites into an App that can be put in the Dock. Now you can quickly get to the sites instead of having to open up a browser and then clicking on a bookmark.
This is also handy if you play Farmville or other web-based games. Now your just a click away from playing your game.
Simple Interface
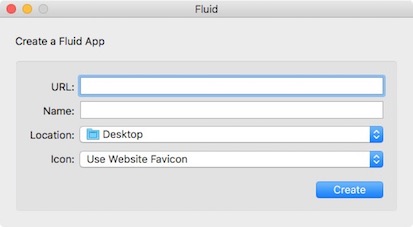
Fluid user interface is pretty simple, just enter the URL and the application name. You then pick where to put the new App and if you have an icon you would like to use. If you don't have one, it will use the same icon that you see when you create bookmarks.
Safari Webkit
Each "application" uses Safari Webkit. So if your website is optimized for Firefox or Opera it may appear slightly different.
Here's an example user agent log entry. The initial requests show that it's from Fluid:
Fluid/206 CFNetwork/811.4.18 Darwin/16.5.0 (x86_64)
Any Clicks/Navigations shows that it's using Apple Web Kit:
Mozilla/5.0 (Macintosh; Intel Mac OS X 10_12_0) AppleWebKit/602.2.14 (KHTML, like Gecko) Version/10.0.1 Safari/602.2.14
Bonus Features
If you like Fluid functionality consider paying $4.99 to get some additional features.
- Create Fluid Apps with Separate Cookie Storage - Useful if you have multiple gmail accounts and don't want to log in each time.
- Pin Fluid Apps to the Mac OS X Status Bar - Now you can make Apps even easier to use.
- Use Userscripts or Userstyles in your Fluid Apps.
- Use Full Screen mode in your Fluid Apps.
Overall Thoughts
This is a pretty cool utility. I could think of some websites that I would want to use this application - especially for testing. For example, I have an App that opens an internal server to check a critical path that customers may take.
At first it feels weird to look at some websites without the browser location bar. It's a pretty cool tool to use for some websites.
Getting the Fluid.App
You can get the Fluid App from their website. You can use the basic features for free.
PermalinkDaisy Disk
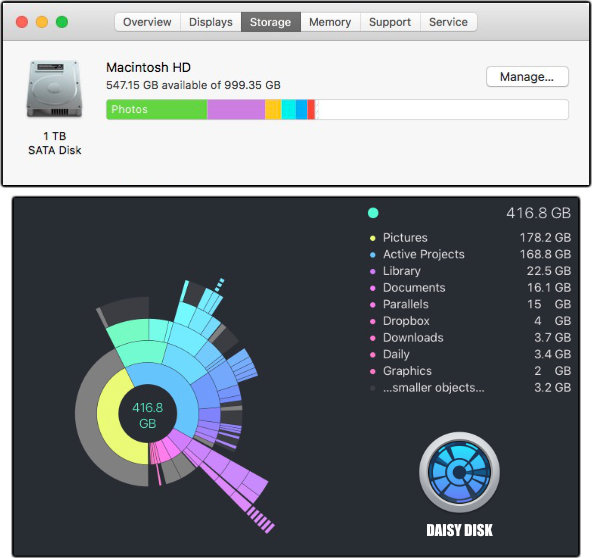
Daisy Disk gives you a visual breakdown of your disk space in form of an interactive map, reveal the biggest space wasters, and help you remove them with a simple drag and drop.
Discover what's hiding inside the "Other" storage category and clear it up.
Check out the difference between Apple's Storage chart and what Daisy Disk shows:
Very Useful Tool
I found Daisy Disk to be very used to figure out which folders are taking up the most amount of space. Especially useful when looking at external Thumb drives.
You can mouse over various parts of the pie chart to see the largest files in that area.
Daisy Disk also makes it easy to remove files. simply drag and drop files and folder and click the Delete button. Just make sure that you have a backup before clicking on the Delete button!
If your looking to take control of your computer storage, I highly recommend getting DaisyDisk.
Getting Daisy Disk
Daisy Disk is available in the App Store for $9.99 as one of the Essential Apps. There's only 2 Essential Apps in the Utilites category, the other Essential Utility App is Parcel - Delivery Tracking.
You can download a trial versions on the Daisy Disk Website. There are some limited features, and a registration reminder and delay whenever you start the application.
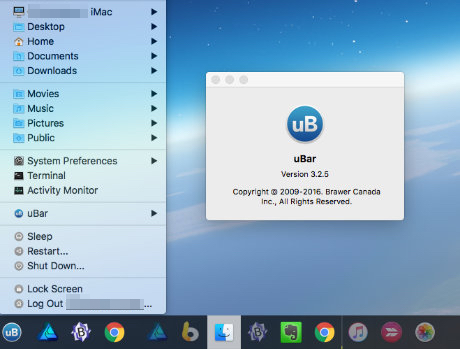
PermalinkuBar 3
uBar is a system utility that puts more power in the default System Dock. Boost your productivity with the most advanced and versatile app and window manager for the Mac.
Yes you do have choices when it comes to the System Doc.
Some users have switched from Apple's Dock to uBar because they want more control of their taskbar. Some users find the Dock to be boring and want the ability to customize the dock.
While there are some visual similarities with Windows Start Menu, uBar offers a lot more functionality and power features. However, if you are migrating from a Microsoft system, you may find uBar to help navigate around the computer.
Features of uBar 3
- Hover over the Date Time to see the Month Calendar and a cool looking Clock
- Easy Access to Terminal
- Windows at a Glance - Know how many windows an application has open
- App Title Flashes when it needs your attention
- Activity Mode - See what percent of CPU usage each application is using
- Custom Themes - Make the uBar dark or light or any color you want.
- Application Progress Indicator - See the tack positions of multimedia apps like iTunes and VLC
- Much More
Some Notes
- It does take some time to get use to the difference between uBar and the Apple Doc
- I found that removing the application title helps keeps the uBar
- Having a monthly calendar is very handy.
- uBar’s application favorites is how you can drag and drop files to open in an application.
- You can exclude application from appearing in the uBar
- I couldn’t find an explanation between the Taskbar and Dock.
Overall Assessment
I actually had an old license copy of uBar from the MacHeist Bundle in 2015. I haven't used it much over the years and decided to check it out again.
It was fun playing around with the toolbar. It does change the look and feel of the computer. Before you would see a bunch of icons on the bottom of the screen, now you see a nice bar at the bottom. It does feel like a new computer system.
I don't think I'll keep using it on regular bases. Over the past year, I have learned to work with the dock hidden. While you can certainly keep the uBar hidden, I just don't think it's something worth upgrading to.
I have also gotten use to opening and navigating applications via LaunchBar.
Don't take my word for it, download the application and play with it yourself. Spend some time playing with the settings and setting favorites.
PermalinkXcode Training Suggestion
If you do any kind of application programming on Mac OS or iOS you need XCode. It's Apple powerful tool for developers.
Xcode includes the Xcode IDS, Swift and Object-C compliers, Instruments analysis tool, simulators, the latest SDKs, and lots of very powerful features that will help get you to build awesome award winning apps.
What is Swift?
Swift is a powerful, modern, and fun programming language. From Apple:
Swift is the result of the latest research on programming languages, combined with decades of experience building Apple platforms. Named parameters brought forward from Objective-C are expressed in a clean syntax that makes APIs in Swift even easier to read and maintain. Inferred types make code cleaner and less prone to mistakes, while modules eliminate headers and provide namespaces. Memory is managed automatically, and you don't even need to type semi-colons. These forward-thinking concepts result in a language that is easy and fun to use.
Learning XCode
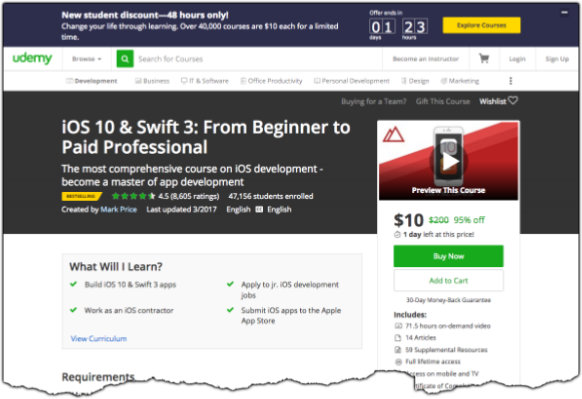
If your looking for a great place to learn XCode programming, I highly recommend iOS 10 & Swift 3: From Beginner to Paid Professional over on udemy . In the class you'll learn all the fundamentals of making a cool application and submitting to Apple's app store. There are 264 lectures totaling 71+ hours of learning.
The class is normally $200 - Yikes! However, it's currently on sale for $10! That's an awesome deal. Cheaper than any Swift Book you'll find on Amazon or Barnes and Noble! You can run the training at your own pace!
Spend a few hours a night over a couple of weeks and you can easily get a return on your $10 investment - plus you'll have the opportunity to learn how to make cool apps.
This particular course has a "full lifetime access." This means you can start whenever you want. In addition, you can reference the material at a later date.
There are other classes on udemy, but this one constantly get's a really high rating from students who take the class.
Note: Let me know what you think of the class, or if there's one better. This isn't a paid affiliate link or reference. Just letting you know of a cool option to learn Xcode.
Getting Xcode
You can download Xcode from the App Store. Warning: It's a pretty big download - 4.51 GB. So make sure you have enough space and working on a fast internet. Some users have complained about getting the file.
PermalinkResize Image via LaunchBar
Whenever I email a picture that I have on my desktop I like to resize it. There's no reason to email a 4,032 x 3,024 picture.
Previously Task
In the past, I would open up the photo in a photo utility, such as Picturesque, downsize the image and save it.
Way too time consuming.
LaunchBar the Better way
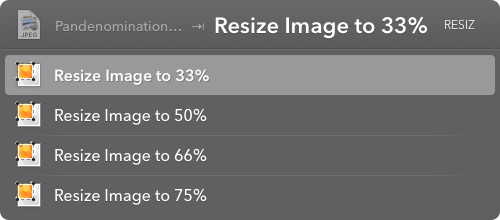
LaunchBar has several resize options, 33%, 50%, 66%, 75%.
Simple steps to resize images in Launcher
- Drag the image you want to resize to the LaunchBar Dock icon.
- Type in ‘Resize’
- Pick the one that works best for you.
Example, a typical iPhone picture is 4032 x 3024 (1.8 MB). Reduced to 33% will yield it to 1344 x 1008 (229 KB) which is reasonable enough to send in an email.
This is just a quick way to resize an image without having to open up an app.
PermalinkLuminar
Meet the world's first photo editor that adapts to your style & skill level. Luminar is the supercharged photo software that makes complex editing easy & enjoyable. And it is as responsive and beautiful as your Mac.
Luminar Fundamentals
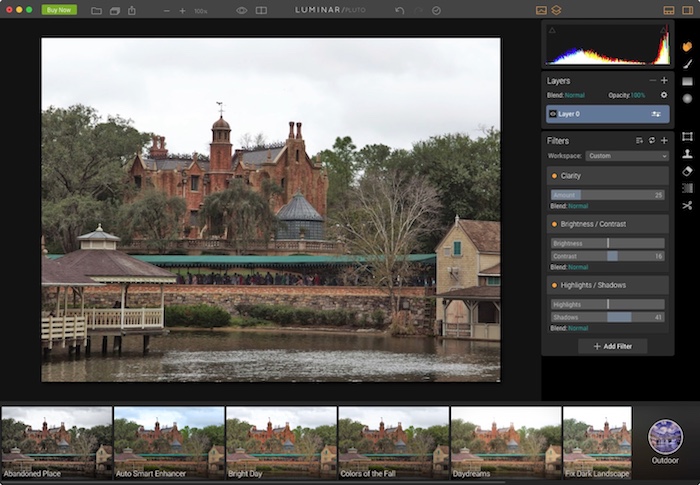
Luminar is a great application when you want to touch up photos. If you need to touch up and enhance photos, Luminar is certainly the app that will make it easy.
Presets
The nice thing about Luminar is that there are a lot of built-in Presets to make it easier to get the photo to look exactly the way that you want it to. Macphun says, "Luminar presets are your secret weapon to instantly fantastic photos. You can get a new look in a single click, or use presets as a starting point for your own creative explorations."
Luminar comes with Presets in six different categories: Basic, Outdoor, Street, Portrait, Travel and Dramatic. In each of the categories, you have a bunch of custom settings to enhance your photos. For example, the Basic set has 13 filters. Luminar website has a few more that your can download or purchase.
Presets Preview functionality is a nice feature that Luminar brings to the table. Before using any of the Presets, you get a "sneak" thumbnail peak of what the effect will have on the image that your working with.
Other Tools
Along with the Presets are various tools to help touch up the images. The Denoise Tool is a really cool way to clean up a photo that may have some noise. When you use this tool, you get a nice before/after slider so you can see what a difference the tool makes.
The Eraser tool seems to do a great job of removing some unwanted object in a couple of pictures that I tested. It works very similar to functionality found in Pixelmator and Affinity Photo.
Luminar has a Batch capability mode, which isn't available during the trial period. This would be perfect when you have a bunch of iPhone photos taken in the same situation, and putting together a collage. This is actually a pretty cool time-saving feature to have.
Luminar vs Affinity Photo
There is some missing functionality that's hard for me to justify buying Luminar. There is no Text or Shape tool and there are not a lot of options on brush sizes for masking.
In addition, I found it hard to apply specific effects that I may want. For example in my test, I wanted to apply a blur effect to a certain part of the image and I couldn't figure a way to do that.
Try it Out Yourself
I think Luminar would be great for someone that doesn't want to play around with post-production filter settings. If you just want to quickly touch up a photo to enhance it more, than Luminar might be the application you need.
You can download a trial from MacPhun's website, and if you like it, it's only $69 which includes a 1 month membership to KelbyOne. It's the best photography education platform. (Monthly membership to KelbyOne is $19.99)
PermalinkFirefox Developer Edition
FireFox Developer Edition
If you do any website development, you should consider installing Firefox Developer Edition. It's a very powerful browser that is "Built for those who build the Web."
Key Advantages FireFox Developer Edition
You may be used to other Developer tools in other browsers. However, FireFox Developer Edition is the only browser to help Developers and QA debug code better than anyone.
- Visual Editing Tools - You can visually edit any page animation objects.
- DevTools Challenger - Learn more about how the Visual Animation and CSS Editing works together with a fun game.
- Extra Performance Tools - Check out Frame Rate, memory consumption and JS profile in the performance tools.
- Page Inspector - Modify HTML & CSS structure live
- JavaScript Debugger - Step through JavaScript code and easily debug issues.
- Awesome Style Editor - Fix CSS issues on the fly.
AppleScript and FireFox
AppleScript was briefly removed from Firefox. You'll be happy to know that it's back! (Ok, It's been back for a while, I just noticed it now.)
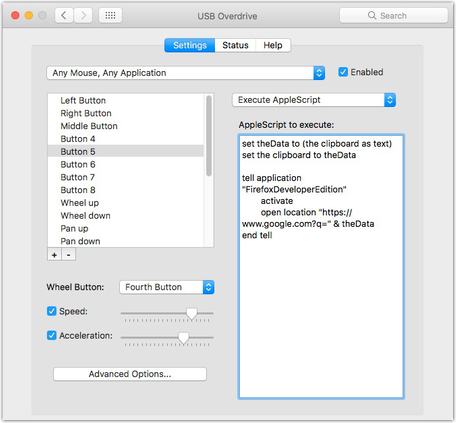
Here's an example code to search Google using the contents of your clipboard:
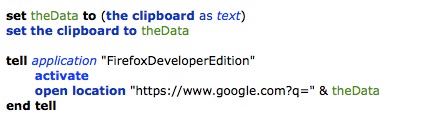
set theData to (the clipboard as text)
set the clipboard to theData
tell application "FirefoxDeveloperEdition"
	activate
	open location "https://www.google.com?q=" & theData
end tell
Mousekey Assignment
I have this setup as one of my mouse buttons. You can assign AppleScripts to mouse buttons via USB Overdrive. I can now quickly search google with the #5 mouse button.
BASH and Firefox
If you don't like AppleScript, you can always use BASH and perform the some actions. (I wasn't able to figure out the search query)
#! /bin/bash
/Applications/FirefoxDeveloperEdition.app/Contents/MacOS/firefox -private-window http://www.cryan.com
Some sample command line actions
Opens a new website in Private Mode:
/Applications/FirefoxDeveloperEdition.app/Contents/MacOS/firefox -private-window http://www.cryan.com
Opens a URL in a separate tab:
/Applications/FirefoxDeveloperEdition.app/Contents/MacOS/firefox -new-tab http://www.cryan.com
Opens Firefox in safe mode, useful if you having problems with firefox. (Also useful to test a site with no plugins enabled)
/Applications/FirefoxDeveloperEdition.app/Contents/MacOS/firefox -safe-mode
This isn't limited to the Developer version of Firefox. If you are using the standard Firefox version, replace FirefoxDeveloperEdition.app with Firefox.app.
You can learn all about the various command line options on Mozilla's developers website.
PermalinkImage2icon
Early this year I blog about how easy it is to setup a MacOs Folder icon maker using Affinity Designer.
I decided to check out Image2icon a bit more and find it to be a good piece of software and certainly worth investing.
Why Use Custom Icons?
Custom icons make it visual quicker to find things. You can quickly sort folders and attach an icon for a quick visual of what's in the folder.
What makes Image2icon better?
I didn't do much research into icon making software, I found the app in the App store and thought it would be worth investigating.
It does take a bit to understand how to use the app. Once you get used to some keyboard commands, you can see that it works really well.
In no time at all you'll be replacing boring icons with nice color ones.
Image2icon Capabilities
You can create twenty different icon types. There are popular types from folders to disk drives.
I mostly use the folder icons, but the disk drives come in handy when I want to customize USB flash drives.
In Image2icon, you can pick from 3 different folder types:

Once you have the design set, simply drag a folder on the Image2icon window and BAM the icon is applied to the folder.
This makes it really easy to apply an icon to any set of folders.
Export to 9 different Icons: Folder, ICNS, iOS, Android, Favicon, Iconset, Windows ICO, PNG, JPG
Image2icon Weaknesses
The tool to manipulate images is a bit weird. I have a hard time getting the image settings correct using the slider to fix the shrinkage or alignment.
There has to be a better way to adjust an image to make it look good.
This isn't a show stopper but if your trying out the app, you should get familiar with how that works.
Red Sox Opening Day Folder Icon Collection
Fenway Park opening day is next week. To celebrate the season, I put together six icons. Use these to highlight photos or trip notes on your next Boston trip.
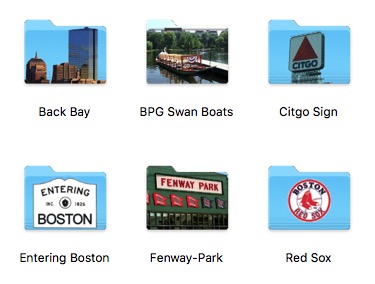
Download the Boston icon Collection
- Fenway Park
- Red Sox Logo
- Swan Boats
- Citgo Sign
- Entering Boston
- Back Bay Buildings
Biff App
I became interested in the Biff app when I saw it included in a couple of Macintosh Mega App deals. I wanted to find out more about the application.
Here's a description of what Biff is from their website:
Biff is a Vector Graphics application. It makes creating graphics for your Website, Poster, or anything else really easy. Biff helps you create Amazing Logos, App Icons (Biff comes with the Templates you need.) with simplicity, without sacrificing powerful features like full path editing and boolean operations.
The developers of Biff are huge Back to the Future fans and the App name is in reference to a character in the movie. There are several references to the movie throughout the App.
Initial Impression
This is a good app to learn some of the fundamentals of Vector Graphics.
It lacks a lot of features that you can find in other vector base applications. While it talks about creating "Amazing Logos," other Applications give you a lot more power.
The application is expensive and sell for $59.99 on the App Store. However it is currently on sale for $39.99 on their website.
Some missing features
True EPS import - You can open up EPS files in biff, but you loose the vector aspects. Basically, you get a rendered EPS file. So if you purchase something online from DepositPhoto you can't modify vector components.
Limited Tools - When you click on the circle or rectangle shape it automatically creates one for you. You don't get to define the size of the shape on creations. The rectangle tool appears on the bottom right corner, and it took me a while to figure out that when I clicked on the rectangle icon a shape was appearing in my image. In addition, there is no pen tool, which is essential for any vector application. There is a free shape tool, which seems to only draw a line.
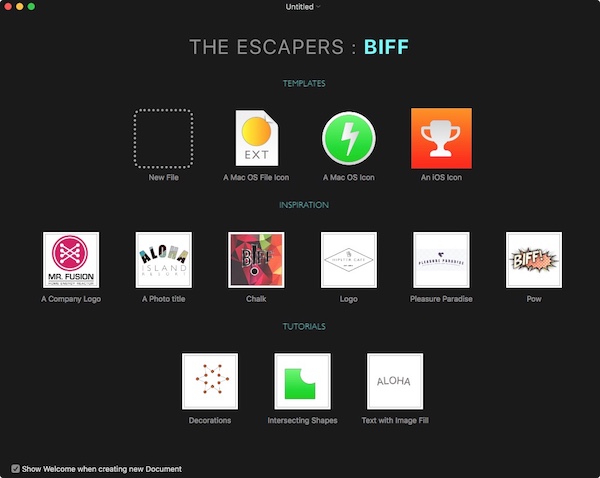
Training - There is some tutorials on the start up screen: Decorations, Intersecting Shapes, and Text with Image Fill. Other vector base apps have more detail information about the various tools.
WYSIWYG Font - There's no WYSIWYG font option, Biff just uses the system font picker when you need to change the font of a text.
Application Features
There is a Library pallet with 18 Objects that you can use as a starting point. You can also build the library with your own Biff Objects. This is useful if you plan on reusing certain buttons or shapes.
There is a Style pallet with 14 styles to spice up any selected object. It's a good way to see the power of the application and makes it easy to see the object in different designs.
Lots of Shapes! Everything from standard circle and polygon to trees, people, and even an iPhone. A total of 53 shapes.
Skew Dialog box - In the transformation tool is the skew dialog box which gives you the ability to preview the skew shape that you wish to perform. This is better than most of the skew functionality that is in other apps, where you have to play around with the tool to figure it out how it works.
The Boolean Operations box in the Objects area is a neat way to learn the way multiple shapes transform when you use the different operations.
Cool Feature
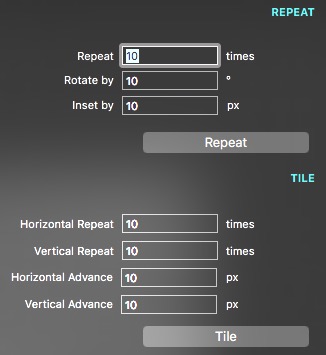
The Repeat/Title Tool is better than what's in Affinity Designer. You can set the repeat amount and offset and see your object get transformed.
Bug: When I clicked on the Repeat/Tile the print dialog appears. Very strange!
Final Thoughts
Hard to recommend Biff when there are a lot of other good options out there. I would certainly suggest looking into Affinity Designer, ArtBoard, and Autodesk Paint as good alternative applications. In the long run, you'll learn some core fundamentals of vector programming.
I highly encourage you to download the Biff app from their site and use the 30-day trial.
Cross Application Note: When I copied an object from Biff and pasted it into Affinity Designer the object shows up as image and not as a shape or curve.
PermalinkAbout
A Mac veteran since 1989, I'm here to share my experience with tips and tricks every Friday. Witnessing the evolution of Mac software and hardware firsthand, I've gained a deep understanding of how these machines work and can help you troubleshoot any issues that may come up.
Check out all the blog posts.
Blog Schedule
| Thursday | Business |
| Friday | Macintosh |
| Saturday | Internet Tools |
| Sunday | Open Topic |
| Monday | Media Monday |
| Tuesday | QA |
| Wednesday | Veed |
Other Posts
- Puzzle Effect in Photoshop Elements
- Combine Files using BBEdit
- Holiday Search in Spotlight
- Archey
- Add Comments to Images/Movies
- Outlook in Apple Mail
- File Juicer
- iCloud Drive
- iMac Boxes
- XXD
- Using Instant Send with Day One
- Transmit 5
- Fix GoPro FishEye on a Mac
- Thumbscrew
- Pixelmator Pro Productivity: Essential Keyboard Shortcuts