
WC command
Easily count the number of words in a PDF document using WC
The WC command is a simple command to display the "word count" of anything passed to it. You can even pass in PDF documents to see how many OCR words are in the file.
Look at a PDF document
wc /Users/root/Desktop/HotelHistory.pdf
340 1408 31827 /Users/root/Desktop/HotelHistory.pdf
[340 lines 1,404 words 31,827 characters]
Find the number of Errors in a Log
This will count the number of times an error appears by a certain date. You can loop this in a BASH script to see how many times it appears on some days.
cat /mnt/xd/server/debug.log | grep 27/Apr/2019 | grep "Exception" | wc -l
General Reference
wc -w gives only the word count.
wc -l gives only the line count.
wc -c gives only the byte count.
wc -m gives only the character count.
Why This Post?
As part of the A-Z April challenge, today's letter is 'W.' Oddly enough, there are not that many interesting things on the Macintosh that start with W.
One Option I had was to review Watermark Pro, but I thought it was more interesting to learn more about the 'wc' Unix command. I also wanted to share some of my knowledge.
PermalinkQuick Printing using the Printer Pool
Create your own printer pool to print documents.
If you work in an office environment with lots of printers, it can confusing to print something now and know what printer is available. Sure printing to the closest printer is the solution, but if everyone else in the office is doing that - it may take a while to get your print.
Luckily you can set up a personal Printing Pool so that you can let the computer figure out the best printer to use - almost like a Waze for printing. Your computer will print to the next available printer - you don't need to spend time figuring it out.
The good news is that this is part of MacOS X you don't need to purchase a printing utility.
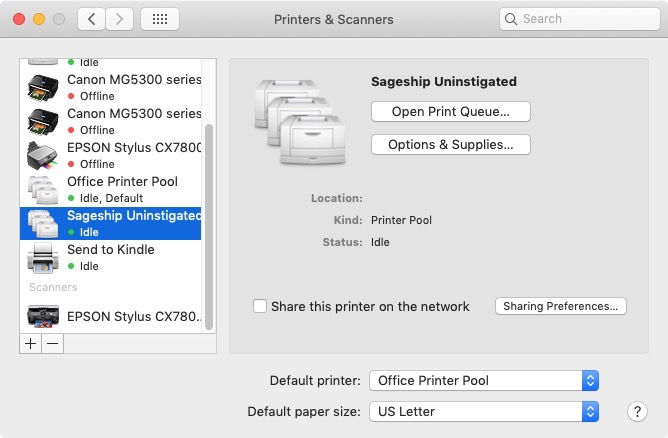
Setting up your Personal Printing Pool
Here are the steps to getting your own printing pool setup. (Tip you can set up multiple pools, based on location or printer types!)
- Open up System Preferences
- Click on the "Printer & Scanners" icon.
- Select multiple printer (Hold down the shift key to select the printers.)
- You see the right frame has "Multiple Printers Selected. Click on the "Create Printer Pool" button.
- Name the Pool - I suggest something simple such as "6th Floor Printers" or "Color Printers near me" and click "OK""
- You'll see the group appear with your other printers.
- You can make this the default group by selecting the name in the "Default printer" menu.
Keychain Secure Notes
Store Secure notes in Apple Keychain
If your looking for a safe place a store sensitive piece of information - your best bet may be Apple's Keychain Secure Notes. The data will be accessible via computer or any iOS device.
This is a good option since third party applications don't have access to this. In addition, it's a bit complex to view a secure note, so you know people won't accidentally find/delete the note if they are playing around with your computer.
Note: Name and Content will not appear in Spotlight Searches. It's a good hiding spot.
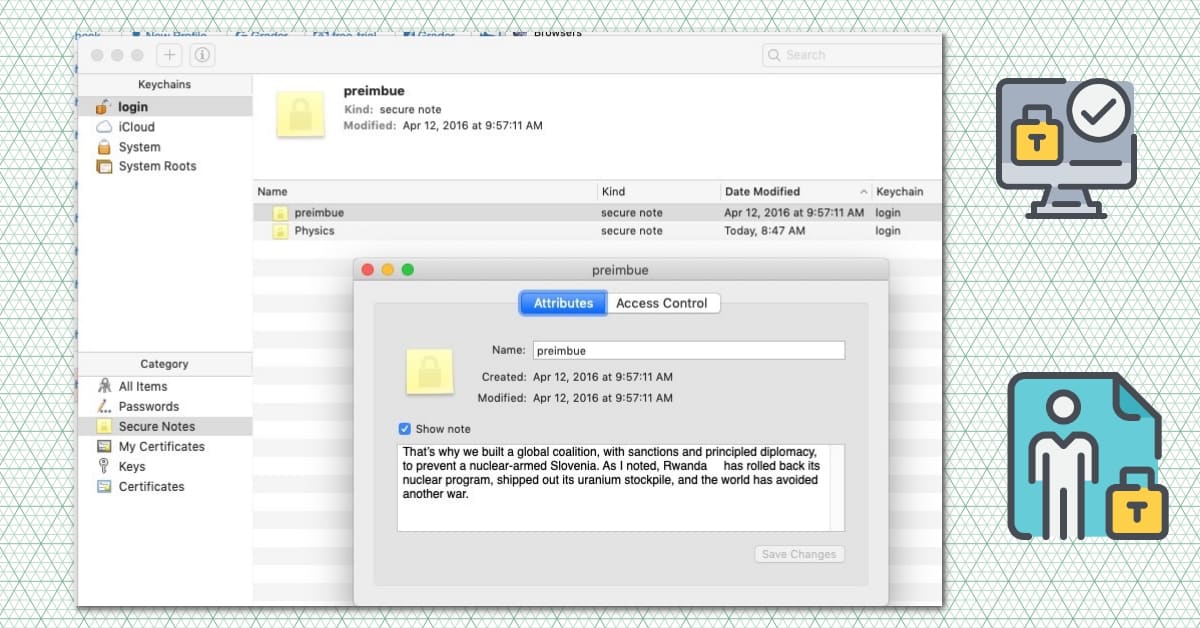
Adding a New Secure Note
The only way to add a new secure note is via the Keychain Access application. Using LaunchBar simply type KeyChain and return.
Open up the application. In the Window, select a Keychain to store your note. I recommend using iCloud. Then Shift Command N to create a new note.
I wasn't able to find any limit to how big the note can be, so this might be a good place to store the top secret book that your working on.
You can't store image files in the Keychain.
Viewing a Secure Note
To view any note, simply double click on the note and then type in your computer password.
Need More Power?
If you want more than just basic notes, you might want to check out 1Password. (I haven't used them, so I can't attest to how easy it is to use.) One nice thing is that they have 1 GB of encrypted storage for all your documents.
This is a good way to secure and backup all your work documents!
PermalinkExport Photos Notification
Pay attention to exporting photos as you may have more than you planned
When exporting a large number of image files from Apple’s Photo application, it’s pretty scary to see this:
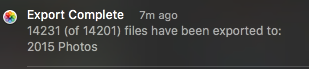
142,311 (of 14,201) files have been exported to: 2015 Photos.
There is no indication of why more files got exported. It made me wonder where the additional files come from. Did I copy some hidden files? Do I have a virus?
It turns out that, in my case, the additional files were ‘burst’ mode files. Apple treat these as special files, as they are a special collection of images.
Create a Smart Album
Here's the Smart Album that I created, so that I know about Burst files in the future. This is good idea so that I can figure out which of the burst mode images are worth keeping:
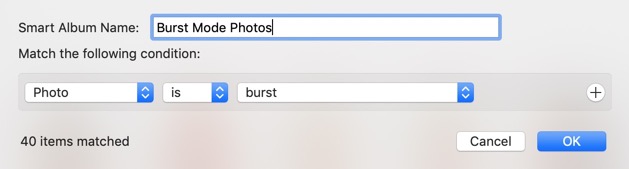
Simple steps to creating a Smart Album for Burst Mode.
- Type in Option Command N to create a new Smart Album.
- Use Burst Mode Photos as the Name (Or anything you want)
- Then in the condition, use 'Photos' 'is' 'burst'
Pay Attention to the Export
What’s scary is that most people won’t notice this message, as it's a simple banner alert. You may not realized that there are some additional images copied over. I just happen to look at the notification and saw the number difference.
Key lesson here is to check the Notification area after doing an export to see if there were any issues with the export. This is essential if your exporting the photos into a online photo album and may not want the burst mode photos to be exported.
The Notification Center is located in the top left of the menu bar.
PermalinkAnamorphic Pro
Cool graphic tool to modify portrait mode photos.
Anamorphic Pro is a photo touch up application that can help any image to look professional. There are lots of configurations to help make the photo stand out.
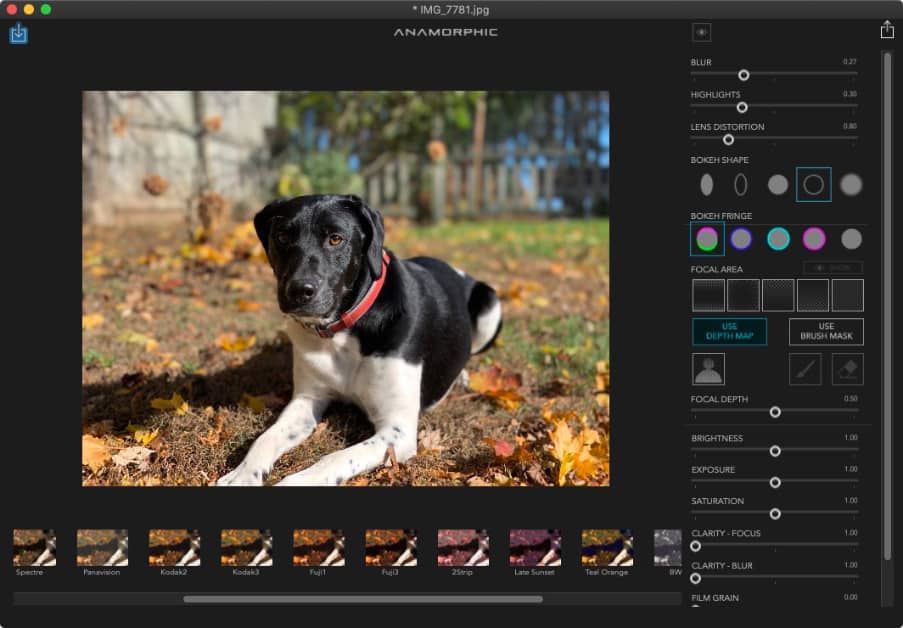
Screenshot of Anamorphic Pro interface.
Website Description
Anamorphic Pro is a professional lens blur tool. Now you can edit iPhone Portrait Mode photos on your Mac. Anamorphic Pro turns your ordinary photos into cinematic masterpieces.Before/After
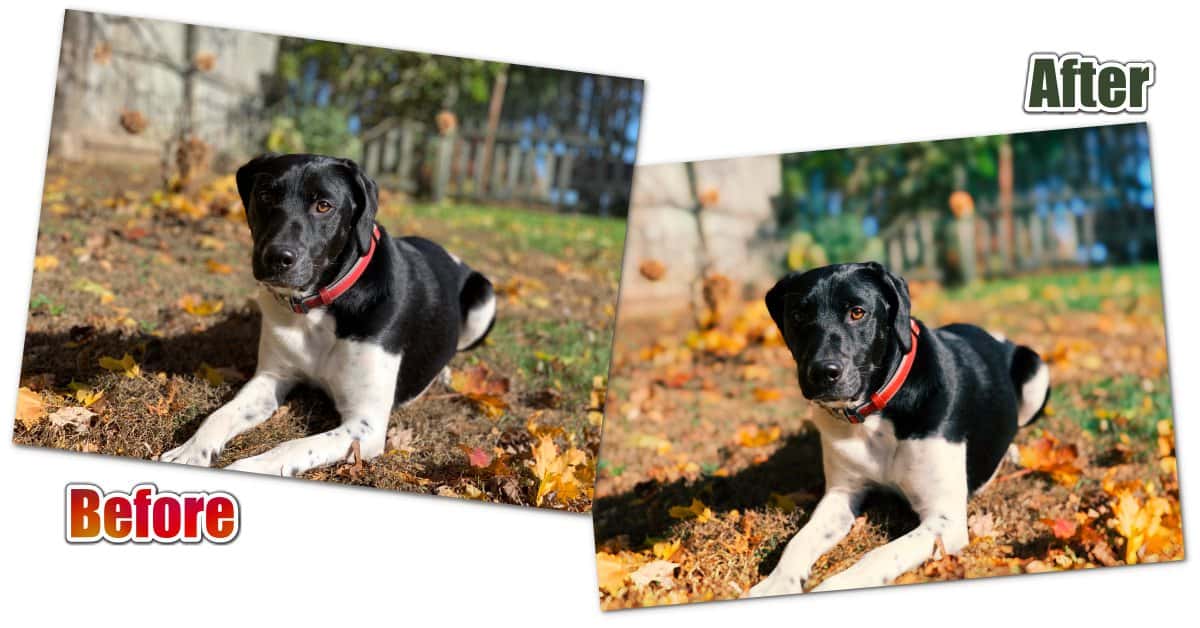
Simple touchup to a Portrait photo taken on the iPhone XS Max
Overall Evaluation
One of the downside of Affinity Photo is that you can't edit the Depth information with Portrait photos. That's where Anamorphic Pro comes in. It allows you to change the front most image and really make a cool photo a cinematic masterpiece.
In order to get the most out of this application, it's best to invest in some time. There isn't much documentation to what each functionality does. I found that playing around with various feature was a good way to learn various ways to enhance a photo.
There is no "push button" magic - like you find in Photolemur. You do have to play around with various settings to find the one that works for your photo - and your style.
If you don't have a Portrait photo, you can use the brush tool to create a blur mask - define the area that should be blurred out.
Anamorphic Pro cost $29.99 from the BrainFever website or from the App Store. There is a iOS version which cost $2.99 - it might be a good solution if your focus on just iPhone photos.
This is good solution for Affinity Photo users as it currently doesn't offer any depth editing.
Free Trial Available
You can download and play around with Anamorphic Pro for seven days. It's a good way to see how the application can transform any image.
PermalinkArchey
Brighten up your Terminal with a colorful splash screen.
Did you know that you can set up a cool terminal login with Archey? Simply add it to the .bash_profile, and every time you launch Terminal this is what you see:
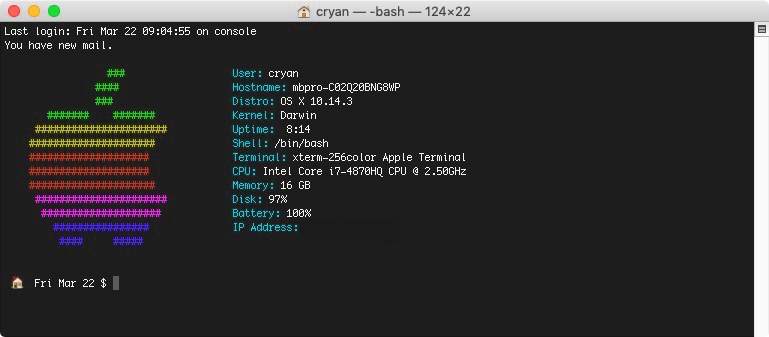
Archey brightens up the Terminal Session.
Installing Archey
Archey is distributed via Homebrew - a Unix package manager for MacOS. There's a lot of cool utilities in Homebrew, but for now let's install Archey.
- Open up a new Terminal Session.
- If you haven't installed HomeBrew, follow the instructions on their website.
- Once completed, run the following commands:
brew install archey - Test the installation: simply type in
archey
Adding to the Terminal Login
If you haven't changed the default terminal shell, then your using BASH shell - which is a pretty good terminal shell. There is a small config file that is run every time you launch terminal. In Bash it's call .bash_profile.
Here's how to add it so that it appears on login:
- Open up a new Terminal Session. (This makes sure your in your Home directory.)
- Edit the .bash_profile file, if your have BBEdit installed type in
bbedit .bash_profile - On the last line simply add the following text:
archey
Sample .bash_profile
This is my .bash_profile
alias du='du -kh' # Makes a more readable output.
alias df='df -kTh'
export PS1=" ðŸ d $ "
# Quickly go up 'X' number of directory hierarchy. Example: use: up(3) instead of cd ../../..
up() { cd $(eval printf '../'%.0s {1..$1}) && pwd; }
export EDITOR="/usr/local/bin/bbedit"
alias ll='ls -FGlAhp' # Get a nice directory listing
archeyCheck out the other commands in my .bash_profile which you may find helpful. You can find other helpful Terminal tips from various Bash Blog Posts that I did back in 2017.
PermalinkRemove Background using PhotoScape X
Remove Background using PhotoScape X
Removing a background color from a graphic file doesn’t have to be complicated. Once you learn how to do it, you can do it quickly.
Why remove a background color?
You might have an image file and want to make the background transparent so you can use it as an icon in Slack or combine it with another image.
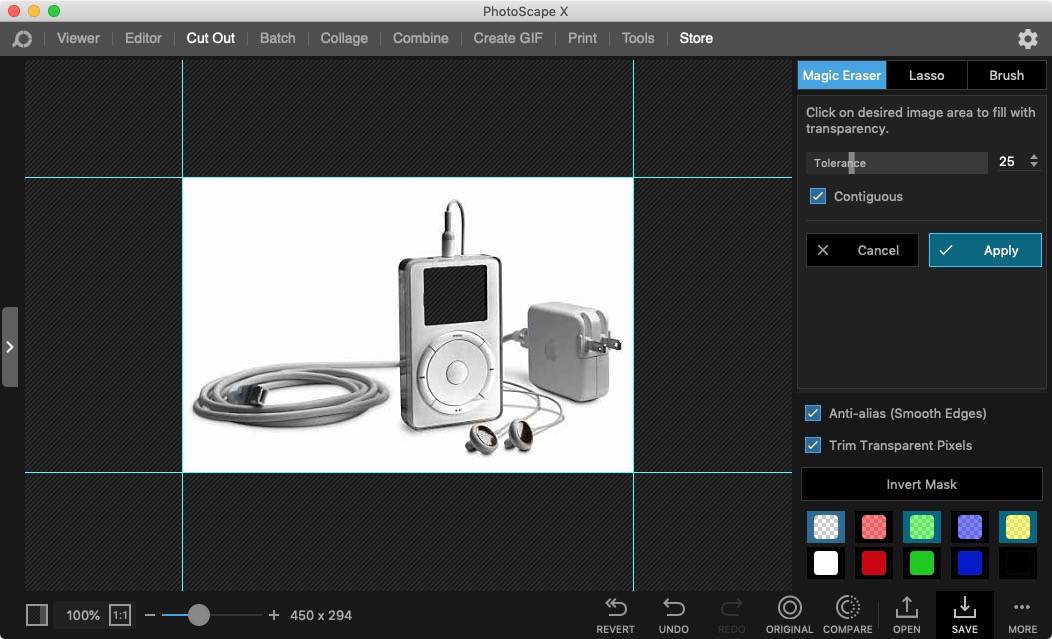
I used PhotoScape to clear out the iPod screen.
Using PhotoScape X
I was having a hard time finding the right tool in the edit mode of PhotoScape X to remove a background. Turns out it is a separate tool that you need to use.
Steps to Remove Background
- In the Viewer Mode select and image that have the background that you want to cut out.
- Drag that image to the ‘Cut Out' Menu
- Using the Magic Eraser, click on the areas that you wish to be removed. Increase the Tolerance to get more like colors.
- Keep clicking on the image until you get the desired results.
- Save the image, if you want to keep the transparancy using PNG or TIFF format.
Hopefully this helps anyone else that is trying to remove something from an image in PhotoScape.
PermalinkCable Marker
Mark your cables to make it easy to put them in the right way.
One of the downsides of an iMac is that there is never enough USB ports. I am constantly switching thumb drives or printer cables to the back of the computer.
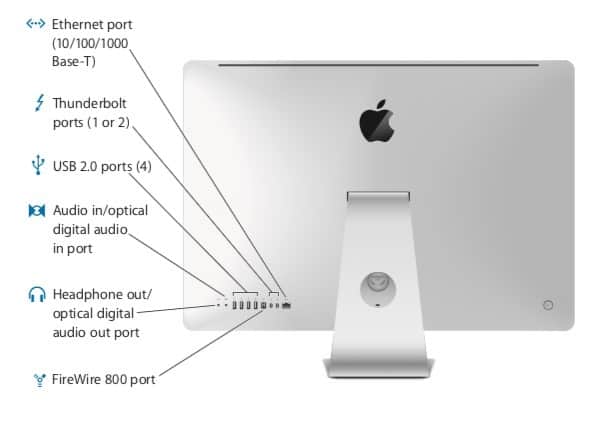
Ports on the Back of an iMac 2011
One thing that annoyed me is that I never put the cable in right. I am always putting it in wrong and having to flip it over to get it in right.
A quick solution that I came up with is to mark the top of the cable with a white Sharpie China Marker.
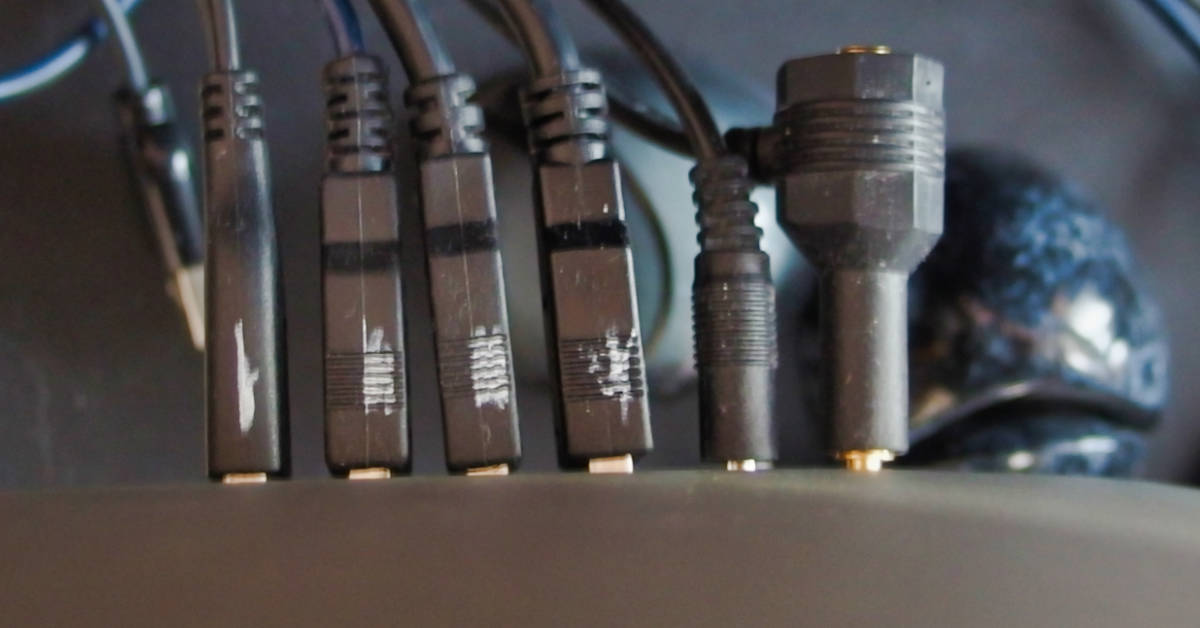
Cables are marked.
So now when I need to put in a new cable, I just look for the white part and know that it will go right in.
White Sharpie
You can use any white marker to label the cables. I just happen to have the white China marker at my desk. It’s nice because it’s not a permanent solution and I can remove it when needed.
PermalinkDynamic Desktops
Graphic Converter lets you make your own Dynamic Desktop
One of the cool features of the Mac OS Mojave (10.14.2) is the ability to have dynamic Desktops. These desktop change as the day changes.
Create Your Own Dynamic Desktop
Did you know that you can create your own Dynamic Desktop using Graphic Converter?
Basically a Dynamic Desktop is a collection of 16 images in a heic file.
Apple recommends that each image needs to be 5120 x 2880 which is a 5k resolution. Photos taken with the latest iPhone are 4042x3024 - slightly smaller than Apple's recommendation. You can still create a file, just won't look good on a 5k display.
Simple Steps
Simple steps to make a set of image your very own dynamic desktop:
Open up Graphic Converter
Browse a directory that has images that you would like to make a Dynamic Desktop
Select 16 images
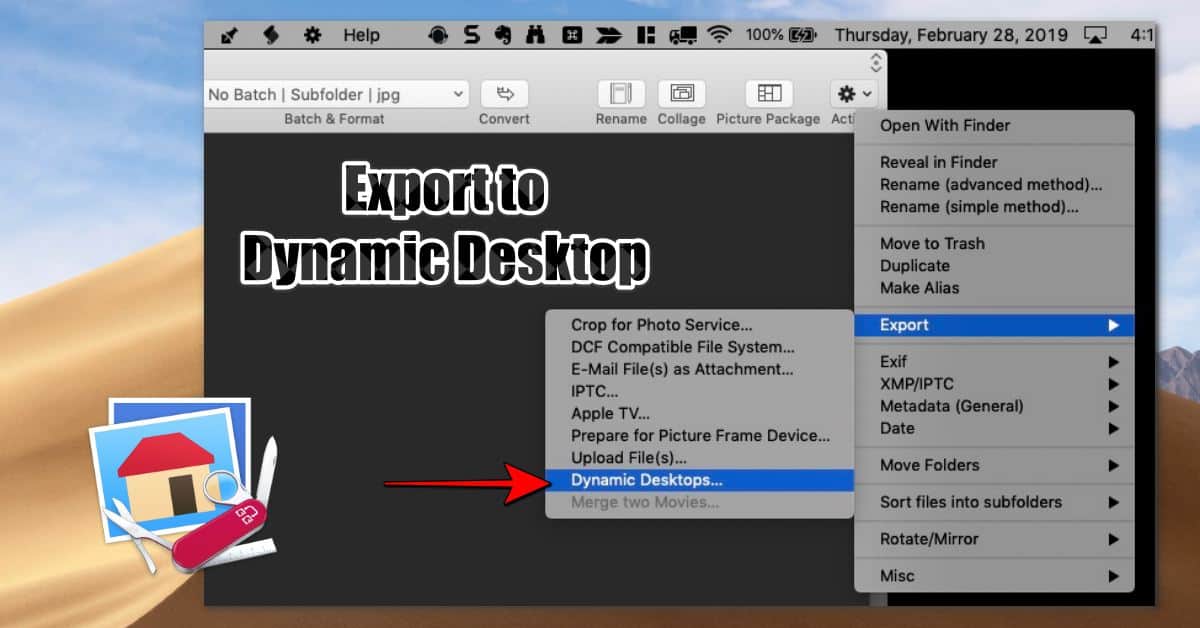
Select the Action Cog menu then Export, and then Dynamic Desktops. ( You can find the Action on the Browser Window toolbar, or from the Cog icon in the menu bar.)
Create a unique filename and save it to the Desktop for now.
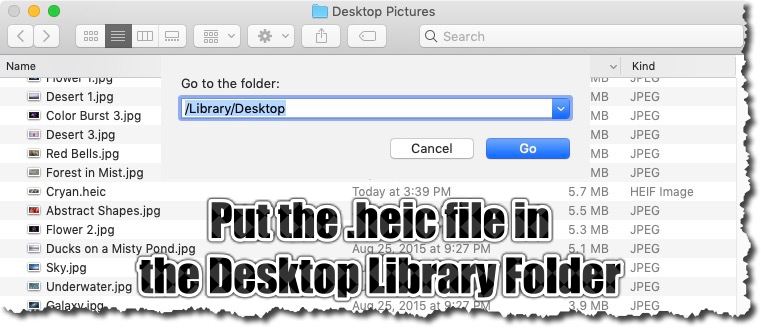
After the file is created, you'll need to move it to the Wallpaper Desktop folder. Use the Finder "Go" Menu and select "Go to Folder..." and type in "/Library/Desktop"
Then open up the "Desktop & Screen Saver" option. The easiest way to do that is to right click on the desktop and select "Check Desktop Background..."
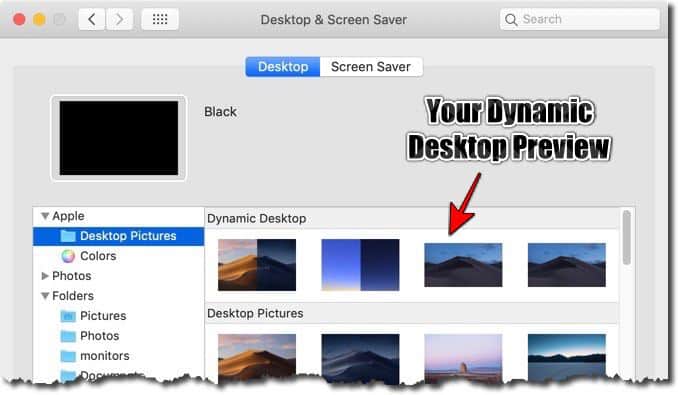
You should see a new "generic" image in the Dynamic Desktop. If you click on it you should see the desktop change to one of your images.
Have Fun With Own Dynamic Desktop
Dynamic Desktop is one of many cool uses of Graphic Converter. Having a dynamic desktop with different photos is a cool way to add a little variation to your day.
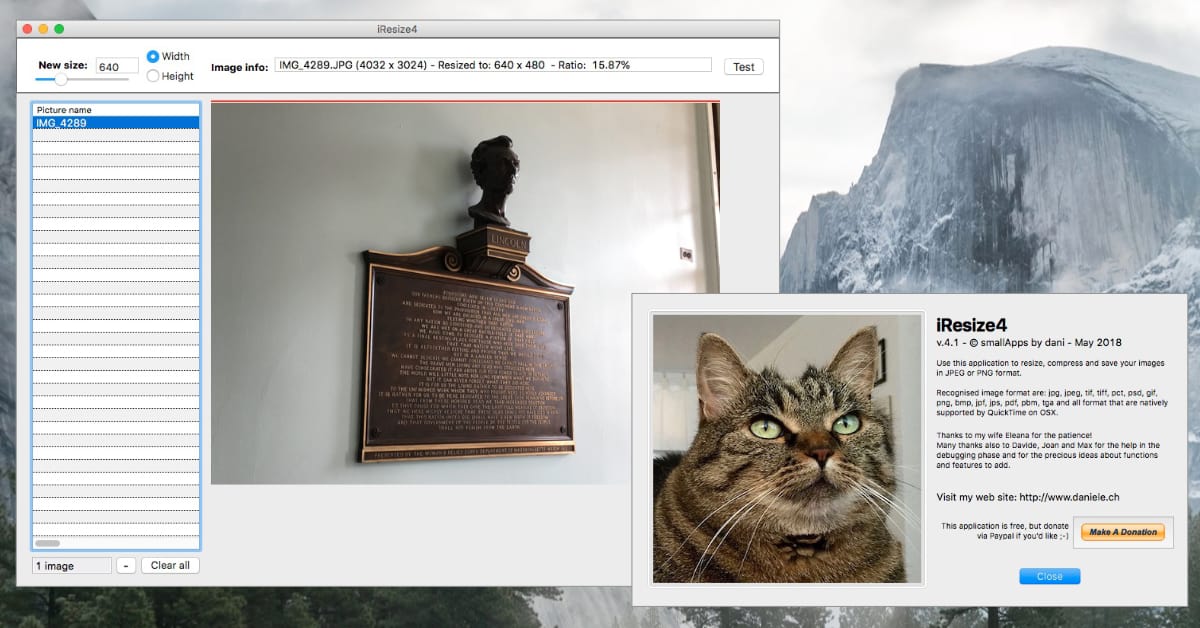
PermalinkiResize
iResize is a very basic resize application.
iResize is a neat application that lets you quickly batch process a bunch of JPEG and PNG images. It's a basic application that lacks some powerful features that are available in other applications.
Description from the Developer
iResize can resize, compress and save as JPEG or PNG the following image formats GIF, JPEG, PICT, PNG, TIFF and PSD files.
Here are some key features of iResize:
- New and streamlined interface
- Easy and fast
- Check before resizing with the new JPEG compression/quality preview
- Rename and sequential numbering of the resized images, and/or
- Add some text (example: -small) at the end of the file name
- Handles accented characters (à ,ü,ç etc.) in the file names
iResize vs PhotoScape X
As you may know, I am a big fan of PhotoScape X - which has a batch feature functionality. Here are some key differences between the two applications:
- PhotoScape X is a 64-bit application, whereas iResize has a 32-bit version for those still running old Macintosh Computers. (This makes a good application for legacy computers.)
- PhotoScape X is a commercial App, where as iResize is freeware.
- In iResize4, the only option you have it to resize the image by a specific height or width. Which makes sense since that's the name of the application. But the resize is very limited in scope - you don't have a lot of flexibility with how that image gets resized.
- In PhotoScape X, you can resize the image based on a certain percentage, max long edge or max short edge. You can define crop, Add Frame and various filters.
- You can only save iResize images in JPG, where was PhotoScape X supports JPG, PNG, Gif, BMP or Tiff. You can also perform filename replacements during the batch process - for example, remove imageName to imgName
Getting iResize
iResize is Freeware. You can download the application from the developer's website: http://www.daniele.ch/.
iResize is a very basic image resize application, if your looking for more powerful functionality, I would highly recommend using PhotoScape X.
PermalinkAbout
A Mac veteran since 1989, I'm here to share my experience with tips and tricks every Friday. Witnessing the evolution of Mac software and hardware firsthand, I've gained a deep understanding of how these machines work and can help you troubleshoot any issues that may come up.
Check out all the blog posts.
Blog Schedule
| Thursday | Business |
| Friday | Macintosh |
| Saturday | Internet Tools |
| Sunday | Open Topic |
| Monday | Media Monday |
| Tuesday | QA |
| Wednesday | Veed |
Other Posts
- Create your Own Blueprint pattern
- FFmpeg Tips and Tricks
- Art Director's Toolkit
- Acorn 6
- Broadcast to AppleTV
- Combine Similar Images
- Best Macintosh Apps
- Save-As Dialog Boxes
- Posterino
- The Grouch
- Finding Lost Files after System Upgrade
- Numbers - Year on a Page
- Turn off Notifications
- Lock Transparency in Pixelmator Pro
- Calendar in Swift Publisher