
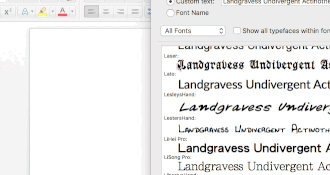
FontDoc Copy/Paste
Earlier this year I wrote about how FontDoc was a useful application to see what font looks best for a given text. You type in any text and in a few seconds, you see your text using all the fonts on your computer. Simply scroll through to see all your options
This is certainly better than judging a typeface by the name - after all many fonts look different when you mix upper and lowercase characters.
FontDoc Cool Feature
There is a cool benefit that I didn't mention - copy and paste. You can copy the text and paste it into any document and it will paste in the text using the font style you selected. How cool is that!

This makes it really easy to look at header text in different font styles and then paste in the one that you like the most. This will work in any application - Affinity Designer, Photoshop, OmniGraffle, Microsoft Word and more. Any document that supports rich text (RTF) will support this.
This is way better than judging what looks better based on the WYSIWYG menu.
Drag and Drop Works!
You can simply select the text and drag and drop it into your application. In the above screenshot, I dragged and drop the text to Microsoft Word.
One Exception to the rule
The only caveat is that the font has to be installed. So if you're using FontDoc to check Fonts that are not on your computer, the pasted text will be pasted in Helvetica font style.
The fix is easy, simply install the font and try again. Note: You may need to quit and reopen the application in order for the application to recognize the font.
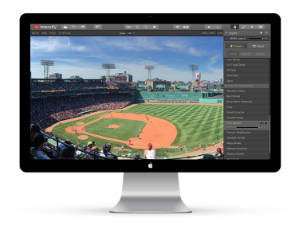
PermalinkIntensify CK
Intensify CK is an Mac OS Application that makes it easy to touch up images. You don't need to be an expert in understanding how vibrance, Saturation and Luminosity works. There are some cool presets that can help you get the most clarity and intensity from your images.
From Macphun's website:
Intensify helps photographers of all skill levels create powerful images with unprecedented drama and detail. Precise control of contrast, structure, detail, and sharpening across different tonal ranges delivers high-quality results every time.
Intensify features special algorithms to prevent image artifacts, stackable image adjustments with opacity control, dozens of professionally created presets, adjustment brushes, RAW image support, vignettes and the ability to run as a standalone application or as a plug-in for popular host applications. combine to make Intensify Pro an essential part of any photo editing toolbox.
Main Preset Categories
- Architecture
- Black & White
- Creative
- Detail Enhancement
- Image Tune
- Landscape
- Soft
Making Standard Photos Awesome
I like Intensity because it can help make simple photos taken with the iPhone to look so much better. Check out how using the basic Artistic Preset changes the sky in this Fenway Park picture:
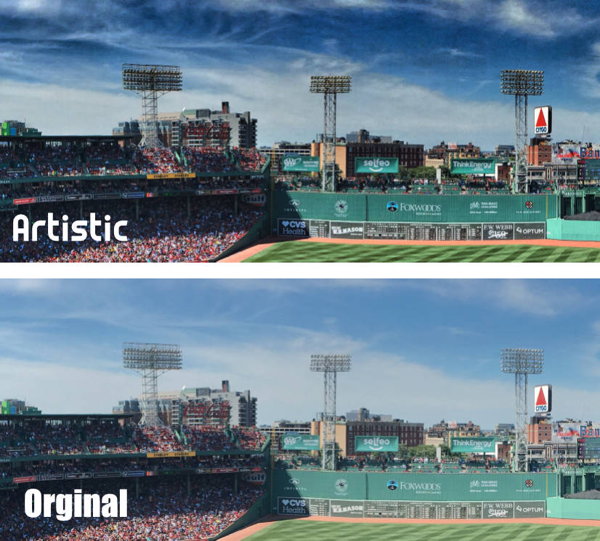
When I load up a file in Intensify CK, I then select one of the Presets, and use the down arrow key to see the change in the image with the different selections.
Lynda.com Class
If you want to get more from Intensify CK, check out the Advance Intensity CK class at Lynda.com. Richard Harrington will help you understand some of the advanced options in Intensify CK. It's a good way to learn to use the software.
Summary
I purchased Intensity CK from a recent Bundle Hunt deal. I don't think that I would use this frequently but think that it's a nice tool to have when I need it.
Check it out for yourself, there is a 15 day trial. Where you can play around with the various presets and see how they can make your photos look different.
For example, there are 9 different Black and White presets. Which is kind of neat to see the difference that each one can do to an image.
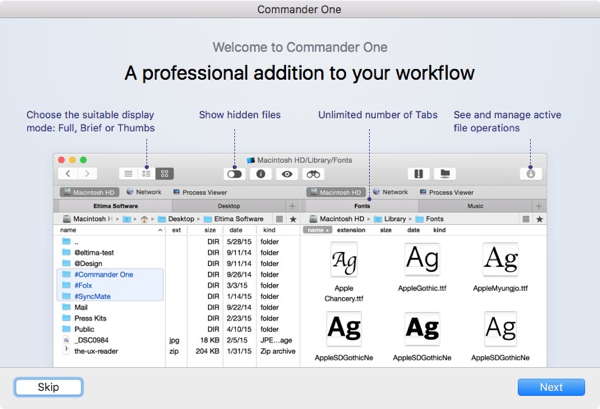
PermalinkCommand One
Commander One is a file manager for Mac, a program like Finder to copy, delete, compress/uncompress files, connect to an FTP server, etc. However, Commander One can do much more than Finder, e.g. search for files with specific pattern across all drives and archives, mount MTP and iOS devices, view processes in the system, etc.
Having multiple windows can be complicated to manage. A Dual-pane browser window can make it easy to navigate between folders and services. With Command One Pro, you can connect to the most popular cloud services and manage them all with one familiar interface.
- Command One Pro is part of the Setup Subscription Service. For $9.99 a month you can have access to 60+ applications. It's a good way to try out various apps to see which ones you may like.
- A Command One Pro Personal License only allows you access to one installation of Commander One Pro, if you have multiple Macintosh computers you need a Team License.
- To view folder contents size you have to press the space bar. (There should be a setting so that folder size is always displayed)
- You can connect your DropBox account and manage it without having to install the DropBox app. Very handy if you have limited disk space on your computer.
- One good use I got out of this was the ability to back up certain files to a thumb drive. I did a quick search for brush files (.abr) and moved them to my thumb drive so that I had a backup of brushes. Command One made it easy to find the files and move them to the folder on my thumb drive.
- Really cool that you can open up ZIP and WAR file without extracting. I have quite a few files that have images and text data that I can access whenever I want.
- Just about every functionality is configurable to a hot key. This makes it easy to make certain tasks easy to perform. (For some reason Command-F is assigned to the Connections dialog. I think it should be assigned to search, fortunately, you can change it.)
- I found the search to be very helpful in managing misc files on the computer.
- The Disk List bar makes it easy to switch between connected accounts/drives. Making it very easy to move files between connected USB thumb drives.
- The Pro pack includes DropBox, Google Drive, Amazon S3, OneDrive and WebDAV. Giving you more power than the standard web interface.
Apple External Keyboard Stopped Working
This week my Apple External Keyboard just stopped working for no reason. I have a MacBook Pro connected to a Thunderbolt display. All of a sudden the keyboard just stopped working.
- I removed the USB end from the display and reconnected it, no such luck.
- I plugged the keyboard directly into the computer, restarted - no keyboard was found.
- The Apple Keyboard didn't even show up in the System Information.
- The caps lock key never lit up.
How did I get it to work?
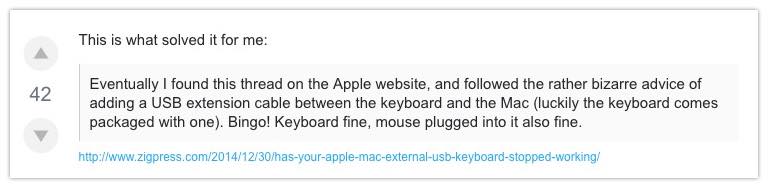
I read various Apple forums from other customers having the same issue. The "easy" solution was to connect the keyboard to a USB hub. I simply connected my USB Mighty Man hub to the computer and then the Keyboard USB to the hub. That worked!
< /p>
Seems like a weird solution. But the advice on Apple.stackexchanged.com worked!
I am wondering if my Optical Gaming Mouse that is connected to the Thunderbolt display is draining out the USB power. Although it doesn't explain why connecting the keyboard directly to the computer didn't work.
The USB Gaming Mouse (Holtek Semiconductor) has a current required 100 (mA), where as the Apple Keyboard has a current required on 20 (mA).
USB Hub Man to the Rescue
In any case, not sure why all of a sudden this started happening. I have been using the Keyboard/Mouse/Thunderbolt connection for about 6 months now with no problems. The system is running macOS Sierra version 10.12.6 with the update installed 17 days ago.
PermalinkFluid Mask 3
Fluid Mask is an easy way to remove/replace background images. People use this when they want to extract people or objects out of photograph.
This is a professional graphic tool that is more powerful than mask functionality that you may encounter in Pixelmator or Photoshop. This gives the user more power to strip out unwanted backgrounds. The net-net results is a cleaner cut with no ugly pixelated edges.
Some example uses:
- Change the background from a cloudy day to a nice sunny one.
- Add someone to a photograph to make it appear that they were at the family outing even though they couldn't make it.
- Take the 'Welcome to Boston' sign out of a picture and place it on your website header.
- Remove unwanted objects from your photos.
- An tool in your photography toolbox to create great images for social media.
From their website:
Good Tools have a Learning Curve
It takes a while to understand how to use this tool. Fortunately, there are plenty of video tutorials to watch and understand the fundamental ideas. Every image is different so learning the fundamentals can help tackle the toughest task.
I did find the layout to be a bit hard to understand but watching the videos and playing around with the software help with the learning curve.
Start off slow. I would recommend just doing a basic background replacement and slowly work your way to more complex masking.
Some Examples of Work
Here are a couple of images that I was able to extract using Fluid Mask.

A little touch up with Pixlr to keep the colors about the same.

Getting Fluid Mask
You don't need Photoshop to use Fluid Mask. It works perfectly fine as a stand alone application. The downside of the standalone version is you can't drag and drop images to open - you need to open the image via the File -> Open option within the application.
You can download a trial version from their website. If you find the tool to be a time saver you can purchase a license for $99.
This might seem a bit expensive for the casual photographer and blogger. However, the tool will save you a lot of time which could justify
PermalinkSmartmockups
Smart Mockup makes it easy to display any image as if it was on a monitor/computer/displays. The application has 458 templates whereas the website only has 157 mockups.
The nice thing about using SmartMockups is that you can present a website in a different view. You simply pick out the design first and then add your image or enter a URL.
You have the option of exporting the image or simply use the 'Share' link to instantly share the image in Slack or Jira.
Some Notes about the application
- There is no glare reflection effect on the mockup image. (Instructions on how to add it in Photoshop.)
- In order to run the SmartMockups app you need to be connected to the Internet.
- Check out some of the designs and use the 'Favorites' feature on ones you like. This will save you time later.
- After you upload an image, you have the opportunity to resize it so that it fits in the placeholder template.
- There are four image sizes on export. If all the sizes are big, you can always resize the exported image to whatever you want.
- There a Suggestion box where you can add and vote on other ideas. You can also see what ideas that might get implemented soon.
- Keep checking the application once and a while, you never know when new designs come in.
- Smartmockups now support GIFs. However, they don't support GIFs larger that 8 MB.
This is a useful tool to have if you do any type of blogging or social media advertising. It can help make screenshot and photos look better than by themselves.
There is a one-time fee of $49 for the application. The software is available for Windows and Macintosh users. You can download the application from their website. Check around the Internet, you may find discounts from various vendors. I was able to pick up a license for $19.
PermalinkTransmit 5
Transmit is a communication software that allows you to transfer files. This is a great tool to use for anyone managing websites.
I have been a long time Panic's Transmit customer. My first Transmit license was purchased on September 27, 2006 (Version 3). I upgraded to version 4.0 on March 15, 2013. ( Checkout my earlier blog post)
I have been a very happy customer of Transmit and pretty much every file that has been moved to the cryan.com server was done using Transmit.
Finally an Update
On July 18, 2016 Panic.com announced a major upgrade to Transmit. This is the first major update since 2010. I decided to take a look at what's new with my favorite software.
Panic's press release has highlighted three major changes:
- Connect to More Servers
- Faster Connection
- New UI
Here's a couple of things that caught my attention when I tried out the software for a few days.
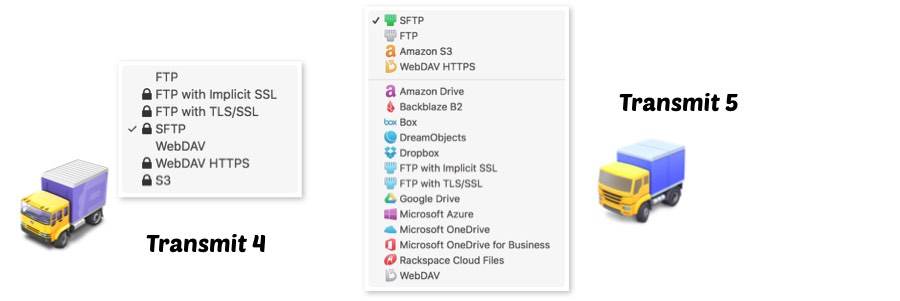
More Servers
It's nice that Transmit can now connect to a lot more services. They went from supporting four to ten.
My file transfer needs are a bit basic. Currently, I don't have any account on the other services, but that may change. I basically use Transmit to copy from my own SFTP server.
I am pretty sure that it's only a matter of time before I'll be having accounts on Amazon S3, Blackblaze B2 or Microsoft Azure. Cloud storage is growing and you're better off storing files there than on a DVD.
Places Bar
The Places Bar is very cool. When you open up a connection there's a new bookmark type of bar on the top of the file listing. The bar stores all your favorite locations that you use for that location.
Now I can navigate between folders a lot easier. It's easier to zoom between folders - definitely a huge time saver.
In Transmit 4, I had set up different 'Favorite' locations on the same server. In version 5, I can simplify things and have my website as a favorite and then use the Places Bar to navigate around common folders. I can quickly move between the Template folder and my Includes folder.
Overall View
I am very happy that Transmit has gotten an update - even happier that they didn't go to a yearly subscription plan like other software vendors have done.
Right now I can't justify upgrading. But it's nice to know that when I get onto additional clouds solutions, that Transmit will be a solution that I can use.
If you're moving files between services, I would highly recommend checking out Transmit. The seven-day trial is plenty of time to see how it's a great time saver.
PermalinkApple Mail HTML Support
I encountered this paragraph in the Take Control of Apple Mail book By Joe Kissell. Google added the Book to a search I was doing for 'raw HTML apple mail'
It hard to believe that it took several versions of OS X before the default Mail application supported HTML in emails.
PermalinkSave-As Dialog Boxes
Today’s post is about what makes a great Save dialog. This is going to be short because a good graphic 'Save-As' dialog box should be simple.
This is a comparison of the Save-As dialog box three main graphic applications that I use:
Omnigroup's OmniGraffle
Great Dialog Box, easy to use and very practical tools.
OmniGraffle gets it right with their version of the save dialog. The Omni Group puts in a nice preview and the option to export different sizes of the graphic. They also have the ability to have a margin around the graphic, which is perfect when the graphic border is a bit too close to the edge.
Nice to Have: A zoom feature in the preview area would be very useful.
Graphic Converter
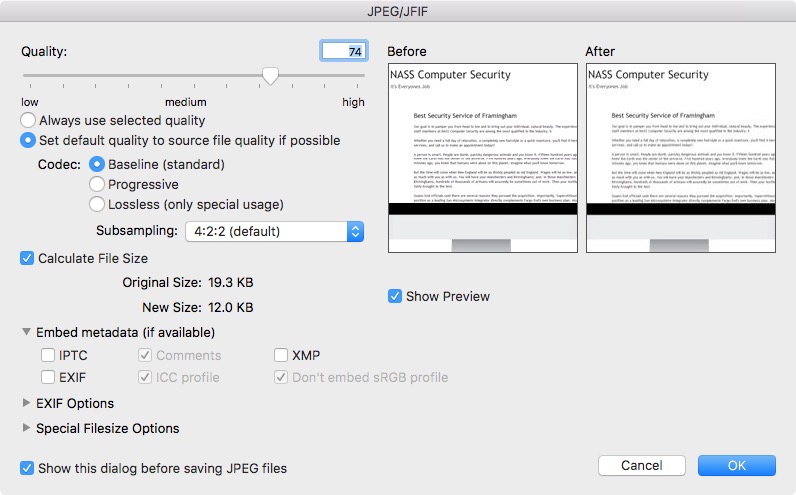
The Before/After Preview feature is really good. I also like the ability to change up on the Codec and Subsampling. Deciding what metadata to include can help make the file size a bit smaller.
Nice to Have: Ability to add the margin around the image.
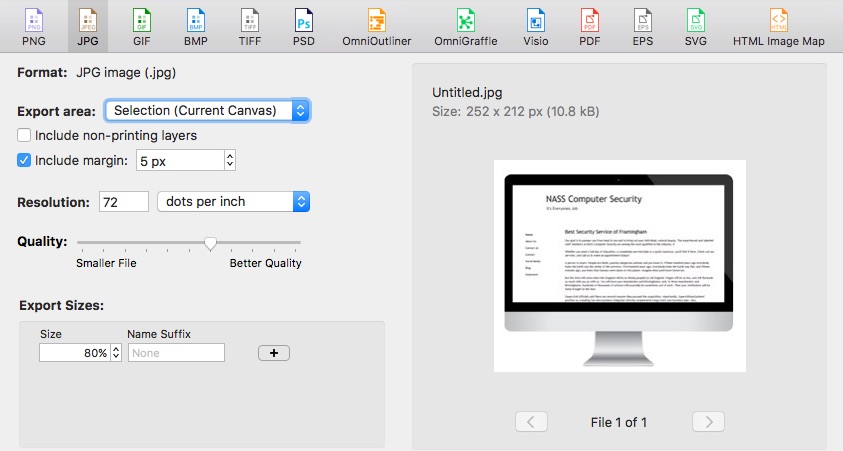
Photoshop Elements 13
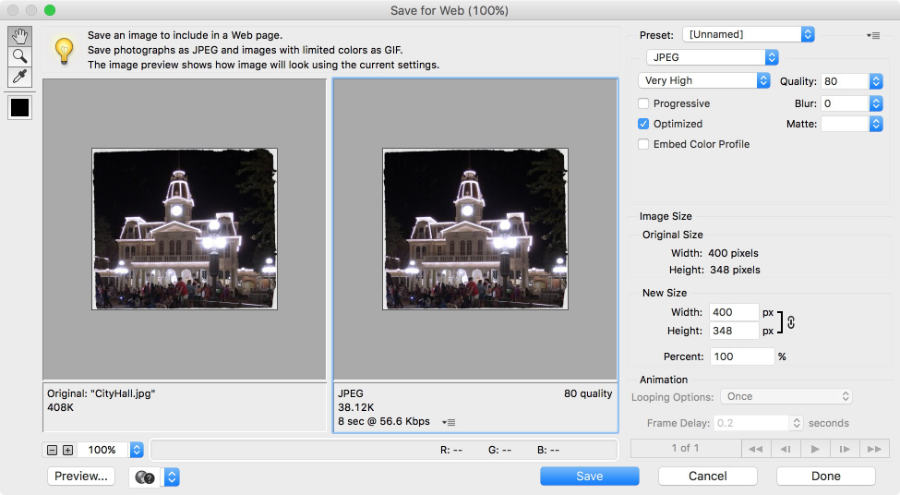
Adobe Photoshop gives you a lot of control on how to setup the final output image. You can easily customize the Width/Height to whatever values that you want. The Preview section gives you additional information about how long a file will take to download, however, this seems to be a bit out of date as there are not many people with 56.6k internet connections.
Nice to Have Features: Ability to add a margin around the image. Ability to save different sizes in the same dialog.
PermalinkUsing the Keyboard in Dialog Boxes
Did you know that you can navigate various dialog boxes in MacOS using the keyboard?
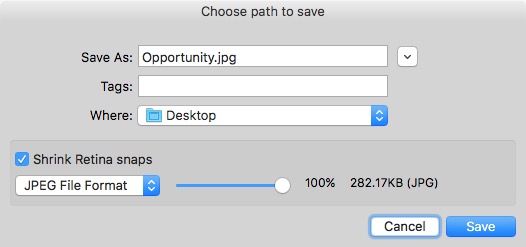
Sample Save Dialog Box
If you look carefully in the above dialog box, you'll see that the 'Cancel' button has a blue glow around it. This is to indicate that this is keyboard actionable item.
Keys to Navigating the Dialog Box
If I click on the 'Space Bar' the dialog box will close and the file will not be saved.
If I click on the 'Tab' the blue highlight will move to the next actionable item, and I can keep clicking 'Tab' until I get the choice I want.
Keyboard Settings Adjustment
If this is not working as you expect, you may need to change the Full Keyboard Access Settings.
- Open up System Preferences
- Select the Keyboard icon
- Select the Shortcuts top menu
- On the bottom of the dialog you'll see the following information:

Make any adjustment that will work how you want to use the system dialogs.
PermalinkAbout
A Mac veteran since 1989, I'm here to share my experience with tips and tricks every Friday. Witnessing the evolution of Mac software and hardware firsthand, I've gained a deep understanding of how these machines work and can help you troubleshoot any issues that may come up.
Check out all the blog posts.
Blog Schedule
| Thursday | Business |
| Friday | Macintosh |
| Saturday | Internet Tools |
| Sunday | Open Topic |
| Monday | Media Monday |
| Tuesday | QA |
| Wednesday | Veed |
Other Posts
- Expand Your iMac 2019 USB-C Ports with a Simple Adapter Solution
- iterm2 Status Bar
- QuickTime Audio
- Copy as Markdown
- imageSnap
- Round Corner Images in Affinity Designer
- Keyboard Maestro Command in BBEdit
- How to Split Videos for Better Smart Conform Results in FInal Cut Pro
- Aerate
- Organizing Your Workspace: Adding macOS Dock Spacers
- Image Conversion Shortcut
- Private File
- Back to Macintosh Basics
- BBEdit 14
- Wondershare Filmora