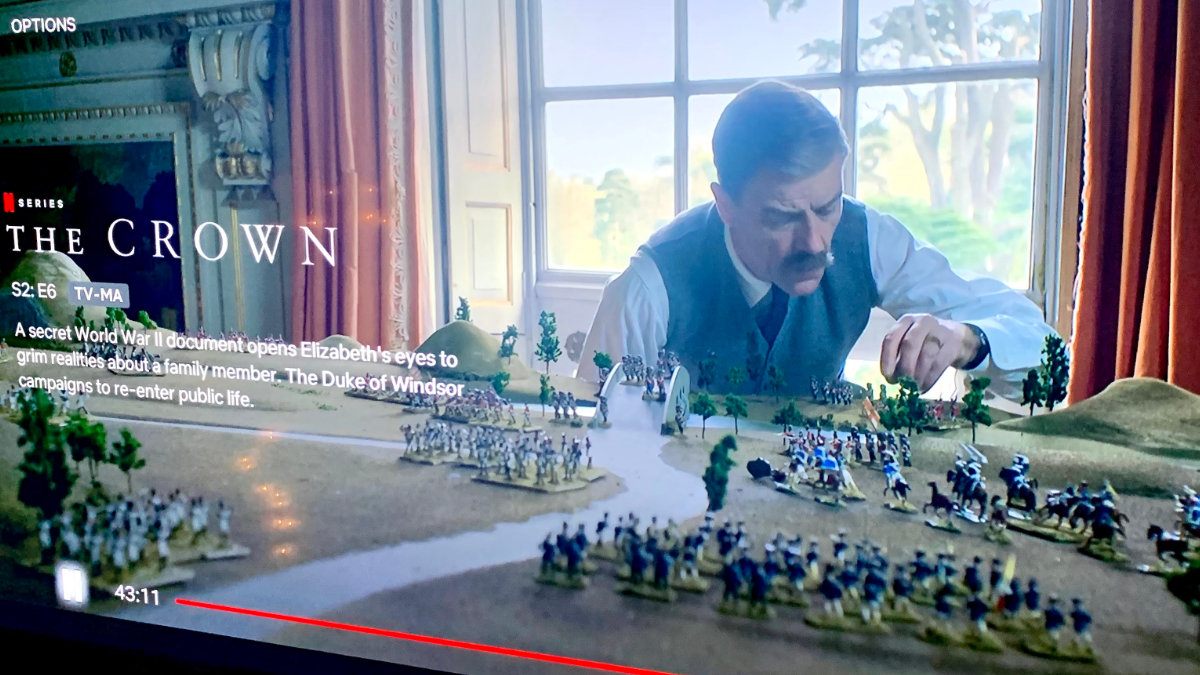
One of the popular shows on Netflix is The Crown. It has gotten a huge following. People can’t wait until the series returns next year.
If you have watched the series, did you notice an interesting display in season 2 episode 6:
Screen Shot of the battlefield display in The Crown
Old North Bridge in the Crown?
If this display showing the battle at the Old North Bridge in Concord, Massachusetts during the Revolutionary War on April 19, 1775?
It certainly seems like it.
How many other British battles featured a bridge as part of the battlefield?
When I posted this in a Facebook group of people that "Lived in Concord Massachusetts," many people didn't think about the Battle of Concord when they saw this scene.
One user, Terri commented: It’s the battle of Salamanca - Duke of Wellington.
Battle of Salamanca
Indeed, the battle of Salamanca was about Wellington's order which took a force of 7,000 men to destroy the bridge at Almaraz. (Learn more on Wikipedia)
The Spanish village Arapiles, Castile and Leon is very small and has no monument to the event on July 22, 1812. This is very different than the Town of Concord, which highlights the bridge contribution to the founding of the United States.
The only mention of the famous battle is a sign in the center of town, which can been seen on Google Maps. The Spanish called the battle Les Arapiles.
Should Have Been Concord
I still think it should have been the famous battle in Concord, Massachusetts.
On Facebook there has been a lot of advertisements on creating Thumbnails images from YouTube videos. This is a paid online service - you can't try it out before you buy.
Fear not, you don't have to purchase an unknown service when there's Canva YouTube Templates.
There are 200+ premade quality designs available. Everything can be customized to your needs and audience's attention. You'll certainly find a design that will make your video stand out.
You don't need to subscribe to Canva to use it. As a basic user, you have a lot of options. If you love it, you may want to subscribe to get access to a lot more templates and design elements.
In the past few weeks, I have been using FFmpeg to modify some video and audio files. I been having found a few productive tips/tricks that I thought would be good to share.
If you have anything good to share, please feel free to leave a comment below.
Loop Video
If you have a short video and would like to extend it for a long duration. For example, if you have a bokeh design that you would like to loop over and over again.
This loops a GoPro video file 4 times it's current length:
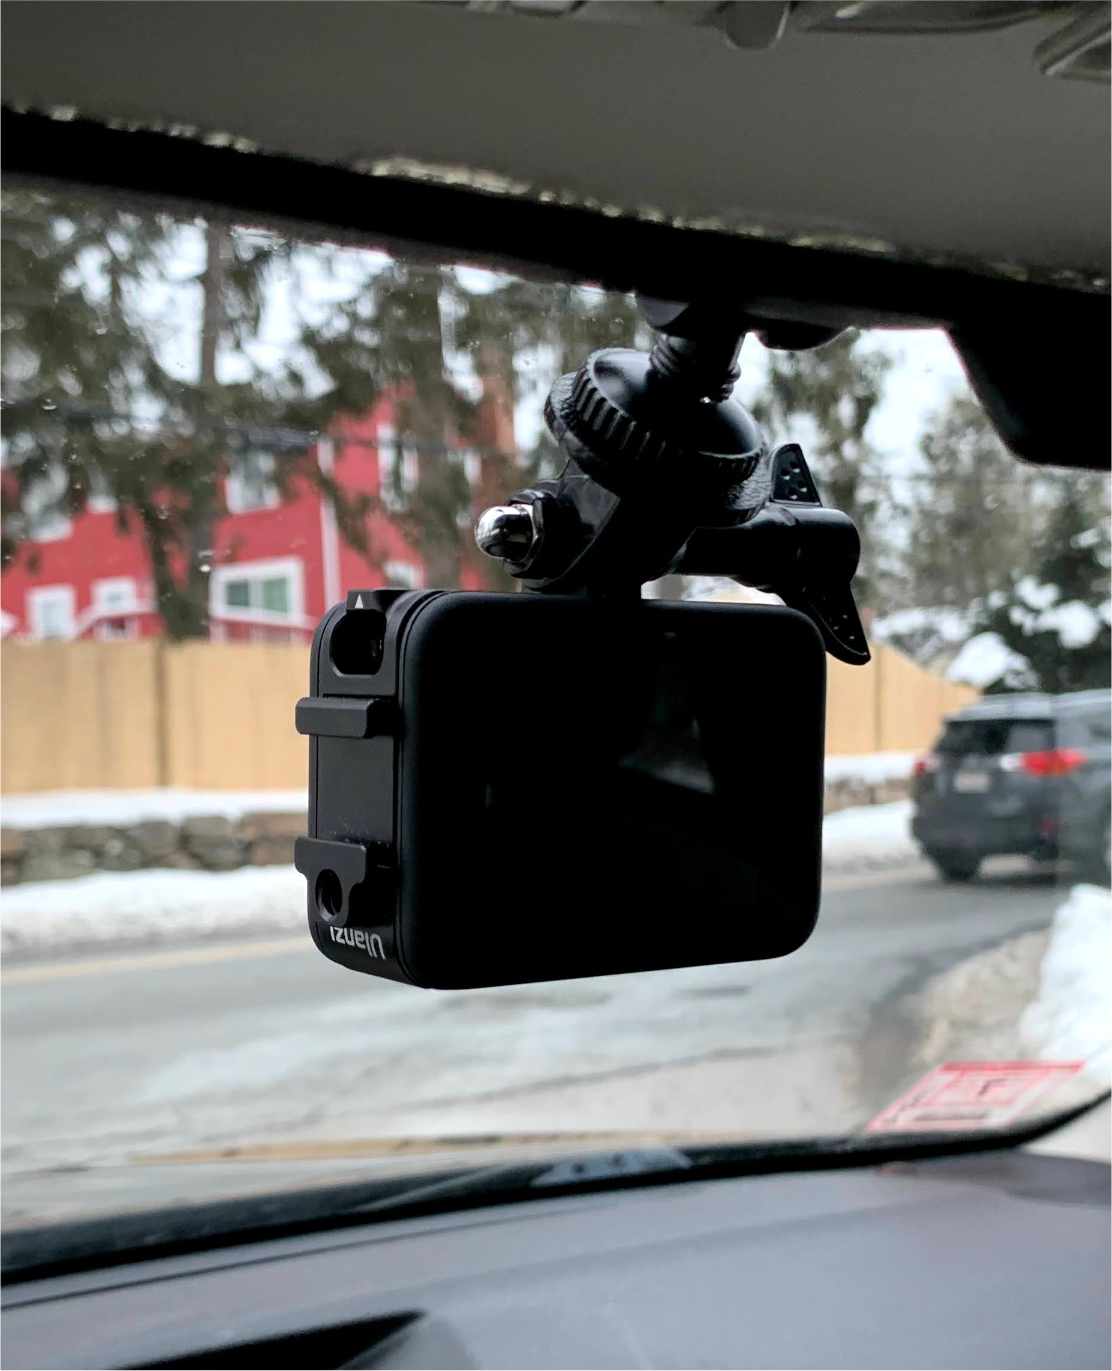
Why buy a dash camera for your car? The GoPro works perfectly well as a dashcam.
GoPro sells lots of great mounts that work great as a dash mount, including the suction mount. However, you don't need to spend a lot of money to make your GoPro a dashcam.
The iSportgo S60 Dashcam mount works great with the GoPro.
The GoPro Hero 9 on the iSportgo S60 Dashcam
The GoPro Hero 9 on the iSportgo S60 Dashcam
Things I Learned using the iSportgo Dashcam
The mount only cost $9.99 on Amazon.com, and is not a permanent to the car, so you can easily move this between cars.
This was put on a Subaru Legacy rearview mirror.
Having the GoPro on the rearview mirror isn't a distraction. You can move it up so that it's behind the rearview mirror.
The iSportgo comes with 13 compatible joints. The whole thing comes in a small brown box, the GoPro mount was in a small bag. You have to put it together. Think of it as if IKEA was to create a rearview mirror dash mount, this is what they would create.
The GoPro's TimeWarp works great as a Dashcam. Simply click on the side button when you want to go in real-time.
If the drive event wasn't exciting, you can always delete the video.
Another option is to use the Hindsight option on the GoPro Hero 9. With hindsight, you can record 15 or 30 seconds before you press the shutter button. This allows you to record things only when they happen - such as an accident. The downside is that using hindsight will use battery time.
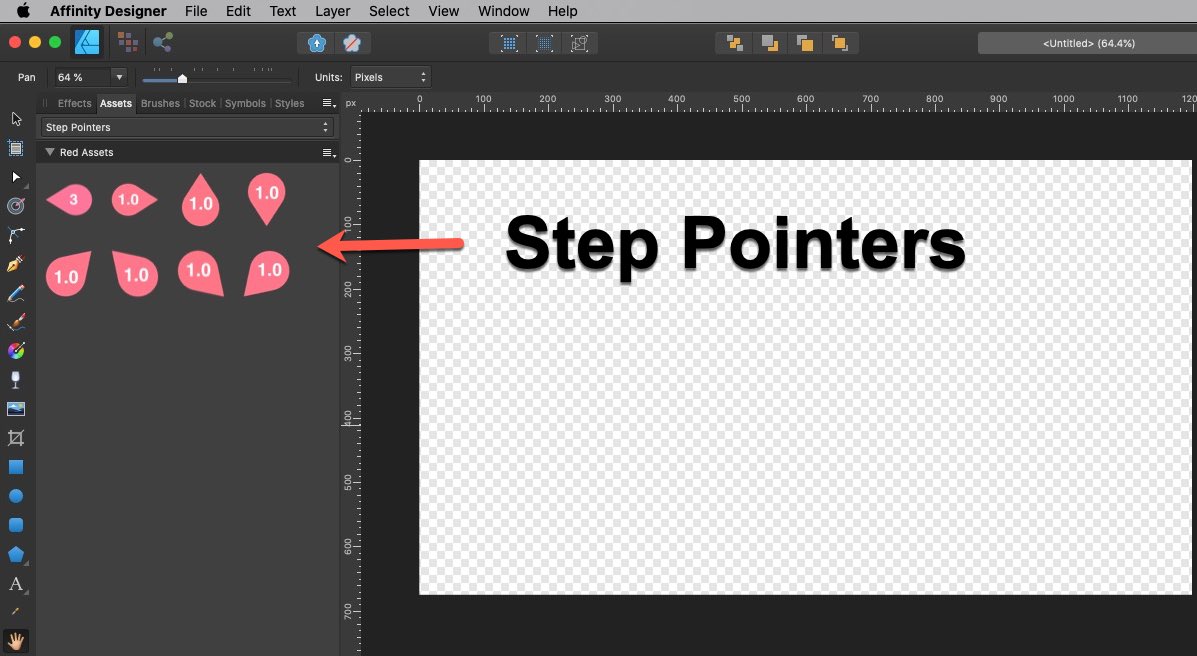
These are step indicators. Which are useful when you want to point out which items should be clicked or acted on first. These are all Curve base designs with changeable text.
Unlike other graphic programs, these don't increment as you apply them. You do have to go into each asset and indicate the correct step number.
You can change the colors and create a new asset subcategory that matches your style.
Installing the Asset
After you download the file, double click on it to uncompress it. Then in Affinity Designer, go under the Assets and click on the three lines. Click on Import Assets.
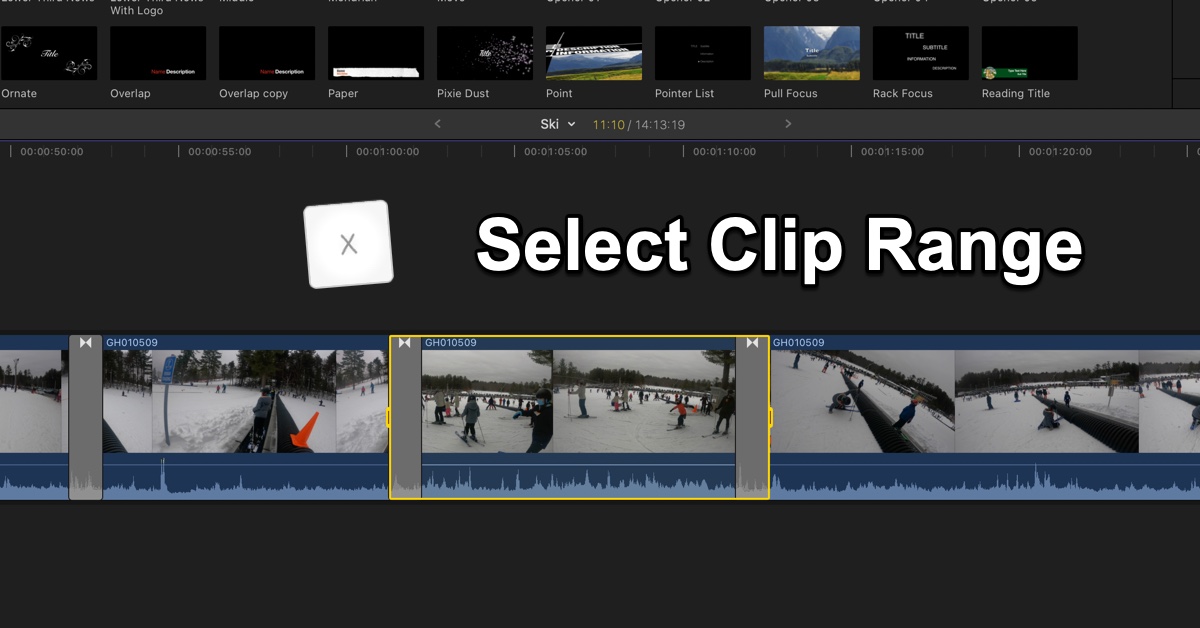
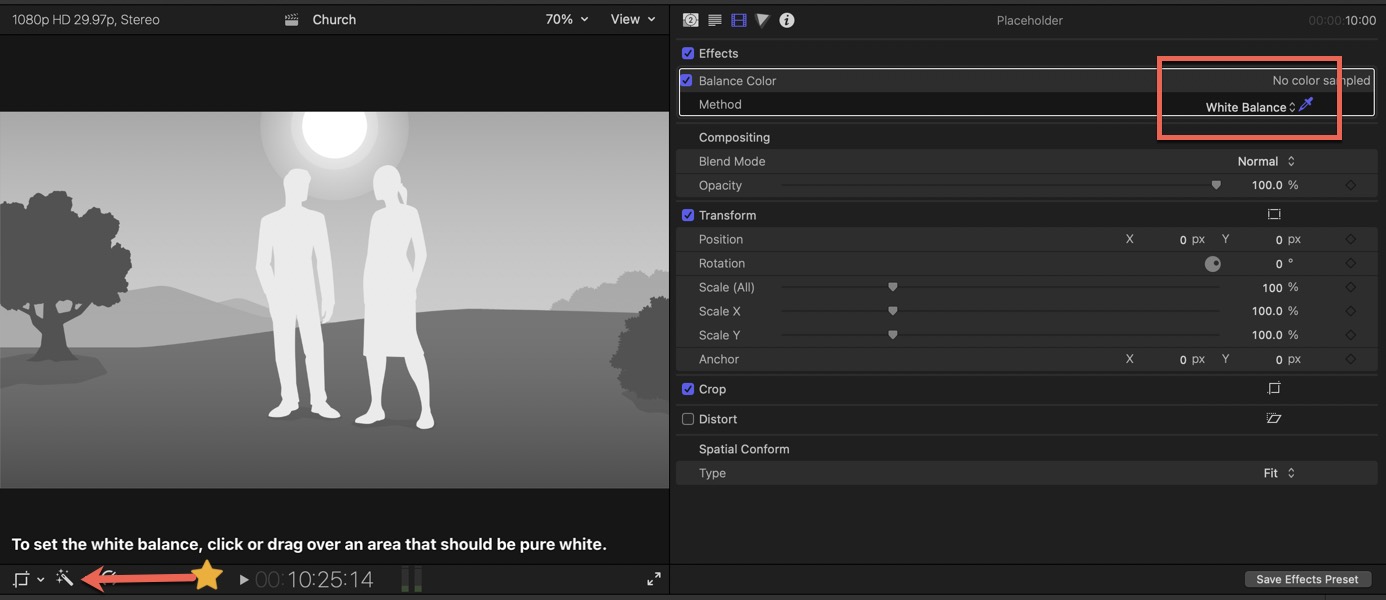
Sometimes I need to find the length of a particular clip in the timeline. Usually, because I want to trim the clip to a specific length.
The timeline under the preview only shows the position of the selection tool and nothing about the clip.
The only way to find out about the clip is to use the Clip Range tool.
Select Clip Range
Use the shortcut “x†and select a clip on the timeline. You’ll see the current length of the clip to the left of the movie duration under the preview window.
In the above screenshot you can see that the selected clip is 11:10 long.
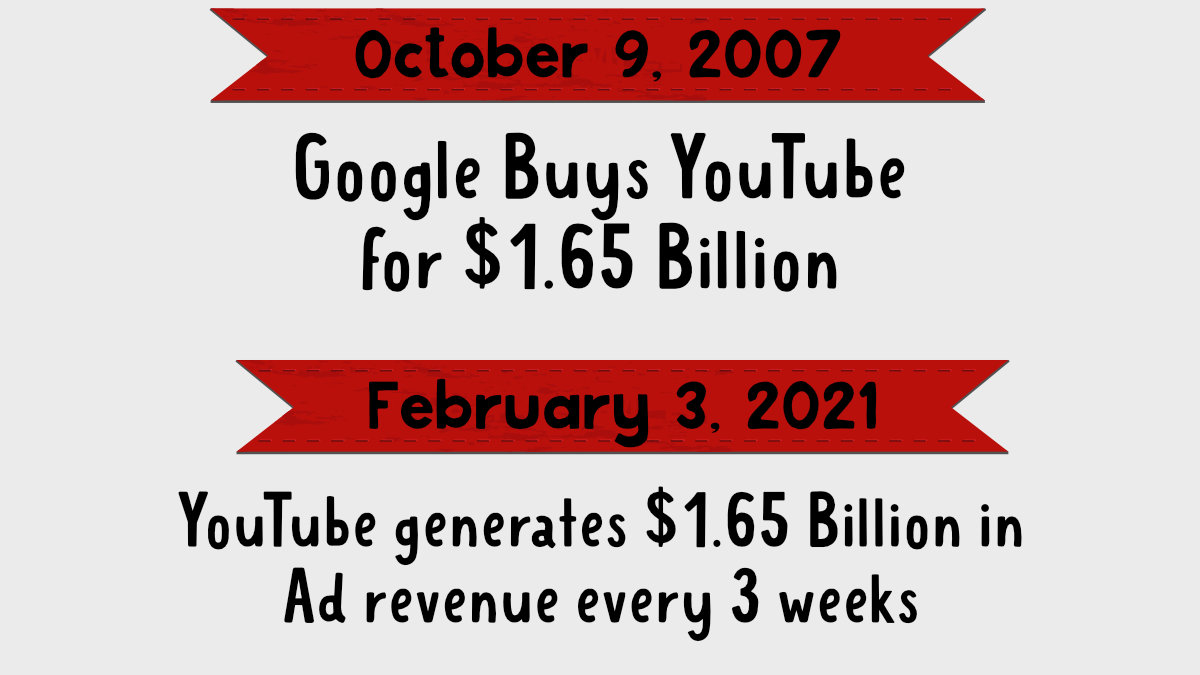
Someone on my social media network posted the following fun fact.
How Does this Apply to Productivity?
So how does this apply to everyday personal productivity? Well, it should make you think about Goals. What is your goal of being productive? Are you focus more on the short term productive or the long-term?
What can you do today that will make a big difference to being more productive in the long term?
Take some time to learn more about equipment that you use every day. For example, how to take better photos using the iPhone.
Invest in Fiverr resources and get help launch your Podcast that you have been thinking of doing. Pretty soon every car in America will have Internet and PodCast will be more popular than regular radio.
Audit your home Desk layout. Many of us have been working from home for a year now. How is your home office layout? Should you invest in some changes to help make it a more productive place?
Ask Yourself
What do you think will be huge in 15-years and what can you do to get a head-on that.
Last month we realized that we needed a digital HDTV Antenna for our Living Room TV. We recently cut the cord - again - the story behind that is a blog post for another day.
The digital HDTV Antenna that we had in the room was needed in the home office. We wanted something different than a typical flat antenna that would go in a window.
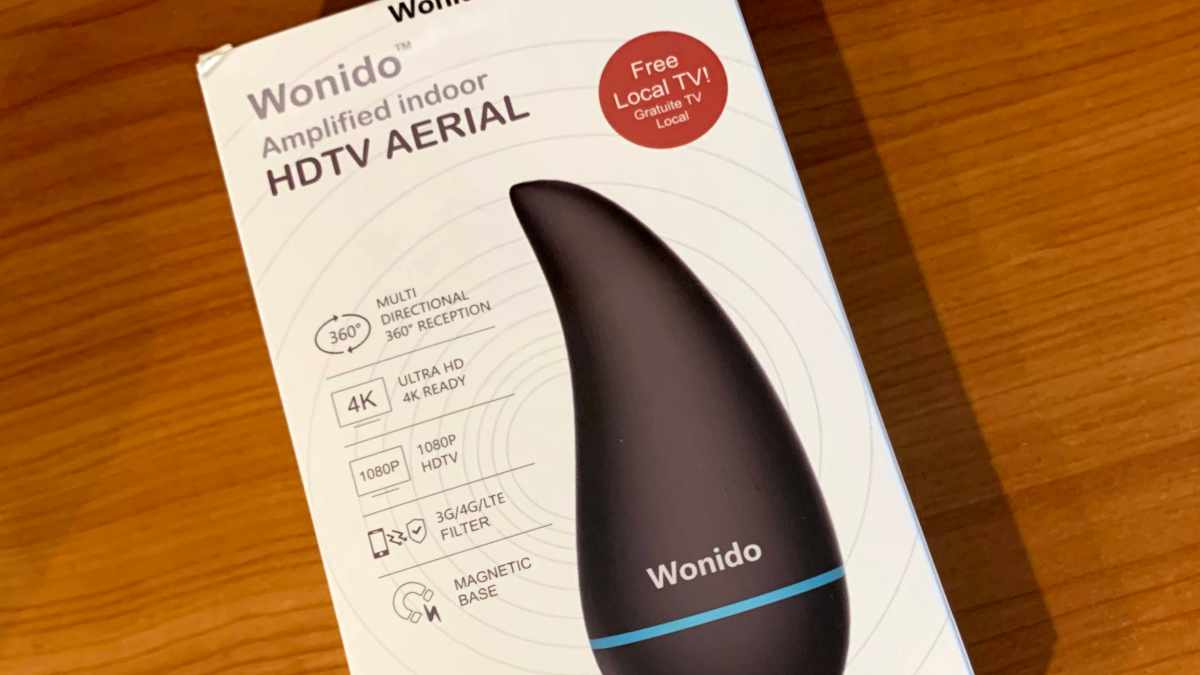
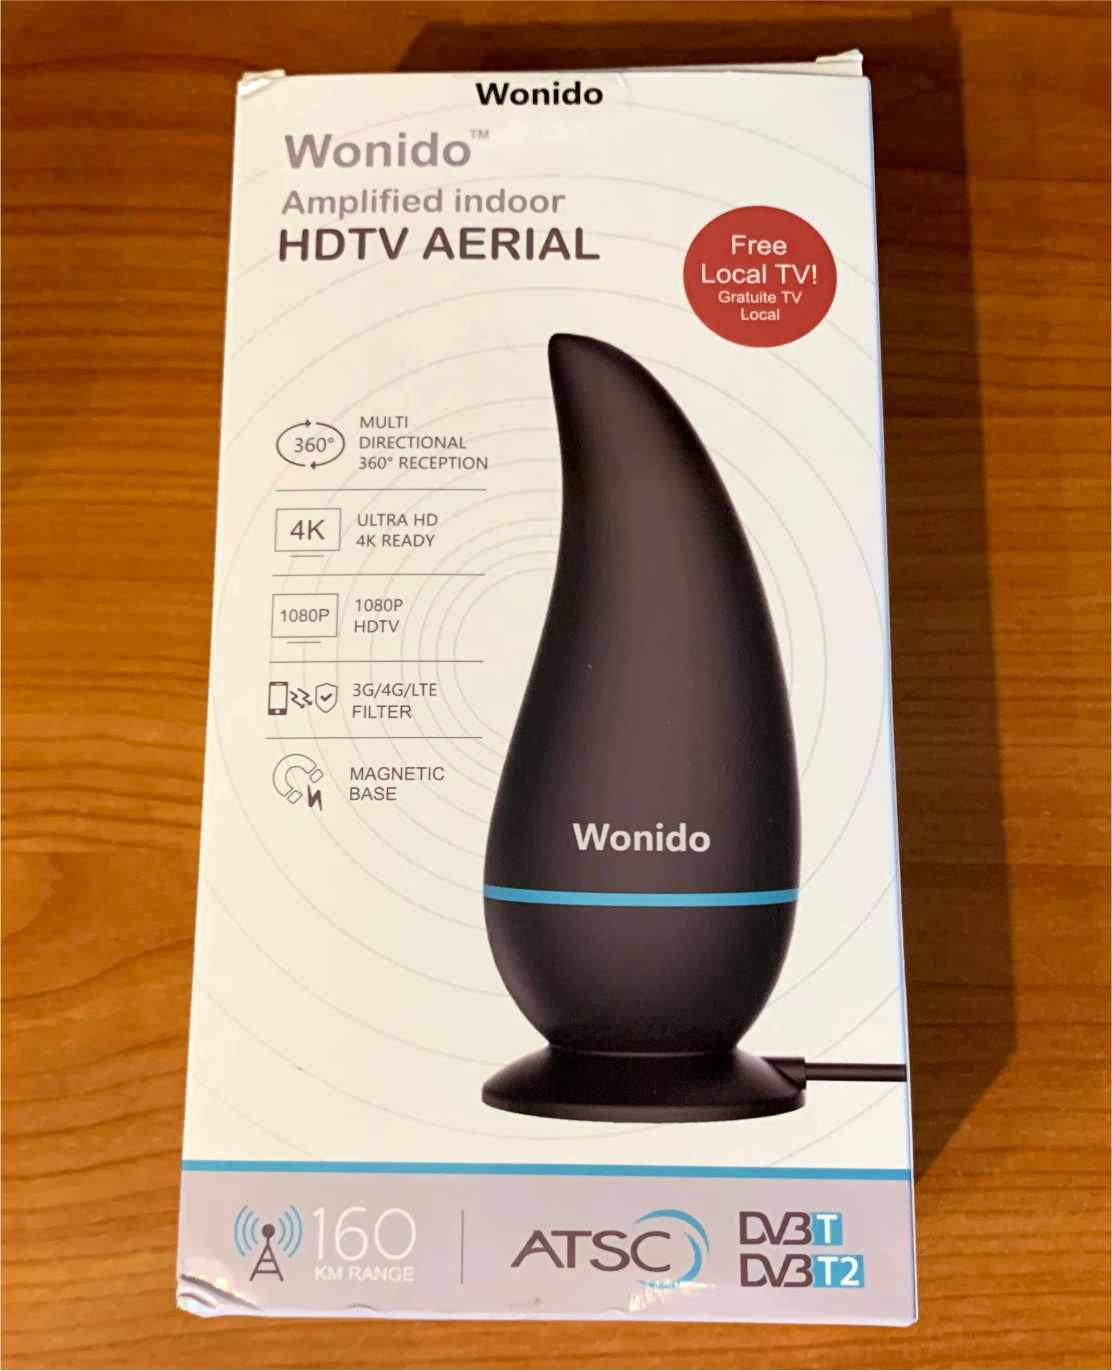
Wonido Antenna
We found the Wonido Digital HDTV Antenna. It seems to be the perfect device. It’s a small antenna that could be put on a shelf and not look bad. It has a range of 150 miles - which is pretty impressive for a small device. (I remember seeing large TV antennas in the attic that didn't have that range.)
Installation was simple. Simply plug in the antenna into the TV and then plug in the USB for power. We plugged the USB into the TV instead of a power jack because it was easier to use the TV.
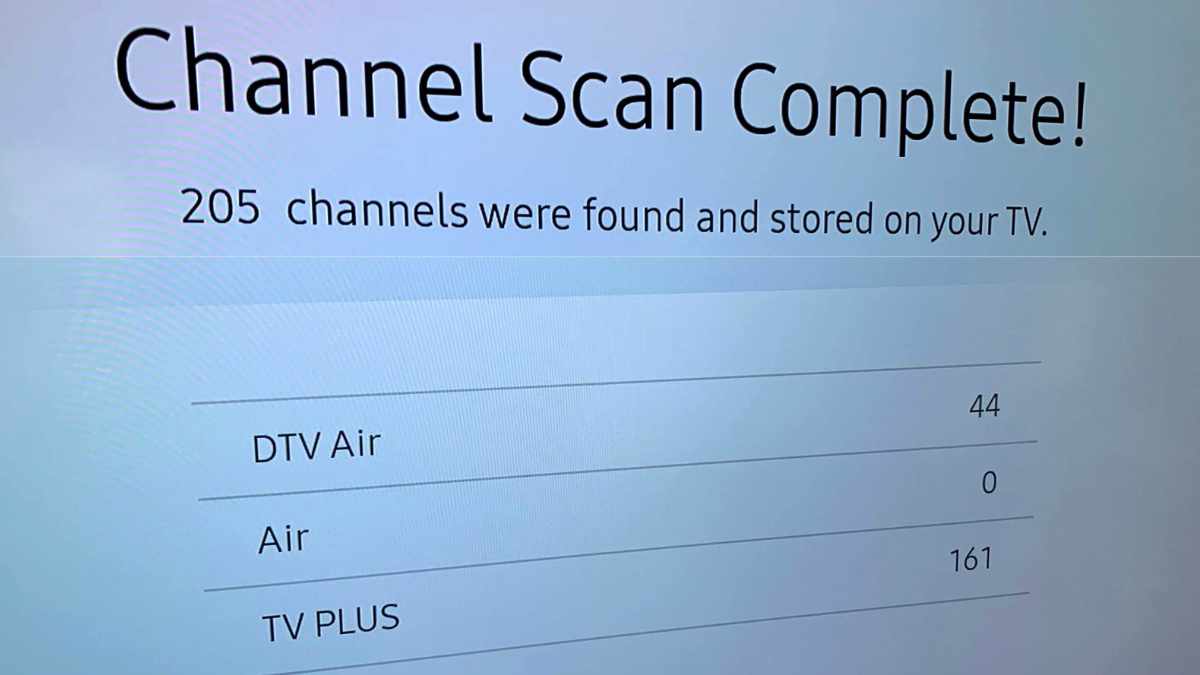
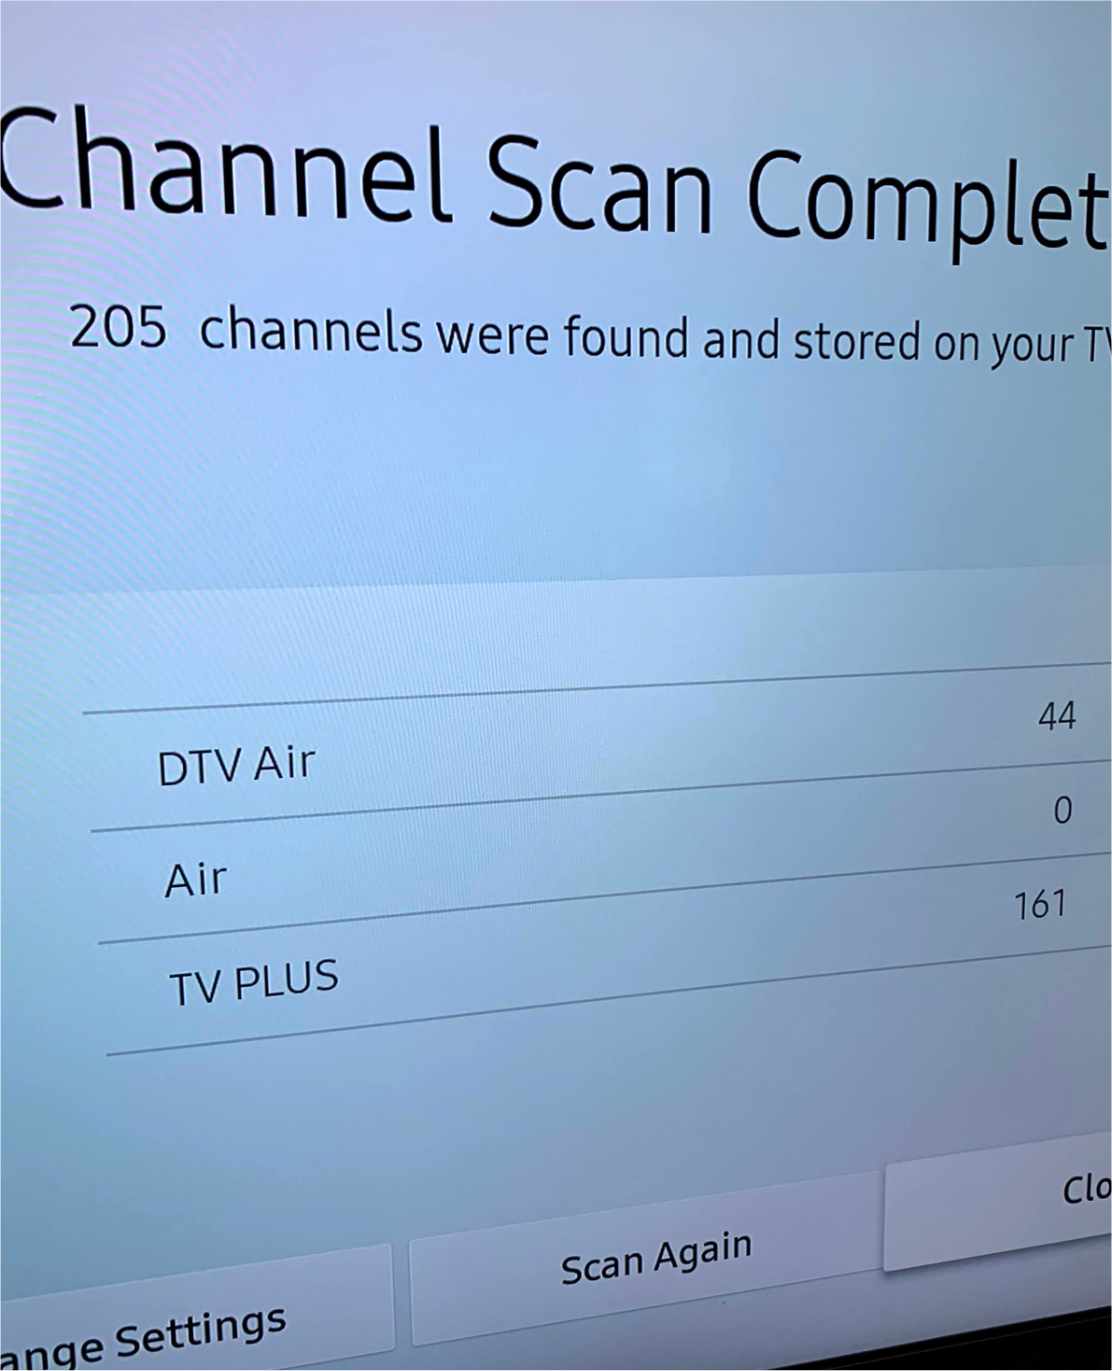
Once connected we told the TV to scan for available "Over The Air" channels. The Wonido device is currently sitting behind the TV.
We got 44 channels via the DTC air. Which is pretty good because the FTC website says that we should be getting only 20 channels. The weakest signal being 63 miles away.
Samsung TV Scan
The above screenshot is from a Samsung TV.
The "Air" category will always be zero since the FCC removed that category in July of 2020. All broadcasts are now over the "DTV Air."
TV Plus is content from Samsung and not something that is from the Wonido Antenna. This is a free ad-supported Smart TV video service. We get instant access to news, sports, entertainment, and more. Samsung provides a list of all the available channels on their website.
Misc Notes
I think if we move the antenna we may get a better signal range. The TV might be blocking the signal strength.
The TV signal is a bit weak on stormy days. We see some delays while watching the news during a snowstorm. It isn’t that bad and maybe moving the device will minimize the distraction.
I noticed during the Super Bowl this year that the audio wasn’t aligned to the video. I noticed this more during the halftime show.
The Wonido Antenna is highly recommend and for $27.99 it is worth the price. You can find the Wonido device on Amazon.com.
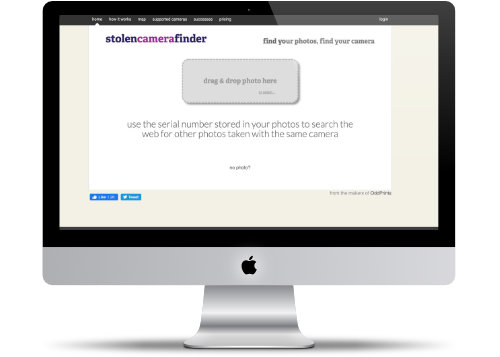
Have you ever lost a camera? Frustrated that you can't get the camera back? Well, there may be hope!
StolenCameraFinder can find out if someone posting photos with your camera!
Simply drag and drop an old photo that was taken with the camera, and StolenCameraFinder will search the internet for the serial number that is hidden in the photo metadata.
StolenCameraFinder currently support 1,534 cameras. You can see all the supported cameras on their website.
Website Details
Every photo you take with your digital camera contains hidden information about both the image and the camera such as the make, model, and date. This information, called EXIF data, can also include a unique serial number that identifies your camera.
stolencamerafinder crawls the internet searching for photos, collecting the serial numbers of the cameras that took them.
When you use the drag & drop feature, stolencamerafinder reads the unique serial number from the EXIF data of your photo and uses it to match against serial numbers it has stored.
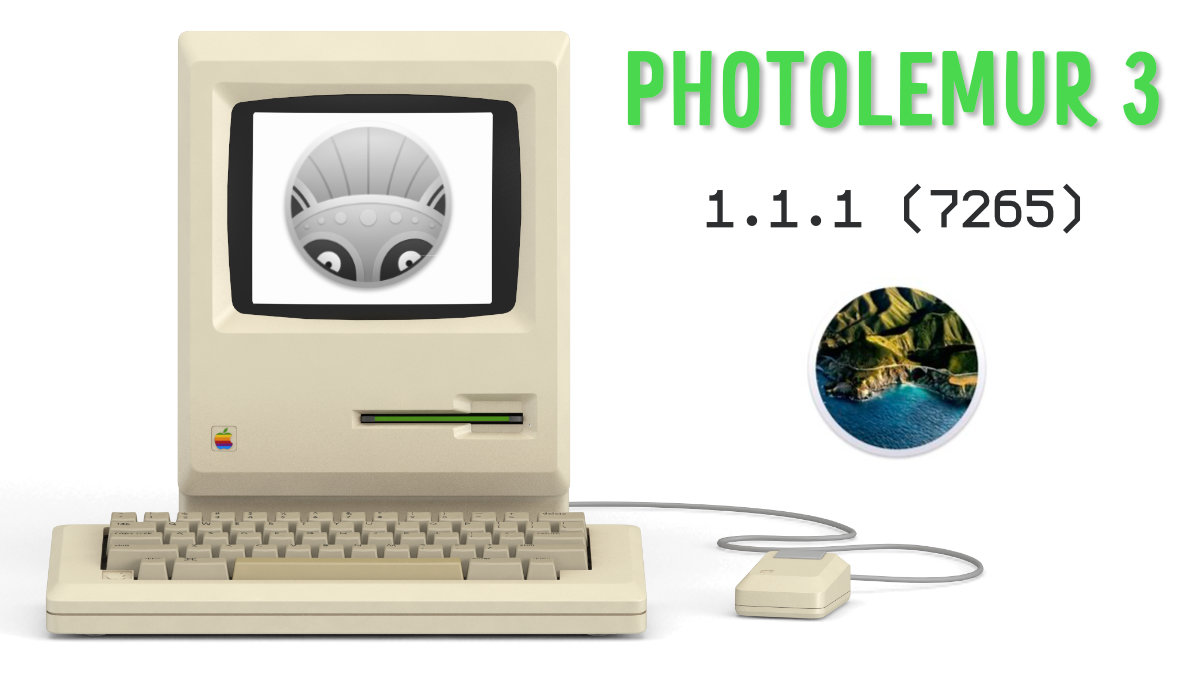
Back in 2018, I blogged about Photolemur 3 and how it is a great photo touch up application. (Read the blog and checkout the before/after sample images.)
After I updated my main computer to macOS Big Sur (Version 11.2.1) Photolemur stop working properly. The image rendering would be fine, but when I went to save the document to the computer it would crash.
Other people also encountered this issue and wanted Skylum to fix this issue. Skylum Community forum has a thread of the conversations.
Obviously this prevented me from using the application. This was a known issue to the Skylum team. However, the developers were focus on the launch of their new update to Luminar.
In order to use Photolumer on some images, I ended up using another computer that I didn't upgrade to macOS 11.2.
Now Works!
Earlier this month, Photolemur was updated to version 1.1.1 (7265) which included the fix so that it would work in Big Sur (macOS 11.2.1).
The update came just in time, I was about to buy Luminar since that was working fine and did offer a lot more flexibility than Photolemur.
The one thing that I learned about this is that the application may not get that much attention for updates in the future. I should look into Luminar at some point.
Check out PhotoLemur
If you do any digital photography, be sure to checkout Photolumer. Your pictures will look much better after running them through the application.
The application works fine, don't worry about the "lack of attention." It's still a perfectly good application.
Have you ever wanted to know what setting to use when you want to time-lapse the sunset and sunrise? With the significant difference between light and dark, how well does the GoPro Hero 9 handle it? What setting produces the best video?
Turns out the GoPro hands the light/dark change very well.
All you need to do is set up the default Night Lapse setting and the video will turn out perfectly fine.
Check out this example:
Night Lapse
This was put in about an hour before sunset and captured about 2 hours after sunset. You can see how the GoPro Hero 9 was able to adjust to the low light. The video came out pretty cool.
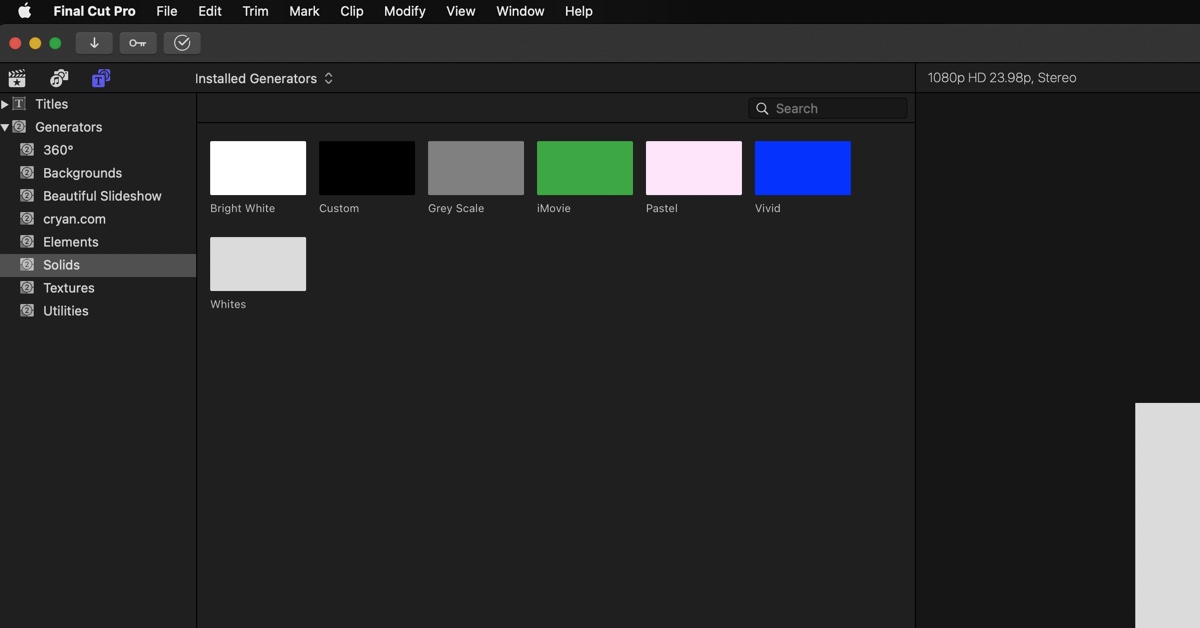
Final Cut Pro has a lot of cool generators for some basic functionality. One of the categories is Solids where you can insert a blank color, useful for text background or something.
Right out of the box there are six colors: Custom, Grey Scale, iMovie, Pastel, Vivid and White.
Seven Shades of White
When you add the White color, in the inspector you'll see that there are seven options: Antique White, Beige, Bright White, Cream, Ivory, Mint, and Smokey.
Smokey is the default.
What if you wanted Bright White to be the default? Wouldn't it be great to always have Bright White available?
Make Any Color Solids
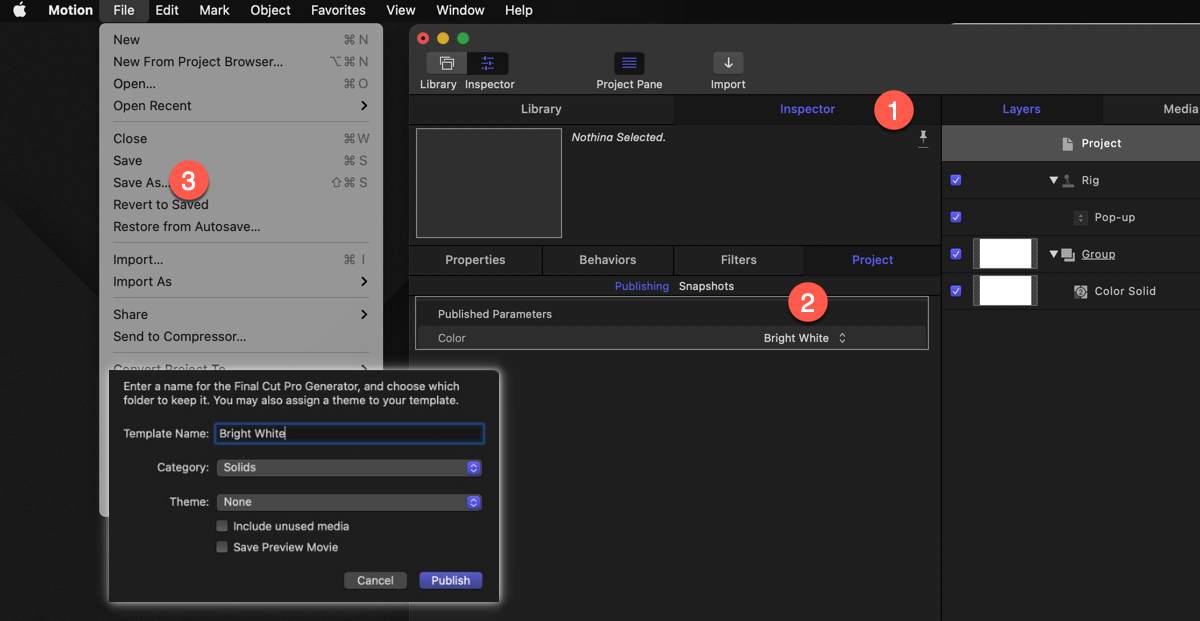
If you have Motion installed, you can easily make your own color the default. Here are the simple steps:
Right click on the White and select "Open a Copy in Motion"
In Motion, Click on the Inspector tab.
Under Projects, select "Bright White"
Under the File Menu, select "Save As..."
I would recommend calling it "Bright White"
Highlighting steps in Motion.
Remove "White Copy"
So when you right-click to "open a Copy in Motion," Final Cut Pro automatically creates a copy of the file and places it in the Generator folder. Here's how to remove that file.
Quit Final Cut Pro.
Navigate to the Motion Template Folder: {{Home Directory}} / Movies / Motion Templates / Generators / Solids
Delete the folder labeled "Whites Copy"
Open up Final Cut Pro and Navigate to the Solids in the Generator category.
You'll see that only the "Bright White" and the rest of the preinstalled generated files remain.
Here's what my solids section looks like today.
Other Colors
This is a good time to install other frequently used colors, such as company colors. I would recommend spending a few minutes now adding your own so you'll save time later when your working on the next big project.
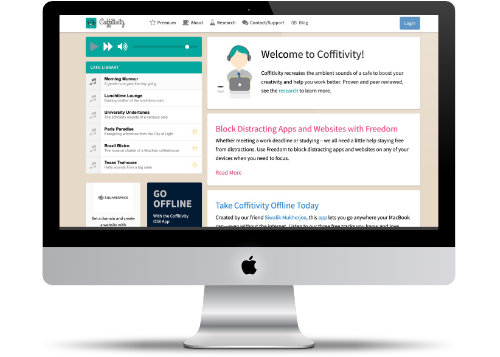
Some people need the background sound of a cafe to stay productive. The pandemic has made it difficult to capture the noise of the cafe.
Coffitivity tries to fix that. They manage to create the background sounds of a cafe which can help you stay focus and get the job done.
Website Description
Coffitivity recreates the ambient sounds of a cafe to boost your creativity and help you work better. Proven and peer reviewed, see the research to learn more.
Coffitivity is a good substitute for having the radio or TV on. You won't get distracted by the latest news or caught daydreaming when you first heard a song on the radio.
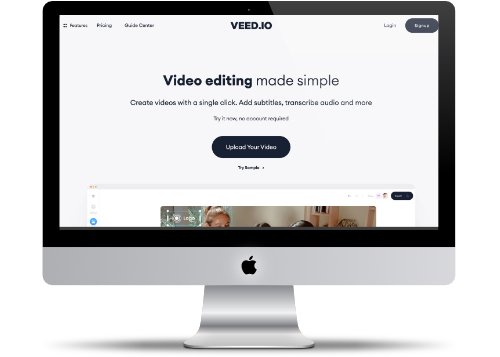
When it comes to video editing, there are a lot of choices. One new player on the market that is making noise is Veed.io.
Veed.io is a great online post production editor. It’s a great resource to make quick clip edits and touch ups.
Website Description
You can try out Veed.io for free with a watermark and an 50gb upload limit. If you like it they have some competitive monthly/year pricing that removes the watermark and increase the file upload size.
As of this writing, these are the main features of Veed.io.
Add Images to Video - Add logos and photos to any video. You can add it for the whole video or just certain parts.
Add Subtitles to Video - You can add your own subtitles using your own style and design. You can save the style to use in other videos
Auto Subtitle - Automatically generate subtitles from the audio of the video. How cool is that!
Filter Video Online -You can easily change the overall color to match various styles. Pick filters that best fit the mood that you are trying to come across.
Music Visualisation - Add an audio visual to your video so that it moves as music or words are spoken. Useful if you have an audio track with a static image.
Translate Video - Easily add translation subtitles to your videos to reach larger markets! Now you can start promoting your services/podcast to different countries.
Video Effects - Add effects such as VHS Filter, Filmic, Snow Effect, and Glitch Effect
Note: The veed.io team are consistently launching new features. So expect to see new features soon!
Online Editor
Veed.io is an online editor and it works great with the iPhone. You can upload a video from your phone and apply any style or effect.
Now you can be a production expert right from your phone!
Sample Video
Check out the sample video that I created.
I had an old Traffic Report from 2002. I added the logo and automatic subtitles to give it a really cool effect. Note: I didn't touch up the subtitles. There are a few places where a break or word needed to get fixed - which you can easily do in Veed. I just wanted to demo that effect.
Automatic Subtitles - This is a cool feature that I haven’t seen elsewhere. More and more videos are adding subtitles as people don’t have sound on when they are browsing social media. Veed makes adding subtitles super easy.
Music Visualisation - This is also hard to find. You can buy plugins for Final Cut Pro, but they are very expensive. Veed makes it easy to place the visualization and offers different styles to choose from.
I would encourage people to check out veed.io and play around with the tools.
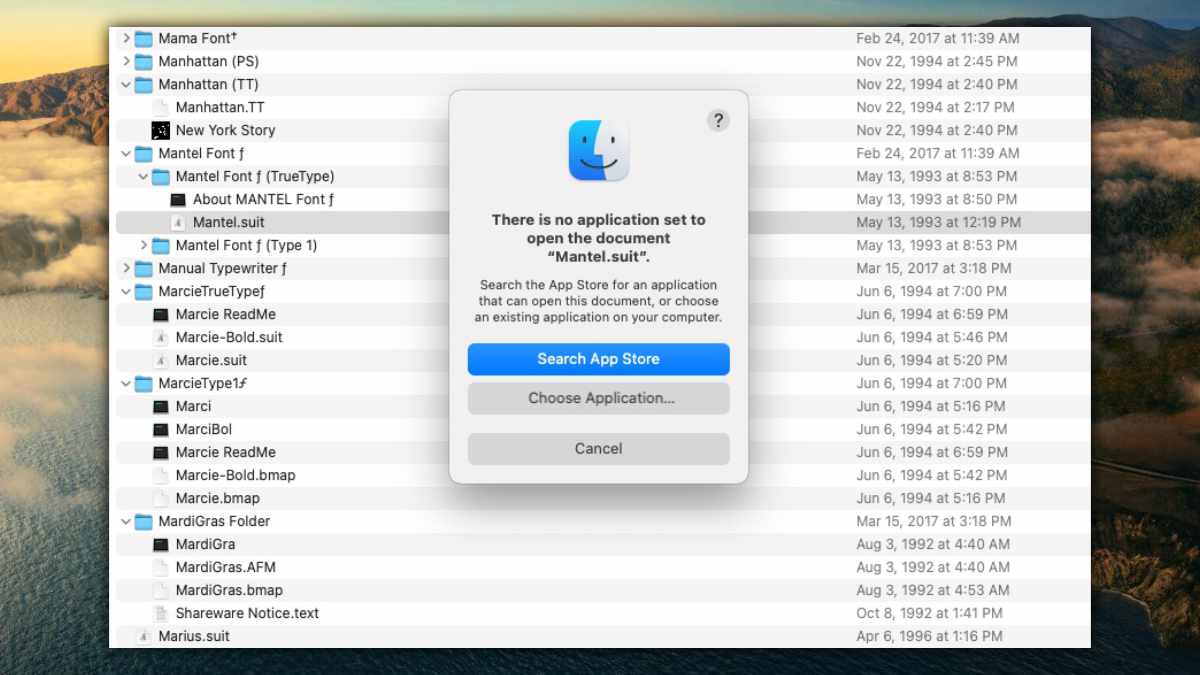
Legacy suitcase TrueType fonts and PostScript Type 1 LWFN fonts might work but aren't recommended.
This is what happens if you double click on a "legacy" font suitcase:
If I selected the "Choose Application..." The Font Book Application will not be selectable. It looks like that there's no way to install this font.
There is an easy work around.
How to Install Legacy Fonts
It's pretty simple to install the font. Simply open the font from the Font Book application. Here are the steps:
Open up the Font Book Application. (Use LaunchPad to find the application.)
Under the File menu select "Add Font..."
Navigate to the folder that has the font that you want. Most likely it is on an external disk or the Desktop. You'll see that Font Suitcase is selectable.
Select that font and click open.
If the font is really old, you may get a Font Validation warning about the font. This could be because of various reasons. If the problem is minor you may be safe to use it. Note: I would be careful about using it in rendered applications such as Final Cut Pro.
The GoPro Hero 9 battery is much larger than previous versions of the GoPro. One nice difference between this version and the GoPro Silver 7 is that you can replace the battery.
Battery Length
In my tests, I have found that the internal battery in the GoPro Hero 9 lasts just more than 2 hours when recording Time-Lapse mode in 4k. It's closer to 2-hours in extremely cold conditions.
Taking Longer Videos
One way to take longer videos is to use a USB power source. This can be a wall outlet or a USB portable charger.
Yes, the GoPro will record when connected to a USB portable charger!
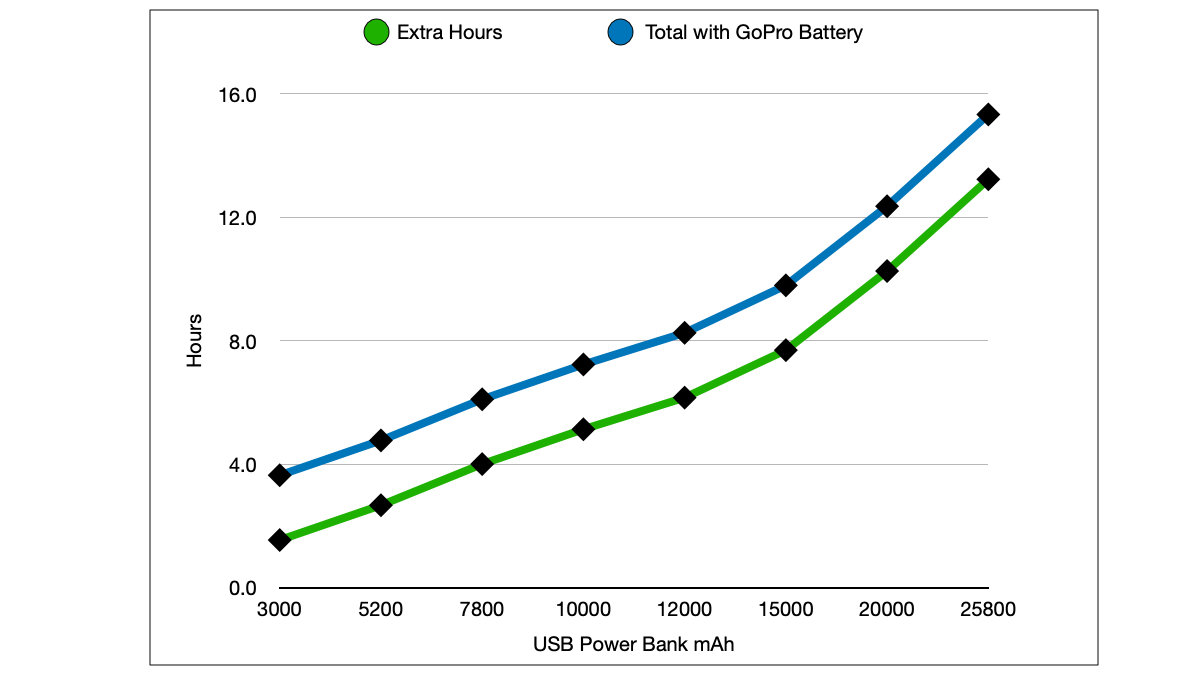
Chart showing the amount of GoPro Hours you get for various USB Chargers.
7,800mAh Charger
I have a USB hand warmer that has a 7,800mAh power charger. In my test, I have found that this makes recording time to 6 hours! You get 4-hours of USB power charge time and then the 2-hours of GoPro battery time.
This means if I get a 10,000mAh charger that my total charge time should get to 7.3 hours. (5.1 hours via USB and 2.2 hours with the GoPro battery)
5,200mAh Charger
I have a smaller 5,200mAh and according to my calculations that should give me 4.7 hours of total recording time.
Affinity Designer and Affinity Photo don't support Emojis. Which means that if you try to add an Emoji or Symbol from the Edit menu all you see is a square.
I don't know why Affinity hasn't supported this - maybe in version 2?
Alternative Solution
You can get around this limitations by using the Emoji images on the emojipedia.org website. Simply search for the emoji or symbol that your looking for and then drag and drop it into your document.
While this isn't the best solution, it does offer an advantage - the ability to select the emoji that works for your design.
Create an Emoji Assets Collection
I took about 10-minutes to build my own Emoji Asset Collection. I basically went through all the popular Emoji that I thought I would use.
Basically, I dragged and drop the images from emojipedia and then move the image to a dedicated Asset panel.
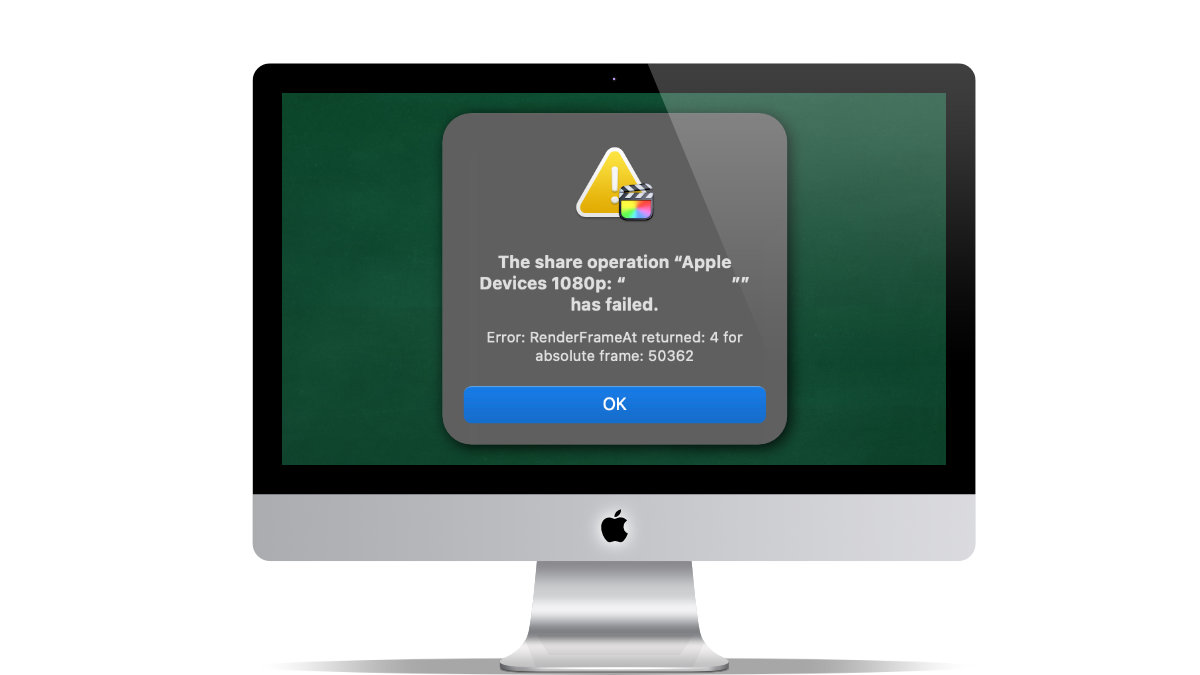
Have you ever gotten the following error when exporting a movie?
The Share operation "Apple Devices 1080p: " Name.m4v" has failed.
Error: RenderFrameAt returned: 4 for absolute frame: 50362
I recently got this error and had to figure out why it was happening to me. I first went to the frame that was causing the issue. In order to do that I had to change the Time Display to show the frame count instead of the time.
Change the Time Display to Frame Count
It's pretty easy to change the Time display, the clock under the preview window, to show the Frame count. Here are the steps:
Open up Final Cut Pro Preferences. (Use Command Comma as the keyboard shortcut.)
Click on the pull down menu next to the Time Display
Select Frames
Close the Preferences dialog box
I then navigated the timeline to the 50,362 frames. I found that the video frame and audio were empty.
What Happened?
I created a Compound clip from two GoPro clips. Apparently, there wasn’t a 100% connection and that caused the error.
I removed that part of the clip.
Then I tried to export the file again and this time I was successful.
Lesson Learned
I need to figure out the best way to join GoPro clips. Especially when the clips are automatically split because of file size.
Studies show that having music on while working can help people stay focus. I have found that music with lyrics can be distracting.
A few years ago I found Arcangelos Chamber Ensemble's collection of music. One of their albums is appropriately titled “Music for Productivity.â€
Album Description
Increase productivity with music that generates the energy needed to set goals and bring tasks to completion. Expert arrangements of classical and original masterpieces use upbeat tempos to enhance alertness, creativity, and focus at home, work, or school.
This is a collection of various classic songs that helps you stay mentally focused. I have found that it's a pretty good collection and it's good to use as part of the Pomodoro Technique.
This was one of the first albums that I purchased on iTunes about 8-years ago.
You can sample the music collection on allmusic.com.
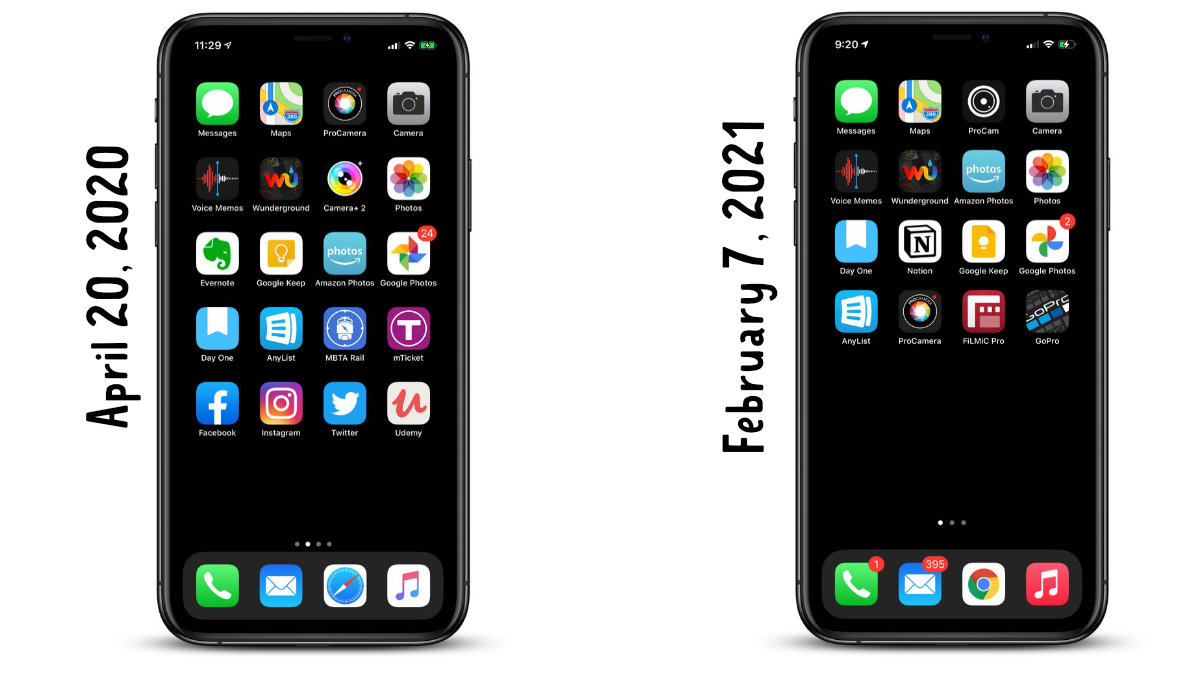
As the one-year anniversary of working from home approaches, because of the pandemic, I thought I take a look back at how my iPhone use has changed.
Here is my screen-shot from last year and today.
Four Things to Note
mTicket is an MBTA app use to purchase commuter rail tickets. I took the mTicket application off my phone homepage in late March - once it became apparent that I wasn’t going back on the train anytime soon.
EverNote is gone. I removed the application last summer as I couldn’t justify spending another year when I don’t use it much.
Social Media. I moved all social media off the homepage because I didn’t want easy access to them. I didn’t want social media to be the reason I pick up my phone.
Keep it Simple. I have fewer icons on my home screen than I have ever had. Is I don’t use my phone as much on a daily basis, because I don’t take the train anymore.
One More Thing...
One thing I did learn, to take more homepage screenshots - especially when I make major changes to the homepage. You never know when you'll need to get that information again. For example, what was that popular camera app that I used to take night pictures.
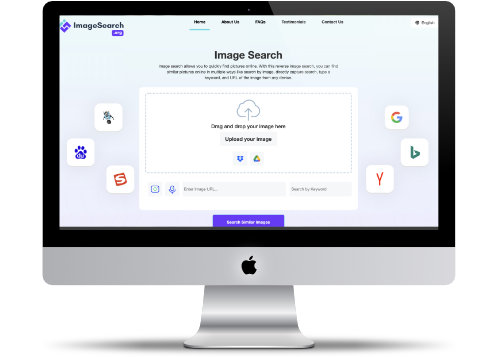
This is a type of search where people put the photo as a query in the device search bar. It also displays the output on the screen is in picture form to help people find similar photos.
Reverse image search is suitable for search engine optimization strategies. We rank this website based on the search for Google images too.
How to search pictures online?
The online image finder tool does not set you up to only use one option to reverse image search. Now you can do an advanced image search on image-search.org using any of the three options listed here:
It includes the URL or address of the website where specific photos are available.
We can also search for keywords by entering a picture query.
Photos can be uploaded directly in the place provided by the tool you choose for picture search.
This free reverse image search helps in reversing photo searches with an easy and simple environment. This helps detect fake websites that upload placard photos. Search will be safe at 100%. You are also welcome to find pictures using image-search.
Google
There are no other image search engines that can beat the standard. This does our best to provide reliable consequences. Google is a strong source that provides pictures that match instant results.
Yandex Pictures
You can see the same photo but in various sizes. The best is to identify the location found in a picture. The reverse image search for photos becomes interesting with it.
Bing image
Users can appreciate high-quality images. It recognizes the element in a picture, and then shows the photo containing all these elements.
Yahoo image search
It also functions like Google pictures but is a little different from it. We will not hide the filtering feature provided by the Yahoo photo search tool. All users can access them without problems.
Reversing image search with different platforms
Online desktop services may be difficult to enjoy for users. But some tools are compatible with desktops, and they offer several platforms to serve in a better way. We discuss compatibility with different devices below:
Search for pictures on mobile
Use a reverse image search tool when your friend sent you pictures on your mobile, but you only know a little about it or sometimes even not a little. To escape the embarrassing situation, you are guided to find pictures on your Android.
Picture search on iOS
The reverse image search tool will work together on iOS because it works with Android. You can find similar photos by utilizing browsers like Safari. Photos are in your hands as a result in just a few seconds even when you work with an iPhone.
Finding photos on a personal computer (PC)
Suppose you scroll the website and stop to see pictures that interest you in a short time. If you want to find similar results that match the picture or are interested in finding the source or high-quality pictorial data; you are advised to copy the photo and attach it to one of the reverse image search tools even using a PC. It will serve you with many results with similar images along with the source.
Photo Search with Mac or Windows
When you work with Windows, it's easy to upload pictures from Cloud storage or immediately drag them from your desktop computer. Any operating system (OS) can be used to open a browser. This will be the best and fastest way.
Mac users don't have to worry about image search. They are also welcome to search for photos by opening a browser on their Mac device. Instant results will be shown to them.
Ways to do Reverse Image Search
Object Investigation
The results displayed for searches allow them to learn more about all objects that appear in the uploaded photo. Objects may be people, animals, or places—name, specifications, and all information about objects presented in results.
Source or History
Users can even find out about picture sources leading them to find the right or actual image owner. Similar or suitable photos are also displayed along with information.
Search for Copyright Pictures
People can do a reverse image search for their pictures to know about all websites that have shared their content or pictures on their site without rewarding them. In this case, they are on the right to request a backlink or reference.
Wrapping up the context
Every reverse image search engine has its advantages and disadvantages. Also remember that there is no search engine in the deep Instagram, Twitter, Facebook, and other social media. It is important to use photo finders when investigating for graphical or pictorial data.
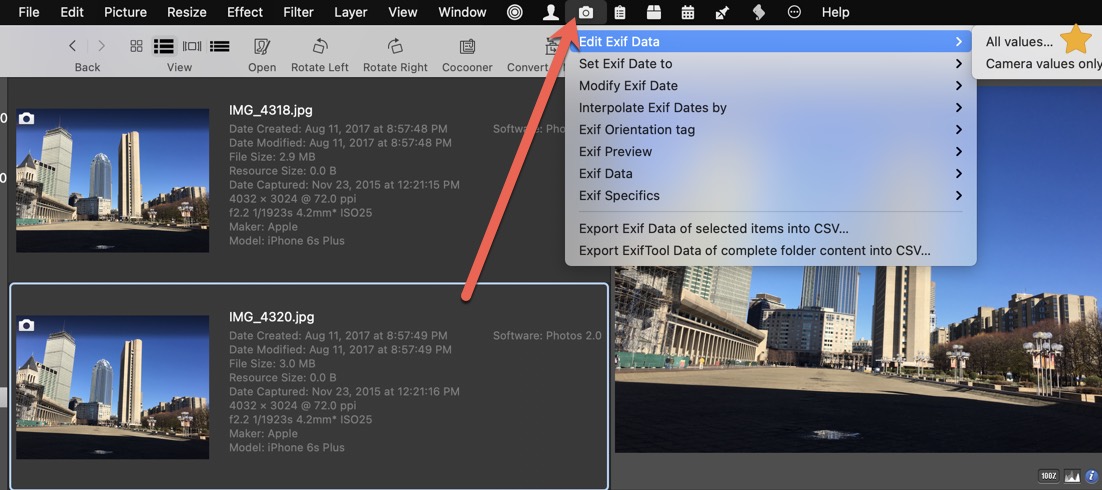
Earlier this week, I was looking for a way to add additional metadata fields to an image. Usually, Metadata (or Exif) fields are used to store information about images. Camera manufacturers will store GPS, Date the Picture was taken, camera type, and more.
Some people like to store additional things such as the photographer's name and copyright information. That way if the photo appears in a paid photo collection - the author can make claims about the photo.
Looking for An Application
There is only one application, that I have installed on my computer, that can modify metadata or EXif data. That's Graphic Converter.
I checked Photoscape X, Affinity Photo, Pathfinder and Apple's Preview. All of them have the ability to view the Metadata and Exif data but they didn't offer any way to modify or add data.
Graphic Converter
Within Graphic Converter, the only way to modify the EXIF data is to use the image browser window. Here are the steps to modify any photo:
Open up Graphc Converter
Go to File > Browse..
Find the directory that has the image that you want to change and click Select
In the browser, select the image. (You should see the Exif data appear on the right)
In the top menu, click on the Camera icon, then select "Edit Exif Data" then select "All Values"
Now you can make any change to the file. Don't forget to click Apply
Just remember when you click the apply button it's final, there's no going back to the original value.
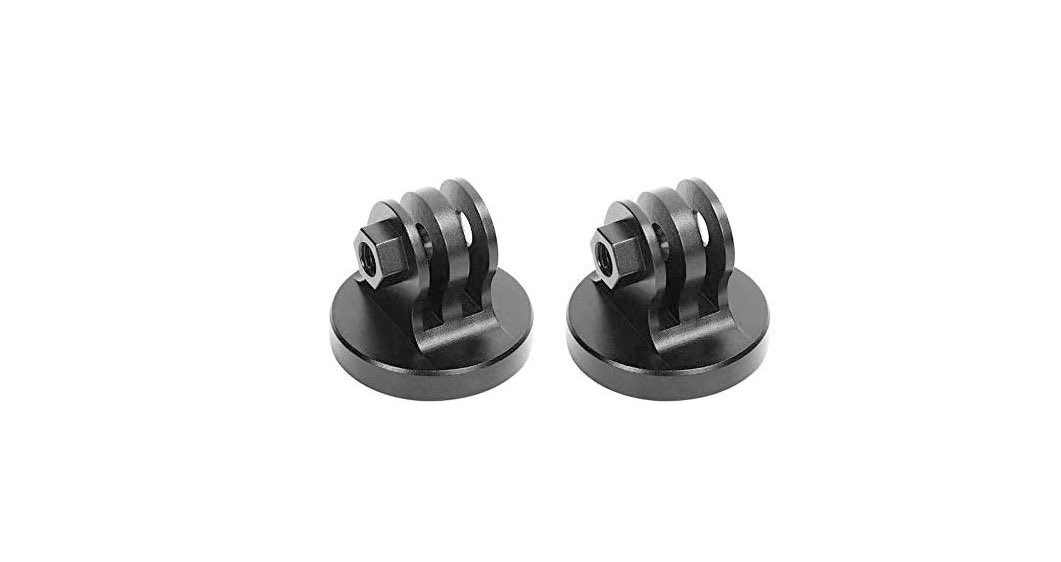
I have several monopods that have standard tripod mounts. There are some great GoPro adapters that make it easy to connect the GoPro to a tripod, they look like this:
The problem with this is that I have to screw on the GoPro every time that I want to use that mount.
Which isn't a great solution if I am moving the camera around. For example, I was using the GoPro on my monopod and then wanted to switch it to my Suction Cup Mount.
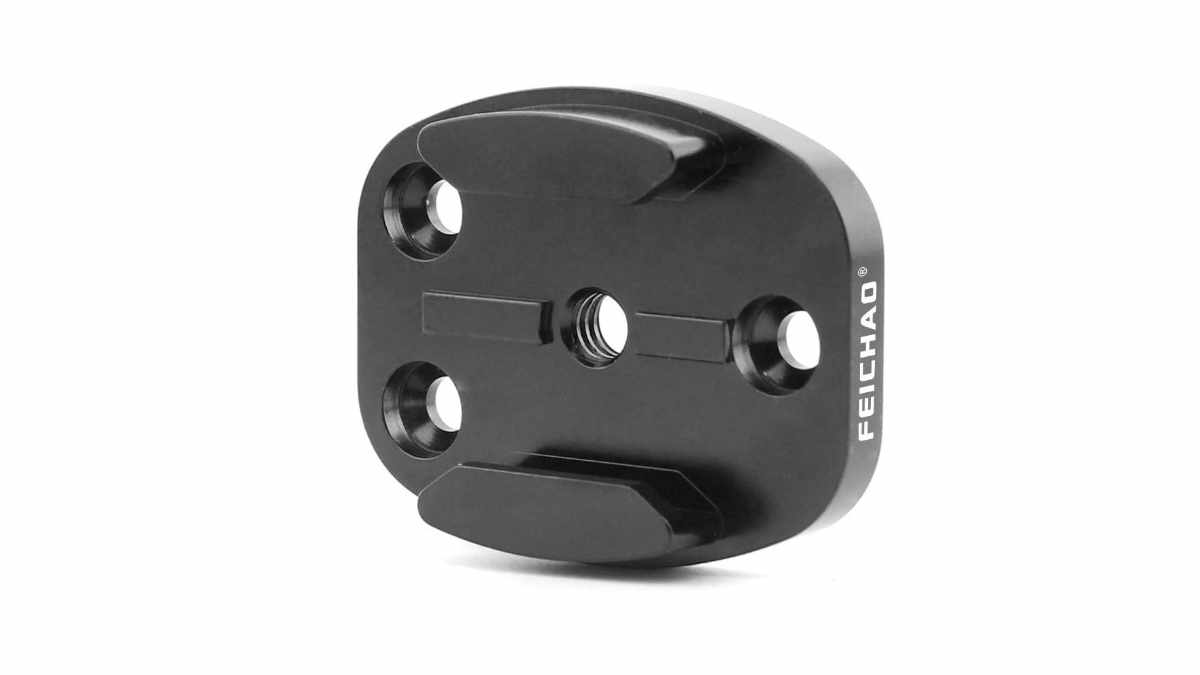
Simple Solution
So the simple solution is to use a different type of tripod mount. Basically, I needed what's called a "Quick Release Tripod Mount." This is what it looks like:
Having a quick release on a tripod or monopod is very cool. It's easy to put on and take off.
The bad side of this solution is that the plate is fairly expensive - about $15 apiece. The previous solution is $7 for four mounts.
I can see this being a good solution for those times when I am switching things around a lot. But for the majority of uses, I would stick to the standard mount adapter.
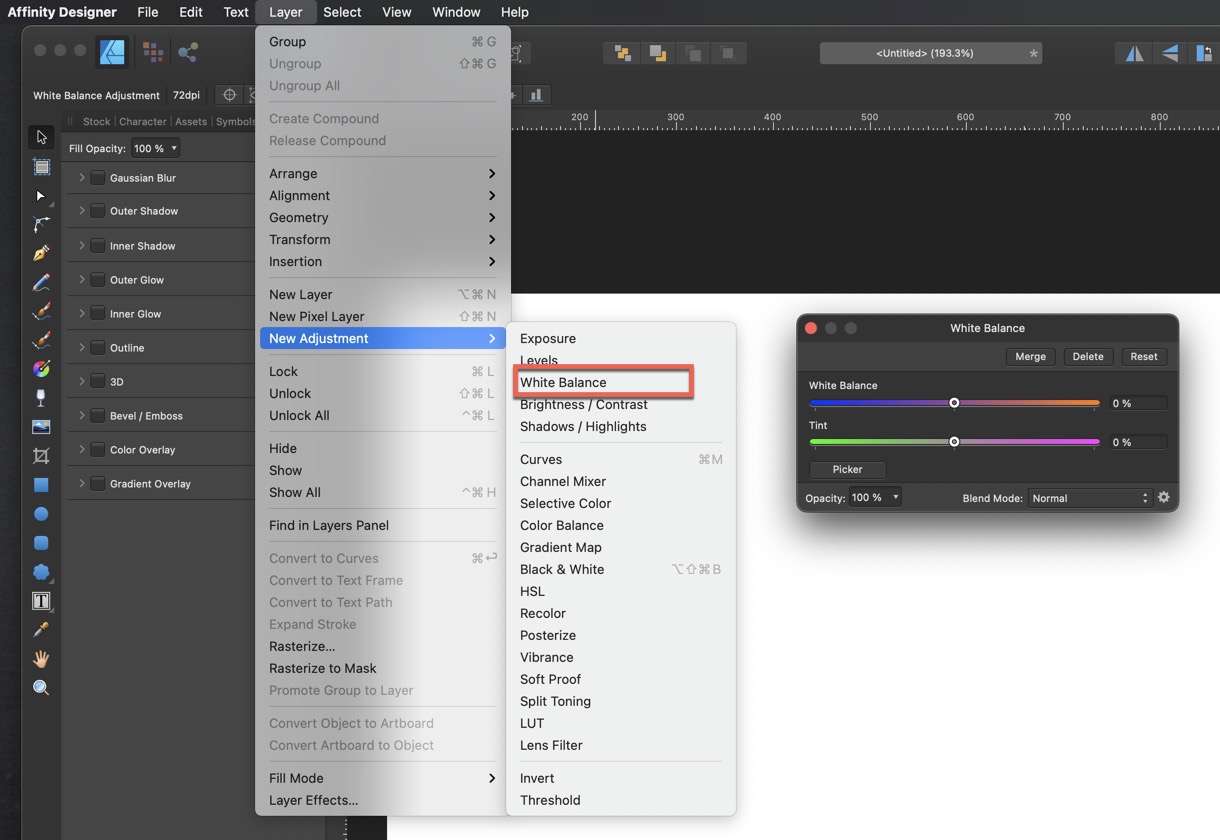
White Balance is very importaint to maintain a quality video production. This is one way to keep colors the same between clips and cameras.
The key thing about dealing with White Balance is to adjust at the end of a project and not during the project. This is because the White Balance will add additional render time every time you make some alteration to the clip - including adding transitions.
Remember the best white balance set up is before production, not at the editing room. Make sure to learn how to set up the white balance on your camera. For most situations, the auto setting should be fine, but there may be times where you may need to make the adjustment before shooting.
Manually Adding White Balance
Here are the steps to adjust any clip to use the Final Cut Pro White Balance:
Select the Clip
Click on Balance Color:
Located under the Preview, click on the "magic wand" and select "Balance Color."
Under the "Modify Menu" select "Balance Color"
Use the keyboard shortcut: Option Command B
In the clip Inspector, go to the Video Inspector (First Icon)
Under Balance Color, you should see the Method is "Automatic." Click on Automatic and select "White Balance"
Now in the Preview window, click on the area that should be white.
Not The Right Color?
After applying the Balance Color, you can use the Color Wheels to fix the color to what you think works best for your project.
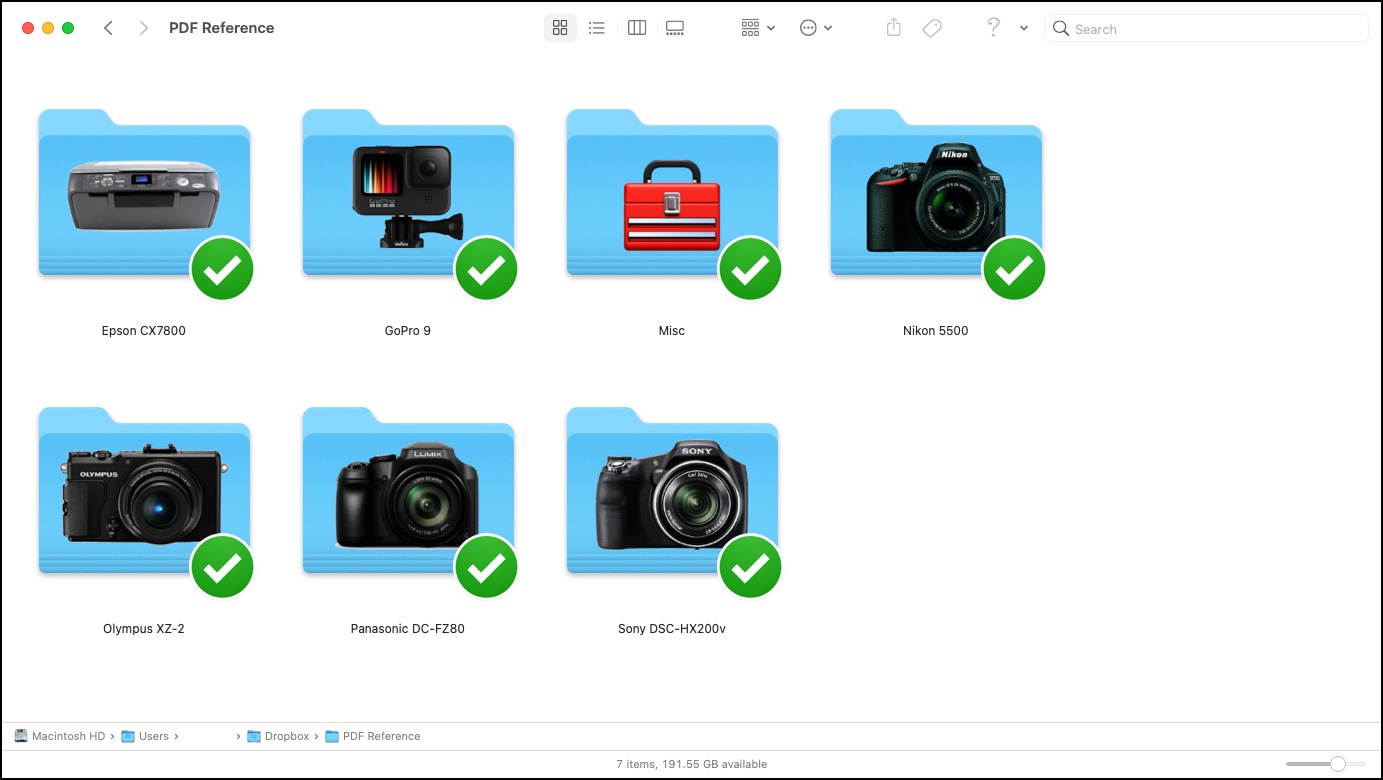
I have about 5 cameras, one printer, and various household devices. Each device has its own manuals in PDF format. This is great because the manuals are searchable and they don't take up any room in the junk drawer.
The PDF documents are also useful in troubleshooting issues to learning more about the device.
Since I reference these a lot, I decided to create a folder so that they would be easy to find. I decided to break up the various products into individual folders - as some devices had multiple PDF folders.
This is what the folder looks like:
How this Makes me Productive
These folders are stored in my Dropbox as they don’t take up much space.
I put the PDF Reference folder in the Finder sidebar. This makes it easy to access my library whenever I want.
Previously I would use Spotlight search to find the documents. This wasn’t an effective method because I would have to scroll to find the right document.
Along with PDF documents, I have product images in the folder so if I want to use photos of the devices, I know where to find them. No more scrolling through Google Photos to find them.
I put the most common items in the root of the PDF Reference folder. Devices/Equipment that I don't need access to are put in the Misc folder.
The Folder icons were created using Image2Icon. It makes it so much easier when there's a picture on the folder.
Welcome to cryan.com's main blog page! Here you'll find a diverse collection of informative posts covering topics ranging from technology and lifestyle to career advice. There's something here for everyone.
We are committed to delivering the highest quality content, ensuring you have access to the most current and reliable information.


 The GoPro Hero 9 on the iSportgo S60 Dashcam