Turn Your Phone Into a Secret Number Vault: The License Plate Wallpaper Trick
How I used AI and creative thinking to hide important numbers in plain sight
We've all been there – staring at a string of important numbers, knowing we need to memorize them but dreading the tedious process of repetition and rote learning. Whether it's client codes, account numbers, or project identifiers, some digits are too important to forget but too sensitive to write down just anywhere.
Recently, I discovered a brilliantly creative solution that transforms the most-used surface on our devices – our wallpaper – into a discrete memory palace for important numbers. The secret? Custom license plate collages.
The Challenge: Seven-Digit Number Overload
I found myself needing to frequently reference two separate seven-digit numbers for work. Writing them down felt insecure, and traditional memorization techniques weren't sticking. That's when inspiration struck while stuck in traffic behind a car with a particularly memorable license plate.
What if I could hide these numbers in plain sight, right on my phone's wallpaper?
The Solution: AI-Generated License Plate Art
The concept is elegantly simple: create a wallpaper featuring a collage of various license plates, with your target numbers cleverly embedded among them. Here's how I made it work:
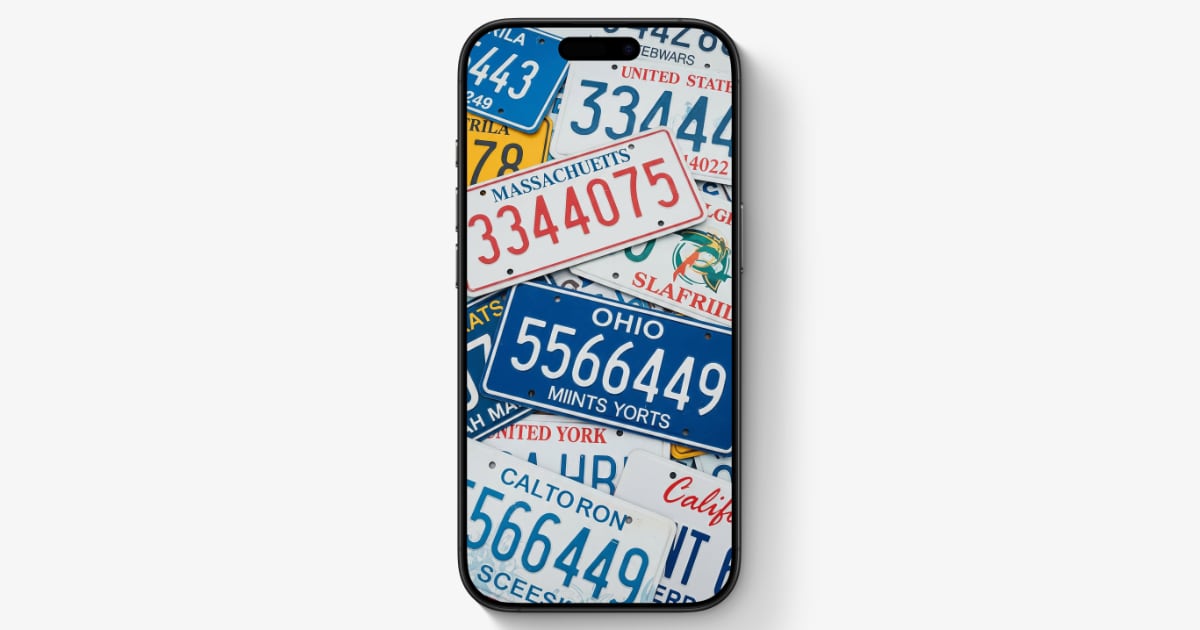
Step 1: Connect Numbers to States I created logical associations between each number and a specific state. For example, since one of my numbers belonged to a Massachusetts-based company, I assigned it to a Massachusetts license plate. The other number related to an Ohio project, so it got the Ohio treatment.
Step 2: Generate the Wallpaper Using AI image generation, I created my secret number vault with this prompt:
"Create a Portrait image of a collage of United States license plates scattered around they are from various states. In that mix, one should be from Massachusetts reading 3344075 and another from Ohio reading 5566449."
The result? A visually appealing wallpaper that looks like abstract automotive art to anyone else, but serves as my personal reference guide.
Why This Method Works
Visual Memory Enhancement: Our brains are wired to remember images better than abstract numbers. By embedding digits within recognizable license plate designs, you're leveraging visual memory patterns.
Contextual Associations: Linking numbers to specific states creates memorable connections. Massachusetts = Company A's number, Ohio = Project B's code.
Hidden in Plain Sight: Your wallpaper appears decorative to others while serving a functional purpose for you. No one suspects your artistic license plate collage is actually a sophisticated memory aid.
Always Accessible: Unlike written notes that can be lost or forgotten, your wallpaper is always one swipe away.
Customization Tips
- Use meaningful state connections: Choose states that have personal or professional relevance to each number
- Vary the arrangement: Request different layouts – scattered, overlapping, or arranged in patterns
- Add visual interest: Include plates from 6-8 different states to make the collage look natural
- Consider color schemes: Some state plates have distinctive colors that can aid memory
- Make it seasonal: Create variations for different times of year to keep it fresh
Beyond Numbers: Creative Applications
This technique isn't limited to numerical sequences. Consider these variations:
- Password hints: Use vanity plates with memorable phrases
- Important dates: Birth years, anniversary dates, or deadline reminders
- Location codes: ZIP codes, area codes, or building numbers
- Personal mantras: Motivational phrases disguised as creative plates
The Security Advantage
Unlike traditional note-taking or password managers, this method offers a unique security benefit: the information is essentially encrypted by creativity. Even if someone sees your wallpaper, they're unlikely to recognize which plates contain your important data among the decorative ones.
Getting Started
Ready to create your own number-hiding masterpiece? Here's your action plan:
- Identify the numbers you need to remember
- Choose meaningful state associations for each
- Craft your AI generation prompt (feel free to adapt mine)
- Generate several variations until you find one you love
- Set it as your wallpaper and test your recall
A Small Revolution in Memory Management
In our digital age, we're constantly searching for ways to balance accessibility with security, function with form. The license plate wallpaper method represents a small but meaningful innovation in personal information management – one that turns the mundane task of number memorization into a creative exercise.
Your phone's wallpaper real estate is valuable territory. Why not make it work double duty as both art and archive? The next time you're stuck memorizing important numbers, remember: sometimes the most obvious hiding place is right in front of everyone's eyes.
Have you tried creative memory techniques like this? What innovative ways have you found to remember important information? Share your own memory hacks in the comments below.
PermalinkPower Up Your Life: The Ultimate Guide to the Charmast Slim Portable Charger
Maximize Your Device Battery Life with This Compact Charging Solution

In today's fast-paced world, running out of battery life can be a major inconvenience. That's where the Charmast Slim Portable Charger comes in. This sleek and compact power bank is designed to keep your iPhone 14 Pro Max charged on the go.
How Effective is a 5000mAh Battery for an iPhone 14 Pro Max?
A 5000mAh battery is a solid choice for charging an iPhone 14 Pro Max. While the exact charging time depends on factors like battery health and usage patterns, it can typically provide multiple full charges or several hours of additional usage.
I estimate this charger would provide about one full recharge for the iPhone 14 Pro Max, essentially doubling the battery life. This is particularly useful when you're taking lots of photos or videos. Additionally, if you're far from any cellular towers, which can strain the iPhone 14 Pro Max's battery, this charger becomes even more valuable.
Six Things I Learned:
Magsafe Mounting: This charger mounts to your iPhone, making it easy to charge and store simultaneously. However, you still need to connect the cable from the charger to the phone; it doesn't charge wirelessly when mounted. This was a bit disappointing, but it explains the lower price compared to other MagSafe chargers.
Pricing: In August, I paid $9.99 for this charger, which is a fair price for a 5000mAh charger. While I have several 10,000mAh chargers, they are bulky - nearly like carrying two phones. This charger is nicely compact.
Digital Readout: There's a digital readout showing how charged the charger is, which is handy for knowing when to recharge, especially if not used frequently.
Versatility: You can also charge other devices with the Charmast Slim Portable Charger, like a GoPro, providing an additional 3 hours of charge time when used as an external power source.
Built-in Strap: The built-in cable acts as a strap, which is strong and gives you a way to carry the charger when mounted to the iPhone 14 Pro Max. However, I wouldn't trust the magnet alone to hold the devices together securely.
Included Cables: The charger comes with a USB-C to USB-C cable. You can charge the Charmast Slim Portable Charger using either a Lightning cable or a USB-C cable.

Listing on Amazon.com.
Final Thoughts
I'll likely take this on our Disney trip next year. It could be handy for occasionally charging my phone in my pocket. However, for days when I plan to capture many photos or shoot 4K videos, I would prefer the larger 10,000mAh charger for its capacity to power both my iPhone and GoPro.
At $9.99, I believe it's worth having as a backup power charger.
PermalinkLive Photos
Not Aways a Good Idea to Use Live Photos

When Apple introduced Live Photos with the iPhone 6s, it added a new dimension to photography. This feature, which captures a brief moment before and after you take a photo, brings your images to life with movement and sound. But like any technological feature, Live Photos come with their own set of advantages and disadvantages. Let's dive into what makes Live Photos both magical and, at times, a bit cumbersome.
Advantages of Live Photos:
Bringing Moments to Life: Live Photos capture a 3-second moving image, which can sometimes convey emotions or moments more effectively than a static photo. This can be particularly poignant for capturing life's fleeting moments, like a child's first steps or a burst of laughter.
Creative Possibilities: With features like Loop, Bounce, and Long Exposure, Live Photos allow for creative expressions that static photos can't match. These effects can turn your photos into artistic pieces or fun social media content.
Key Photo Selection: If the captured moment isn't perfect, you have the flexibility to choose a different frame as the key photo. This means you're not stuck with a less-than-ideal shot just because the shutter was pressed at the wrong moment.
Enhanced Engagement: Viewing Live Photos can be more engaging. They provide context and a snippet of life, making the memory more vivid when revisited.
Disadvantages of Live Photos:
Storage Consumption: Live Photos record both a photo and a short video clip, which means they take up significantly more storage space than a regular photo. This can be an issue for users with limited iPhone storage.
Compatibility Issues: Not all platforms or devices support Live Photos. When shared outside the Apple ecosystem, they often just turn into still images or require conversion, losing their dynamic aspect.
Battery and Processing Power: Capturing Live Photos can be more taxing on your iPhone's battery and processor since it's essentially recording video continuously when activated.
Unwanted Motion: In low light or with fast-moving subjects, Live Photos can result in blur or grainy quality, which might not be desirable for every shot.
Changing Live Photo

Enhancing Your Moments: A Guide to Live Photo Effects on Your Device
In the age where every moment is captured, shared, and relived, the evolution of photo technology has given us tools not just to capture images, but to bring them to life. Among these innovations, Live Photos on certain devices stand out by adding a touch of motion and sound to what would otherwise be static images. Here, we delve into the magic of Live Photo effects - Loop, Bounce, Long Exposure, and the choice to turn Live off.
1. Loop
The Loop effect transforms your Live Photo into a continuous video loop. Think of it as turning your brief moment into a GIF that plays indefinitely. This effect is perfect for those moments that are too short in their original form but have the potential to convey more through repetition.
This can be particularly fun for actions like a pet running, a child blowing out birthday candles, or any repetitive motion that gains charm through looping.
2. Bounce
Bounce makes your Live Photo play forward and then immediately reverse, creating a yo-yo like effect. This can add a playful or dynamic feel to actions, making it seem like the moment is bouncing back and forth.
Bounce works wonderfully with moments like a jump, a dance move, or anything with a natural back-and-forth motion.
3. Long Exposure
For those looking to capture the passage of time in a still image, the Long Exposure effect is a gem. It smoothes out moving elements, like water or traffic, while keeping static parts of the image sharp. This effect can turn an ordinary photo into a piece of art.
This is ideal for: - Waterfalls or rivers, giving them a silky smooth look. - Busy streets at night to create light trails from car lights. - Clouds moving across the sky for a blurred, ethereal effect.
4. Live Off
Sometimes, you might prefer the simplicity of a still photo. Turning the Live feature off converts your Live Photo back into a regular image.
- Why Turn Live Off?
- Space Saving: Live Photos can take up more space due to the additional video component.
- Stillness: Some moments are better captured in complete stillness without the slight movement or sound.
- How to Turn Live Off:
- Edit your Live Photo, tap on the 'Live' icon at the top, and it will revert to a still image.
Live Photos are undeniably a fun and innovative feature for iPhone users, offering a glimpse into the moments just before and after a photo. However, they're not without their drawbacks, especially concerning storage and compatibility. Whether you choose to stick with Live Photos or explore alternatives, these tools remind us that photography continues to evolve, blending the lines between still images and video, capturing life in motion.
PermalinkJJC Magnetic Phone Camera Grip Handle Review
Somewhat Useful iPhone Tool

The JJC Magnetic Phone Camera Grip Handle is a versatile accessory designed to enhance your smartphone photography and videography experience. Here are some key features:
- One-Hand Phone Grip Design: The ergonomic design provides a comfortable and stable grip, reducing shaking when taking photos or recording videos.
- Strong Magnetic Force: With a magnetic force of up to 5.1lbs/2.3kg, it securely attaches to iPhone 12, 13, 14, 15, 16 series, Magsafe cases, or other phones with the included metal ring.
- Phone Grip and Stand in One: Easily rotate your phone from landscape to portrait and use the grip as a tabletop stand for TikToks, live streaming, video calls, and watching movies hands-free.
- Magnetic Wireless Remote: The detachable remote pairs instantly with iOS and Android smartphones without needing an extra app. It allows you to take selfies or group photos from up to 32.8 feet away and is rechargeable with the included Type-C cable.
- More DIY Scenarios: The back of the grip allows for mounting accessories like a magnetic LED light or tripod. The 1/4" tripod screw on the bottom expands your creative possibilities.
- What You Get: The package includes a Magnetic Phone Grip, Wireless Remote, Type-C Cable, Lanyard, Safety String, 3M Adhesive Metal Ring, Clear Protective Film, and Wet Cleaning Wipe.
My Views
I recently purchased the JJC Magnetic Phone Camera Grip Handle for $15.99 during the Prime Days event in October 2024. It currently retails for $19.99, so I believe I got a good deal. Here are five things I learned from using this device:
Easy Setup: Syncing the phone trigger to the camera was straightforward. A long press on the trigger connects it via Bluetooth. However, it requires occasional re-syncing, so it's not ideal for instant shots. It's best to set it up before starting your photoshoot.
Trigger Functionality: The trigger is a bit tricky. There's no tactile feedback when a photo is successfully taken. You need to press hard, and a picture is taken, but I wish there was a way to confirm the action.
Stand Functionality: The stand works well, providing a stable base for various activities like watching movies or live streaming.
Portability: My primary intent for purchasing this grip was to use it at Disney World. While it's slightly bulky to carry around all day, it might be perfect for use on an airplane. The stand could be great for watching movies during the flight.
Overall Thoughts: This is a cool device, and I will probably pack it for my Disney trip. However, I don't think I'll use it in the parks due to its bulkiness. The included straps are nice, but the grip is still a bit too bulky for all-day carry.

The JJC Magnetic Phone Camera Grip Handle makes it easy to prop the camera for a great shot.
In conclusion, the JJC Magnetic Phone Camera Grip Handle is a versatile and useful accessory for smartphone photography and videography. While it has some minor drawbacks, like the lack of tactile feedback on the trigger and its bulkiness, it offers great value, especially if you can snag it at a discounted price.
PermalinkGorillaCamPro
Look Back at a Cool App

GorillaCamPro was a practical camera app designed to simplify the process of creating professional-quality content. With its intuitive interface and powerful features, it's the perfect tool for both beginners and experienced photographers.
GorillaCamPro was quietly discontinued in 2022. At least that is the last copyright date on the document. I don't know exactly when it was discontinued.
Key features of GorillaCam Pro include:
- Time-lapse photography: Capture the passage of time with ease by creating breathtaking time-lapse videos.
- Stop motion animation: Bring your imagination to life by animating objects frame by frame.
- Self-timer and burst mode: Perfect for capturing group photos or action shots.
- Remote control: Control your camera from a second device for added flexibility.
- Advanced settings: Customize your shots with a variety of options, including exposure, focus, and white balance.
Some of the features that I liked, and were I can find these features today.
Camera Setting

Self Timer was a way to set the time for 2-seconds to 120-seconds. Great if you had to place the camera some place and walk/run far away to get to the right spot.
Bust Mode shoot a series of photos one after another as fast as the camera could shoot. Choose from 3 to 60 photos in quick succession.
I haven't found any app that automatically takes burst shots and lets you set a long Self timer mode. ProCam does let you setup 60-seconds delay.
Stop Motion

Stop motion is an animation technique that makes an object appear to move on its own - such as claymation or animated action figures. The object is moved in small increments between individually photographed frames, creating the illusion of movement when the series of frames is played back as a video.
Press the shutter button to capture each frame. Move your subject in small increments between each frame you capture. The frame count is displayed at the top left of the screen. When you're finished shooting, hit the Done button and GorillaCam will stitch the photos into a stop motion video.
Advance Setting: Playback Rate: Set the rate at which your photos are played back as a video. The higher the playback rate aka frames per second (fps), the smoother the video. Stop motion animation is typically between 12 and 24 fps. Standard video is 30 fps. The fewer fps, the longer you will see each individual photograph and the more noticeable the movements of your subject will be.
Timelapse

The Capture Time and Playback time is a great way to set the camera and let it do its thing for what ever duration you want. Great when you want to set up the camera and take a timelapse for a particular duration.
Timelapse Mode takes photos at regular intervals to capture change over time, condensing hours of activity into seconds of video. Common examples: sunrise or sunset, clouds moving, flowers blooming or dying, or a day on a busy city street.
Advance Setting:
- Take Photos: Save a series of photos in your photo library instead of a stitching the photos into a video. This is great if you want to edit the photos individually in post production, add or delete or rearrange frames, or experiment with different playback rates on your computer.
- Shots: Set the number of shots you want to capture.
- Interval: Set the amount of time you want between each shot.
- Frames Per Second: Set the rate at which your photos are played back as a video. The higher the frames per second (fps), the smoother the video. Standard video is 30 fps. The fewer fps, the longer you will see each individual photograph.
Moment Pro Camera App has the ability to set the capture time and Playback time.
PermalinkMastering Final Cut Camera: A Disney Vacation Test Drive
Exploring Key Features and Tips for Capturing the Magic Before You Hit Main Street USA

This week, I experimented with Final Cut Camera to explore its features and see if it's something I'd use on a future Disney World vacation. Here are some of my notes:
Lock Your Camera Orientation
This feature ensures the camera is always ready to go when you launch the app. No more adjusting the camera to get the perfect horizontal orientation. I love this because I've often taken videos, only to realize later that I didn't tilt the camera properly before shooting.
Smooth Zoom
Final Cut Camera's zoom is smooth - which is great for slow pans. However, once you start recording, you can't change the lens. Be sure to select the right one before shooting.
Focus Peaking
This feature lets you easily see where the focus is while shooting. You can make adjustments on the fly to create some cool effects.
Cinematic Mode
Final Cut Camera doesn't have a built-in cinematic mode, where the background is slightly blurred. However, you can apply this effect during post-production.
Home Screen Access
You can't add Final Cut Camera to the iPhone Home Screen, which is surprising given it's an Apple app. You'd expect it to take full advantage of the iPhone's capabilities.
Multi-Camera Functionality
The main purpose of Final Cut Camera seems to be connecting multiple iPhones for shooting different angles simultaneously. This isn't something I'd likely use on vacation.
Overall, it's a cool app, and I'm excited to master it before strolling down Main Street USA!
PermalinkFinal Cut Camera
A Superior Choice for Video Enthusiasts

As we delve into the realm of mobile videography, Apple's introduction of Final Cut Camera has sparked a revolution, particularly for those looking to elevate their video recording game beyond the capabilities of the standard iPhone Camera app. Here's why Final Cut Camera stands out as a compelling alternative:
1. Professional Controls at Your Fingertips: Final Cut Camera introduces a level of control that was previously reserved for high-end standalone cameras or professional camera apps. Users can manually adjust settings like white balance, ISO, and shutter speed directly from their iPhone or iPad. This level of customization is crucial for achieving the precise look you envision, whether you're shooting in bright daylight or under the dim lighting of an evening event.
2. Integration with Final Cut Pro: For those already invested in Apple's ecosystem, Final Cut Camera's seamless integration with Final Cut Pro for iMac is a game-changer. This app allows for a live multicam setup, where multiple Apple devices can be used simultaneously, switching between feeds live or editing them later with ease. This feature alone transforms your iPhone or iPad into a full-fledged video production studio, making it an invaluable tool for content creators, filmmakers, or anyone looking to produce professional-quality video content.
3. Apple ProRes Support: The ability to shoot in Apple ProRes, particularly on iPhone 15 Pro models, offers video quality that's not just good but visually lossless, ensuring maximum dynamic range and editing flexibility. While this feature isn't supported in the form of ProRes LT for smaller file sizes, having ProRes available directly on your phone significantly reduces post-processing time and quality loss, which is crucial for professional workflows.
4. Enhanced Stabilization and Focus: User feedback, particularly from platforms like X, highlights the superior stabilization features in Final Cut Camera, which benefits from Apple's advancements in hardware and software integration. This means smoother footage, even when shooting on the move, without the need for additional stabilization gear.
5. User Experience and Community Feedback: The community on X has been buzzing with positive reactions towards Final Cut Camera's ease of use for both novice and professional videographers. Features like one-handed control adjustments and the intuitive interface make it user-friendly, yet powerful enough for those who demand more from their recording equipment.
6. Future-Proofing Your Footage: By recording in formats like ProRes, Final Cut Camera not only enhances current video quality but also future-proofs your footage. With trends moving towards higher resolution and dynamic range, having videos in a format that's already ahead of the curve ensures longevity in video archives.
Conclusion: Final Cut Camera isn't just an app; it's a statement from Apple about where mobile videography is heading. By offering tools that were once the domain of professional setups, Apple has democratized video production. Whether you're a budding filmmaker or a seasoned pro looking for on-the-go solutions, Final Cut Camera provides an alternative that not only matches but often surpasses what was possible with the standard Camera app. Its integration with professional editing software, advanced recording formats, and user-centric design make it a must-have for anyone serious about video recording on Apple devices. Embrace the future of mobile videography with Final Cut Camera, and witness your videos transform from good to extraordinary.
More Next Week!
Next Week we'll take a deep dive and talk about the five tips that I learned using the Final Cut Camera. These will be helpful to know before going on a vacation.
PermalinkCamera App in iOS 18
Exploring the New Features

Apple's iOS 18 brings a suite of new features to the Camera App, enhancing user experience and functionality in ways that cater to both casual photographers and content creators. Here's a detailed look at what's new:
1. Music Playback During Recording: One of the most user-requested features has finally arrived. With iOS 18, music playback doesn't stop when you open the Camera app to record video. This means you can have background music for your videos without the interruption of restarting your music app. This feature is particularly handy for creators who like to add live music or background tracks to their video content directly from their iPhone.
2. Pause While Recording: Video recording has become more flexible with the ability to pause and resume your video without stopping and starting a new clip. This feature is perfect for editing out mistakes or unwanted parts in real-time, making post-production smoother.
3. Control Pad UI for Tone and Color: A new control pad interface allows for simultaneous adjustment of tone and color based on touch input. This innovative feature, while not directly mentioned in official updates, has been highlighted in community discussions and tech previews, suggesting a more intuitive way to tweak your photos on-the-fly.
4. Enhanced Photos App Integration: Although not directly a Camera App feature, the significant overhaul of the Photos app in iOS 18 impacts how users interact with their camera-captured content. The Photos app now features a more streamlined interface, making it easier to find and edit your photos, which indirectly enhances the workflow from camera to post-processing.
5. Customizable Control Center: While this isn't specifically for the Camera App, the redesign of the Control Center with iOS 18 allows for more customization, including potentially quick access to camera settings or modes, enhancing the overall user experience with the camera.
6. Spatial Photo/Video Mode: Mentioned in beta updates, this feature hints at Apple's push towards more immersive content capture, potentially integrating with AR or VR technologies for a richer viewing experience, though specifics on how this interacts with the Camera App are still emerging.
Conclusion
iOS 18's updates to the Camera App and related functionalities signify Apple's commitment to enhancing user creativity and ease of use. From the practicalities of music playback during video recording to the innovative control pad for photo editing, these features cater to a wide range of user needs. Whether you're capturing everyday moments or producing professional content, iOS 18's Camera App enhancements offer tools that make your iPhone an even more versatile device for photography and videography. As users continue to explore these new features, we can expect a surge in creative content, leveraging these tools to tell stories in more engaging ways.
PermalinkiPhone 16 Pro vs. iPhone 14 Pro Max
Reflecting on the iPhone 16 Pro Announcement
This week, Apple unveiled its latest lineup of iPhones, and I paid particular attention to the iPhone 16 Pro. Currently using an iPhone 14 Pro Max, I'm in a position where an upgrade is possible.
On October 5, 2022, when I acquired the iPhone 14 Pro Max, my enthusiasm was fueled by the prospect of its advanced camera capabilities. It perfectly met my needs, particularly for filming at church, where it proved to be an essential tool for producing high-quality video content.
However, my usage has shifted since then. I'm not capturing as much video or as many photos as before, which means my requirements for a smartphone camera have evolved.

Apple's Side-By-Side Comparison.
Key Differences Between iPhone 16 Pro and iPhone 14 Pro Max
iPhone 16 Pro vs. iPhone 14 Pro Max: A Closer Look
The new iPhone 16 Pro features a display that's 0.2 inches larger than its predecessor. It retains the Super Retina XDR display with the Always-On feature. A significant improvement in design is that the iPhone 16 Pro is nearly half a pound lighter than the iPhone 14 Pro Max, making it more comfortable for prolonged use.
Camera Enhancements
One of the standout features of the iPhone 16 Pro is its new Camera Control system, which promises to enhance the quality of photographs significantly. This feature might inspire other camera apps to expand their offerings with similar advanced controls.
Video Capabilities
For videographers, the iPhone 16 Pro now supports video capture in 4K at 120 fps with Dolby Vision. While not everyone might need such high frame rate video, it's an impressive feature for those who do.
Camera Specifications
The Ultra Wide camera has seen the most significant upgrade, jumping from 12MP in the iPhone 14 Pro Max to 48MP in the iPhone 16 Pro. This change aside, the camera setup remains largely similar between the two models.
Battery Life
Battery performance has also been improved. The iPhone 16 Pro lasts up to 4 hours longer during video playback, which is particularly beneficial for long days out, like at Disney World. If your current iPhone's battery health is waning, like mine at 81% maximum capacity, the upgrade could make a noticeable difference in all-day usage scenarios.

This screenshot from Apple's website suggests how they envision users interacting with the new Camera Control system.
Final Thoughts
As of now, there's no pressing need for me to upgrade to a new iPhone. My iPhone 14 Pro Max has just been paid off, and the additional cost of nearly $50 per month for 24 months doesn't seem justified by the enhancements, especially in the camera department, which hasn't seen changes significant enough for my current needs.
Therefore, I won't be rushing to preorder the latest model this week. Instead, I plan to visit a local Apple Store next week to conduct a hands-on, side-by-side comparison with my current phone.
PermalinkCamera+: Macro Photos
Mastering Macro Photography
The iPhone 14 Pro Max is a powerful tool for photography, and when it comes to macro photography, it truly shines. Combined with the advanced features of the Camera+ app, you can capture stunning close-up shots that reveal the intricate details of your subjects. Whether you're photographing flowers, insects, or everyday objects, this guide will help you make the most of your iPhone 14 Pro Max and Camera+ for macro photography.
Why Choose Camera+ for Macro Photography?
While the iPhone's native camera app is excellent, Camera+ offers additional features that can elevate your macro photography experience. With manual controls, focus peaking, and the ability to shoot in RAW, Camera+ gives you the precision and flexibility needed for capturing those tiny details with clarity and sharpness.
Getting Started: Setting Up Your iPhone 14 Pro Max
Install Camera+: First, download the Camera+ app from the App Store if you haven't already. It's a small investment for a big leap in your photography skills.
Enable Macro Mode: On your iPhone 14 Pro Max, the macro mode automatically kicks in when you bring the lens close to your subject. However, in Camera+, you can take control by adjusting the manual focus and enabling focus peaking to highlight the areas in sharpest focus.
Activate Pro Mode in Camera+:
- Open Camera+ and switch to 'Pro Mode.'
- Tap on the focus icon and slide the focus dial until your subject is sharp.
- Use focus peaking (highlighted edges) to ensure your subject is in focus.

Camera+ Options
Tips for Capturing Stunning Macro Shots
Get Close, But Not Too Close: The iPhone 14 Pro Max allows you to get as close as 2 centimeters from your subject. However, keep some distance to avoid casting shadows or losing focus.
Use Manual Focus: In Camera+, manual focus is your best friend. Fine-tune the focus until you get the sharpest possible image. This is especially important in macro photography, where even the slightest shift can throw off the focus.
Stabilize Your Shot: Macro photography is sensitive to movement. Use a tripod or stabilize your hands against a solid surface to prevent blur. Camera+ has an image stabilization feature, but physical stabilization will always yield better results.
Adjust Exposure and White Balance: Macro shots often require precise exposure and white balance adjustments. In Camera+, you can manually adjust these settings to get the perfect lighting and color balance.
Shoot in RAW: For maximum detail and flexibility in post-processing, shoot in RAW. Camera+ allows you to capture RAW images, which retain more detail and dynamic range than JPEGs.
Use Natural Light: Lighting is crucial in macro photography. Whenever possible, use natural light to illuminate your subject. If you're shooting indoors, consider using a soft light source or a ring light to avoid harsh shadows.
Experiment with Angles: Don't just shoot from above; explore different angles to find the most interesting perspective of your subject. Side lighting or backlighting can add depth and drama to your macro shots.

Post-Processing Your Macro Photos
Once you've captured your macro shots, Camera+ also offers robust editing tools to enhance your images. Adjust the sharpness, contrast, and saturation to make your photos pop. Since you shot in RAW, you'll have plenty of data to work with, allowing for significant adjustments without compromising quality.
Conclusion
With the iPhone 14 Pro Max and Camera+, you have everything you need to explore the fascinating world of macro photography. By taking control of the manual settings and utilizing the powerful features of Camera+, you can capture stunning images that showcase the intricate beauty of the tiny world around us. So grab your iPhone, fire up Camera+, and start shooting those mesmerizing macro shots today!
PermalinkAbout
Here you'll find all the information you need about the iPhone 14 Pro Max. This includes specs such as the processor and storage capacity, as well as features like the camera, display size, and battery life. You can also find out about the operating system and accessories, so you'll know exactly what you're getting.
Check out all the blog posts.
Blog Schedule
| Saturday | Internet Tools |
| Sunday | Open Topic |
| Monday | Media Monday |
| Tuesday | QA |
| Wednesday | Veed |
| Thursday | Business |
| Friday | Macintosh |
Other Posts
- iPhone Xs vs iPhone 14 Pro Max
- Mastering Final Cut Camera: A Disney Vacation Test Drive
- Statik Cables
- Camera+: Macro Photos
- iPhone 14 Pro Max Template
- Privacy with Airdrop
- ProCam Triple Feature
- Camera App in iOS 18
- Macro photography
- Low Light Photos
- iPhone Microphone
- 5G Speed at Gillette Stadium
- LiDAR Scanner
- Display Aspect Ratio
- iPhone 20-watt charger