
Apple Devices 1080p
Better Export than the YouTube & Facebook...
This is my last weekly contribution to the Final Cut Pro blog post. I won’t be doing that much video work as my volunteer video recording has come to an end. I am happy with the work that I did and got positive feedback from a lot of people.
I distributed my Final Cut Pro videos to YouTube. It seems to be the favorite way of distributing content for most people.
I was disappointed when Apple changed the export option and removed the ability to export directly to YouTube. It was supposed to be an easy way to get the video to YouTube. Starting with version 10.15.1 it would be gone.
Apple put in a new option to export videos to Facebook and YouTube. It was designed to be an easy export option.
The thing was that it wasn’t better. When you put in content in the description field, it didn’t get carried over to YouTube. You would have to re-enter the description again. Wasn't really a good time saver.
My Option
I have played around with the YouTube and Facebook export option and hated it. The export video file was huge. It took a long time to render and then I would have to upload the large file onto YouTube and Facebook. This upload time would take a while and the larger file size means that it would take a while for YouTube to render it
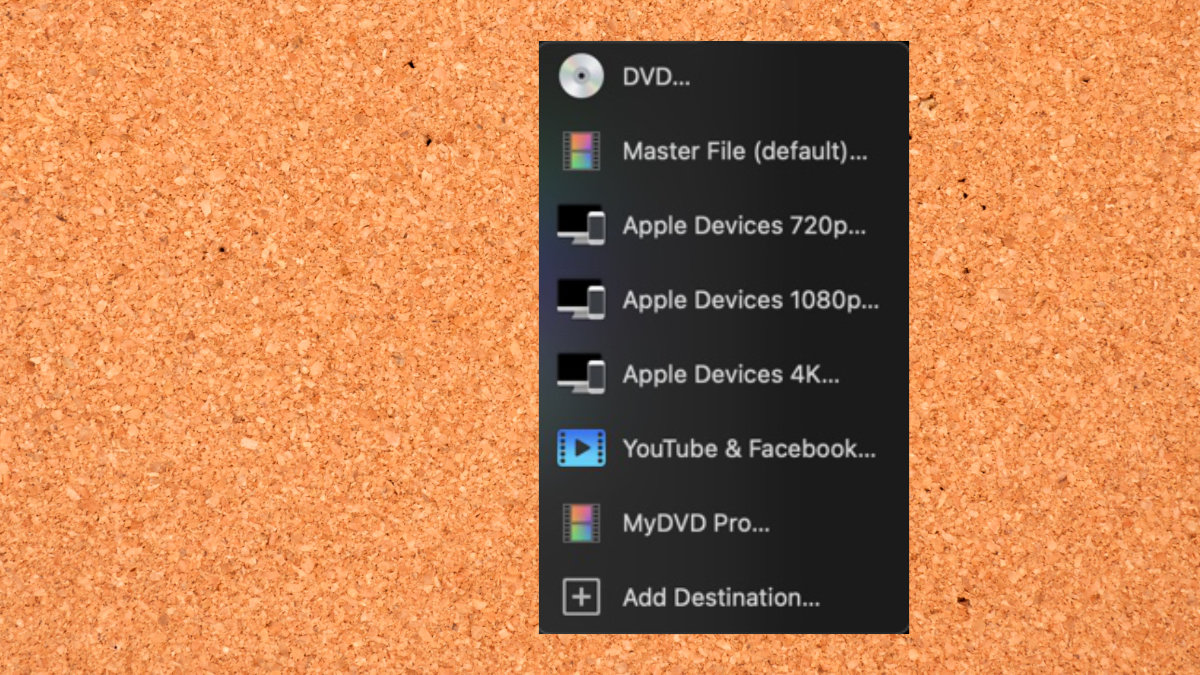
I found that doing the simple export "Apple Devices 1080p..." worked perfectly well. The video saved quickly and I was able to distribute it quicker.
The quality of the video was fine. If your shooting 4K videos then using YouTube and Facebook might be better. Otherwise, I believe it’s safe to go the standard route.
PermalinkTips on Titles and Effects
Take Time to See what You Have!
There are lots of websites that offer various types of plug-ins. You can get plugins for Titles, Effects, Transitions and more.
A couple of popular package deals:
- FCPEffects.com -
- envatoelements.com - Hundreds of titles and video templates
- bjkproduction.com - You probably seen their ads on Facebook. Lots of drag and drop transitions, titles and Effects. $65 for the 700 pack.
Multiple packs are fun. But they can be a bit overwhelming.
The Ultimate Graphics Pack has lots of great titles.
Four Things I Have Learned
Over the past year I have purchased a few mega packs. I have learned a few things along the way.
- Spend time learning all that you get. Create a new project and play around with all the various effects and titles. You might be surprised what you do have! This learning will help you understand what you got. This may inspire some ideas when your working on a project.
- Install what you need. Having too many plugins can slow down the load time of Final Cut Pro. If you are not likely going to use some effects or titles, you should remove them - if possible. This will also make it easier to find things that you would likely need.
- Make Use of Search - When you want a good lower third title, select all the Titles and search for "third." You'll see all the various Lower Third Titles. Perhaps you'll discover an old title that would work best. This also applies to transitions and effects.
- Sound Effects are Universal - Titles, Transitions, and Effects have to be specific to Final Cut Pro and Motion. This is sometimes unfortunate as there are a lot of Premier plugins available. Sound is a whole different market. You can use any sound in Final Cut Pro.
Using Keywords for Organization
Makes using the Synchronize Clip much easier
Using the Multicam Clips functionality can be tricky when working with multiple scenes.
There may be instances where one camera shot contains several scenes. If you use that same clip multiple times, it could cause some performance issues. This could delays when exporting the video - thus making the process take a long time.
One solution is to break up the long clip using keywords. When you assign a keyword to a super long video clip, Final Cut Pro treats the keyword clip as a separate clip. Now you can easily apply the "Multiple Clip" or "Synchronize Clip" functionality.
You can assign keywords to Video and Audio clips, making it easy to synchronize related scenes.
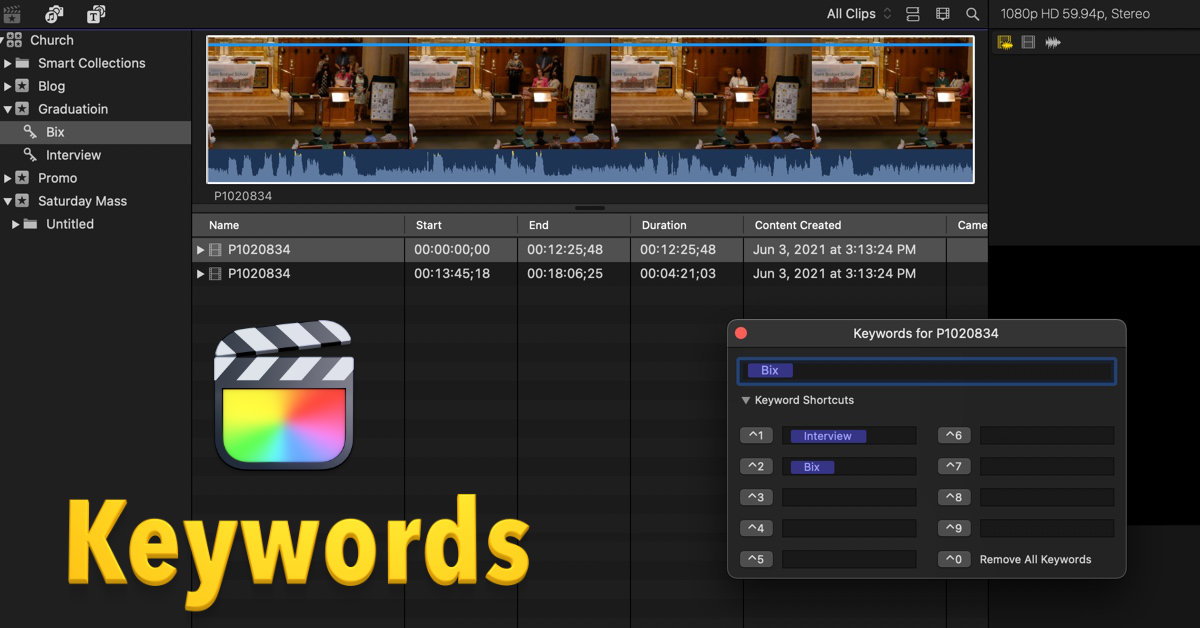
Define Keywords to a Clip
Simple steps to assign keywords to any clip:
- Select a clip and type the keyboard shortcut Command K
- Type in a Keyword to use
- Click Enter and you should see you keyword in the left tree.
Steps to select a part of the clip:
- In the Final Cut Pro browser, select a range within a clip.
- Type in the Keyboard Shortcut Command K
- Enter in a new Keyword, or use one of the ones you already defined
- Click Enter.
Remember
This works with audio and video. If you have an external mic, you can use the keyword to break up the clip into meaningful sections. This is much easier than using a third-party tool to split the clip.
I would recommend playing around with keywords, you may find that it will make putting together videos a bit easier.
You can learn more about Keywords on Apple Support page: Add keywords to clips in Final Cut Pro
PermalinkPage Curl
Create a cool effect with Page Curl
Last week’s Media Monday video featured a cool Page Curl effect. If you haven’t seen the video, check it out.
I searched around to see if there were any generators and I didn’t find anything that would only take the page curl to about 20% and then reverse. I decided to create my own generated effect using Apple Motion.
Page Curl is one of the built-in effects. However, it's a bit tricky to create a slight page curl and then retreat.
Four Things I Learned
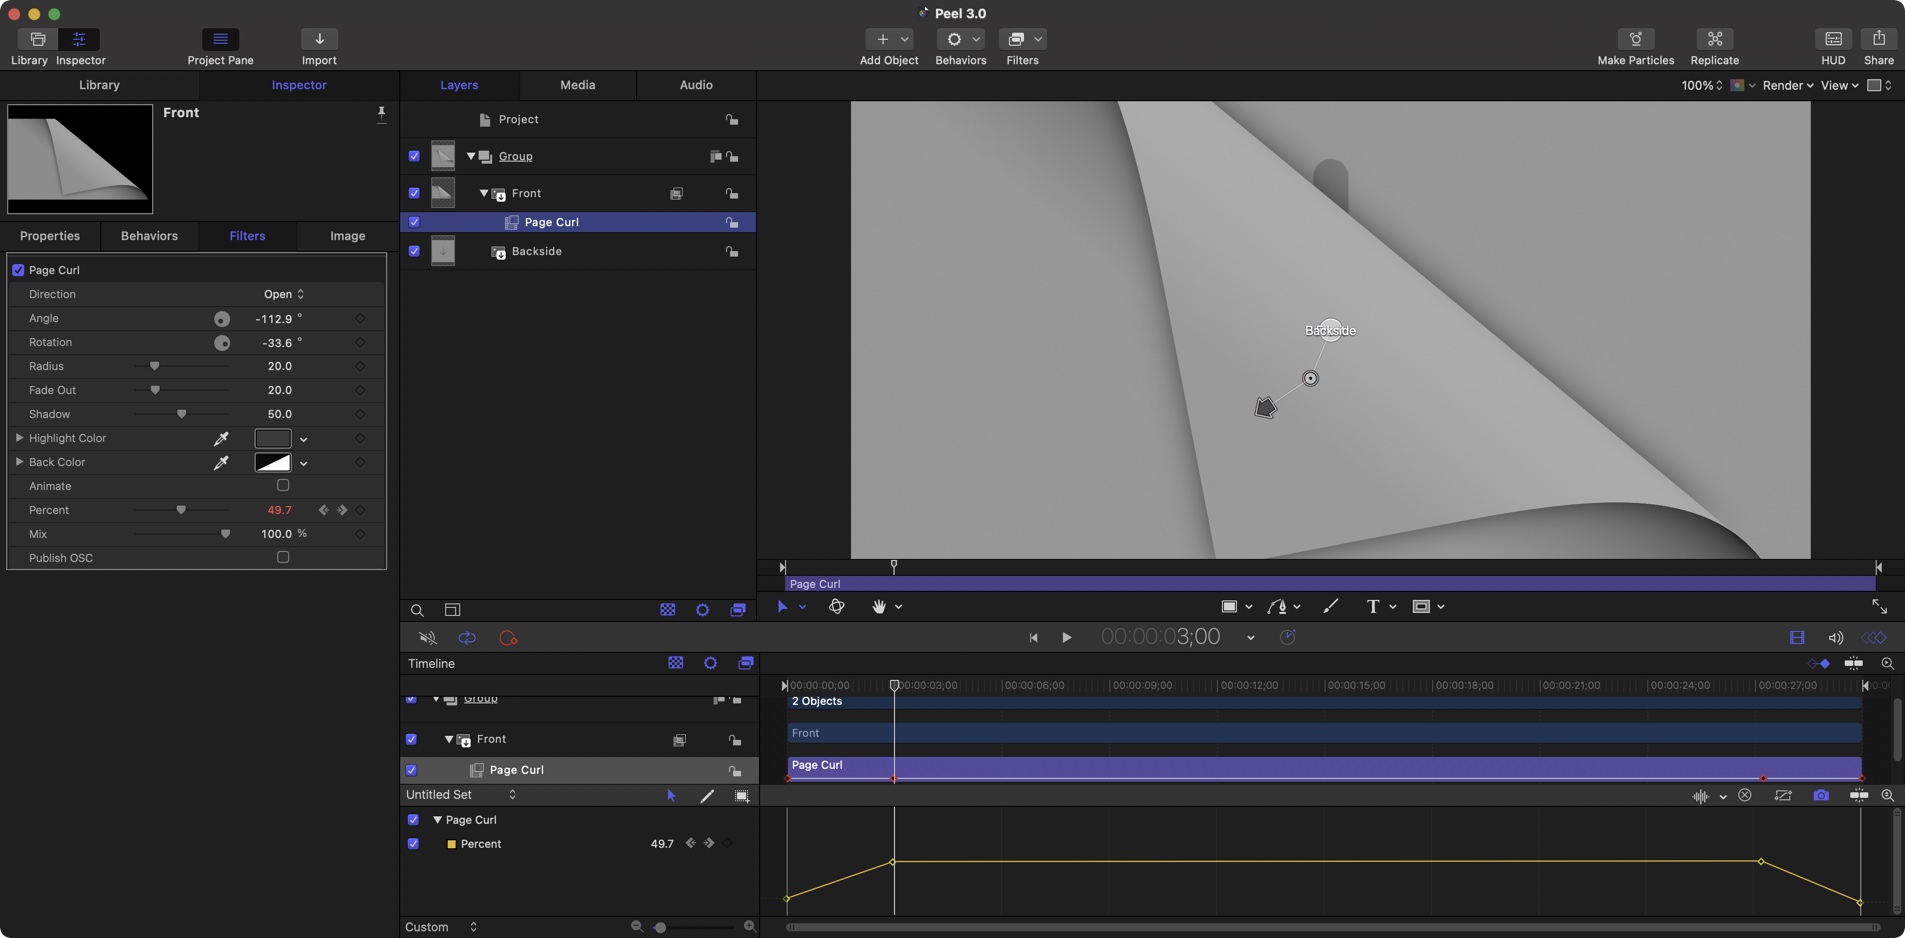
If you want to customize how the page curl works, you should turn off the Animate feature in the Page Curl Filter Inspector. This allows you to use keyframes to control the Page Curl to the way you want.
The Page Curl backside is just a mirror image of the front side. There’s no way to change the backside - at least I didn’t see a way to do it..
When animate is enabled the selected object that has a Page Curl connected, will peel away for the duration of the timeline. There is no way to pause it and then reverse with the animate enabled.
Use Page Curl percent as the keyframe. Set the percent to 0 at the start then to a certain point in the timeline change to some value. In my case, it was 50%. Then you can keyframe it to 0 at the end to get the full effect. (That sounds complicated. Just look at the image to get an idea.)
Download A Sample Page Curl Generator
If you want to create your own page curl flip effect in Final Cut Pro or Apple Motions, you can download my version of the Page Curl effect. You can completely customize it using Apple Motion.
Download the Page Curl Generator
To install it, simply uncompress the download file and put it in:
~/Movies/Motion Templates/Generators
To use it, simply drag it to the timeline as you would any media file. Select the generated clip and in the Properties panel, add the image/movie for the front and back.
You can also edit it in Apple Motion and change the effect of the Page Curl.
PermalinkApple Motion Duration
Easily change the project duration
When you create a new project in Apple Motion, there may be times when you want to change the duration. It's really easy to change the duration.
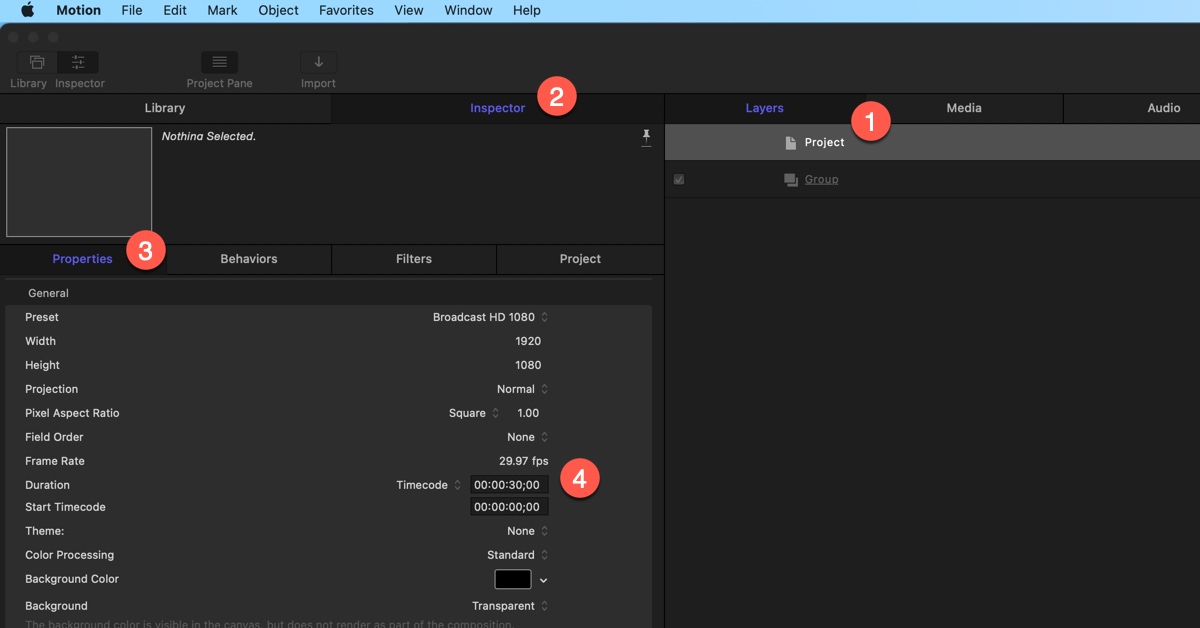
Steps to change the Project Duration.
See the attached graphic for locations.
- Select the Project in the Layers Panel
- Click on the Inspector
- Select the Properties Tab
- Change the Duration value.
Copy Timeline Video
Easily reuse some of clip later on in your movie.
Did you know that you can select a portion of the clip using the Range Tool and then copy/paste it somewhere else? You can!
Copy Timeline Video
Simply use the Range Tool (Keyboard Shortcut R) select the area that you wish to copy then use the Edit menu Copy/Paste to duplicate it elsewhere in your clip.
This is an easy way to reuse part of your video, for example, if you want to playback some of the beginning music at the end.
PermalinkCrossfade Audio
Make Audio transitions Easy
In Final Cut Pro 10.4.9, Apple introduced a long-awaited feature - the ability to add audio crossfade. This makes it so much easier to create a smooth transition between audio clips.
Final Cut Pro Crossfade works very similar to how video dissolves work.
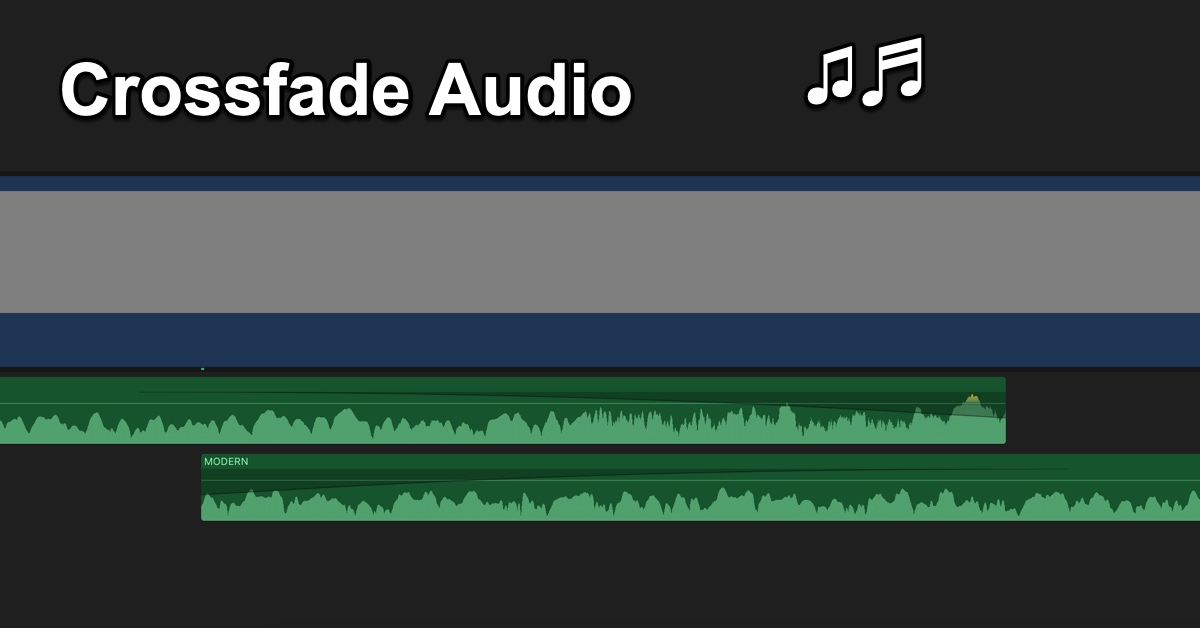
Adding A CrossFade
There are three ways to add crossfades:
- Using the Modify Menu. Select the audio clips and then go to Modify > Adjust Audio Fades > Crossfade.
- Use the Keyboard Shortcut: Option T
- Apply a transition to a clip. Whatever transition you add, the audio automatically gets a crossfade.
Adding a Crossfade
To add a crossfade you need to select two or more adjacent audio clips or video clips that contain audio. (Note: the clips can't be overlapping.)
Use the Keyboard shortcut: Option T
My Thoughts
I saw some YouTube videos hyping this feature as something they have been asking for since version 10 came out. I wasn't all that impressed with how crossfade feature works. I think that crossfade should work regardless of where the two audios are in the timeline.
If you have two audio clips, You should be able to fade into the next clip very easily:
For Example: Like how a DJ will start playing the next song before the current playing song ends.
You would think that's how crossfade works, but it doesn't it just fades one clip until it ends and the second clip fades in. You do have some "dead air" time.
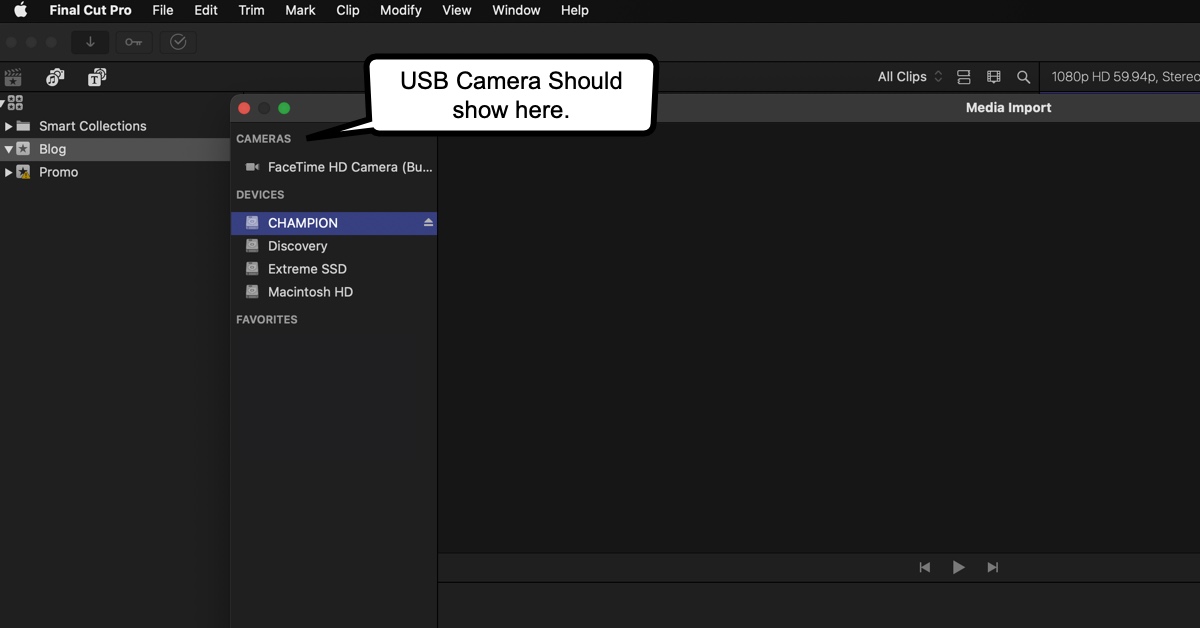
PermalinkRecord USB Cameras in Final Cut Pro
Currently can't record from the Camera
Final Cut Pro doesn’t support using USB cameras as video import. In other words, you can’t just hook up a DSLR camera and record live video through Final Cut Pro.
The option to select the video won’t appear in the import dialog. Only the built-in camera will show in the import dialog. This prevents you from importing live video, from another webcam or from a USB device such as a VCR or legacy video camera.
See this Import Dialog with two USB cameras connected:
According to Apple's documentation:
Connect the camcorder to your Mac using the cable that came with the camcorder, and configure your device for remote control over FireWire, if necessary.
If your computer does not have a FireWire port but does have a Thunderbolt port, you can connect the FireWire cable using an Apple Thunderbolt to FireWire Adapter or an Apple Thunderbolt Display (which also has a FireWire port).
Note: For best results when importing from a tape-based camcorder, it’s recommended that you import the video using the same camcorder that you used to record it.
This apparently true for iMovie. You are not able to select any USB devices to record live video.
Works in Other Apps!
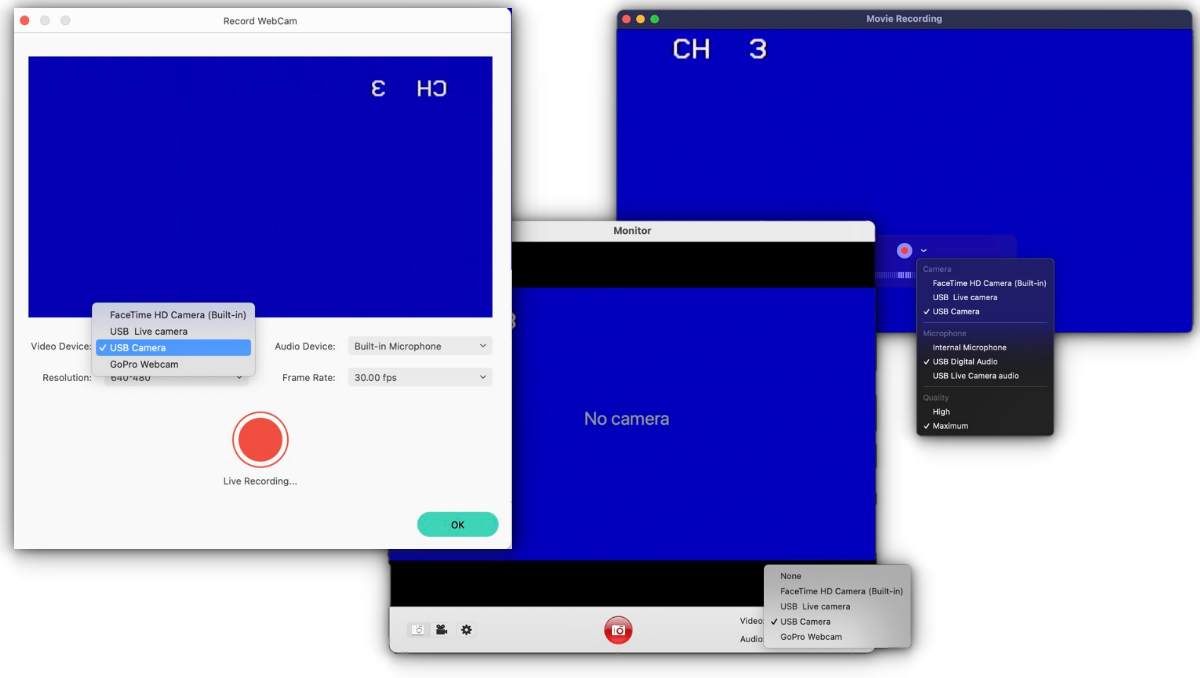
I am able to access USB camera in other apps, such as Apple QuickTime, Wondershare Filmora and Graphic Converter.
What's Going on Apple?
I am not sure why Apple won't let users record from USB cameras in Final Cut Pro and iMovie. Hopefully, its something that will be fixed soon.
PermalinkScreen Splitter 2
Great way to show multiple video clips at once.
FCPeffects has a lot of great Titles, Effects and Transitions for Final Cut Pro. These are great additions to help make your videos look more professional.
One of their popular effects is the Screen Splitter 2, which gives you control over how a clip appears in the video. This is an easy way to make a side-by-side video clip.
FCPeffects currently sells the Screen Splitter 2 for $20 - you can get it cheaper if you buy multiple effects and apply their coupons.
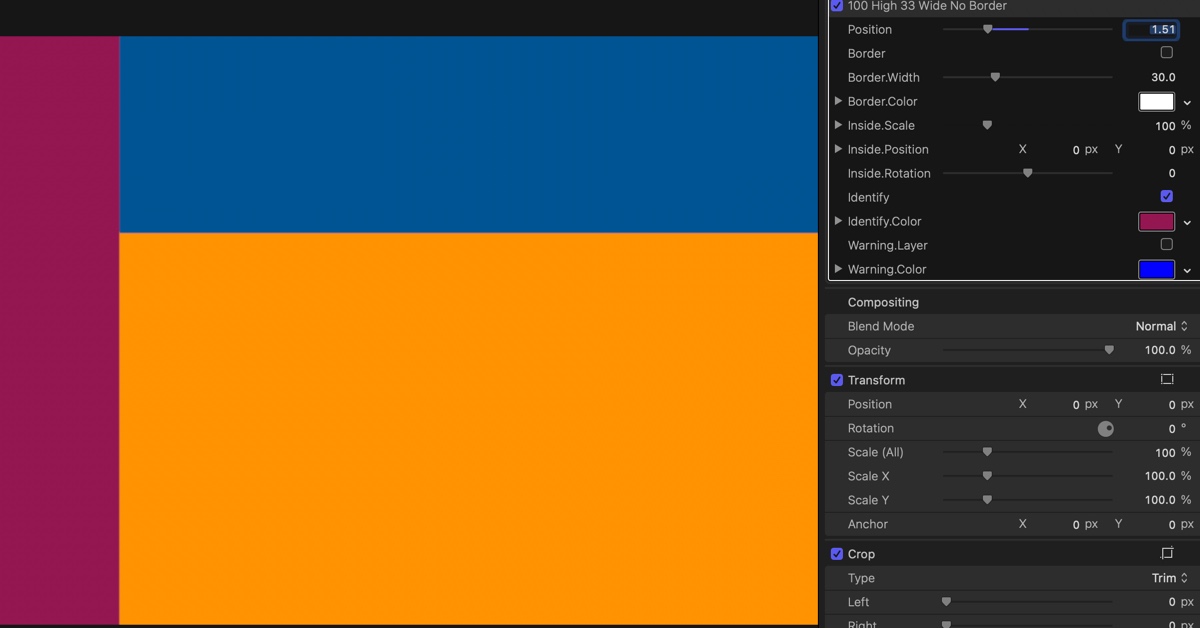
Six Things I have Learned
There are 123 Effects in three border type categories: No Border, White Border, Black Border. You can change the border color to anything you want - regardless of what effect you picked.
When using the effect it's helpful to enable the screen you are editing.
You can zoom in and out of a clip by using the inside scale. This helps center the clip content to the appropriate frame.
To get the Brady Bunch effect, you would use the 33 High 33 Wider with a Black Border.
Make sure to crop the clip to the right dimensions (16:9) before applying the effect. If you don't do that you may see some extra black space that can't be corrected using the Inside.Scale settings.
You can navigate through all the effect selections simply by searching for the size you need. So if you need a 100 Wide panel, save time and search for the "100 Wide."

The above shows just some of the design choices that you have.
PermalinkFavorites
Sorting Browser View to show only Favorties
When working with a lot of files in a project, it can get confusing trying to focus on the important images, videos, or audio clips. This is true especially in the Browser.
In a recent project this was a real issue. I had 20-30 photos and while they were all important, they just weren't important for the task I was working on at the moment.
My Favorite Solution
A quick solution to fix this problem is to use favorites. Simply tag the photos, videos, audio, Compound, and Multicam clips that you want to focus on. Then set the 'Clip Filtering' to only show favorite.
Easy to Tag
In the Browser, simply select the clip that you want to add to your favorite and click on the 'f' key. When you do that the white arrow appears to the right and when you expand it you'll see it tagged as a favorite.
Easy to Remove
To untag an object, simply select it and click on the 'u' key. It's instantly removed.
Change the Browser View
To change the browser view to only show favorite items, simply type in Control f.
To change it back to the "Show All Clips" simple type in Control C,
PermalinkAbout
This blog series will explore the many different features and tools of Final Cut Pro X. We will cover everything from basic editing techniques to more advanced topics such as color grading and motion graphics. We will also provide tips and tricks to help you get the most out of Final Cut Pro X.
Check out all the blog posts.
Blog Schedule
| Monday | Media Monday |
| Tuesday | QA |
| Wednesday | Veed |
| Thursday | Business |
| Friday | Macintosh |
| Saturday | Internet Tools |
| Sunday | Open Topic |
Other Posts
- Trim Start and End
- Screen Splitter 2
- Apple Motion
- Crop 4k to 1080p in the Timeline
- Using Rejected Clips to Manage Your Clips Library
- White Balance
- Setting Up Final Cut Pro for Audio Editing
- How to Split a Stereo Audio File in Final Cut Pro and Disable a Problematic Track
- Upload to Different YouTube Channels
- Matching Crops across Clips
- Getting Live Photos
- Page Curl
- Computer Setup
- Pan Audio
- AC3 Audio in Final Cut Pro