
Audio Fade Shape
Change the fade on your audio that works best for you.
Did you know that you can change how audio fades in/out in Final Cut Pro?
You may know about the short cut, Command - A to apply an audio fades to the selected clip.
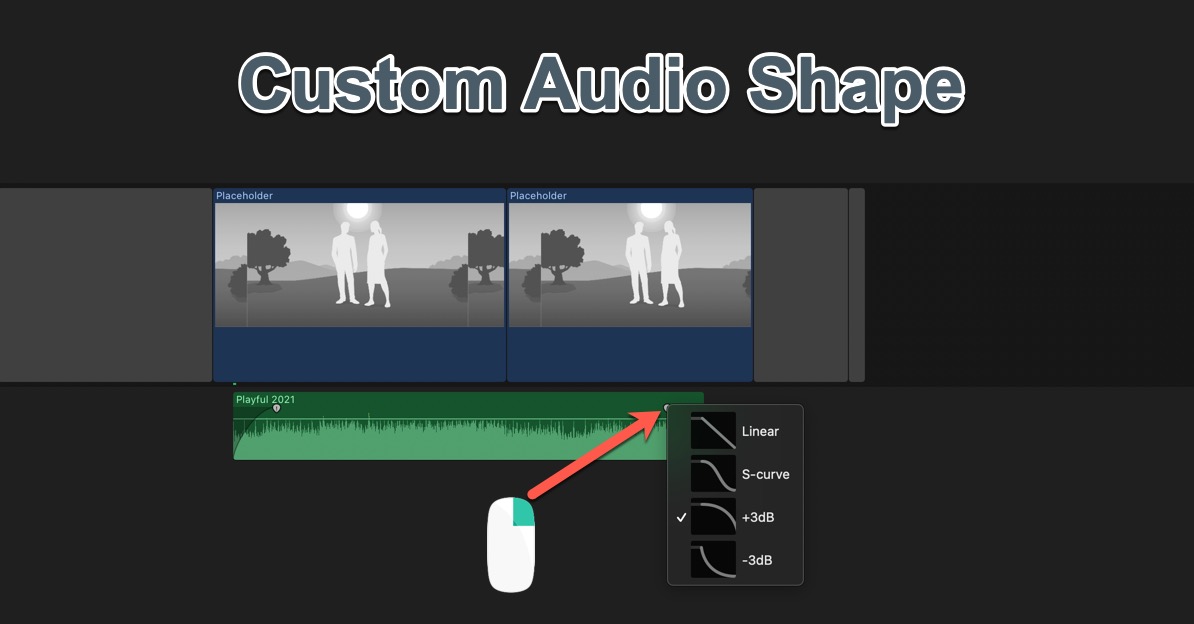
Did you know that you can control how the fade happens? Simply right-click on the white dot and a selection menu appears giving you some options on how the fade should work.
Now you can change the fade that makes sense for your clip. No more fumbling around with audio points to get the right effect.
Apple Document on the Shapes
Apple documentation explains the options you have with shapes. These correspond to the image that you see above.
- Linear:Â Maintains a constant rate of change over the length of the fade.
- S-curve:Â Eases in and out of the fade with the midpoint at 0 dB.
- +3dB:Â Starts slowly and then moves quickly toward the end. This is the default setting and is best for maintaining a natural volume when crossfading between two clips.
- –3dB: Starts quickly and then slowly tapers off toward the end.
Match Color
Let Final Cut Pro take the guess work on the best color to enhance a clip
If you use multiple cameras to shoot a similar scene, one of the issues is dealing with different color shots. This is because every camera handles white balance differently.
Final Cut Pro has a way to fix the color mix match. It's a simple process, and the good thing is that you can always make adjustments to fix any strange color combinations.
Matching Color Steps
It's quite easy in Final Cut Pro to make two clips the same color. Here are the steps:
- Select the clip that you wish to fix the color.
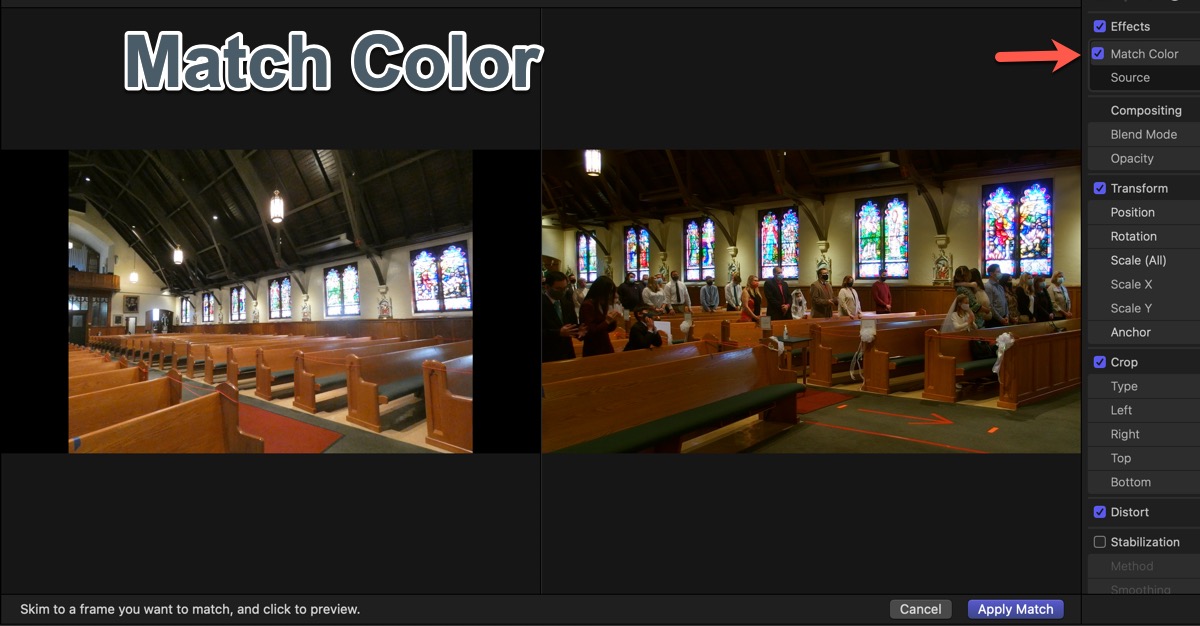
- Type in Command-Option-M to open up the Match Color functionality.
- The viewer now has a split screen. Using the select tool, skim the clips in the timeline.
- Simply click once and then click on the "Apply Match" button.
Three Things I have Learned
I have found that the Match Color works best when you have two cameras pointing to the same source at the same time. (Similar lighting and angle) If you use a different time for the match, you may not get the optimized results.
It doesn't matter where in the clip you click to get the best match. I would suggest near the entry point if you're merging the two clips together.
When you do a color match there will be no indication of the color change in the Color Inspector. In the Video Inspector, you'll see a "Mach Color" under the Effects section. You can enable/disable the effect here - very useful when you want to see how much improvement the matching color has on the clip.
PermalinkMatching Crops across Clips
How to crop clips the same way
Have you ever wanted to crop two clips with the exact same crop dimensions? Perhaps these are two clips that were shot in 4k and you crop them to 1080p and have the crop location be the same.
You could use compound clips, but if the clips are being used in different parts of the video that doesn't help.
A good solution is to use the Crop info in the Video Inspector. Check out this snapshot:
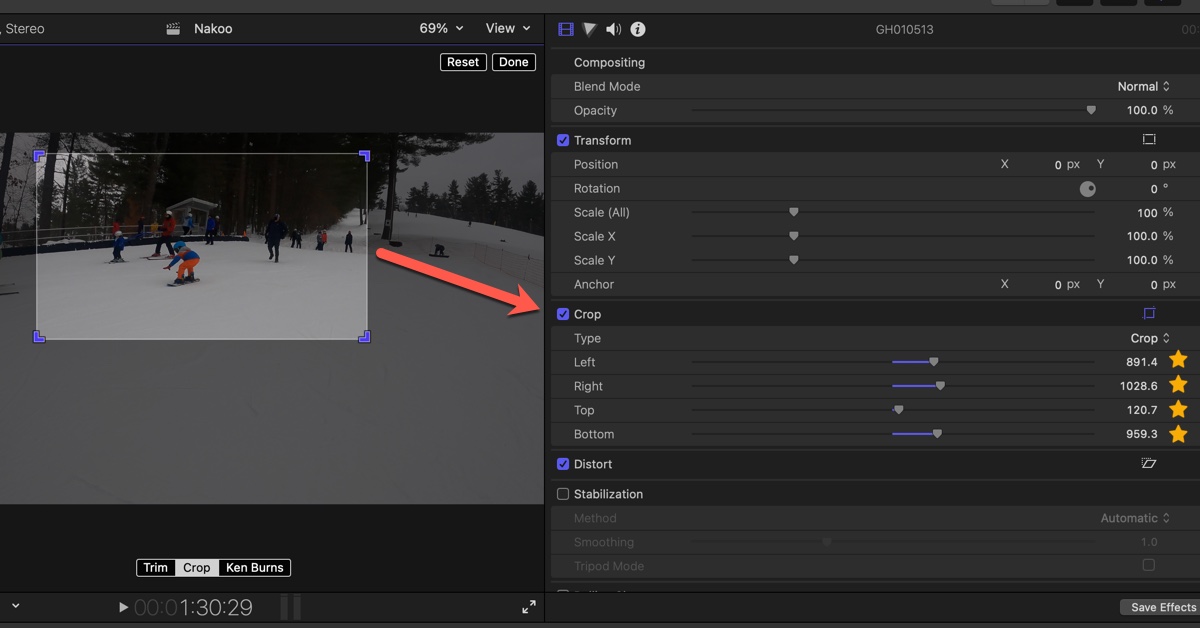
When you crop an image, the specific crop details are stored in the Video Inspector.
Did you know that you can just copy the configurations to other clips. The bad news is that there's no way to copy the configuration settings - Like a copy/paste function.
You need to manually type in the numbers such as 612.8, 1307.2, 509.8, and 570.2.
I tried writing the commands in BBedit with a tab between the numbers thinking that would make it easier. But Final Cut Pro won't accept that. I even tried with a return break after each value and that didn't work.
You would need to manually write down the values and enter them in each time you want the clip to match a particular setting.
PermalinkPan Audio
Create cool effects using the built in pan audio feature
One of the cool effects that Final Cut Pro has is the ability to enhance audio. This is a creative way to slightly change video audio to give it more of a personal touch. (Think: Intro music!)
If your audience is mostly going to watch your video on an iPhone or iPad, with headphones, they won't really hear much of a difference. However, in the future, some people may watch the video on a TV system.
I would suggest exploring using the Pan Audio for the Intro music - just to give it some effect.
Apple Description
Panning audio lets you distribute sound across the stereo or surround spectrum to create balance or a special effect. For example, you can place more sound in the right channel of a stereo clip or less sound in the center channel of a surround clip.
Final Cut Pro includes a built-in surround sound decoder that lets you choose among several stereos and surround preset pan modes that you can apply to clips from the Audio inspector. Using the pan mode presets, you can dynamically re‑create surround sound fields from the stereo source content.
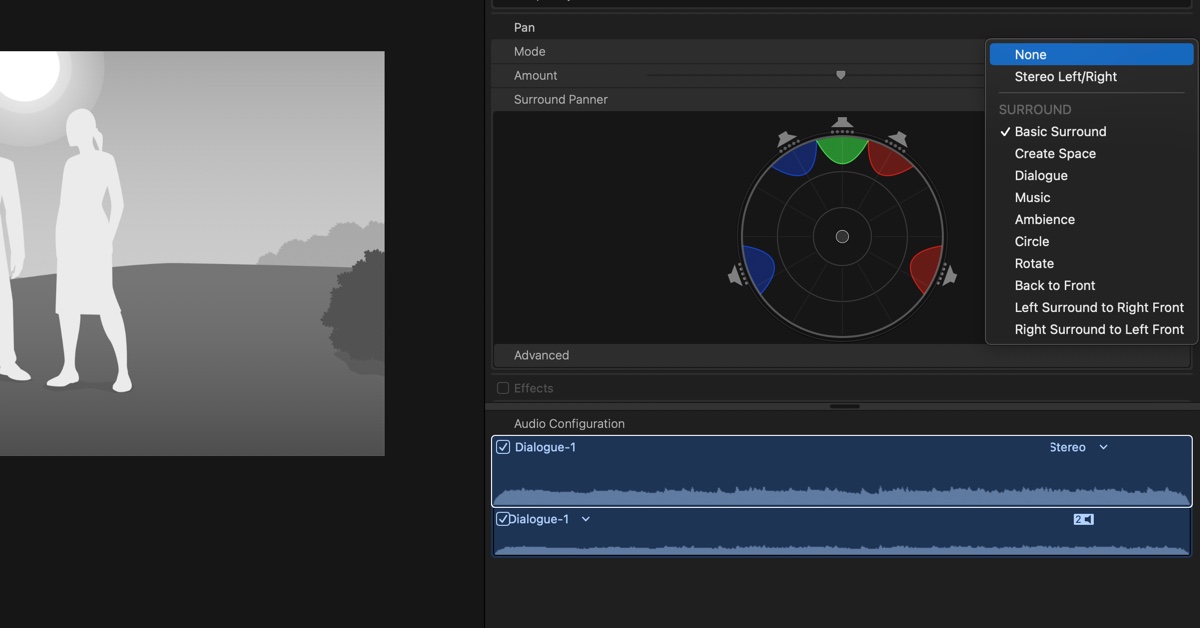
You can see the controls when you set the Pan option in the audio inspector.
Pan Options
Think of the options as to how a movie theater would be set up. These are the options that you have:
None - Keeps the audio the same style as imported into Final Cut Pro.
Stereo Left/Right - Focus the audio on the left or right speakers. Useful if you want to play one track on the left and another track on the right.
Basic Suround - Typical suround sound setup. All audio is evenly split between the speakers.
Create Space - Push the audio to some of the sound spectrum. Useful first step when experiementing with suround sound.
Dialogue - Sound is more focus to the center of the room where the video is. Great when you have mostly vocal audio.
Music - Even mix of sound to all the channels
Ambience - More sound in the surounding channels and not much focus on the front and center channels.
Circle - Focus the sound in one area. Useful if your doing keyframes to have the audio move around the room.
Rotate - Move the sound to focus to a different speaker. Useful if you have two people speaking and you want the audio attention to the left and right person.
Back to Front - Focus the sound on the front or back speakers. Use the slider to set the adjustment. Useful if your audio has a lot of background noise that you want to reduce.
Left Surround to Right Front - Pans the sound from the left to the right. Key frames would work great here.
Right Surround to Left Front - Pans the sound from the right to the left, again keyframe would be the focus here.
PermalinkSelect Clip Range
Quick Tip to get the range of the selected clip
Sometimes I need to find the length of a particular clip in the timeline. Usually, because I want to trim the clip to a specific length.
The timeline under the preview only shows the position of the selection tool and nothing about the clip.
The only way to find out about the clip is to use the Clip Range tool.
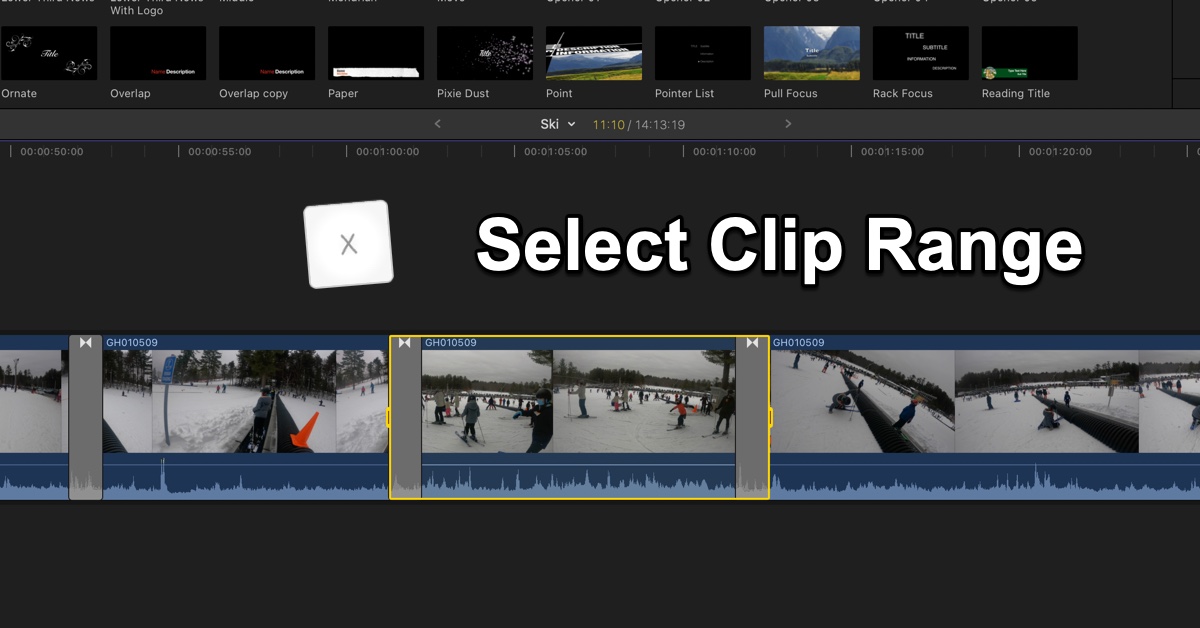
Select Clip Range
Use the shortcut “x†and select a clip on the timeline. You’ll see the current length of the clip to the left of the movie duration under the preview window.
In the above screenshot you can see that the selected clip is 11:10 long.
PermalinkBright White Background Generator
Easily add a new color generator to Final Cut Pro
Final Cut Pro has a lot of cool generators for some basic functionality. One of the categories is Solids where you can insert a blank color, useful for text background or something.
Right out of the box there are six colors: Custom, Grey Scale, iMovie, Pastel, Vivid and White.
Seven Shades of White
When you add the White color, in the inspector you'll see that there are seven options: Antique White, Beige, Bright White, Cream, Ivory, Mint, and Smokey.
Smokey is the default.
What if you wanted Bright White to be the default? Wouldn't it be great to always have Bright White available?
Make Any Color Solids
If you have Motion installed, you can easily make your own color the default. Here are the simple steps:
- Right click on the White and select "Open a Copy in Motion"
- In Motion, Click on the Inspector tab.
- Under Projects, select "Bright White"
- Under the File Menu, select "Save As..."
- I would recommend calling it "Bright White"
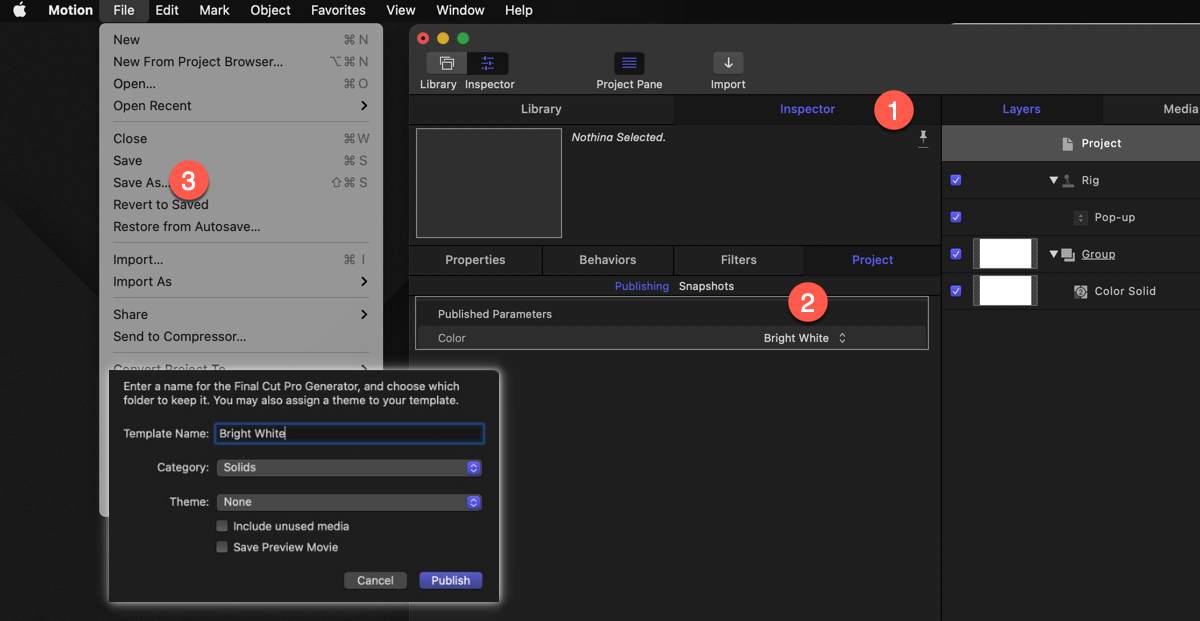
Highlighting steps in Motion.
Remove "White Copy"
So when you right-click to "open a Copy in Motion," Final Cut Pro automatically creates a copy of the file and places it in the Generator folder. Here's how to remove that file.
- Quit Final Cut Pro.
- Navigate to the Motion Template Folder: {{Home Directory}} / Movies / Motion Templates / Generators / Solids
- Delete the folder labeled "Whites Copy"
- Open up Final Cut Pro and Navigate to the Solids in the Generator category.
You'll see that only the "Bright White" and the rest of the preinstalled generated files remain.
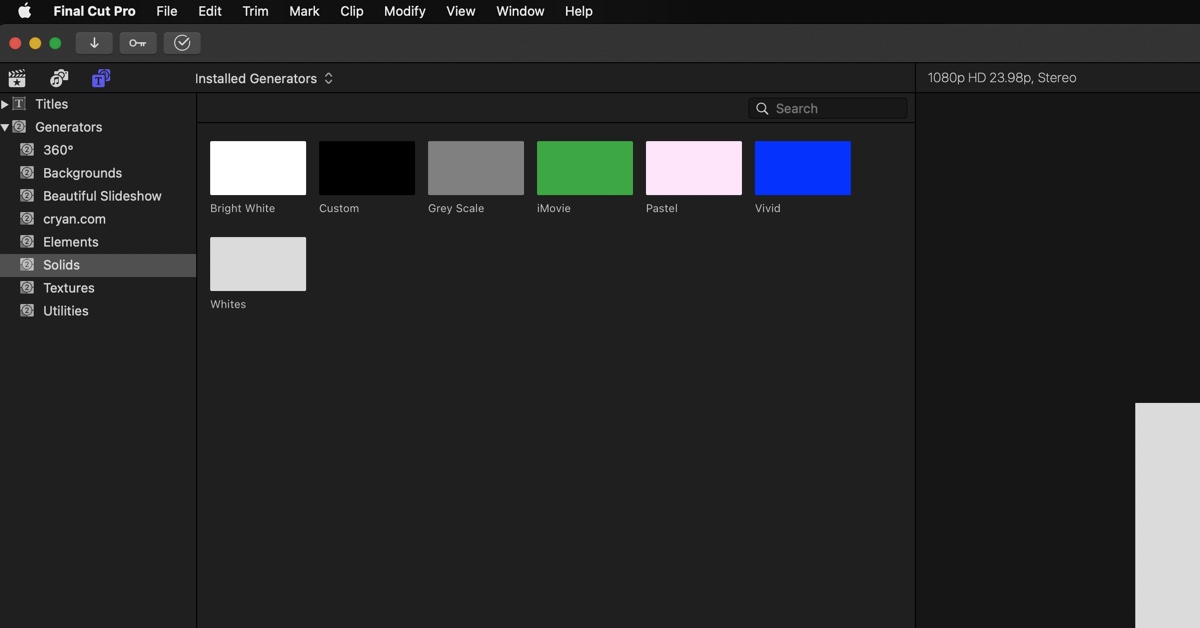
Here's what my solids section looks like today.
Other Colors
This is a good time to install other frequently used colors, such as company colors. I would recommend spending a few minutes now adding your own so you'll save time later when your working on the next big project.
PermalinkRenderFrameAt Error
Fixing the dreaded RenderFrameAt Error
Have you ever gotten the following error when exporting a movie?
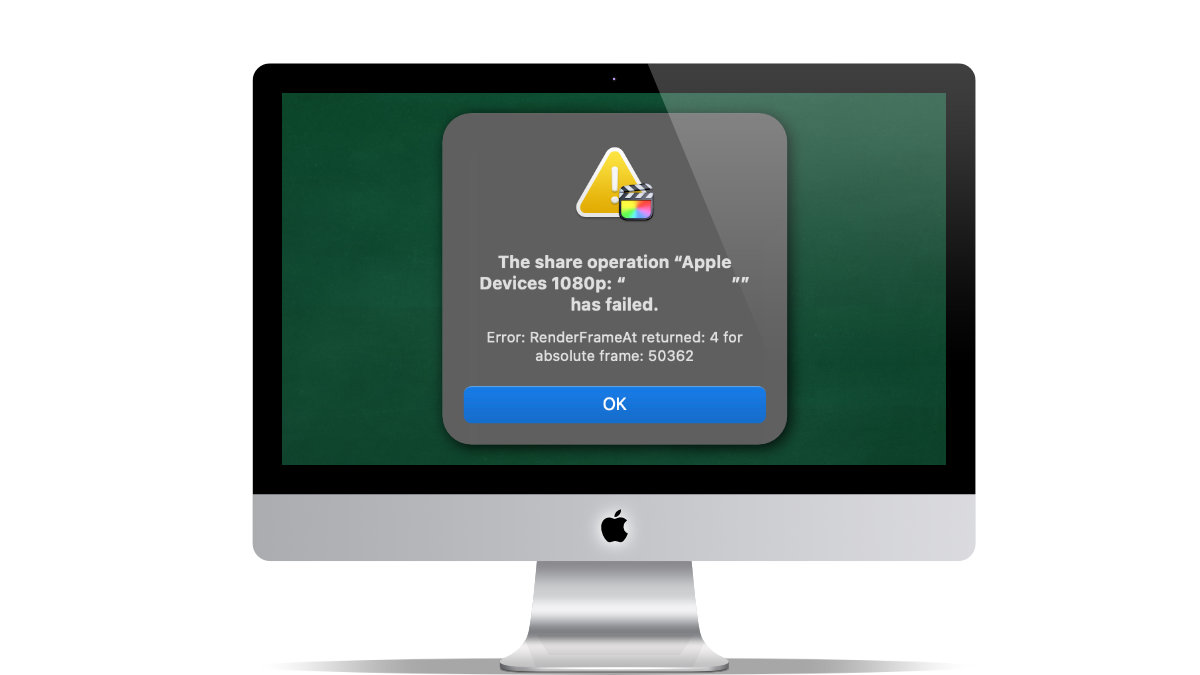
The Share operation "Apple Devices 1080p: " Name.m4v" has failed.
Error: RenderFrameAt returned: 4 for absolute frame: 50362
I recently got this error and had to figure out why it was happening to me. I first went to the frame that was causing the issue. In order to do that I had to change the Time Display to show the frame count instead of the time.
Change the Time Display to Frame Count
It's pretty easy to change the Time display, the clock under the preview window, to show the Frame count. Here are the steps:
- Open up Final Cut Pro Preferences. (Use Command Comma as the keyboard shortcut.)
- Click on the pull down menu next to the Time Display
- Select Frames
- Close the Preferences dialog box
I then navigated the timeline to the 50,362 frames. I found that the video frame and audio were empty.
What Happened?
I created a Compound clip from two GoPro clips. Apparently, there wasn’t a 100% connection and that caused the error.
I removed that part of the clip.
Then I tried to export the file again and this time I was successful.
Lesson Learned
I need to figure out the best way to join GoPro clips. Especially when the clips are automatically split because of file size.
PermalinkWhite Balance
Quick Tips on setting your own White Balance.
White Balance is very importaint to maintain a quality video production. This is one way to keep colors the same between clips and cameras.
The key thing about dealing with White Balance is to adjust at the end of a project and not during the project. This is because the White Balance will add additional render time every time you make some alteration to the clip - including adding transitions.
Remember the best white balance set up is before production, not at the editing room. Make sure to learn how to set up the white balance on your camera. For most situations, the auto setting should be fine, but there may be times where you may need to make the adjustment before shooting.
Manually Adding White Balance
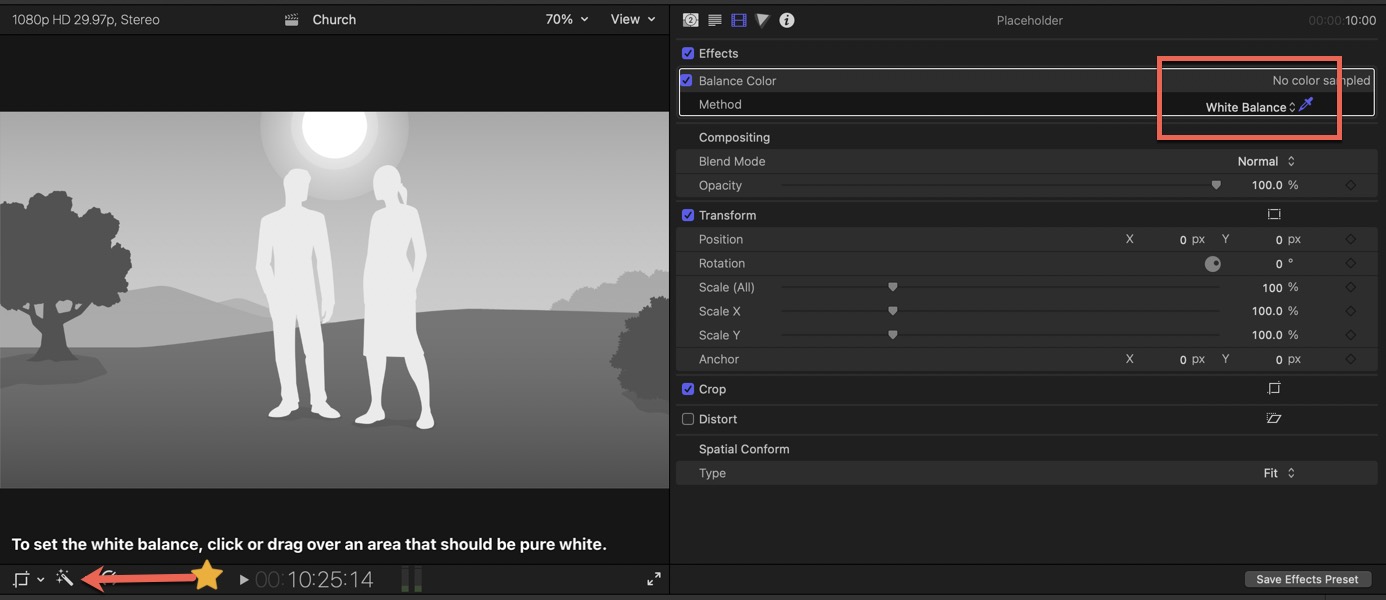
Here are the steps to adjust any clip to use the Final Cut Pro White Balance:
- Select the Clip
- Click on Balance Color:
- Located under the Preview, click on the "magic wand" and select "Balance Color."
- Under the "Modify Menu" select "Balance Color"
- Use the keyboard shortcut: Option Command B
- In the clip Inspector, go to the Video Inspector (First Icon)
- Under Balance Color, you should see the Method is "Automatic." Click on Automatic and select "White Balance"
- Now in the Preview window, click on the area that should be white.
Not The Right Color?
After applying the Balance Color, you can use the Color Wheels to fix the color to what you think works best for your project.
PermalinkLooping Audio
How to Loop Audio in Final Cut Pro
Last week I talked about using audio clips from iMovie. This week I wanted to use the "Playful.M4A" clip for the duration of the video that I was working.
This means that I had to figure out how to convert a 1-minute clip into 10 minutes. Unfortunately, there is no "loop" feature in Final Cut Pro.
Basically to loop this audio clip, you need to copy and paste it X number of times until you get the duration that you want. The problem with the "Playful" audio is that it fades in the last 2 seconds.
Five Things I Learned
The reason why I want to do this outside of Final Cut Pro was that I could create a new Audio file so I can reuse this in the future.
I looked into using ffmpeg, and someone had a solution over on StackExchange, but it was a lot more work for the simple task.
Apples' Garageband wasn't very friendly. I couldn't clip the final 2 seconds. I tried using Rogue Amoeba's Fission, but I couldn't get the copy clip to paste at the end of the clip.
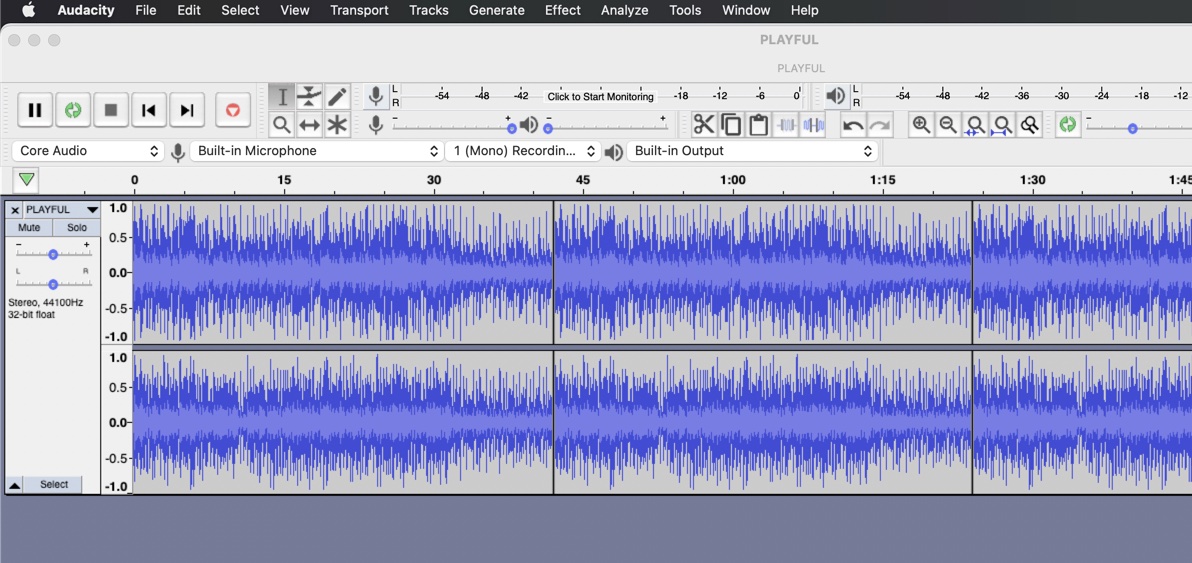
Audacity was the clear winner.
The best program that I found to clip and duplicate the audio is Audiacity. It was very easy to clip the final 2 seconds and then copy/paste the clip over and over.
I only needed 7-minutes, but I ended up creating a 10-minute audio file. This way I don't have to do this in the future.
Other Audio Clips
If your looking for alternative audio clips, similar to the Playful clip check out Fiver. A few years ago I purchased a couple of good audio collections that is useful for background music.
Chan Redfield - For $5 I was able to get 17 royalty free clips. Awesome deal now that he is selling some of the songs on an album for $28.
BasicPro - For $5 I was able to get 24 royalty free clips. Today Basic Productions is selling some of the individual songs on EnvatoMarket.
PermalinkGetting iMovie Sound to Final Cut Pro
Bring some classic iMovie Sounds to Final Cut Pro
Final Cut Pro has a great collection of music and sound effects. The Final Cut Pro supplemental pack includes over 1300 royalty-free sound effects you can access from the Photos and Audio sidebar right in Final Cut Pro.
Even with all those sound effects and music, I still like the music from iMovie. I especially like Playful sound. It's great when you need a filler sound for when you doing a collage of video clips.
Seven Sounds of iMovie
These are the sounds that are available in iMovie:
Bright.M4A, Modern.M4A, Neon.M4A, News.M4A, Playful.M4A, Simple2.M4A, Travel.M4A
Lets Use them!
Turns out you can "mix rip burn" the sound from iMovie - if you still have it installed on your computer. You can import these into Final Cut Pro for all your fun projects
Note the location of these files.
Getting the Audio
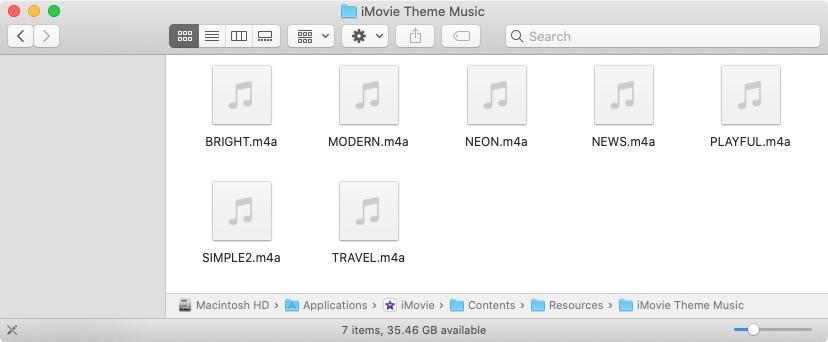
You can't use Spotlight search to find the "Playful.m4a" audio file. It's actually buried in the iMovie application. Here are the steps to find the audio include in iMove as the "iMovie Theme Music"
- Go to the Applications folder and locate the iMovie applicaiton
- Right click on the application and select "Show Package Contents"
- Click on the "Contents" Folder
- Click on the "Resources" Folder
- Click on the "iMovie Theme Music" Folder
- You should now see seven audio files.
You should drag and drop a copy of these files into another location. One option would be the Music application, so you can go under the Photos and Audio sidebar and use these files.
Just remember to copy the files, you don't want to lose the files in the original location!
Apple Music Tip
These audio clips don't have any metadata so when you are in Final Cut Pro it makes it hard to search for the clips that you got from iMove.
In Music, I selected the seven sounds, right-click, and selected "Get Info." I then added some metadata so that that it's easy to search:
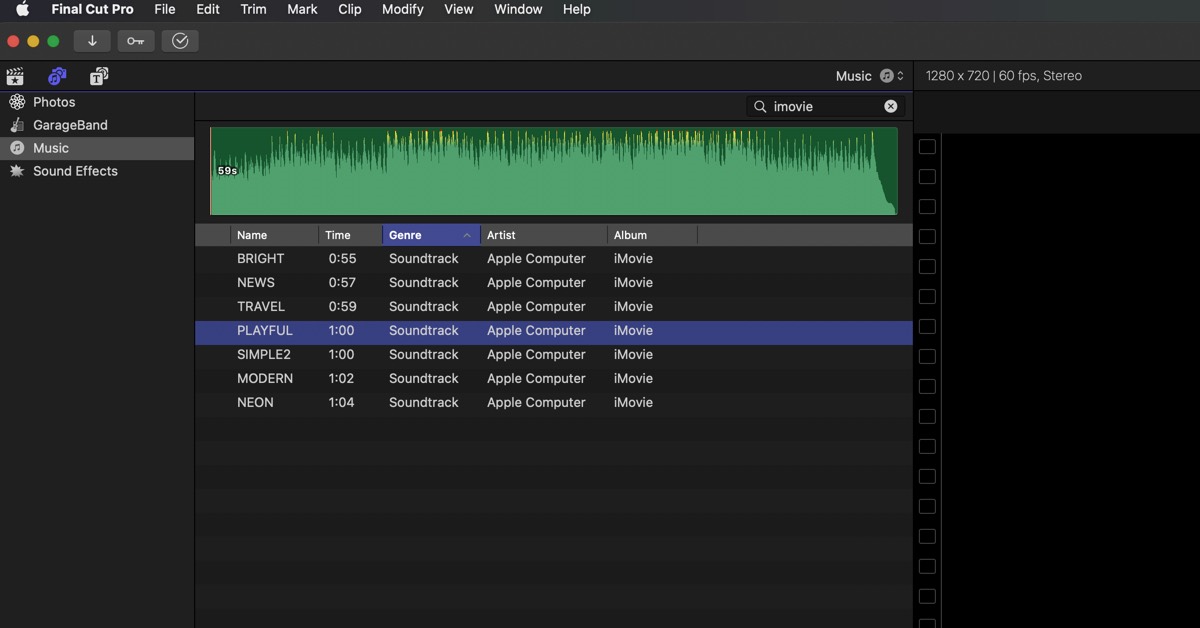
All I have to do is search for "imovie" and the sounds show up!
Apple Licence
Here's the legal info about using the media files in iMovie and if you're allowed to move them to other applications:
The Apple Software contains media content including but not limited to graphics, audio clips, video clips, and/or templates (“Media Contentâ€). This Media Content is proprietary to Apple and/or its licensors, and is protected by applicable intellectual property and other laws, including but not limited to copyright. Except as otherwise provided, all Media Content included in the Apple Software may be used on a royalty-free basis in your own video projects but may not be distributed on a standalone basis (and audio Media Content may only be used for your own personal, non-commercial use).
About
This blog series will explore the many different features and tools of Final Cut Pro X. We will cover everything from basic editing techniques to more advanced topics such as color grading and motion graphics. We will also provide tips and tricks to help you get the most out of Final Cut Pro X.
Check out all the blog posts.
Blog Schedule
| Monday | Media Monday |
| Tuesday | QA |
| Wednesday | Veed |
| Thursday | Business |
| Friday | Macintosh |
| Saturday | Internet Tools |
| Sunday | Open Topic |
Other Posts
- Copy Timeline Video
- How I Edit QA Training Videos with Final Cut Pro
- Blade Tool Tricks
- Unlock Clearer Dialogue in Final Cut Pro with Voice Enhance
- How to Add Custom Sound Effects to the Sound Library
- Moving on From Wondershare Filmora
- Multiple Displays
- Adaptive Limiter
- Adding Favorites Folders to Import
- Crop 4k to 1080p in the Timeline
- Transparent Background in PowerPoint
- Getting Live Photos
- Computer Setup
- Create a crowd effect in Final Cut Pro
- Tips on Titles and Effects