
Chrome Mouse Shortcuts
Three Simple Shortcuts to use Everyday
If you right-click on a link to Open a Link in a New Tab, or a Window. There is actually an easier way to get the task done.
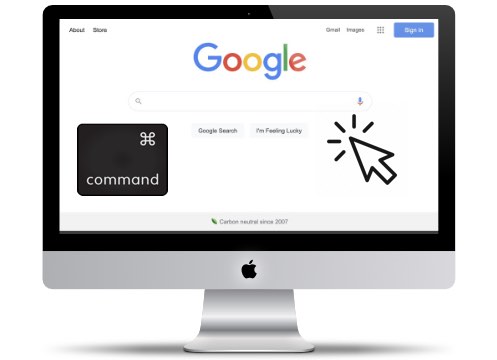
Here are three useful Chrome shortcuts that are worth using every day:
| Open a link in new background tab | ??? + Click a link |
| Open a link, and jump to it | ??? + Shift + Click a link |
| Open a link in a new window | Shift + Click a link |
These tips work in Chrome, Firefox, and Safari - it seems to be a universal standard. So they are worth knowing and using. You can save some time and be more efficient.
PermalinkMost Used Macintosh Apps of 2021
Great Productive Apps
Usually, I feature the top ten Macintosh blog posts of 2021. However, this year I decided to do something a bit different. This year the last Macintosh post will feature the top ten applications of the year.
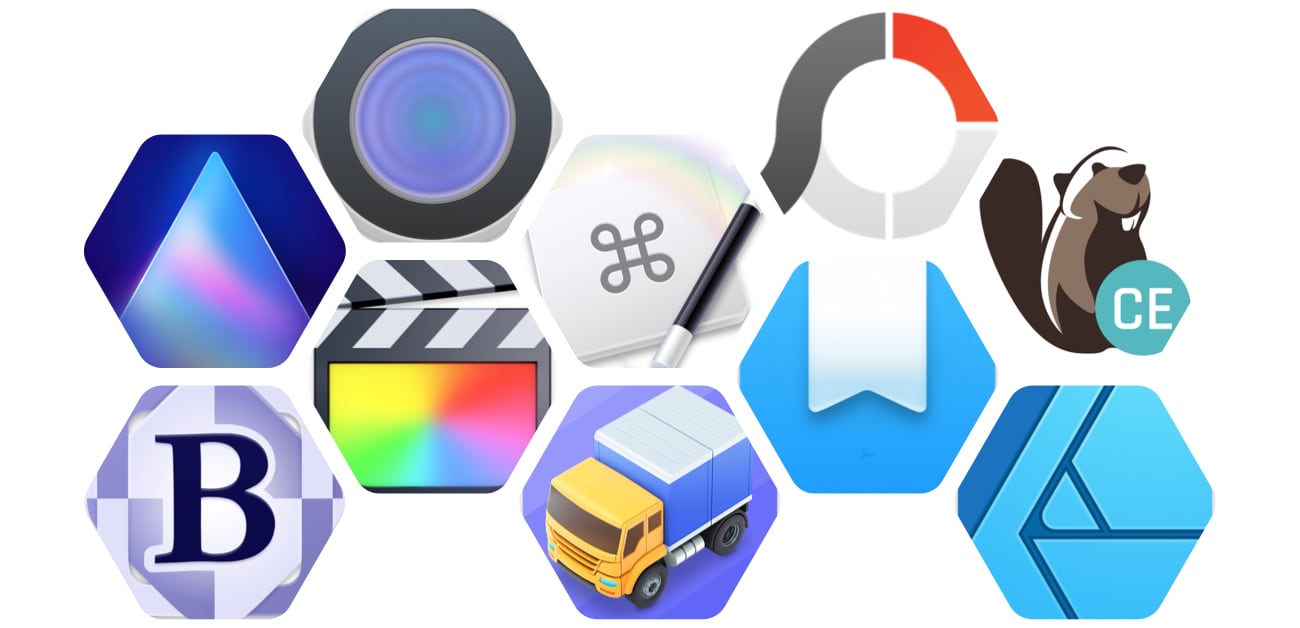
Top Ten Apps of 2021
These applications were the ones that I used the most in 2021.
BBEdit - In late July, Bare Bones released BBEdit 14 and some cool new features - including notes. Now there???s no excuse to not use BBedit as your go-to notes tool - especially for programming. Read my review of BBEdit 14.
Final Cut Pro - In October, Apple released Final Cut Pro 10.6 and some cool Object Tracking and Cinematic Mode features. I use Final Cut Pro for weekly video editing. Read the Final Cut Pro Blog posts.
Transmit - I did look into switching to Viper FTP Lite, but I kept going back to Transmit because of the easy to use functionality.
Luminar AI - I purchased Luminar Ai in October and I use it to touch up all my photos. The application does a great job with enhancement and adding some cool special effects. Read my initial review of Luminar Ai and a followup review a month later.
This is a great application to have if you???re doing any photo work. The whole point of Luminar AI is to make enhancements as quickly as possible. If you are a Photoshop or Affinity Photo pro then you may not need this application. However, over the long run, I think the time saved is worth the cost.
Keyboard Maestro - According to Keyboard Maestro stats, the time saved using this application is 32 hours and that???s just this year. Keyboard Maestro released version 10 in early November - read my review.
I created 404 macros and use a lot of them on a day-to-day bases. You can see some tips and tricks on my Keyboard Maestro Blog.
Day One - This is where I keep tabs on my day. It???s a great way to track things that were important that day. I really like going to ???On This Day??? and seeing what happened personally over the past years.
Affinity Designer - This is where I create all my graphics for work and this website. It???s easy to use and offers a lot of power to create amazing images. I like Affinity Designer because it opens up EPS files for easy manipulation.
DBeaver - I started using this in July and have found it to be a great database tool. I can connect to various databases and perform similar tasks. Having one tool means I don???t have to remember different shortcuts as I switch between database types.
Photoscape X - When I want to create collages this is an application that I turn to. In a matter of minutes, I can create a collage that looks awesome. PhotoScape has a lot of tools to help touch up files - such as screenshots and Memes.
An updated version of Photoscape X should be announced soon!
Drop Zone 3 - I use Drop Zone to transfer files to my webserver. There are separate actions for different projects. To copy a file to the remote server, I simply drag an image to the taskbar and then drop it on the icon that represents the final destination.
PermalinkChristmas Graphic
Done using Affinity Designer.
Happy Christmas Eve!
The main website graphic was created using Affinity Designer and a clip art that I had around.


Some Notes
I used the "My Dear Santa" font from Creative Market. It was free during the first week of December.
The text background color was done using the 50 Glitter Texture Images. It's a great collection to have for background or for text masks.
PermalinkEPS Thumbnails
Bug in macOS Monterey
One of the bugs that macOS Monterey (12.0.1) has that the Finder isn't able to display EPS thumbnails and when you try to preview the images it doesn't work.
This is due to changes in macOS Monterey on how thumbnails are created.
Sample Issue
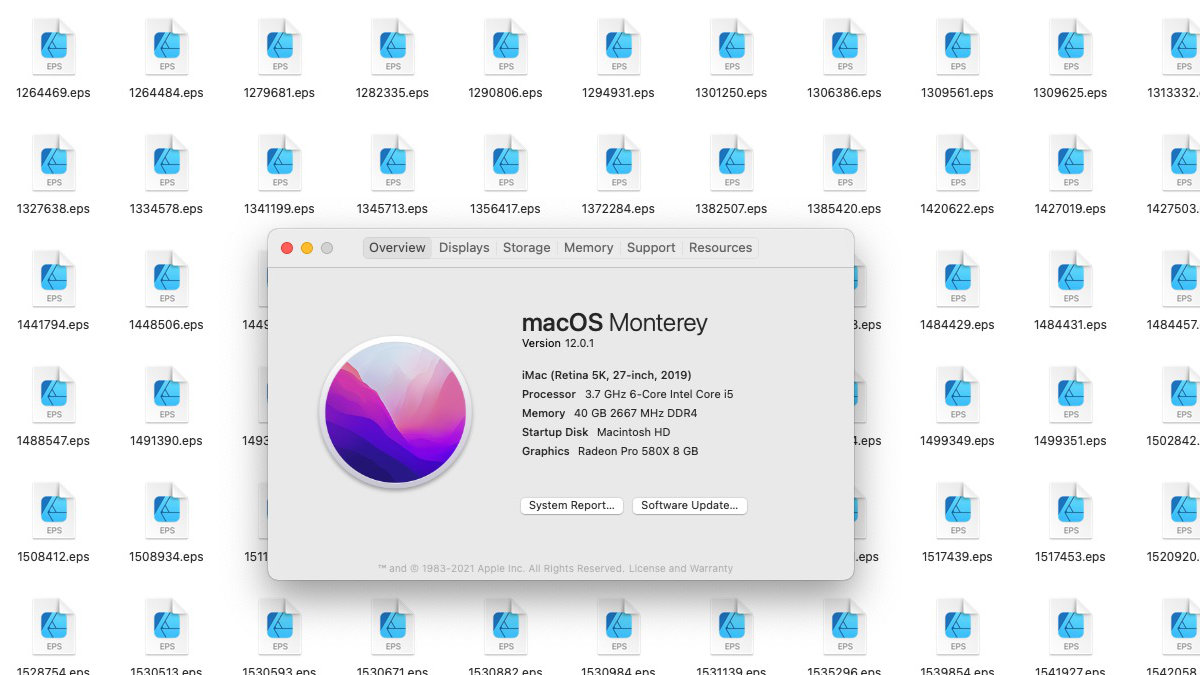
I have found other applications were having a problem with generating thumbnail images as document icons, such as Pathfinder and Commander One.
Quick Fix
The only application that I found useful is Graphic Converter. The Browse functionality let you get a real view of all your EPS files.
Here's the same directory using the Graphic Converter Browse functionality:
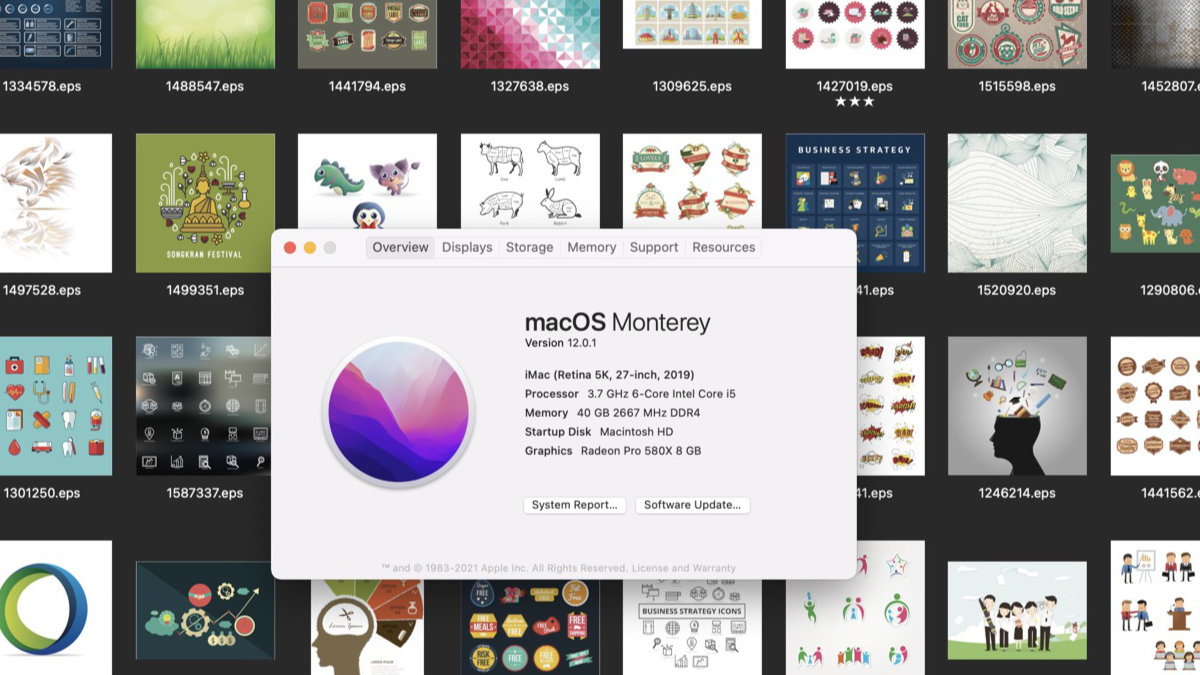
Right click on the image and you can open it in Affinity Designer!
Until Apple fix the bug, this is a good solution to look at directories that have lots of EPS documents.
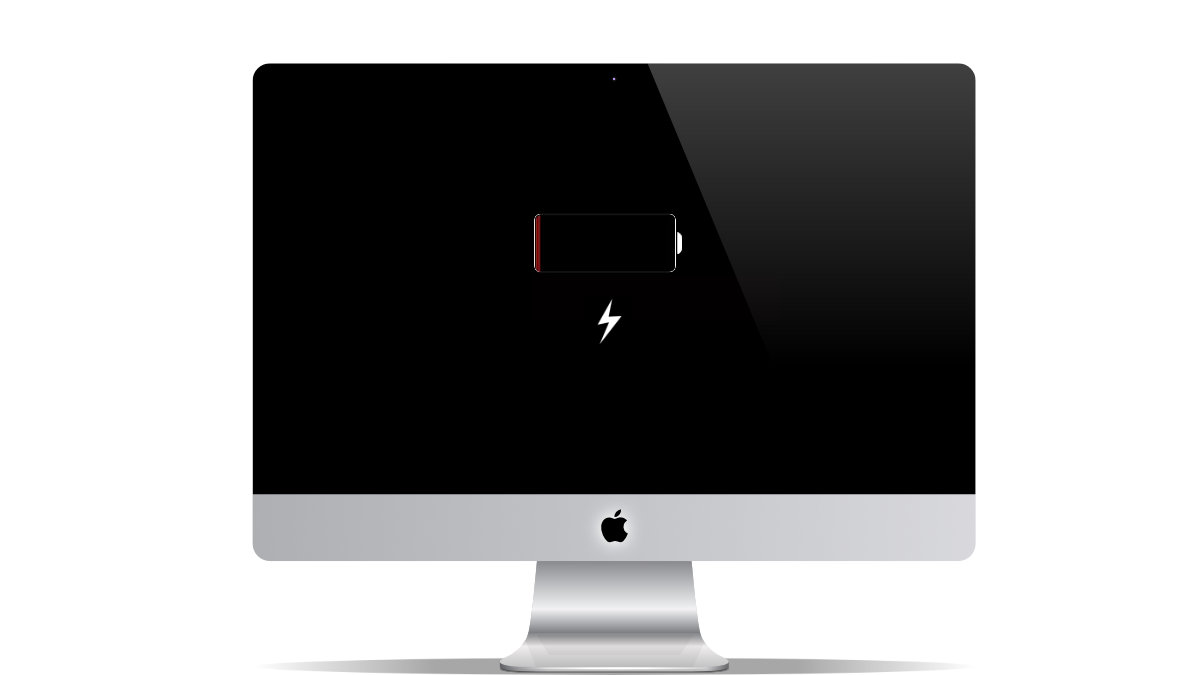
PermalinkMacBook Restart
Fixing an issue with the computer not booting up
This week I have been having some issues with my MacBook not starting up. There has been a couple of times when I would see the battery icon with a lightning bolt.
According to Apple
The best solution is to Force your Mac to turn off and back on (Knowledge Base Answer: HT204267).
What's Going On?
For MacBooks, this means that the battery has died. The computer is charging the battery up enough so it can work.
You may have to wait a couple of minutes before trying to start the computer.
Long Term Solution: You should take the laptop to get looked at - Apple will likely install a new battery.
Try Resetting the SMC
The System Management Controller (SMC) may need to be reset. The SMC manages tasks like thermal and battery management. Resetting may help restore your computer back to life. (Note: It can't hurt to try this!)
Here is how to reset the SMC via MacBook:
- Shut down your Mac
- Press and hold 'Control' (Left) + 'Option' (Left) + 'Shift' (Right) keys
- Keep holding them for seven seconds and press and hold the 'Power' button. Keep pressing for another seven seconds
- Release all the keys, wait, and then restart your Mac.
What Worked for Me
After resetting the SMC, I restarted the computer by holding down the power button for 10-seconds. This seems to be the "best way" for me to get out of the mode that it is in.
PermalinkChristmas Accessories Idea
Create Gift Ideas for that Tech Person
This week's post are some suggested ideas to give to your favorite Macintosh User. Every Macintosh user is different, and some people might be brand specific, but honestly, you can't go wrong with these items.
This list covers various items from various stores online.
Mac Accessories
USB-C Hub - $$$$ - After using the MacBook and iMac for a while, you quickly find that there are never enough USB-C ports. The OWC Thunderbolt Hub adds 4 USB-C Ports and one USB-A port. At $179.00 it's a bit of a pricy gift, but your Mac User would be so much more productive with it.
Qi Charger - $$ - All the newest smartphones are based on wireless charging. Having multiple Qi chargers around the house can be a great gift idea. Even if they have one in every possible room - they could use one for travel! The Mophia 3-in-1 7.5W Wireless Charging Pad at Best Buy is a practical gift idea. (Currently selling for $49.99)
Wireless Keyboard - $$$ - Having a spare wireless keyboard can be a time saver! Your Mac User may think they don't need a new keyboard, but it may make their life a bit easier. Apple's Magic Keyboard with Numeric Keypad is selling for $129 on Apple.com
1TB SSD External Drive - $$$ - Everyone can use more local storage. A SSD drive is practical way to backup your data quickly. The SanDisk 1TB Extreme Portable SSD is one of the best devices, B&H Photo has them on sale for $140.00.
Clip on Light Reading Light, 3000K - 6500K - $$ - These are so useful on Zoom calls - especially if you have a lot of light behind you. Here's one on Amazon that is currently selling for $13.99.
Extra Large Mouse Pad - $$ - A large mouse pad makes using the mouse so much easier. No more fumbling with the mouse to keep it on a tiny mouse pad. The extra-large pad helps keep the desk safe from hot drinks. You can find a lot of good options on Etsy. There are some places that will customize your own desk pad. I find the 35" by 15.5" be a great size.
USB Flash Drive Dock - $ - Keep your USB drives in a handy stand so they get lost in the top desk drawer. Patriot3dPrinting on Etsy makes one for $5+ shipping.
Memory Card Carry Case - $$ - Does your Macintosh user have a lot of memory cards hanging around? Get a Memory card travel case so they can find a card when they need one. B&H Photo Video has some good cases starting at $10 and up to $300 I like the ones that hold both SD and MicroSD cards.
10000mAh External USB Power Bank - $$$ - A good portable charger can be very handy to have when you away from the desk. Get at least a 10,000mAh size so that you can charge your phone multiple times. Amazon.com has a large selection of devices and they start at $10 and goes up to $133.
USB-C to USB-A Converter - $ - Useful for MacBook users when traveling. Keep an adapter in the travel bag - so it's handy when you need it. You can find a lot of multi-packs on eBay, some starting at $5. At this point in time, you may want to select the search query location for your country.
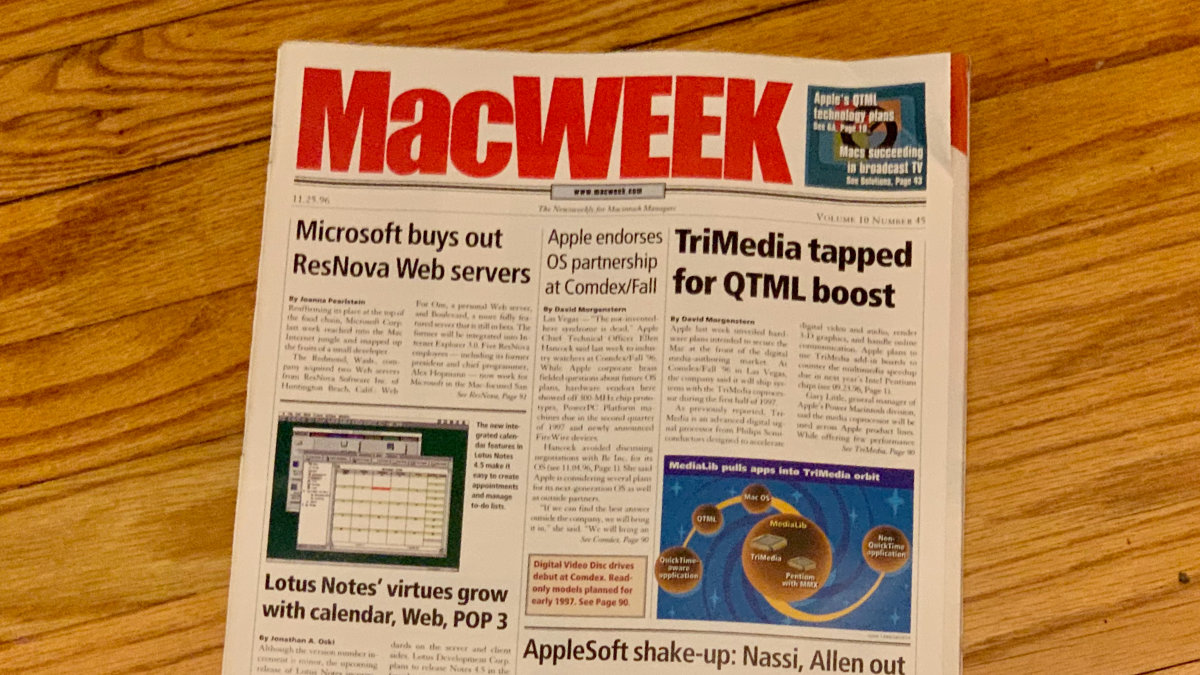
PermalinkMacWeek Review
Looking Back at Mac Technology in 1996
This week I was going through a box in the attic and came across an old copy of MacWeek magazine. This was from 1996 - 25 years ago. I thought I take some time to thumb through and take a walk down memory lane.
Issue date - November 25, 1996
Volume 10 - Number 45
Nine Things I Remembered
Power Computing PowerCenter 150 vs Apple PowerMac 8500/150 battle - While the were essentially the same price, the Power Computing model included more RAM, 15??? monitor and Microsoft Office. All this for $2,995.
Lotus Domino - Huge color 2-page cartoon spread on a web service that pretty much has nothing to do with Macintosh.
Apple QTML - Apple QuickTime Media Layer. Apple called it a platform-independent universal container for multimedia information. This later became a foundation for the Carbon API that made it possible for legacy apps to run on Mac OS X.
USRobotics Pilot - There was a single page Ad for this personal assistant device. This automatically links to your Apple Computer. It???s 4.5??? tall and costs $299. The ???only??? lacking feature is the ability to make calls.
Storage Costs - Zip 100mb drives were selling for $149. Cartridges were selling for $14 ( Today you can get a 16GB USB flash drive for $9 - which has the capacity to hold 160 Zip disks. No separate hardware needed. )
SCSI Hard Drives - These we???re the most reliable form of disk storage. Other World Computing
CD Stomper - I have a couple of these label applicators. The applicator makes it easy to center CD dick labels. In 1996, they were selling for $79.95. I don???t recall paying that much. Wow!
Netscape Constellation - This recently announced web technology will allow users to collect and organize Internet and network information. Users will be able to modify their desktops to receive real-time site updates. (It was officially branded as Netscape Netcaster, and some people may remember as it being used as Webtops.)
DVD Products - Many vendors displayed their Digital Video Disks products at Comdex/Fall ???96 in Las Vegas. The new DVD players would be an extra $400 to $500 for computers equipped with DVD drives. Shipping would start in the Fall of 1997
PermalinkMacBook Keyboard Replacement
Free Replacement has one tiny caveat
Apple has identified a keyboard issue with some Apple laptops. In 2019, they announced a program to repair the keyboards of various MacBook, MacBook Air, and MacBook Pro for Free.
You can find all the details, and the supported models, on their Keyboard Service page:
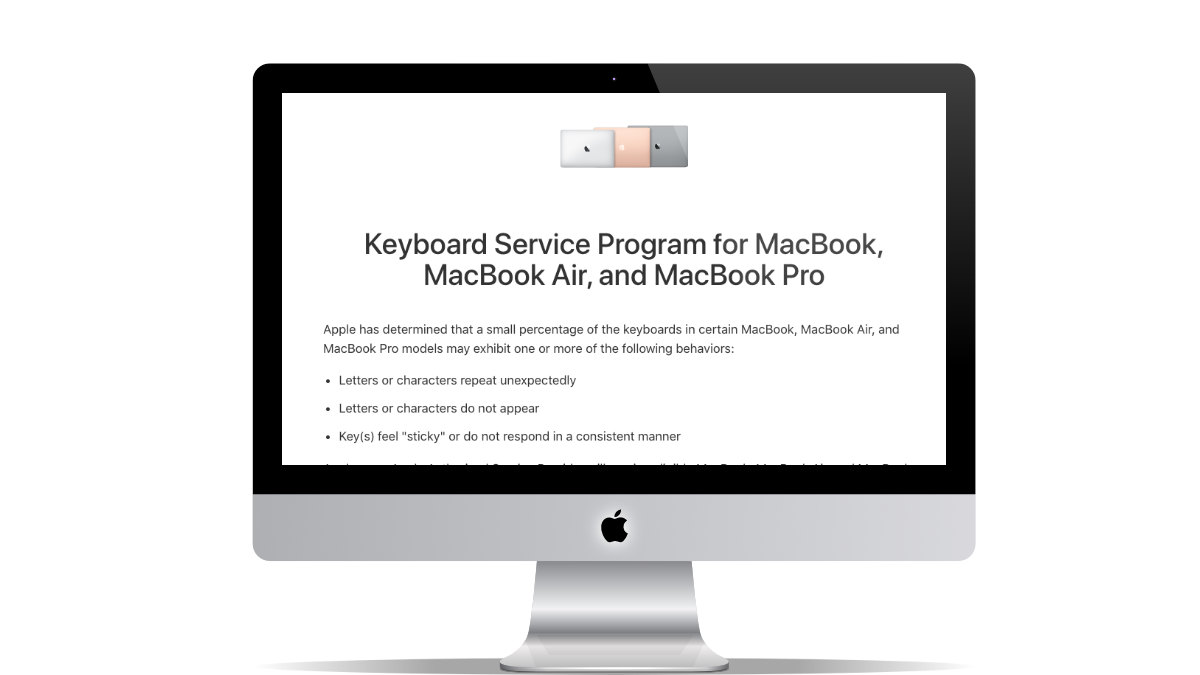 https://support.apple.com/keyboard-service-program-for-mac-notebooks
I recently visited the Apple Store to get my "MacBook Pro (15-inch, 2016)" fixed. There is an issue with some of the keys and the spacebar didn't always work when clicked on it.
Five Things I Learned
Like any Apple repair inquire you need to schedule an appointment.
You can't check in to your appointment at the Genius Bar until 5-minutes before the actual appointment. You are welcome to visit the store earlier and browse the computers, but you can't "check-in" until 5-minutes before the appointment time. They will send you to a table to wait for a technician.
The technician first verified that there is an issue with some of the keys. She then ran some tests on the computer - which involved restarting the computer. She informed me that there is also an issue with the battery.
Here's the kicker... In order to fix the computer keyboard they need to send it out to a repair facility. This means that it could take up to five days before I would get the computer back. Since the issue I am having is a work computer, I declined to part with the laptop for five days. (Without the computer, I wouldn't be able to work.) Who has the time to give up their laptops for 5-days?
One More thing... On the bottom of the Keyboard Service Program for MacBook, MacBook Air, and MacBook Pro. is this statement:
The program covers eligible MacBook, MacBook Air, and MacBook Pro models for 4 years after the first retail sale of the unit.
Wait, what?
This means that the "MacBook Pro (15-inch, 2016)" isn't eligible for the free keyboard replacement program - even though it is listed on the website as an eligible model. that Apple would likely charge me for the service.
The technician didn't say anything about a charge. But I wonder if they would have said something once it arrived at the repair shop.
Apple should update the page with the current list of supported models.
Quick Alternative Solution
I use an external Bluetooth keyboard. It works perfectly well. I didn't have to buy one, I had a spare one from an old iMac.
PermalinkMagnifier Annotate Tool
Snagit vs Photoscape
A useful tool in a screen capture program is a magnifier. This allows people to enlarge a certain part of an image. Usually, this is done to highlight some graphic or text.
On my computer, I have two tools that has the magnifier functionality: Snagit and Photoscape X. Here are my thoughts on each one.
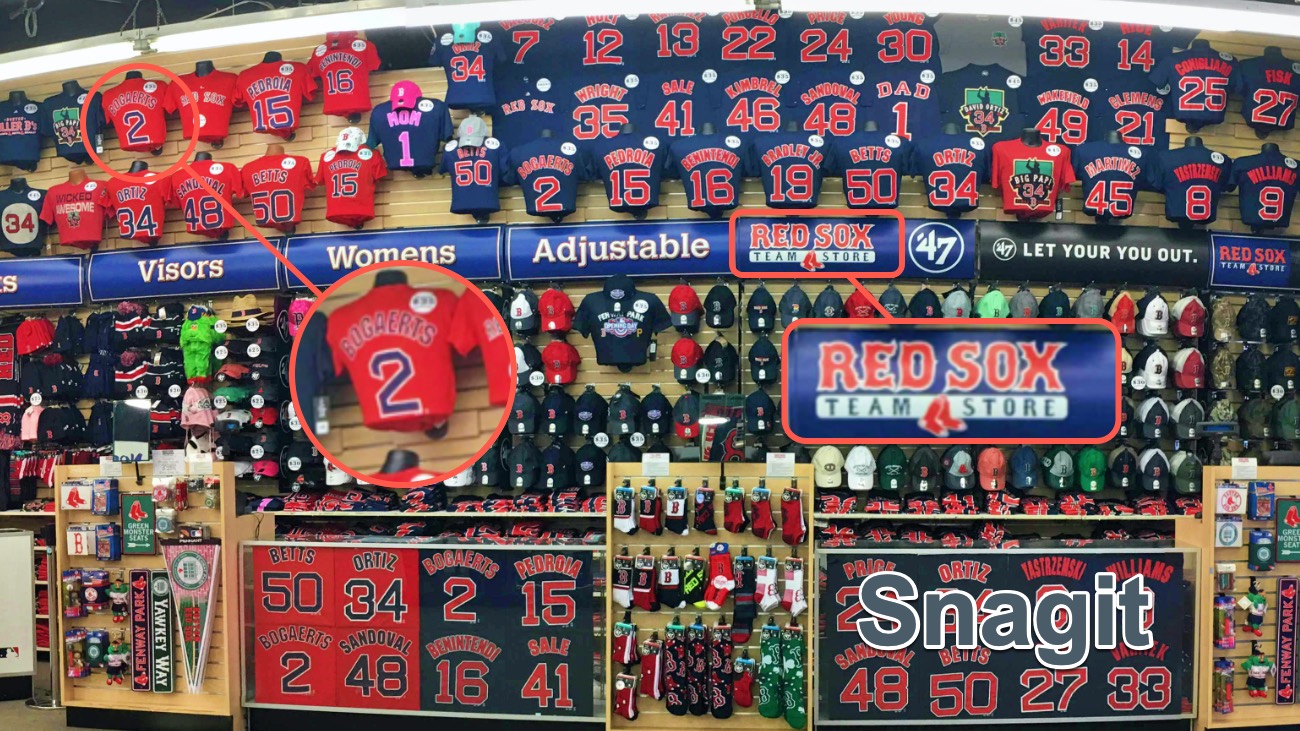
Red Sox Store touched up with Snagit
Three Reasons Why Snag-it is Great
Multiple Shapes - You have a choice between circle, rectangle, and round rectangle shapes. Sometimes, a circle isn't the best way to zoom into a section, particularly if you highlight a word/phrase in a sentence.
Offset Magnify Style - New in 2021!, you can now drag the magnified area so that you can see the original highlighted elements. This is a great way to point out something without covering the area.
Combined Effects - Once you apply the magnifier tool, you can add additional effects without impacting the magnified area. For example, you can add a highlight to the area so that it stands out more.
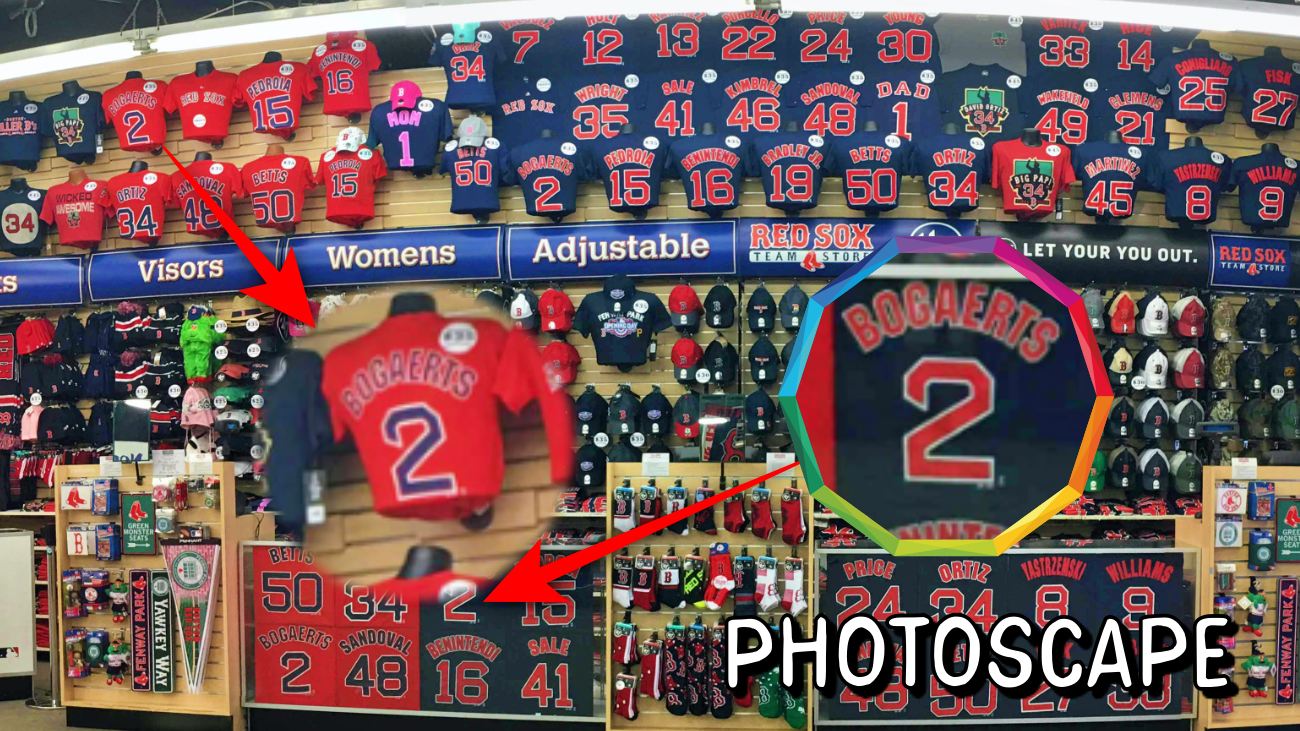
Red Sox Store touched up with PhotoScape
Three Reasons Why PhotoScape is Great
Circle Designs - Photoscape only has circle magnifiers. However, there are 20 different types, in some of the types, you can change the colors, and in others, you can only fix the styles. The designs are nice and they can help draw attention to the magnified area. There is one design where there's no border and it just fades out - this produces a neat effect.
Change the Angle and Scale - You can rotate the inner part of the magnified area - not exactly sure why but it does create a cool effect. You can also scale the inside of the magnified area without changing the size of the magnified circle.
Change the Magnified Location - You can change the "focus" of the magnified area. It's a bit different than in Snag-it. You simply move the inner blue dot to the area you want to magnify. Snag-it automatically puts in a line between the focus point and the magnify section. In Photoscape, you have to put in your own arrow. I guess the nice thing about Photoscape is that you have a choice if you want an arrow. There may be cases where you may not want to include the line.
Which is the Better One?
Both PhotoScape and Snag-it have some cool ways to implement the magnification tool. I think PhotoScape gives the user a bit more control over the style and effect of the magnification.
While it's nice that Snag-it includes a reference line when moving the focus of the magnification. I think there are times when I may not want to have that reference included. I like that PhotoScape gives the option of manually adding it in.
I also like that you have a lot more choices when it comes to magnification design.
PermalinkLuminar AI
Quick Recap of using Luminar AI
Last month, I blogged about Luminar AI and how excited I was in using the newly purchased application. This is a quick recap of using the Luminar Ai software for the past month.
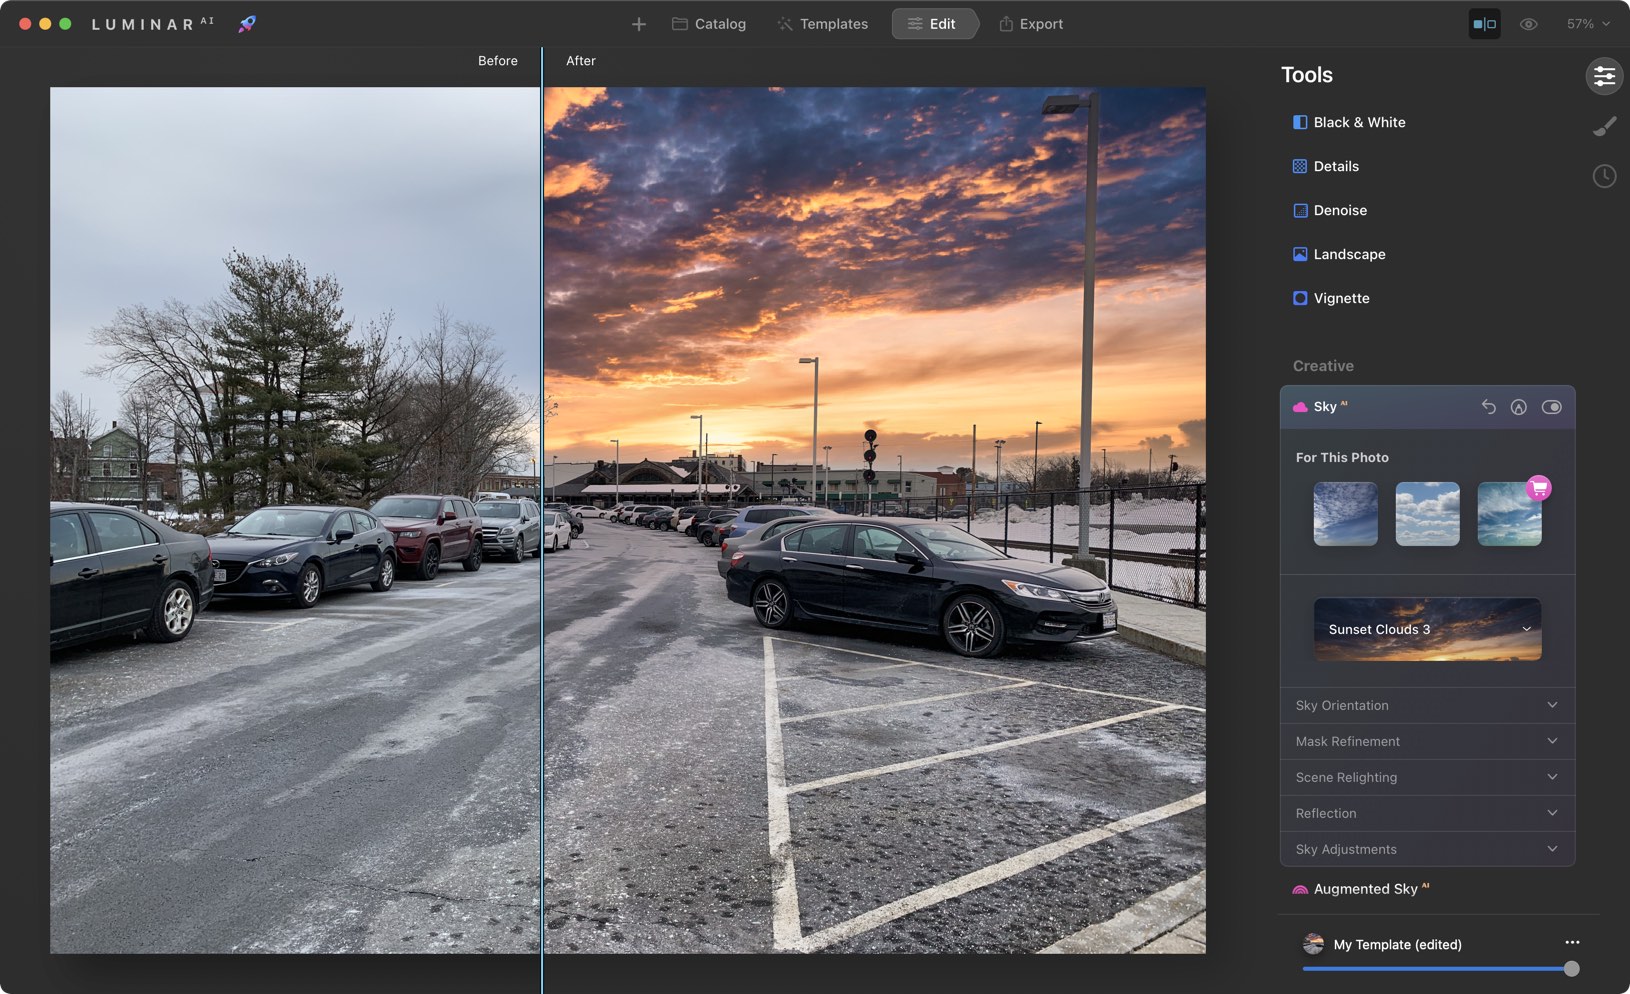
Touching up a boring parking lot photo.
Seven Things I Learned
The suggested templates aren't always the best selection. The suggested templates are determined by AI to be the ones best fit to enhance the photo. I have found that they aren't always the best choices. I found that manually applying an edit using the Enhance Accent to be the best choice in most situations.
I tested Luminar AI against Photolemur and found that for quick edits Photolemur was the way to go. However, if I want to make the photo stand out, Luminar AI is the best option. Photolemur works best to quickly fix color balance in a photo. However, you can't touch up the photo or enhance it as you can with Luminar AI.
The Sky effect is very cool. It's super easy to replace the sky and by doing so can drastically change the mood of the image. I did encounter some issues with the sky not being replaced near trees.
I was able to add my own Augmented Sky object. I was looking for Star War's Death Star to be in a Halloween photo. It was easy to add and apply all the options. The nice thing is that the Augment Sky object stayed in the library so I can use it again at a later date.
I learned a lot by watching the Luminar AI - Tutorial for Beginners in 10 MINUTES! on YouTube. Bai teaches you all the tips and tricks to get you started using Luminar Ai. The only bad thing is that this is for an older version, and some functionality has changed.
There is an in-product promo for the Luminar Neo that is to be released this winter. I just feel it's way too much in-product promotion.
I tested Luminar AI's Erase tool vs Affinity Photo's Inpainting brush tool to see which one was the best. I found that Affinity Photo's Inpainting brush tool did a better job in removing objects. Not only were the objects removed, but Affinity Photo's Inpainting brush tool did a better job in the replacement. I found that you couldn't tell objects were removed because of how the replacement looked.
Overall View
Overall I really like Luminar AI. Its a cool application that helps make ordinary photos to be extraordinary.
PermalinkAbout
As someone who has worked on Macs since 1989, I will use my experience to share tips and tricks with you on Fridays. As a Mac user since 1989, I have seen the evolution of Mac software and hardware, and I know how Mac computers work. I also know how to troubleshoot and fix Mac problems that can arise.
Check out all the blog posts.
Schedule
| Friday | Macintosh |
| Saturday | Internet Tools |
| Sunday | Open Topic |
| Monday | Media Monday |
| Tuesday | QA |
| Wednesday | New England |
| Thursday | Gluten Free |
Other Posts
- Best Macintosh Blog Post of 2022
- BBEdit Clippings
- PhotoBulk
- Paste Clipboard Content as Plain Text
- Photoscape 4.2.1 Update
- Aldus SuperPaint 3.5
- Printed List of Applications
- Vintage Prints Tip in Apple Photos
- Mosaic
- iResize
- iTunes ArtWork
- Creating Round Corners on Images
- Macintosh Year in Review
- SD Card iMac Speed
- Using the Keyboard in Dialog Boxes