
New iPhones Coming Soon
Will the new iPhones have more than just 5g?
Apple will be making some product announcements in late September. In the past, the announcements are related to new iPhone's products and accessories.
These are perfectly timed for the Christmas Season and the "Back to School" shopping.
This year the announcements are a bit late perhaps because of quality control issues.
Best Time To Buy Apple Products
If you are thinking of getting a new iPhone your better off waiting for a couple of weeks - maybe a month. Even if you don't get the latest and greatest, some of the older models may have deep discounts.
To find out when to buy a Macintosh computer, I highly recommend the Mac Rumor's Buyers Guide. They are the best resource on when the best time to get a new Apple device.
This year the rumor is that the new iPhones will be using the 5G standard. There's very limited support worldwide for 5G, so it will be interesting to see how sales go.
In Boston, Verizon has 5G Ultra Wideband coverage in some parts of the Fenway area, including Fenway Park, Foxborough, Boston Marathon Finish Line, and the Boston Garden. It appears that the 5g network is best for the sports venue. Outside of these areas, you're getting the usual 4G LTE.
PermalinkMacintosh HFS Disk Format
MacOS Sierra no longer supports HFS disk format
When macOS Catalina was introduced, Apple quietly made a change to how it supports old file system formats.
Apple dropped support for formatting or writing HFS disks and images, which remain supported as read-only volumes. Starting with macOS 10.15, **HFS disks can no longer be read**.
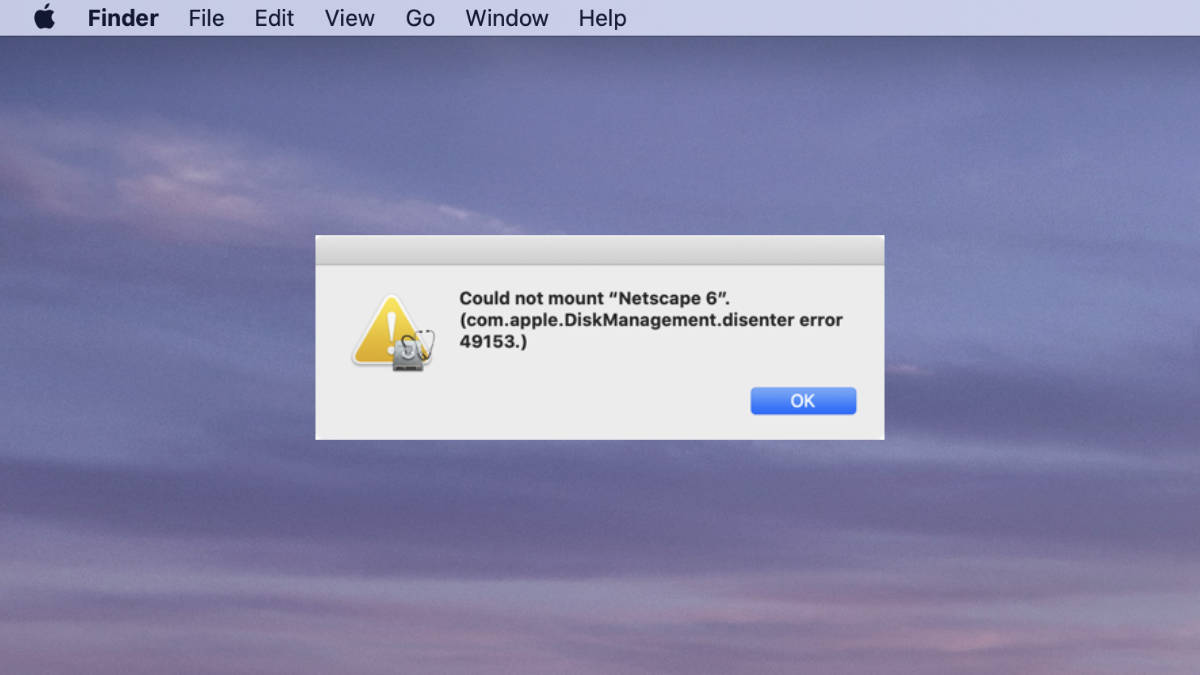
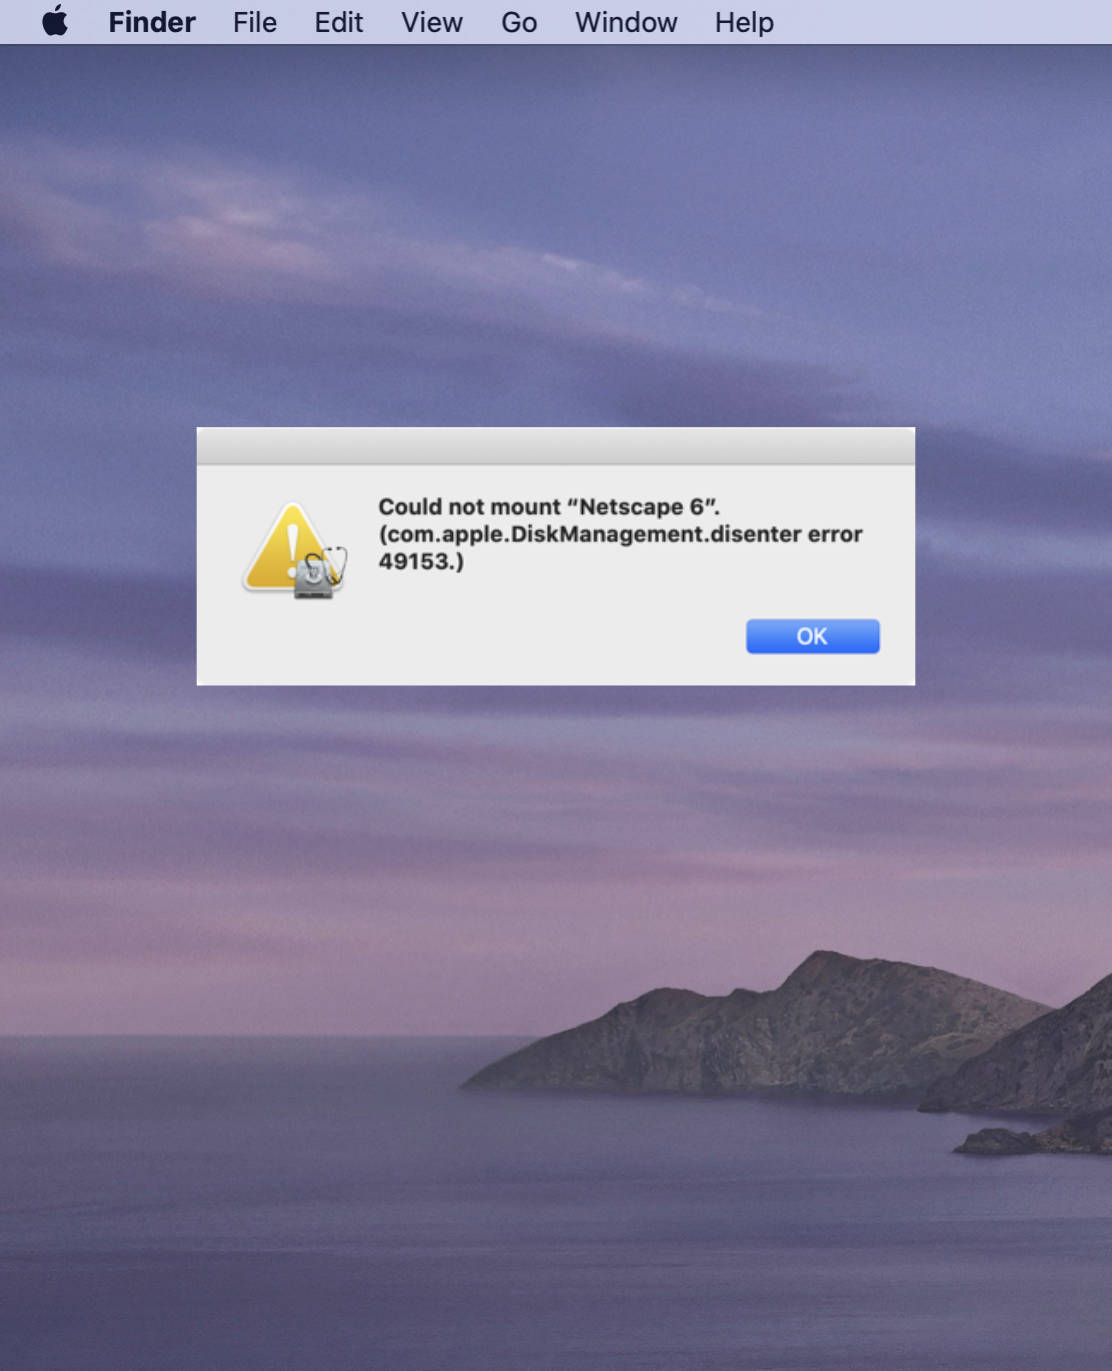
This means that if you have CDs or DVDs using this format you will start seeing this error:
Could not mount ???X". (com.apple.DiskManagement.disenter error 49153.)
Now what?
There is no way around reading these disk media files in macOS Catalina and beyond. You will need to "rollback" to the previous MacOS or use an older iMac.
Remember this doesn't happen to all media. Only media files that used HFS disk format.
Note: This also applies to USB Thumb drives. If you have some old drives that suddenly stopped working, it could be this reason.
Tech Notes
There is a difference between HFS formats:
- HFS - Mac OS Standard, Introduced with System 2.1 in September, 1985.
- HFS+ - Mac OS Extended, Introduced as part of Mac OS 8.1 in January, 1998.
Apple stopped supporting HFS since macOS Sierra - which was released 3 years ago. Apple Still supports HFS+ format. Apple currently favors the Apple File System (APFS)
Netscape CD
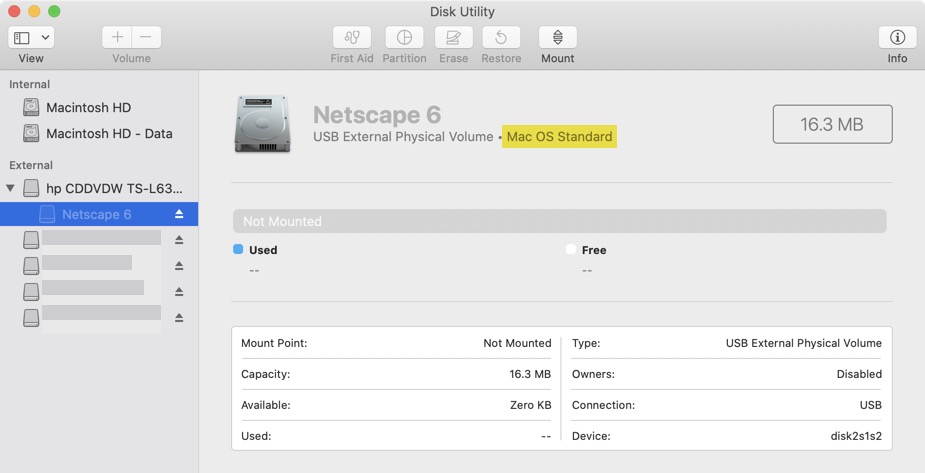
Using Disk Utility, I highlighted the file system being used my Netscape 6 CD. As you can see it was formatted for Max OS Standard. So now, if I want to get files off this CD, I have to use an old Mac. (Netscape had some cool space images on these CDs.)
PermalinkPath Finder 9 Productivity
Top 4 Things that Make Path Finder 9 Awesome
Here are four Ways that Path Finder makes you more productive using your Macintosh Computer. Path Finder 9 is a powerful Finder replacement with lots of tools and utilities that make using the computer a lot of fun. (See my blog overview on Path Finder)
Menu Bar Application Access
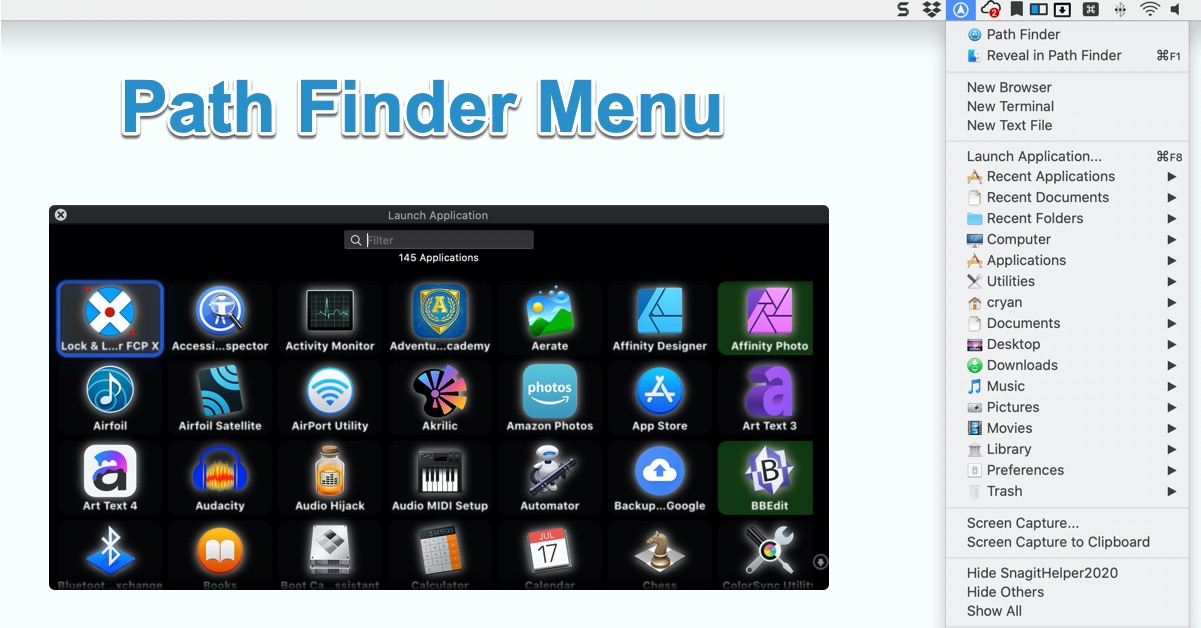
Quickly access many applications and documents right from the menu bar. No need to remember shortcuts or navigate the LaunchPad. Just click on the icon in the menu bar from any application and quickly go wherever you want.
There's a "Launch Application" feature where you can quickly go to your application with a quick search. The nice thing about this is that it contains more applications than what's available in the LaunchPad. Basically another way to get to your apps.
Size Browser
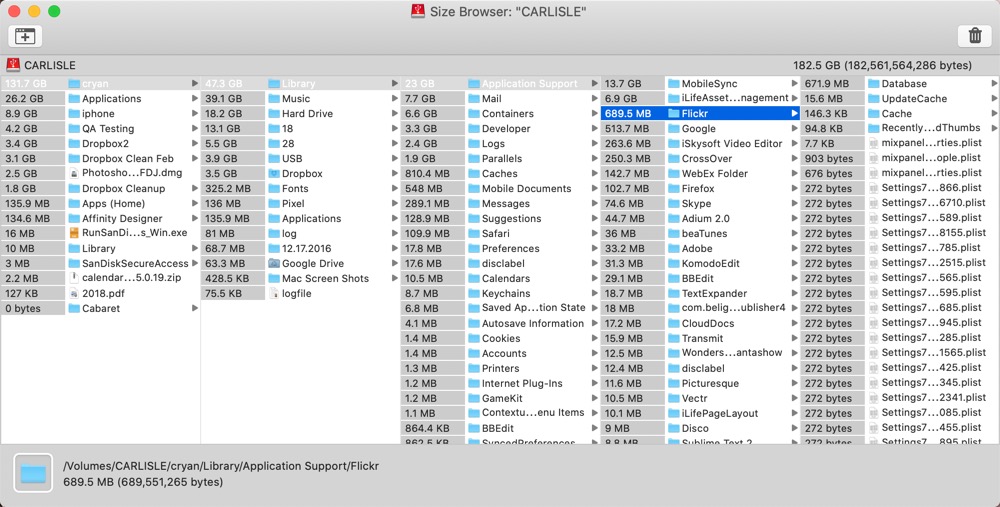
The Size Browser is a cool way to view your hard drive by file size. Simply click on each folder and start narrowing your way through your computer.
This isn't as pretty as DaisyDisk, but its just as practical. Path Finder's Size Browser fast and helps me navigate to the biggest files on my drive.
A cool feature of Size Browser is that is digs into Apple's Photo Library collections, so you can discover large files in there. Useful when you backup the Photo Library, and now you want to look into it.
Font Reports
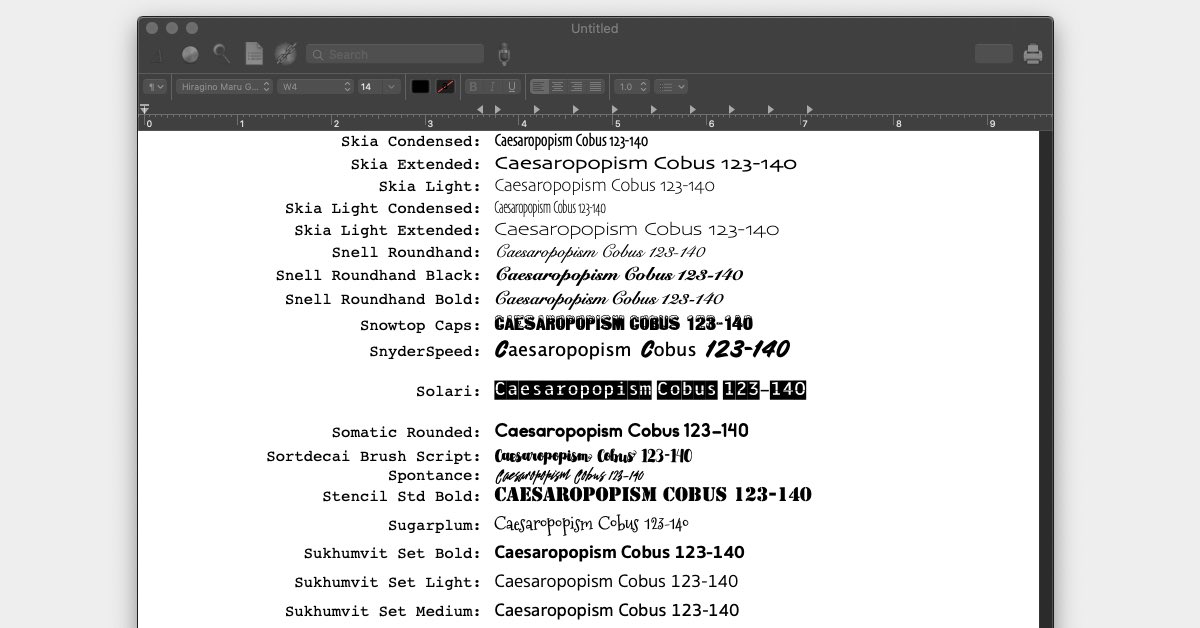
This is a great way to get a snapshot of all the fonts that you have currently installed on your computer. You can print this out and have it handy for when you are looking for that perfect font for your headline.
Path Finder creates a new Rich Text Document, so you have the flexibility to increase the font size.
This is very useful when you manage multiple computers. The report can tell you a lot about what fonts are available.
Ratings Are Back!
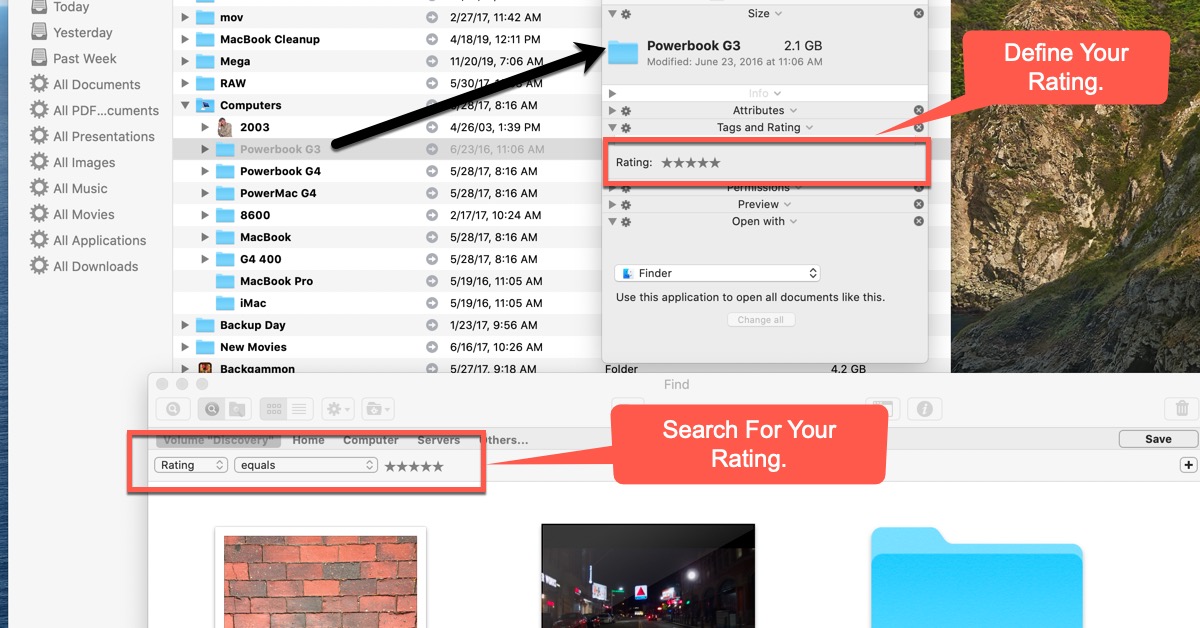
Remember when you could rate images in iPhoto? That was taken away with the new Photos app.
With Path FInder, you can now use ratings again! You don't need the alternative solution.
The nice thing is that you now can define ratings for any object. So you can rate photos, Word Documents, Folders and even Applications.
So, Why do this? Well you can use Smart Folders and only show the 5-Star applications you use every day.
The nice thing is that this carries over to the Finder, so you can use Spotlight and Search for 5-Star photos, folders, movies???etc.
PermalinkInkscape Spray Tool
Create cool effects with the spray tool in Inkscape
Have you wondered how to get this done?

Lots of BBEdit Icons!
Here's a neat way to empathize wearing a mask:

"Wonder if we should wear a mask?"
On the Macintosh, the only application that I found to get this effect is Inkscape. You can't do this in Photoshop Elements or Affinity Photo. The nice thing is that Inkscape is free, so you don't have to worry about paying for an application just to use this tool.
Inkscape Spray
The spray tool in Inkscape basically sprays whatever the selected object is. Simply select an object, click on the spray tool and then start spreading the image the way you would like. Each spray creates a new image on the current selected layer.
You can get tricky by creating different sizes on different layers. In addition, there's a lot of configurations that may make your image unique.
Spray Options
There are several options that impact what happens when you click the mouse button:
Width - How big of a spray area do you want. That is, how big of a spray nozzle do you want.
Amount - How often should a image be placed as you move the mouse.
Rotation - Set if you want the image to rotate as you spray.
Scale - Each image sprayed will randomly change in size. Don’t want this? Then use 0.
Scatter - Do you want the scatter the images around?
Focus - Where should the image appear relative to where you are spraying? A large number means that the image will not appear directly where you click.
Cool Effect
This is a really cool effect to use for blog post or category headers. You can combine the images, change color and so much more.
So if your out of a clue for a blog post graphic, why not try the Spray Option in Inkscape.
PermalinkReset Preview Icons
How to reset Macintosh Preview Icons
Every so often I find that my preview thumbnails through my Mac finder disappear. They don???t disappear entirely, they just stop displaying the preview of the file and show only the generic jpeg icon. It???s a fairly cumbersome problem, especially when the icon previews help determine which files I may want to use.
Fortunately, there???s an easy fix for this and it???s basically nondestructive.
- Open to the Preferences folder of your home directory
- (your home > library > preferences)
- Delete com.apple.finder.plist
- Right click on Finder icon in the dock and select Relaunch.
Note: This may not fix all icons. I find that it works best with EPS files and AI files.
PermalinkApple Notes
Some Things I have learned why playing with the app
This week I have decided to go "all in" with using various note-taking tools. I have made the decision of moving away from the Evernote subscription service. One of the reasons that I have decided to move on was that that I haven't been using Evernote much and couldn't justify paying for the services.
On of my note-taking apps is Apple Notes. It's great because it's available on my iMac and iPhone. I don't use my Samsung Galaxy Tab E as much because of working from home due to COVID-19.
I have been playing around with Apple Notes and I like it. It does take some time to get used to using the applications. (I had to promote it to my iPhone Homepage so that I would use it more frequently.)
Three Things I have Learned
Here are some things that I have discovered.
Limited AppleScript Support
Works With Apple Script - No surprise, but it works with AppleScript. At this time it's not possible to create a new Note using AppleScript. I checked the dictionary and it doesn't support it. (Weird that EverNote has better AppleScript support) Right now you can basically show an Apple Note file.
This is my AppleScript that I was trying to run:
tell application "BBEdit"
	set docname to name of text window 1
	set doctext to contents of window 1
end tell
tell application "Notes"
	create note name docname with body doctext
end tell
No Text Services
There's No Text Services Actions - In the Keyboard preference panel, there's a service section. This is where you can enable services such as "Search in Google" or "Send Message." There's no ability to send selected text to Apple Notes.
Checklist
You can create a checklist and when things are done, the item gets moved to the bottom of the list. When starting a note, to get to the checklist format simply type in Shift-Command-L.
You can also add list levels by typing a Tab next to an item to make it a sub list. So if you're putting together a Saturday morning shopping list, you can have the top-level be the stores to visit and the sub-items be the things to pick up in the store.
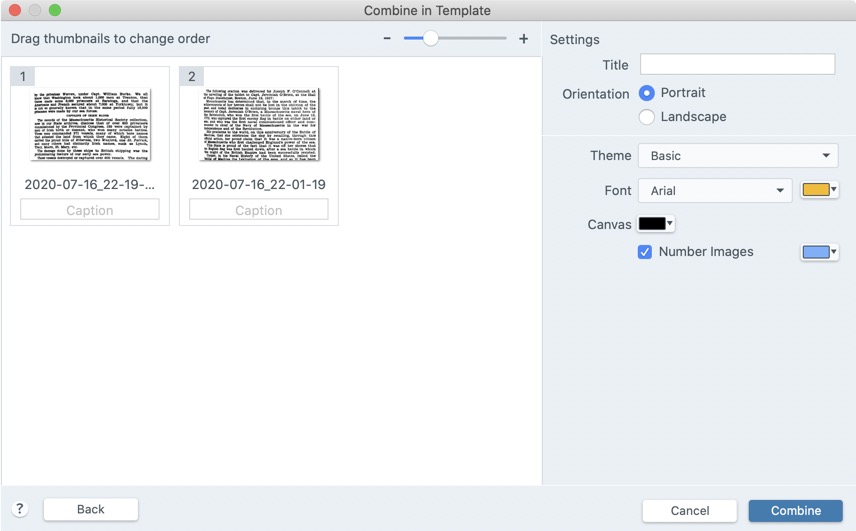
PermalinkCombine in Template in Snagit 2020
Snagit Combine feature lacks functionality.
One of the features of Snagit 2020 is the ability to use templated for combine images. This makes it really easy to show a side-by-side comparison. It's a nice feature to quickly put together some professional-looking designs.
Simply select the images in the Recent Capture tray or in the Snagit Library, right-click and select "Combine in Template." You'll see the following dialog box:

At this point, you pick the template that works best for the message that you want to communicate. The thumbnail images help
Note: If your use to how combine worked in previous versions of Snagit, simple select the first option "Custom Steps" as it will show you the previous combine functionality.
Some Thoughts on Snagit Combine Feature
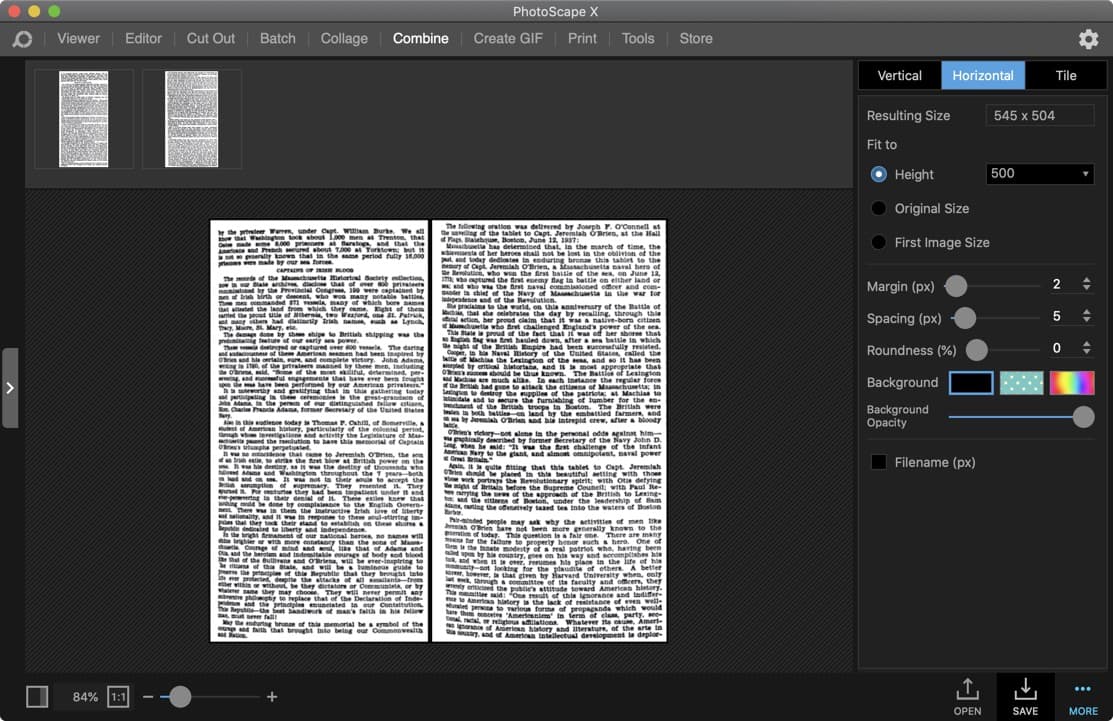
There's very little flexibility with combine images. I find the combine options in PhotoScape X to offer choices with margins, spacing between images and size of the combined image.
I don't like how TechSmith Snagit appears at the bottom of every template. You can select the bottom object and remove them, just an extra step that I don't feel that I have to do. Snagit should do what BBEdit does when creating a new HTML document, add a setting to "Give BBEdit credit."
The other thing I don't like about the templates is that they are small size: 612 x 792. It doesn't really work when you combining 5 images. Sure you can resize the canvas but then you're having to adjust everything else.
If I need to put together a quick comparison, I'll probably use Snagit. But for detail combinations, I'll probably just export the images in Snagit and put it together in PhotoScape X.
PermalinkiTerm2 Shortcuts
Use Keyboard Shortcuts to replace common copy and paste
iTerm2 is a very popular replacement application for Apple's Terminal. The application makes using terminal services a lot more productive. One great tool is the Key Mapping.
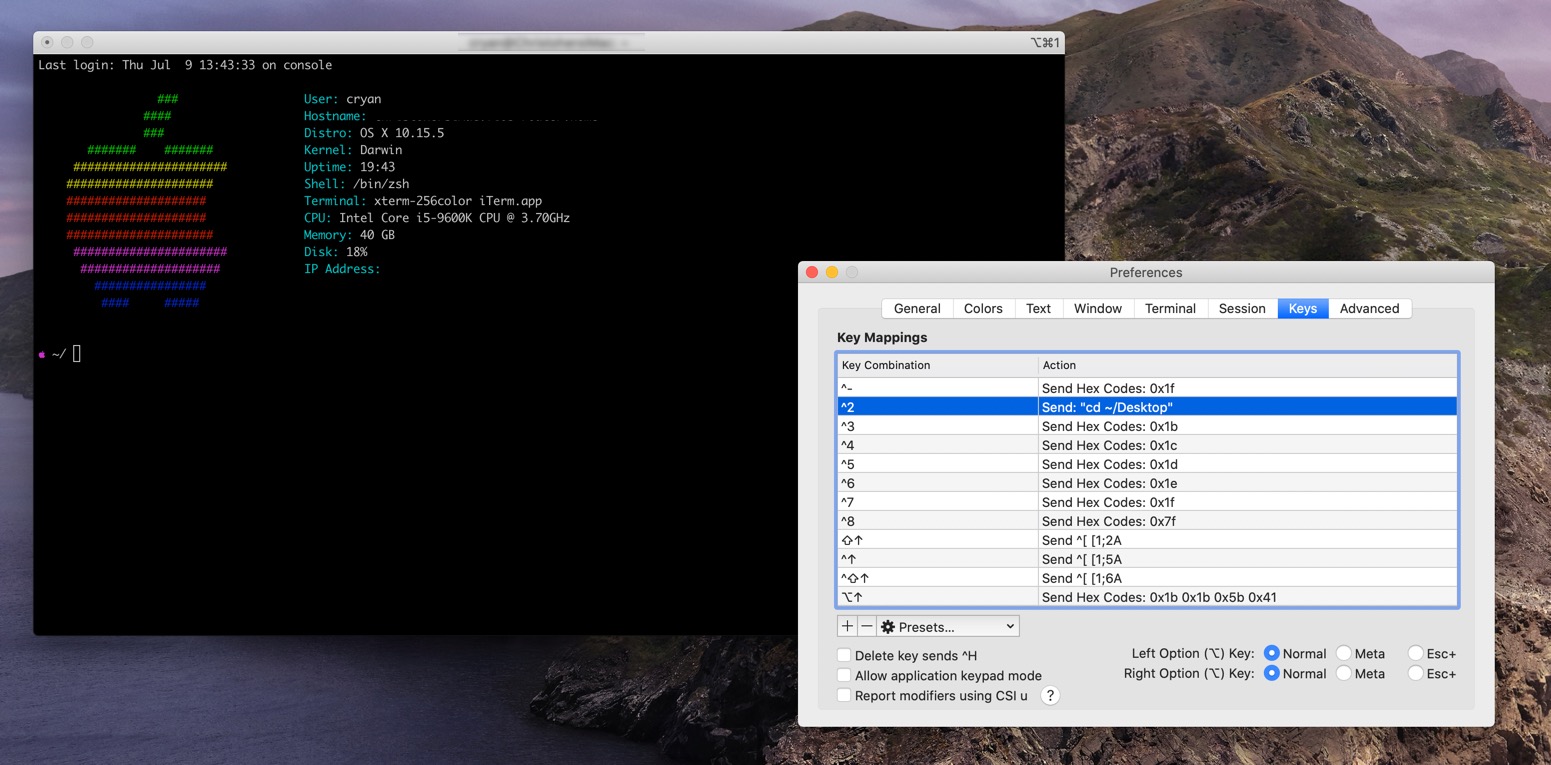
iTerm2 KeyMapping
If your copying/pasting the same commands every time you open up iTerm2, you should know about the Key Mapping functionality. You can easily set up keyboard short cuts to perform some common commands.
Examples
- ps -ef | grep chrome ## Show active processes
- tar -cvf- . | gzip -9 > files.tar.gz ## Tar and Compress the current directory
- bbedit /etc/hosts ## Change the local host file
- su - apachectl restart ## Restart apache
- mysqldump website >mysql-backup.sql # Quickly Backup the mysql database
- sudo -u company /home/company/.virtualenvs/dev-ppc-two/bin/python run_report.py
Follow the steps below to put your own KeyMapping
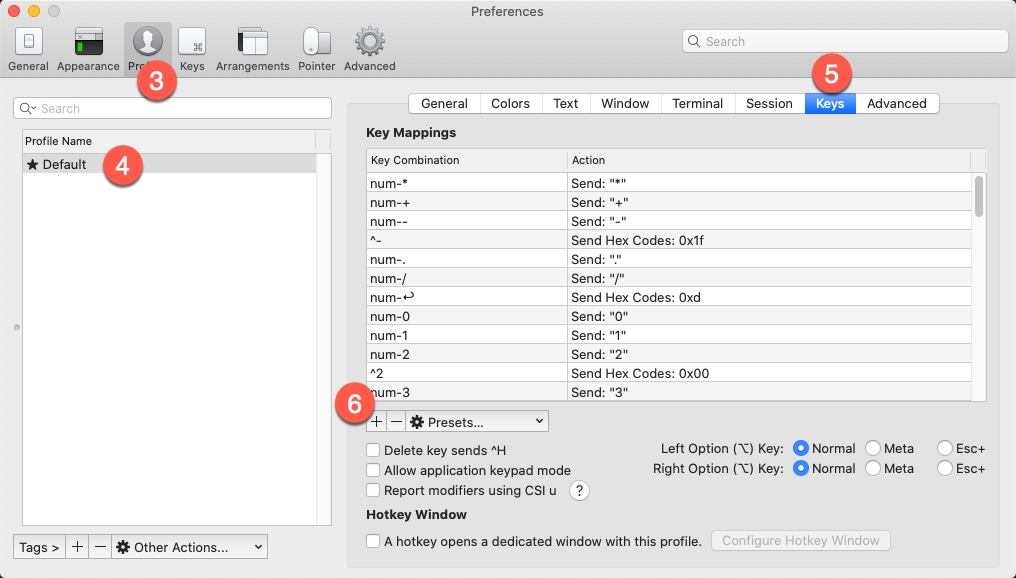
Setting up the KeyMapping
It's really easy to set up KeyMapping. You do it for each profile. Which makes it great as you may have different commands for each server that you are connecting to.
- Open iTerm2
- Type Command , to open up Preferences
- Select the Profiles on the Top
- Select a Profile Name in the left panel
- Then Select the ‘Keys' sub menu
- Click the ‘+' under the row of "Key Mappings"
- Click on the "Click to Set" and define your hot key
- Under the Action Menu scroll and search for "Send Text"
As you can see there are a lot of action items. iTerm has a nice document of all the capabilities that you can do. Some tricks you can do:
- Quickly open up a profile that is tailing the error log file using the "Split Horizontally with Profile."
- Switch between live and dev sites using the "Change Profile" action.
- Search for ‘Errors' and ‘Warnings' that you may have missed using the "Find Regular Expression.."
- Check out various AWS instances by opening the profile in a new tab via "New Tab with Profile."
All-in-One Snag-it Capture
Snagit makes it easy to capture screen objects
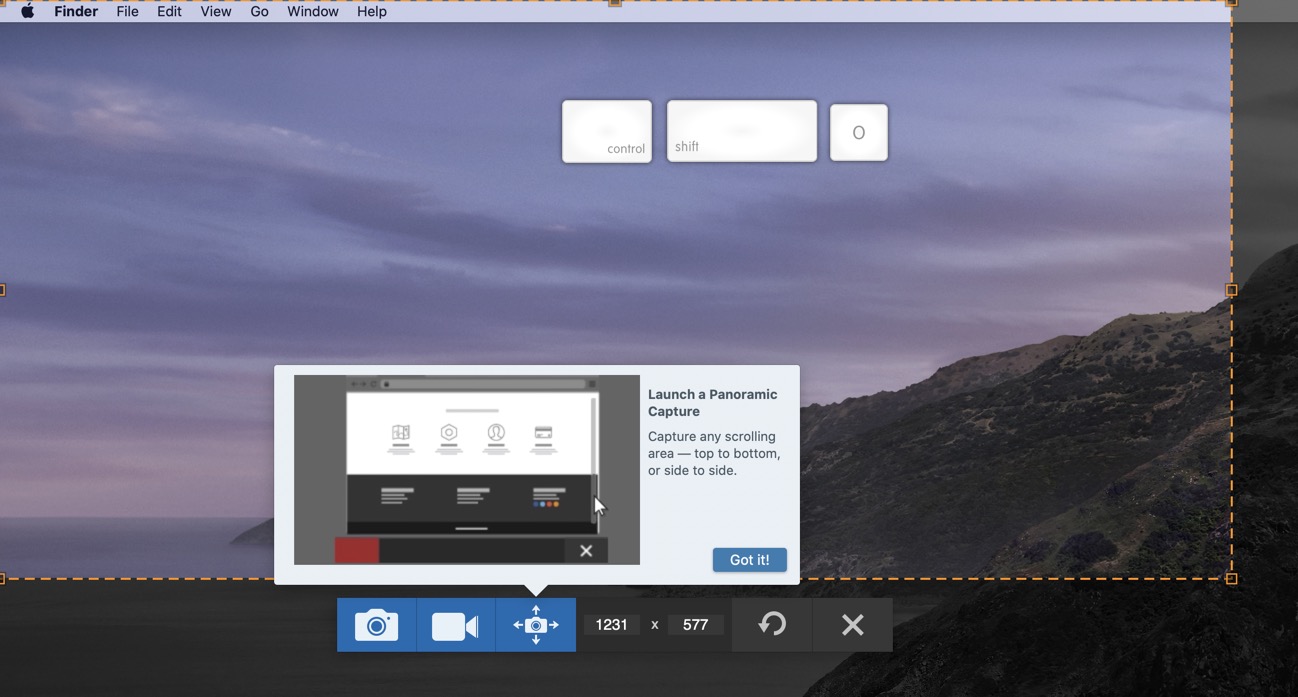
The Snag-it's "Capture All" feature is my new go-to screen capture. It really is an upgrade to the standard MacOX screen capture. If you're using Snagit - you should use it instead of the "image Capture" shortcut.
When you type the shortcut Control - Shift - O, you bring up the standard capture crosshairs to select the area you want to select. When you let go you get a little post-capture option - including the option to change the selection. Which is great because I can't tell you how many times when I do the capture and the selection wasn't 100% correct.
Five Reasons to Use All-in-One Capture
As mentioned above, the ability to change the selection after the initial capture can save a lot of time later.
You can select the Panoramic capture to capture webpages. This is great when you want to capture a page that has an internal webpage frame. The panoramic capture depends on you moving the page, whereas the Chrome webpage capture depends on the page scroll.
Movie Capture - maybe you want to take a video instead of a screen capture. This is a quick way to start that process.
Undo - If the capture was taken at the wrong time, you can undo the selection. Saving you from generating useless files when doing bad screen captures.
PermalinkLaunchBar Search
Easily Add Twitter and Google Photos search
Launch Bar is a great Macintosh productivity utility. It makes using the Macintosh so much easier.
One of the cool features is the ability to quickly enable a search action. With a couple of keystrokes, you can instantly open up your browser to whatever search results that you want to see. Potentially saving a lot of time doing it the old fashion way.
Use LaunchBar to Search
Here's a quick way to search for something on Twitter:
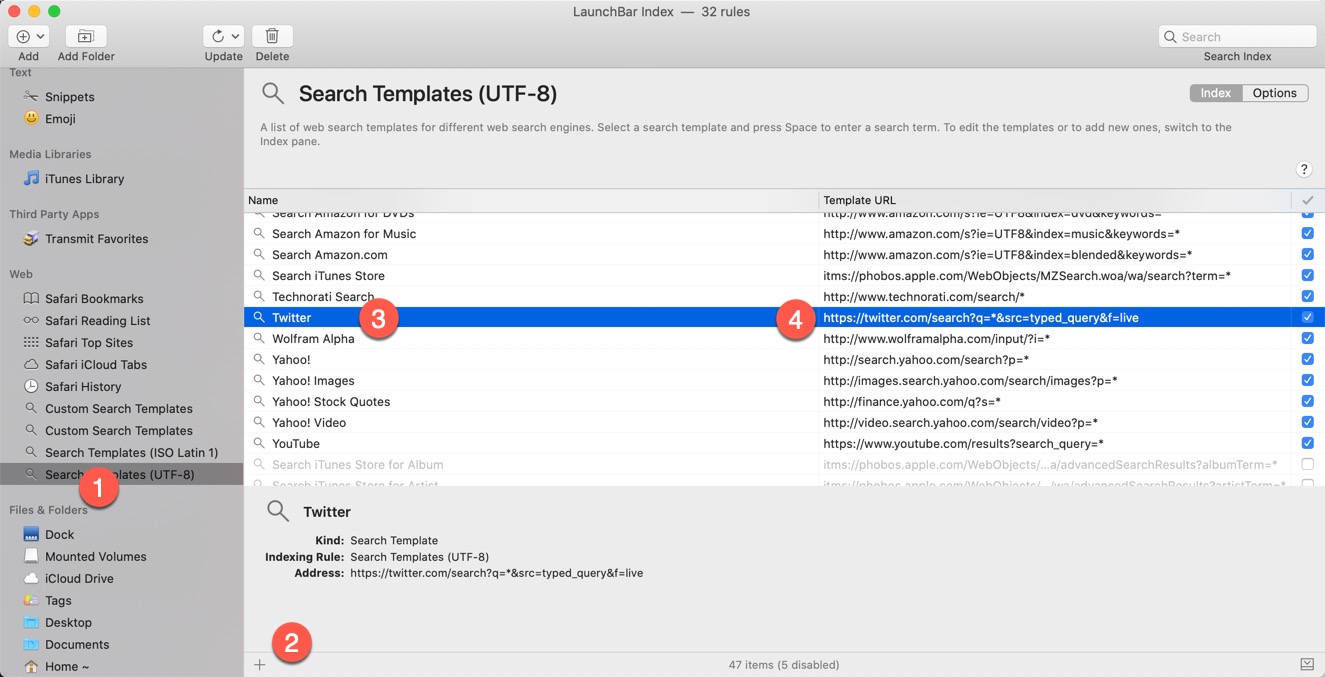
First you'll need to add a new Search Template. This is done by opening the LaunchBar Index, and selecting the Search Templates (UTF-8):
- Trigger the LaunchBar Action (Command Shift)
- Open the LaunchBar Index: Option-Command-I
- Select the "Search Templates (UTF-8)" in the left panel
- Click the '+' button at the bottom left of the main window.
Now Your Ready!
Now your ready to create your own search templates. The key thing to remember in a search template is to grab the URL from search results and replace the keywords that you used with a '*'.
A basic example:
If you had the following URL from a Bing Search for GusODog:
https://www.bing.com/search?q=GusODog&form=QBLH&sp=-1&pq=gusodog&sc=8-7&qs=n&sk=&cvid=F62E44EB0F524B788301CE611566657C
Your Search Template might look like this:
https://www.bing.com/search?q=*
I filtered out some of the text in the URL that I didn't think was important.
Twitter Search
You can now search Twitter for what people are talking about:
For Twitter Templates:
Name: Twitter
Template URL:
https://twitter.com/search?q=*&src=typed_query&f=live
Google Photos Search
If you have a lot of photos in Google Photos, now you can quickly search for the one you're looking for.
Name: Google Photos
Template URL:
https://photos.google.com/search/*
Instant Search
Now when you want to search for something on twitter:
- Command Space
- Type: Twitter
- Click Space
- Type in your Search Term and then click the return
About
As someone who has worked on Macs since 1989, I will use my experience to share tips and tricks with you on Fridays. As a Mac user since 1989, I have seen the evolution of Mac software and hardware, and I know how Mac computers work. I also know how to troubleshoot and fix Mac problems that can arise.
Check out all the blog posts.
Schedule
| Wednesday | New England |
| Thursday | Gluten Free |
| Friday | Macintosh |
| Saturday | Internet Tools |
| Sunday | Open Topic |
| Monday | Media Monday |
| Tuesday | QA |
Other Posts
- Skitch
- Calendar in Swift Publisher
- imageSnap
- Camera Permissions
- Connecting Apple Thunderbolt Display to a Dell Laptop
- Top 8 Macintosh Post of 2018
- Keyboard Maestro 10
- Convert Multiple markdown to HTML
- Always view Image dimensions in Finder
- Equirectangular projection
- Launchbar Clipboard History
- How to Print Odd/Even Pages in macOS Sonoma
- Wondershare Filmora's Auto Reframe
- DragThing
- Add Signature in Preview