
Safari vs Chrome
Should you even use Safari anymore?
Welcome to this week's edition of our Macintosh-centric blog! As a decade-long user and enthusiast of all things Mac, I'm thrilled to dive into a topic that showcases the unique capabilities of our beloved platform. Today, we're exploring the Safari browser - a gem in the Macintosh ecosystem that often gets overshadowed by the likes of Chrome and Edge. However, Safari holds a trove of exclusive features that not only enhance our browsing experience but also demonstrate the seamless integration and innovation Apple is known for. Let's embark on this safari into Safari!
1. Seamless Integration with Apple Ecosystem
iCloud Keychain: Safari's integration with iCloud Keychain is a standout. Unlike Chrome or Edge, it offers an encrypted and seamless way to store and sync your passwords and credit card information across all your Apple devices.
Handoff: Picture this: You're reading an article on your iPhone and you switch to your Mac. With Handoff, Safari allows you to continue reading right where you left off. This level of synchronization is unmatched in other browsers.
2. Energy and Performance Efficiency
Optimized Battery Life: Safari is engineered to be energy efficient. Mac users can vouch for the noticeable difference in battery life when using Safari compared to Chrome or Edge, especially during prolonged browsing sessions.
Performance Enhancements: Safari's JavaScript engine is optimized for Apple's hardware, making it significantly faster and more responsive than its counterparts on Macs.
3. Privacy and Security Features
Intelligent Tracking Prevention: Safari leads the pack with its approach to privacy. It uses machine learning to identify trackers and prevent cross-site tracking while not compromising the browsing experience.
App Privacy Report: This unique feature provides an overview of how websites and apps are using your data and which ones are attempting to track you.
4. Specialized Browsing Experience
Reader Mode: Safari's Reader mode offers a clutter-free reading experience by stripping away ads, buttons, and background images. It transforms articles into a clean, customizable format.
Picture-in-Picture Mode: Watch videos in a floating window while working on other tasks. This feature is more intuitive and user-friendly in Safari compared to the limited versions in Chrome or Edge.
5. Exclusive Extensions and Integration
Safari Extensions: The Safari Extension Gallery offers unique extensions not available for other browsers. These extensions are more privacy-focused and integrate tightly with the macOS.
Apple Pay Integration: Safari is the only browser on Mac that supports Apple Pay, making online shopping seamless and secure.
6. Visual and User Experience Enhancements
Tab Groups: Safari's Tab Groups is more than just a tab organizer. It syncs across your devices, allowing you to access your group of tabs on your iPhone, iPad, or Mac.
Customizable Start Page: Personalize your browsing experience with a customizable start page, featuring your favorite sites, iCloud Tabs, Siri Suggestions, and even a background image of your choice.
Conclusion
Safari is more than just a browser; it's an experience tailored for the Mac user, offering features that are not just about browsing the web but enhancing the overall macOS experience. Its deep integration with the Apple ecosystem, commitment to privacy and security, and unique user-centric features make it a browser that stands out from its counterparts. For those entrenched in the Apple world, Safari is not just a choice; it's a natural extension of the Macintosh experience.
Until next week, keep exploring and enjoying your Macintosh to its fullest!
PermalinkApple Magic Mouse Problems
Have You Tried Cleaning the Top?
Welcome back, Mac aficionados! Today, we're tackling an issue that might have troubled some of you - the Magic Mouse and its occasional rebellious streak.
When Your Magic Mouse Goes Awry
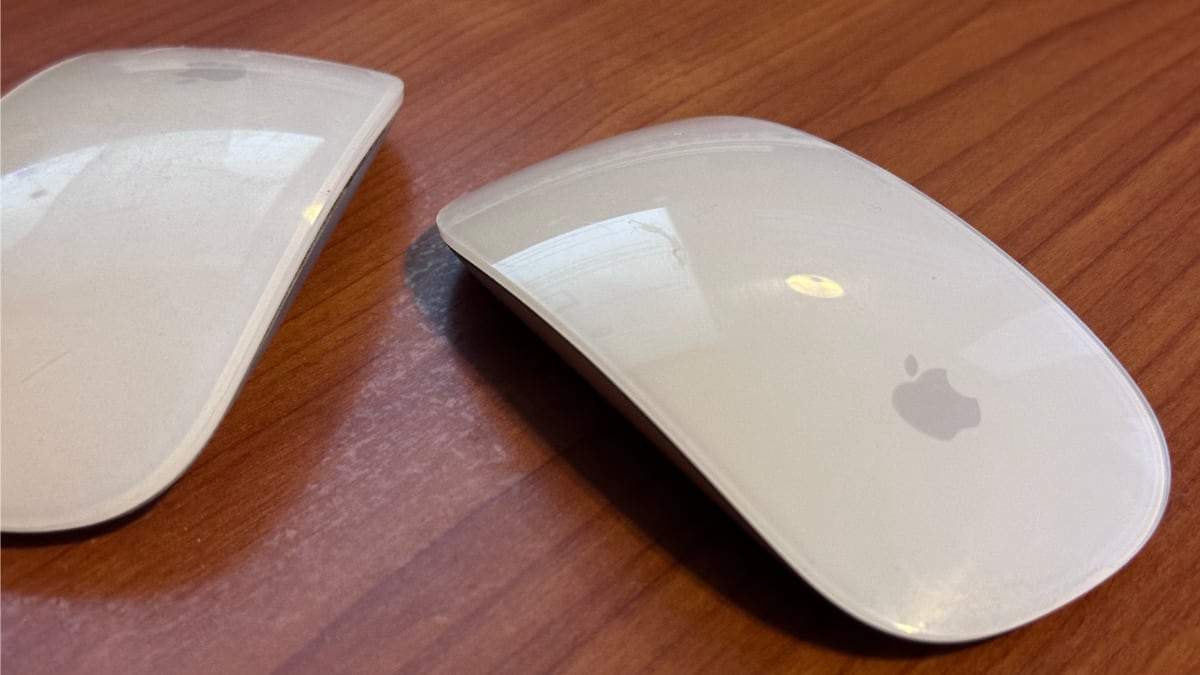
Ah, the Magic Mouse - sleek, responsive, and when it works, a real extension of your fingertips. But what happens when your cursor starts dancing around your screen like it's auditioning for "Swan Lake"? You move it straight, but it jitters, it jags, it takes on a life of its own. Frustrating, I know, let me share a simple fix that might just do the trick.
The Top-Down Approach
In my decade of Mac-mastery, I've seen many a Magic Mouse lose its way. More often than not, the culprit is the top of the mouse. Yes, that smooth, multi-touch surface is not just for show - it's a critical component of your mouse's tracking ability. And just like any other part of your Mac setup, it's prone to gathering dust and grime.
Now, before you reach for the nearest rag, let me stop you right there. The key to cleaning your Magic Mouse is not just to wipe it down, but to do so with care. That's where an alcohol prep pad comes into play.
A Clean Sweep
Alcohol prep pads are perfect for this delicate operation. They're gentle, they're effective, and they'll evaporate without leaving a residue. Take one of these pads and gently clean the top surface of your Magic Mouse. Be thorough, but don't press too hard ? treat it like you would your own smartphone screen.
You'll want to focus on the area where you typically rest your fingers, as this is where most of the dirt accumulates. This slight amount of dirt, almost invisible to the naked eye, can seriously impact the performance of the mouse's sensor.

The Result
Once you've given it a good clean, give it a test drive. You'll likely notice an immediate improvement. The cursor should now glide across your screen in alignment with your hand movements, straight as an arrow, just as it should.
Wrapping Up
So there you have it, folks - a simple, yet effective way to troubleshoot a wandering Magic Mouse. It's these little details that can make a big difference in our daily digital interactions. And isn't that what our Macs are all about? Seamless integration into our lives, with just a touch of magic.
Remember, a clean mouse is a happy mouse, and a happy mouse means a more productive you. Stay tuned for more tips, tricks, and insights from your go-to Macintosh pro. Until next time, keep clicking and stay magical!
PermalinkApple Magic Keyboard with Numeric Keypad on Windows 11
Works But Not Worth it
Welcome to another week on our Macintosh blog! Today, we're venturing slightly off the beaten path to explore how Mac enthusiasts can effectively use the Apple Magic Keyboard with Numeric Keypad on a Windows 11 system. Yes, you read that right - let's bridge the gap between macOS and Windows in a unique way!

Embracing the Unfamiliar: The Windows Key Dilemma
One of the initial challenges Mac users face when shifting to Windows 11 with an Apple keyboard is the absence of a dedicated Windows key. But here's the trick: The Command Key doubles as the Windows key! This might feel a bit odd at first, but it's a seamless transition once you get the hang of it. This key allows you to access the Start menu and perform other Windows-specific functions.
Navigating the World Without a Print Screen Button
As a professional who relies heavily on screenshots, the lack of a Print Screen key might seem like a deal-breaker. However, there's a simple workaround:
Using Keyboard Shortcuts: Windows 11 offers a variety of shortcuts for taking screenshots. For instance, pressing
Fn + Shift + F11on your Apple keyboard captures the entire screen, mimicking the traditional Print Screen function.Snipping Tool: Windows 11's Snipping Tool is a powerful alternative for more tailored screenshots. You can easily launch it with a keyboard shortcut or from the Start menu.
Differentiating Between Two Apple Keyboards
Using two identical Apple keyboards for two different systems can indeed be confusing. Here's how to differentiate them:
Custom Labels or Stickers: A simple and effective way to tell your keyboards apart is by using custom labels or stickers. This can be as straightforward as a small sticker on the back or a unique keycap for a specific key.
Physical Placement: Consistently placing the keyboard for your Windows machine in a specific spot can help create a mental note of which keyboard belongs to which system.
Why Stick with the Apple Magic Keyboard for Windows?
You might wonder why you should bother using an Apple keyboard with Windows 11. Here are a few reasons:
- Familiarity: If you're primarily a Mac user, the feel and layout of the Apple keyboard might be more comfortable for you.
- Aesthetics: Apple's sleek design is hard to beat, and it can bring a touch of elegance to your Windows setup.
- Minimalism: The Apple Magic Keyboard with Numeric Keypad offers a clean, minimalistic design that many users appreciate, especially in clutter-free workspaces.
Conclusion
Transitioning from a Mac to a Windows environment doesn't mean you have to give up on your beloved Apple peripherals. With a few adjustments and a bit of patience, the Apple Magic Keyboard with Numeric Keypad can become an integral part of your Windows 11 experience.
PermalinkConnecting Apple Thunderbolt Display to a Dell Laptop
A Mac Professional's Experience
As a Macintosh professional, I've often marveled at the seamless integration and high-quality design of Apple products. However, my recent experience at a new job, where I was provided with a Dell Latitude 7420 laptop, presented an interesting challenge: connecting an Apple Thunderbolt display to a Dell computer. In this week's blog post, I'll share my journey and insights gained from this endeavor.
The Challenge
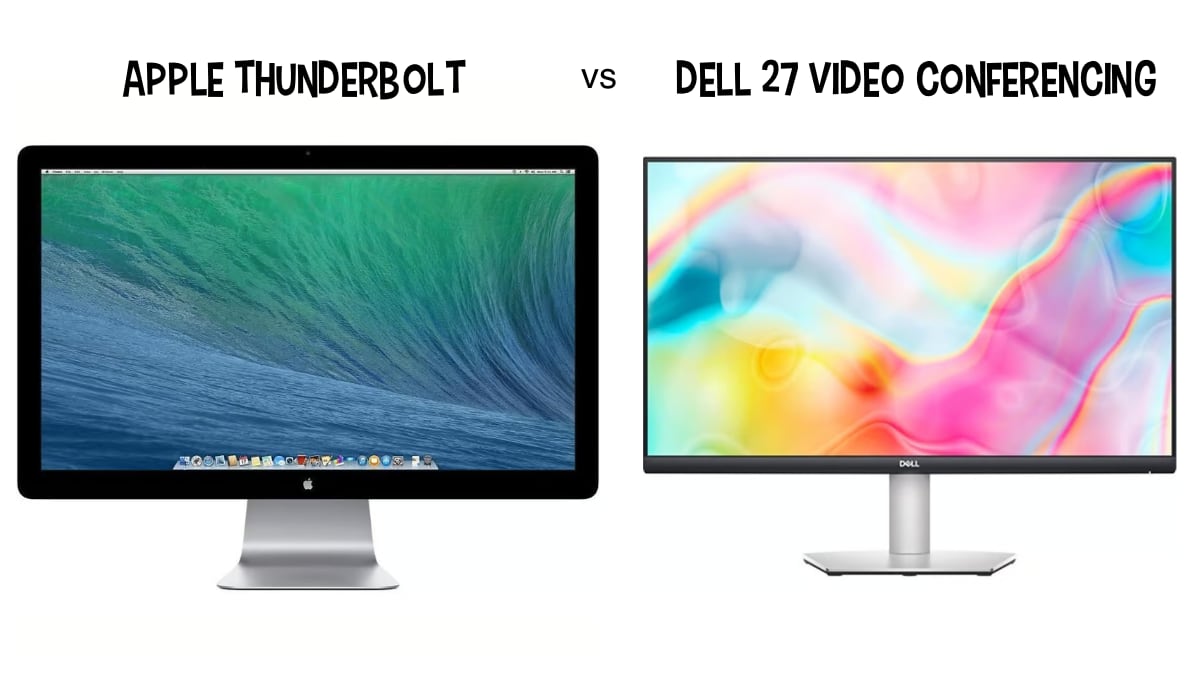
Excited to enhance my new Dell Latitude 7420 laptop, I attempted to connect my Apple Thunderbolt display. Known for its impressive 2560x1440 resolution, the Thunderbolt display had been a faithful companion in my previous setups. However, I quickly realized a fundamental compatibility issue - the lack of an on/off switch on the Thunderbolt monitor, making it incompatible with non-Apple hardware.
The Solution
After some research and contemplation, I decided to purchase a new monitor: the "Dell 27 Video Conferencing Monitor - S2722DZ." To my surprise, this monitor also boasted a 2560x1440 resolution, matching the Thunderbolt's capabilities. Priced at around $300, it was more economical than the $400 Thunderbolt display.
The Comparison
Dell S2722DZ:
- Cost-Effective: At $300, it provides excellent value for money.
- Cross-Platform Compatibility: Works seamlessly with both Windows and Macintosh systems.
- Designed for Video Conferencing: Enhanced features suitable for modern workplace requirements.
Apple Thunderbolt Display:
- Higher Price Tag: Today sells for about $400 but it was listed around .
- Exclusive Apple Compatibility: Limits its use to Apple products only.
- Unique Feature: Offers a Firewire port, a rarity in current times.
Conclusion
This experience was enlightening in understanding the compatibility challenges between Apple and non-Apple products. While the Apple Thunderbolt display offers specific advantages, particularly for Mac users, the Dell S2722DZ stands out for its versatility and cost-effectiveness, making it a suitable choice for a mixed-device environment like mine.
In a world where cross-platform functionality is increasingly important, choosing the right equipment can significantly impact productivity and ease of use. As technology continues to evolve, staying informed and adaptable is key to navigating these changes successfully.
Stay tuned for more insights and experiences from the world of Macintosh and beyond!
PermalinkThe Magic Mouse No-Mousepad Experience
You Don't Need a Mouse Pad!
Welcome back, Mac enthusiasts! As someone who has spent over a decade exploring every nook and cranny of the Macintosh universe, I'm always excited to share new insights and tips. This week, I've been diving into a topic that might seem small but is quite significant for everyday use ? the practicality of using a Magic Mouse without a mousepad.

The Magic of the Magic Mouse
First off, let's talk about what makes the Magic Mouse a standout accessory. Apple has always been at the forefront of combining functionality with elegant design, and the Magic Mouse is no exception. Its sleek, minimalist appearance is more than just aesthetically pleasing; it's designed to be highly functional.
Design and Functionality
The Magic Mouse boasts a smooth, touch-sensitive surface, allowing for intuitive gestures and a more organic interaction with your Mac. Its laser tracking engine is incredibly precise, meaning it can handle more surfaces than traditional optical mice.
Mousepad or No Mousepad?
Now, onto the main question: do you really need a mousepad for your Magic Mouse? From my experience over the past few weeks, the answer is a resounding no, provided you have the right surface.
The Ideal Desk Surface
A smooth, non-glossy desk surface is key. I've been using my Magic Mouse on a wooden desk with a matte finish, and it's been nothing short of seamless. The mouse glides effortlessly, maintaining its precision and responsiveness.
Benefits of Ditching the Mousepad
- Aesthetics: Without a mousepad, your workspace looks cleaner and more streamlined.
- Space Efficiency: Freeing up that extra bit of desk space can make a big difference, especially in smaller work areas.
- Cost Savings: While a mousepad isn't a major expense, every little saving counts.
Considerations and Tips
- Desk Surface: Ensure your desk's surface is smooth and free of debris. Rough or uneven surfaces can hinder the mouse's performance and potentially scratch its underside.
- Cleaning: Keep your desk and the mouse's surface clean. Dust and particles can affect the mouse's movement.
- Sensitivity Adjustment: Play around with the tracking speed in your Mac's settings to find the sweet spot for your usage.
Conclusion
The Magic Mouse is designed to excel without the need for additional accessories like a mousepad. It's all about simplicity and efficiency ? core principles of the Macintosh philosophy. So, if you've got the right desk surface, give it a try and enjoy an uncluttered, streamlined workspace.
Stay tuned for more Macintosh tips and tricks. As always, keep exploring the endless possibilities of your Mac!
PermalinkTop 5 Macintosh Friday Blog Posts of 2023
My Favorite Posts of the Year

2023 has been a stellar year for Macintosh enthusiasts, with a plethora of insightful and innovative blog posts illuminating various aspects of the Mac experience. Macintosh Friday, a dedicated slot for celebrating and discussing all things Mac, has seen an array of intriguing posts. Here, I'm excited to share my top five favorites, each offering unique insights and tips for Mac users.
1. Sennheiser SC60 Headset Review (May 19, 2023)
This post dives into the Sennheiser SC60 Headset, a popular choice among Mac users for its compatibility and audio quality. The review comprehensively covers the headset's features, such as its noise-canceling microphone and USB connectivity, making it a must-read for anyone considering an audio upgrade for their Mac setup.
2. CofeShow Video Slideshow ? A Creative Tool (June 9, 2023)
CofeShow Video Slideshow is highlighted in this intriguing post. It walks readers through the process of creating visually stunning slideshows on their Macs, showcasing the software's ease of use and the impressive results it can produce. This post is particularly useful for those looking to enhance their presentations or personal projects.
3. Exploring the World of Tilt-shift Photography (June 16, 2023)
The art of tilt-shift photography is beautifully explored in this post. It provides valuable tips on how to achieve the unique miniature effect using a Mac, along with software recommendations and editing techniques. This post is a treasure trove for photography enthusiasts looking to experiment with new styles.
4. Colorful Icons on my External Drive (August 4, 2023)
This post is a delightful read about personalizing the Mac experience. It details how to customize the icons on external drives, adding a splash of color and personality to your workspace. The step-by-step guide makes the process accessible, even for those not deeply versed in Mac customization.
5. iMac FaceTime Camera Quality (November 3, 2023)
The final pick is a comprehensive review of the iMac's FaceTime camera quality. This post is particularly relevant in an era of remote work and virtual communication, providing insights into the camera's performance, tips for getting the best video quality, and comparisons with other Mac models.
Each of these posts stands out for its depth of information, practical advice, and contribution to enhancing the Mac user experience. Whether you're a seasoned Mac user or new to the ecosystem, these blog posts offer valuable insights and tips to make the most out of your device.
PermalinkNavigating the Legacy of Sorenson Video Codec
Covert Videos using macOS 14.1
Welcome to this week's blog post, tailored for Macintosh professionals and enthusiasts! Today, we're delving into the realm of media handling in macOS, focusing on a legacy codec that has been a cornerstone in video encoding for years: Sorenson Video. Let's explore what it means in the modern macOS environment and the best ways to deal with legacy content encoded in this format.
Understanding Sorenson Video: A Legacy Codec
The Rise of Sorenson Video
Sorenson Video codec, once a prominent player in the digital video encoding arena, played a crucial role in the early stages of online video streaming. It gained popularity for its efficiency in compressing video while maintaining quality, making it a go-to choice for many macOS users in the late 90s and early 2000s.
Why It's Considered Legacy Today
With the evolution of technology and the introduction of more advanced and efficient codecs, Sorenson Video has become a legacy codec. Modern macOS versions no longer natively support it, as the focus has shifted to more contemporary codecs like H.264 and H.265, which offer superior compression and quality.
Challenges for MacOS Users
Many macOS users who have been long-time users in the video field may find themselves with a library of content encoded in Sorenson Video. The main challenge is accessing and utilizing these videos on the latest macOS platforms, which no longer support this codec natively.
Side note: I blogged about a way to enable Sorenson cCodec back in 2016: Encoding old Video Files. Tools and techniques mention in that blog post s no longer available in macOS 14.1 (Sonoma).
Navigating the Sorenson Video Legacy: Solutions for MacOS Users
Using Legacy Media Players
One of the simplest ways to watch videos encoded in Sorenson Video is by using legacy media players that still support this codec. VLC Media Player, a versatile and free tool, is one such option. It can play a wide range of video formats, including those encoded with the Sorenson codec.
Test and confirmed that VLC 3.0.20 is able to open up amazon.mov.
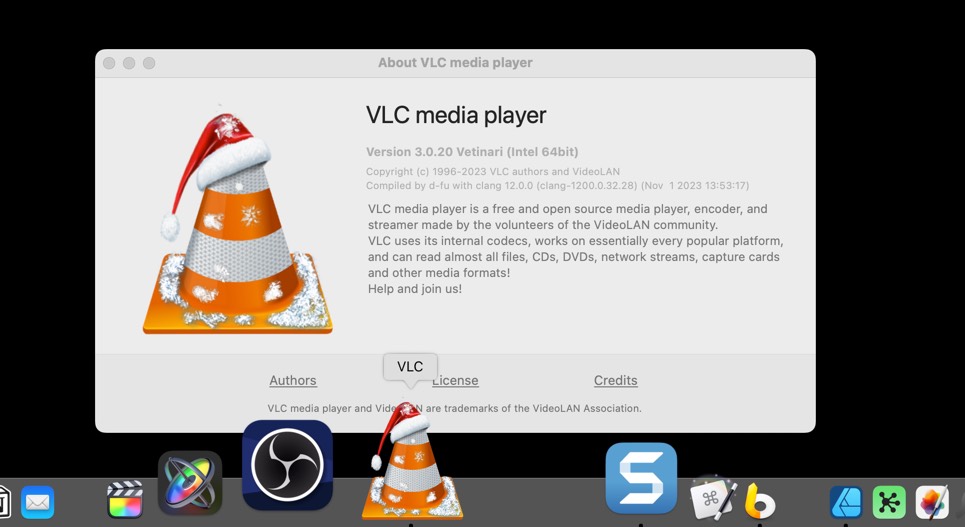
Good job by VLC to add a Christmas Easter Egg. The dock icon adds a Santa hat once the application is launched.
Converting Videos to Modern Formats
For long-term accessibility and compatibility, consider converting your Sorenson-encoded videos to a more modern format like MP4 (H.264). Tools like HandBrake or FFmpeg offer robust conversion capabilities, ensuring your old videos remain playable on current and future macOS versions.
Tested and confirmed that ffmpeg version 6.0 was able to convert the amazon.mov video. This is the code that I used:
ffmpeg -i amazon.mov -c:v libx264 -crf 23 -preset veryfast output.mp4
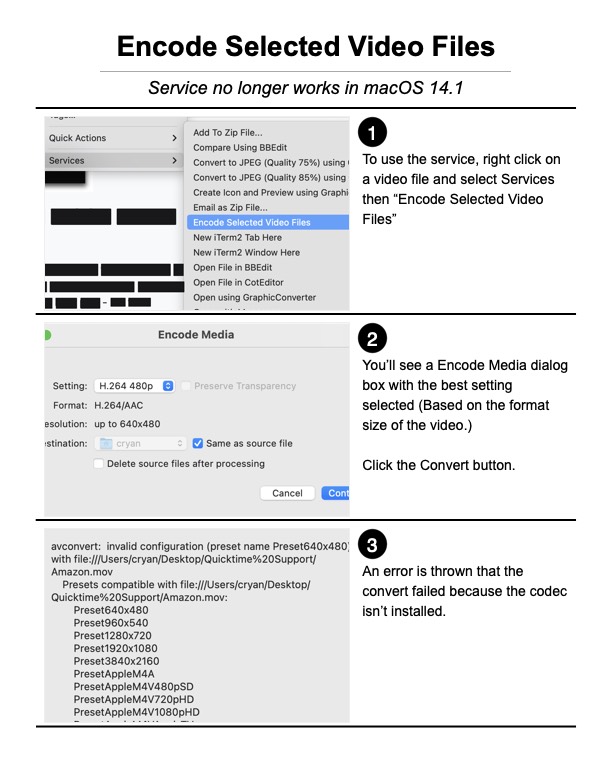
'Encode Selected Video Files' Service
Apple's 'built-in' "Encode Selected Video Files" service no longer works for Sorenson video files.
Embracing Change While Preserving the Past
As technology advances, it's essential to adapt to new standards while also preserving access to legacy content. For macOS professionals and users, understanding how to handle Sorenson Video encoded files is a step in balancing the old with the new, ensuring that valuable content from the past remains accessible and usable.
I would recommend converting video now because who knows how long VLC or FFmpeg will support converting these file types.
PermalinkEXA
Modern Tool for the LS terminal command
Hello, Mac enthusiasts! As someone who's spent a decade diving into the depths of the Macintosh world, I've come across numerous tools that transform our user experience. This week, let's talk about a gem that reinvents a classic Unix/Linux command -- Exa.
Exa is a modern replacement for the well-known ls command. If you've used Terminal, you know ls is like an old friend, listing directory contents and being an integral part of our command-line routines. But, it's time to meet its more colorful and powerful successor.

Why Exa?
Color-Coded and Easy to Read: Exa uses color coding to distinguish file types and metadata. It makes scanning through directories not only more efficient but also more enjoyable.
Enhanced File Information: Unlike
ls, Exa provides detailed information like file size, inode number, and extended attributes, all in a user-friendly format.Git Integration: This is a game-changer. Exa seamlessly integrates with Git, showing the status of files right in the file list. No more switching back and forth between
lsandgit status.Customizability: Tailor Exa to your preferences. With various flags and options, you can control how the output appears, making your terminal experience truly yours.
Getting Started with Exa
Installation: Use Homebrew, a package manager for macOS. Simply type
brew install exain your Terminal, and you're good to go.Basic Commands: Start with
exa -lfor a detailed list view. Explore other flags like-afor all files (including hidden), and-Tfor a tree view of your directory structure.Git Integration: Use
exa -l --gitto see the Git status of files alongside the regular output.Aliases: Supercharge your workflow by creating aliases in your
.bashrcor.zshrcfile. For instance, aliaslstoexa -lfor a quick switch.
Practical Use Cases
- Developers: Quickly navigate through project directories with enhanced visibility into file statuses, especially within Git repositories.
- System Administrators: Utilize the detailed file information for system maintenance and file management.
- Automation Scripts: Incorporate Exa into scripts for more readable and informative outputs.
Final Thoughts
Exa isn't just a replacement for ls; it's a modern, feature-rich command that brings joy and efficiency to your Terminal experience. As you integrate Exa into your daily routine, you'll discover more ways it can streamline your tasks and make Terminal work not just a necessity, but a delight. Happy exploring!
Background Removal via Finder
Pixelmator Pro vs Finder
As a Macintosh professional, it's important to stay informed about the best tools available for specific tasks. When it comes to removing backgrounds from images, both Pixelmator Pro and the general Finder background removal tool on MacOS have their strengths, but Pixelmator Pro generally offers superior capabilities, especially for professional use.

Pixelmator Pro
- Better Edge Detection: Pixelmator Pro is known for its advanced image editing capabilities, including superior edge detection. This is particularly useful when dealing with complex images or when the background and the foreground have similar colors or textures.
- Advanced Editing Options: It provides more control over the editing process, allowing for finer adjustments and more precise editing. This is beneficial for professional-quality work where every detail matters.
- More Features: Pixelmator Pro includes a wider range of tools for image editing, not just background removal. This makes it a more versatile choice for comprehensive image editing needs.
General Finder Tool
- Convenience and Accessibility: The background removal tool in Finder is more accessible for casual users, as it is built into the MacOS Finder. It's handy for quick edits where high precision is not critical.
- Simplicity: It's more straightforward and easier to use for those who are not professional editors or those who need to perform a simple background removal without many additional editing needs.
Conclusion: For professional use, where precision and the quality of edges are paramount, Pixelmator Pro is the better choice. Its advanced features and superior edge detection capabilities make it more suitable for detailed and high-quality image editing. The general Finder tool, while convenient for quick and simple tasks, may not provide the same level of precision and control needed for professional-quality work.
PermalinkExpanding Polygons Beyond the Default in Keynote
Unlocking More Sides
Hello, Mac enthusiasts! This week, we're diving into a neat trick within MacOS that many users overlook. By default, when you draw a polygon in most MacOS applications, it comes with five sides. However, did you know you can easily expand this number to create more complex shapes? Let's explore how to expand a polygon to have up to 11 sides by simply using a green dot.

- Starting with the Basics:
- First, open the application where you want to draw your polygon (such as Pages, or Keynote).
- Select the shape tool and choose the polygon shape.
- Understanding the Default Setting:
- By default, the polygon appears with five sides.
- Notice the green dot on one of the vertices of the polygon ? this is your key to customization.
- Expanding the Polygon:
- Click and hold the green dot. As you start dragging it, you'll see the number of sides increase.
- Slowly drag the dot around the center of the polygon, and watch as the sides increase up to 11.
- Customization Tips:
- Remember that as you add more sides, the shape gradually becomes more circular.
- Experiment with different numbers of sides for various projects ? whether it's for graphic design, presentations, or just for fun.
- Applications and Creativity:
- This feature is particularly useful in design projects where you need polygons that are not commonly available.
- Combine it with other tools like color fill, border adjustments, and rotation to create unique graphics.

Conclusion
Expanding the sides of a polygon from the default five to up to eleven opens up a new world of design possibilities on your Mac. It's a simple yet powerful way to add flair to your documents and presentations. As always, the key is to experiment and find what works best for your creative needs. Stay tuned for more tips and tricks next week!
PermalinkAbout
As someone who has worked on Macs since 1989, I will use my experience to share tips and tricks with you on Fridays. As a Mac user since 1989, I have seen the evolution of Mac software and hardware, and I know how Mac computers work. I also know how to troubleshoot and fix Mac problems that can arise.
Check out all the blog posts.
Schedule
| Thursday | Gluten Free |
| Friday | Macintosh |
| Saturday | Internet Tools |
| Sunday | Open Topic |
| Monday | Media Monday |
| Tuesday | QA |
| Wednesday | New England |
Other Posts
- iResize
- Letters
- Luminar AI Crash
- Stitch Effect in Pixelmator
- Mission Control Tips and Tricks
- Rotate Images in the Finder
- Apple at the Smithsonian
- AutoDesk Sketchbook
- Keyboard Maestro
- Macintosh ExFAT Format
- GIF Annimation Resize
- Installing legacy Font Suitcase files
- How to Print Odd/Even Pages in macOS Sonoma
- AirDrop with iMac Mid 2011
- Removing Color in Affinity Photo