
Organizing Your Notebooks with the Checkmark Emoji in BBEdit
Make it Easy to find Notes that haven\\\\\\\\\\\\\\\\\\\\\\\\\\\\\\\'t been posted.
Organizing Your Notebooks with the Checkmark Symbol in BBEdit
BBEdit is a powerhouse tool for writers, coders, and anyone who loves efficient text editing. But did you know that you can leverage simple visual cues to organize your work better? One such trick is using the checkmark symbol to indicate completed or posted notebooks directly in BBEdit's file list and content.
Why Use the Checkmark Symbol?
The checkmark symbol is a clean, universally recognizable mark that conveys task completion at a glance. By placing it on the first line of your BBEdit files, it not only appears prominently in the file's content but also shows up in BBEdit's document listing (if supported by your version and operating system).
This small visual tweak can:
- Streamline organization: Quickly differentiate completed notebooks from pending ones.
- Enhance readability: Spot completed items without opening every file.
- Save time: Focus on unfinished work while reviewing your projects.

How to Implement This Workflow
Insert the Checkmark Symbol
On macOS, you can easily insert the checkmark symbol by:
- Pressing Control + Command + Space to open the character picker.
- Searching for "check" and selecting the symbol.
Add the Symbol to the First Line
Open your notebook file in BBEdit.
On the first line, add the checkmark symbol followed by a brief status note. For example:
Notebook on Markdown Syntax
Save Your File
Ensure the file is saved. The first line will now serve as a visual marker in BBEdit's open document list or file preview pane.
Practical Examples
Here are some ways you might use this system:
- Blog Content Tracking: Mark posts as published with the checkmark symbol and drafts without.
- Project Notes: Identify completed milestones or ideas that have been implemented.
- Code Review: Use the symbol to signify approved scripts or resolved issues.
Wrapping Up
BBEdit offers endless possibilities for customization, and small hacks like the checkmark symbol can make a significant impact on your workflow. Whether you're tracking blog posts, notebooks, or project statuses, this simple visual cue helps you stay organized and focused.
Start incorporating the checkmark symbol into your BBEdit workflow today and enjoy the clarity it brings to your projects! If you have additional tips for using symbols in BBEdit, feel free to share them in the comments or tweet at me.
PermalinkExploring BBEdit's Dock Options on macOS
Deep dive into BBEdit options
BBEdit provides users with a variety of options directly accessible from the macOS Dock. These options enhance productivity by offering quick access to frequently used features. Let's dive into each of these Dock options and explore how they can make your BBEdit experience even better.

Show Notes
The "Show Notes" option opens BBEdit's default Notebook. This is a convenient way to access your notes instantly. If you've created additional notebooks, you'll need to open them manually through the application.
The default notebook is stored at:
/Users/cryan/Library/Mobile Documents/iCloud~com~barebones~bbedit/Documents/Application Support/Notes.bbnotebookdPro Tip: Back up your notebook periodically to ensure your important notes are secure and easily retrievable. Regular backups help keep your notebook relevant and organized for daily use.
Show Scratchpad
BBEdit's Scratchpad is a versatile space to store temporary data, such as code snippets or useful information you may need later. Think of it as your personal digital sticky note that's always available when you're working in BBEdit. Whether it's for jotting down ideas or saving small chunks of reusable code, the Scratchpad is an invaluable tool.
Show Unix Worksheet
The Unix Worksheet is another standout feature in BBEdit. It provides a space to write and execute Unix commands, making it perfect for developers and system administrators who frequently work with the command line. Store and access your favorite commands quickly without having to leave BBEdit.
New Text Document
The "New Text Document" option allows you to create a blank text document in an existing BBEdit window. This feature is useful when you want to stay organized and keep your new document within your current workspace.
New Text Window
Need to separate a new document from your current BBEdit workspace? Use the "New Text Window" option to open a blank text document in a brand-new window. This is particularly helpful if you're working on multiple projects and need a clean slate in a separate environment.
New Note
The "New Note" option lets you quickly create a new entry in the default Notebook. Over time, your Notebook may become cluttered, so it's a good idea to clean it up regularly to keep it manageable and ensure it remains an effective tool for note-taking.
Final Thoughts
The BBEdit Dock options on macOS offer a seamless way to interact with the application's powerful features. Whether you're managing notes, experimenting with Unix commands, or creating new text documents, these options save time and streamline your workflow. Take advantage of these features to maximize your productivity and make the most of BBEdit's capabilities.
What are your favorite BBEdit Dock options? Let us know in the comments below!
PermalinkMastering BBEdit Search Commands: A Complete Guide for Power Users
Unlock the full potential of BBEdit\'s Search Menu with detailed explanations of every command, from basic Find to advanced Multi-File Search and Pattern Playground.
BBEdit Search Menu has lots of useful commands. Here's an explanation of each Search Menu command in BBEdit:

Find...
Opens the Find dialog box, allowing you to search for specific text or patterns in the current document. This dialog provides options for case sensitivity, searching with regular expressions, and more.
Shortcut: Command F
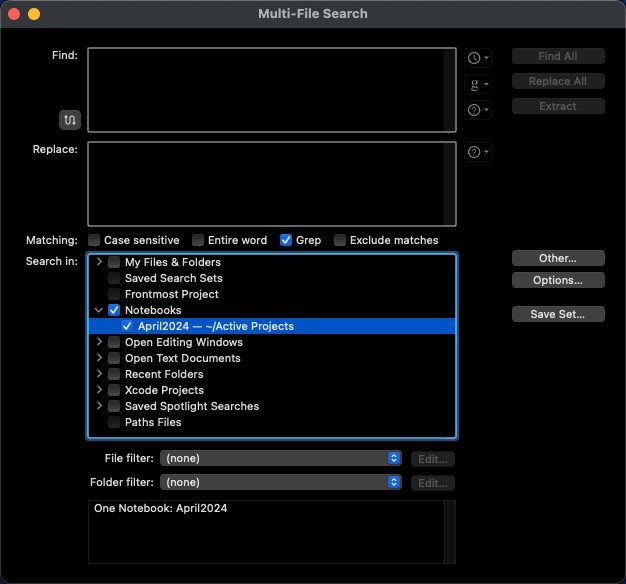
Multi-File Search...
Enables searching across multiple files in a directory, project, or even open documents. You can configure the search scope and filters for file types or names.
Shortcut: Shift Command F
Search in Document's Folder
Automatically searches for a term in all files within the same folder as the active document. Ideal for quickly scanning related files.
Search in Project
Performs a search across all files in the current project. Useful for finding references or occurrences of terms in a cohesive codebase or project.
Live Search
Provides instant, interactive search as you type, highlighting matches in the current document. It's lightweight and fast, great for quick searches.
Shortcut: Option Command F
Pattern Playground
A tool for experimenting with regular expressions. You can test patterns and preview how they match text, making it a valuable resource for learning and debugging regex.
Find Next
Finds and selects the next occurrence of the current search term in the document.
Shortcut: Command G
Find First
Finds the first occurrence of the search term from the top of the document.
Shortcut: Control Command G
Find All
Finds all occurrences of the search term and lists them in a results window, allowing quick navigation to matches.
Shortcut: Option Command G
Find & Select All
Finds all occurrences of the search term and selects them in the document.
Shortcut: Control Option Command G
Extract
Extracts all occurrences of the search term into a new document for further analysis or processing.
Find Selected Text
Uses the currently selected text in the document as the search term.
Search for "BBEdit" in Every Open Text Document
Searches for the specified term (e.g., "BBEdit") in all open text documents in BBEdit.
Find References to Selected Symbol
Searches for references to a selected symbol (e.g., a variable, function, or class) in the code.
Use Selection for Find
Takes the selected text in the document and sets it as the current search term.
Shortcut: Command E
Use Selection for Replace
Uses the selected text as the replace term for the next or all replace operations.
Shortcut: Option Command E
Replace
Replaces the current match with the specified replacement term.
Shortcut: Command =
Replace All
Replaces all occurrences of the search term with the replacement term in the current document.
Shortcut: Option Command =
Replace All in Selection
Replaces all occurrences of the search term with the replacement term, limited to the current text selection.
Shortcut: Control Command =
Replace to End
Replaces all matches from the current cursor position to the end of the document.
Shortcut: Shift Command =
Replace & Find Next
Performs a replacement for the current match and automatically searches for the next occurrence.
First Occurrence of Selected Text
Jumps to the first occurrence of the currently selected text in the document.
Shortcut: Control G
Next Occurrence of Selected Text
Moves to the next occurrence of the selected text.
Shortcut: Control Control G
Previous Occurrence of Selected Text
Moves to the previous occurrence of the selected text.
Find Differences...
Opens the Find Differences tool for comparing two files or folders to identify changes or differences between them.
Find Differences
Compares the current document with another file or version to find differences.
Find Definition
Locates the definition of a symbol (e.g., function, variable, or class) in the project or workspace.
Find Symbol in Workspace...
Searches for a symbol across the entire workspace, making it easier to locate definitions or references.
Find in Documentation...
Searches for the selected term in the associated documentation (if configured), useful for looking up references or API details.
These commands provide a powerful and flexible set of tools for navigating and manipulating text efficiently within BBEdit, especially for programming, web development, or other text-heavy workflows.
PermalinkMaster BBEdit’s Unix Worksheet: Advanced Commands for Effortless Productivity
Discover powerful Unix commands to streamline text processing, file management, and data analysis directly within BBEdit\'s Unix Worksheet.
In BBEdit's Unix Worksheet, you have a powerful terminal-like environment that integrates seamlessly with your text editing workflow. While BBEdit's core functionality is incredible on its own, leveraging Unix commands directly from the Worksheet can significantly enhance productivity.
This post builds upon my earlier introduction to the Unix Worksheet. Below, I'll outline some advanced commands that are worth having at your fingertips for a variety of tasks.
Essential Advanced Commands
1. Search and Replace in Files
Need to perform a global search and replace across multiple files? Here's a Unix command to do it quickly:
find /path/to/directory -type f -name "*.txt" -exec sed -i '' 's/search_term/replace_term/g' {} +- Usage: Replace
search_termandreplace_termwith your desired text.
- Pro Tip: Change
*.txtto match specific file extensions or*for all files.
2. Extract Unique Lines from a File
Clean up duplicate lines in your text files with this one-liner:
sort input.txt | uniq > output.txt- Use Case: Quickly sanitize log files or datasets for unique entries.
- Tip: Add
-ctouniqto count duplicate occurrences.
3. Count Word Frequency
For quick text analysis, this command counts word occurrences in a file:
tr -c '[:alnum:]' '[n*]' < input.txt | sort | uniq -c | sort -nr- What It Does: Breaks text into words, sorts them, and outputs a frequency count in descending order.
- Advanced Tip: Use
grepbeforehand to focus on specific patterns before running this analysis.
4. Bulk Rename Files
When working with directories full of misnamed files, use this batch renaming command:
for file in *.txt; do mv "$file" "${file%.txt}_new.txt"; done- Explanation: This appends
_newto the filename while preserving the original extension.
5. Find and Delete Empty Files
If you're cleaning up directories and want to remove useless files:
find /path/to/directory -type f -empty -delete- Why It's Useful: Keeps your workspace tidy by removing zero-byte files.
6. Check Disk Usage by Directory
Quickly see which directories are taking up the most space:
du -sh /path/to/directory/*- Output: Displays the disk usage of each subdirectory in a human-readable format.
7. Generate a Word Count Summary
Want a summary of lines, words, and characters in a file? Use:
wc -lwc input.txt- Details: Outputs the line count, word count, and character count, respectively.
8. Preview File Contents Without Opening
For a quick peek at the beginning or end of a file, these commands are helpful:
head -n 20 input.txt  # Shows the first 20 lines
tail -n 20 input.txt  # Shows the last 20 lines
Pro Tips for Using the Unix Worksheet
Create a Command Repository: Save frequently used commands in a text file for easy copy-pasting.
Test in Small Batches: When working with large datasets, run commands on smaller test files first.
Explore Aliases: Use shell aliases to simplify complex commands. For example, add this to your
.bash_profile:alias clean_empty_files="find . -type f -empty -delete"Backup Before Applying: For destructive actions (like
delete), create backups of your files. Usecpto duplicate your directories beforehand.
BBEdit's Unix Worksheet isn't just a tool for developers; it's a Swiss Army knife for text processing and data management. These advanced commands can save time, prevent errors, and add a level of sophistication to your workflow.
Do you have a favorite Unix Worksheet command? Share it in the comments below!
Read my earlier post about BBEdit's Unix Worksheet.
PermalinkExploring the New Text Factory Layout in BBEdit 15
New UI Shows all the Powerful tools in Text Factory
If you're a BBEdit user, you likely already know about the Text Factory - a powerful tool for streamlining repetitive text editing tasks. Whether you're cleaning up code, reformatting data, or parsing files for specific characters or patterns, Text Factory can handle it all. With the release of BBEdit 15, BareBones Software has made significant enhancements to Text Factory, making it even more useful and user-friendly.
What is Text Factory?
BBEdit's Text Factory allows you to combine multiple text actions into a single workflow, saving time and ensuring consistency. Instead of performing each text transformation manually, you can define a sequence of actions and apply them all at once to one or more files. This feature is invaluable for tasks such as:
- Removing extra spaces or unwanted text.
- Formatting text to meet specific requirements.
- Cleaning up data copied from external sources like websites.
If your work involves running multiple transformations on text files, Text Factory is your best friend.
What's New in BBEdit 15's Text Factory?
In BBEdit 15, BareBones has given the Text Factory a significant facelift, improving usability and adding functionality to make it a more powerful tool.
Enhanced Layout and Descriptions
The new Text Factory interface is more intuitive, with detailed descriptions of each action. This change reduces the learning curve for new users and makes it easier for seasoned users to select the right action quickly.Expanded Action Items
Text Factory now offers 38 action items to choose from, covering a wide range of text manipulation needs. From search-and-replace to more complex text transformations, the expanded options ensure that you have all the tools you need in one place.New Text Transform: Normalize Spaces
One of the standout additions in BBEdit 15 is the Normalize Spaces transform. Available in the Text menu, scripting interface, or Text Factory, this action converts printable nonbreaking spaces into standard ASCII space characters.Why is this important? When you copy text from web pages, it often contains nonbreaking spaces that can cause issues in formatting or processing. The Normalize Spaces transform cleans up these inconsistencies, ensuring your text behaves as expected in various contexts.
Old Text Factory Look

New Text Factory Look

Why Use Text Factory?
If you regularly work with files that need multiple transformations, Text Factory can save you hours of manual effort. Here's why BBEdit 15's revamped Text Factory stands out:
- Efficiency: Automate repetitive tasks to focus on higher-value work.
- Consistency: Apply the same transformations every time, reducing errors.
- Powerful Actions: With 38 actions to choose from, you're well-equipped for any text-processing challenge.
- User-Friendly Interface: The enhanced layout and descriptions in BBEdit 15 make Text Factory easier to navigate and use.
Conclusion
BBEdit 15's updated Text Factory is a must-try feature for anyone who deals with complex text transformations. With a polished interface, more action items, and the handy Normalize Spaces transform, it's a clear demonstration of how BareBones Software continues to innovate and listen to its user base.
If you haven't explored Text Factory yet, now is the perfect time. Give it a try and see how it can simplify your workflow.
Have you used the new Text Factory in BBEdit 15? Let me know your thoughts in the comments!
PermalinkHow to Use the Reflow Document Feature in BBEdit
A Comprehensive Guide
BBEdit is a powerful text editor known for its flexibility and precision, particularly when working with HTML, XML, and other markup-heavy documents. Among its many features, the Reflow Document command stands out as a tool for improving document readability and structure by reformatting tags and content. Whether you're tidying up a single file or processing multiple files programmatically, this feature can save time and reduce errors.
In this blog post, you'll learn what the Reflow Document command is, the options it offers, and how to use it effectively in your workflow.
What Is the Reflow Document Command?
The Reflow Document command in BBEdit allows you to reformat the structure of an active document. It's particularly useful for improving the readability and maintainability of HTML, XML, and similar documents by adjusting indentation, wrapping text, and ensuring consistent formatting.
You can access this command in multiple ways:
- Via the Markup menu. (Markup > Tidy > Reflow Document)
- As part of a Text Factory action (for batch processing).
- Through an AppleScript to process multiple documents programmatically.

When invoked, BBEdit presents a configuration sheet where you can select from various formatting options tailored to your document's needs.
Reflow Document Options: A Breakdown
The configuration sheet includes several options, each designed to handle specific formatting tasks. Let's take a closer look at each:
1. Input is XML
If your document is XML rather than HTML, this option ensures that BBEdit uses the Tidy XML parser. Unlike the error-correcting HTML parser, the XML parser enforces stricter formatting rules, making it ideal for XML-based workflows.
2. Indent Block-Level Tags
This option determines whether block-level tags (such as <div>, <p>, or <section>) should be indented for better readability. Indented block-level tags can make it easier to understand the hierarchy and nesting of elements in your document.
3. Indent Attributes
When enabled, this option places each attribute on a new line. This is particularly useful for documents with complex tag attributes, as it improves clarity and simplifies attribute management during editing.
4. Wrap ASP Elements
This option wraps text contained within ASP pseudo-elements, which are denoted by <% ... %>. This is useful for developers working with ASP-based server-side scripting.
5. Wrap Attributes
With this option, BBEdit wraps long attribute values across multiple lines. This makes attributes easier to edit, especially when they contain lengthy data like URLs, inline styles, or embedded JSON.
6. Wrap JSTE Elements
This controls wrapping for text within JSTE pseudo-elements (<# ... #>), often used in templating systems. Wrapping ensures that the content is neatly formatted and easier to manage.
7. Wrap PHP Elements
If your document includes PHP code (e.g., <?php ... ?>), this option ensures that text within these pseudo-elements is wrapped appropriately, maintaining clarity and structure.
8. Wrap Script Literals
Script attributes containing long string literals (e.g., onclick="...") can be challenging to read. Enabling this option wraps these string literals, inserting a backslash () before line breaks for valid script syntax.
9. Wrap Sections
For documents containing CDATA or similar sections (<![ ... ]>), this option wraps the text inside these tags, making it easier to read and navigate through the content.
How to Use the Reflow Document Command
Here's a simple step-by-step guide to applying the Reflow Document command:
- Open the Document: Open the file you wish to reformat in BBEdit.
- Access the Command: Navigate to
Markup > Tidy > Reflow Document.
- Configure the Options: Select the desired formatting options from the configuration sheet that appears.
- Apply Changes: Click OK to apply the reformatting to your document.
If you're working with multiple documents: - Use Text Factory to automate the process across multiple files.
- Alternatively, integrate the command into an AppleScript for custom workflows.
When to Use Reflow Document
The Reflow Document feature is best suited for scenarios where: - You need to clean up messy or inconsistent HTML or XML files.
- You're preparing code for collaborative development or deployment.
- You want to enforce formatting standards for a project.
For developers, this command ensures that your code is not only functional but also readable and maintainable - a critical aspect of efficient programming.
Wrapping Up
BBEdit's Reflow Document command is a versatile tool for streamlining the formatting of your markup documents. By leveraging its extensive configuration options, you can tailor the reformatting process to suit your needs, whether you're working with HTML, XML, or embedded scripting languages like PHP and ASP.
Start experimenting with the Reflow Document command today and see how it can enhance your coding workflow!
BBEdit is a powerful text editor known for its flexibility and precision, particularly when working with HTML, XML, and other markup-heavy documents. Among its many features, the Reflow Document command stands out as a tool for improving document readability and structure by reformatting tags and content. Whether you're tidying up a single file or processing multiple files programmatically, this feature can save time and reduce errors.
In this blog post, you'll learn what the Reflow Document command is, the options it offers, and how to use it effectively in your workflow.
What Is the Reflow Document Command?
The Reflow Document command in BBEdit allows you to reformat the structure of an active document. It's particularly useful for improving the readability and maintainability of HTML, XML, and similar documents by adjusting indentation, wrapping text, and ensuring consistent formatting.
You can access this command in multiple ways:
- Via the Markup menu. (Markup > Tidy > Reflow Document)
- As part of a Text Factory action (for batch processing).
- Through an AppleScript to process multiple documents programmatically.

When invoked, BBEdit presents a configuration sheet where you can select from various formatting options tailored to your document's needs.
Reflow Document Options: A Breakdown
The configuration sheet includes several options, each designed to handle specific formatting tasks. Let's take a closer look at each:
1. Input is XML
If your document is XML rather than HTML, this option ensures that BBEdit uses the Tidy XML parser. Unlike the error-correcting HTML parser, the XML parser enforces stricter formatting rules, making it ideal for XML-based workflows.
2. Indent Block-Level Tags
This option determines whether block-level tags (such as When enabled, this option places each attribute on a new line. This is particularly useful for documents with complex tag attributes, as it improves clarity and simplifies attribute management during editing. This option wraps text contained within ASP pseudo-elements, which are denoted by With this option, BBEdit wraps long attribute values across multiple lines. This makes attributes easier to edit, especially when they contain lengthy data like URLs, inline styles, or embedded JSON. This controls wrapping for text within JSTE pseudo-elements ( If your document includes PHP code (e.g., Script attributes containing long string literals (e.g., For documents containing CDATA or similar sections ( Here's a simple step-by-step guide to applying the Reflow Document command: If you're working with multiple documents: - Use Text Factory to automate the process across multiple files. The Reflow Document feature is best suited for scenarios where: - You need to clean up messy or inconsistent HTML or XML files. For developers, this command ensures that your code is not only functional but also readable and maintainable - a critical aspect of efficient programming. BBEdit's Reflow Document command is a versatile tool for streamlining the formatting of your markup documents. By leveraging its extensive configuration options, you can tailor the reformatting process to suit your needs, whether you're working with HTML, XML, or embedded scripting languages like PHP and ASP. Start experimenting with the Reflow Document command today and see how it can enhance your coding workflow!, or ) should be indented for better readability. Indented block-level tags can make it easier to understand the hierarchy and nesting of elements in your document.
3. Indent Attributes
4. Wrap ASP Elements
<% ... %>. This is useful for developers working with ASP-based server-side scripting.5. Wrap Attributes
6. Wrap JSTE Elements
<# ... #>), often used in templating systems. Wrapping ensures that the content is neatly formatted and easier to manage.7. Wrap PHP Elements
), this option ensures that text within these pseudo-elements is wrapped appropriately, maintaining clarity and structure.8. Wrap Script Literals
onclick="...") can be challenging to read. Enabling this option wraps these string literals, inserting a backslash () before line breaks for valid script syntax.9. Wrap Sections
), this option wraps the text inside these tags, making it easier to read and navigate through the content.
How to Use the Reflow Document Command
Markup > Tidy > Reflow Document.
- Alternatively, integrate the command into an AppleScript for custom workflows.
When to Use Reflow Document
- You're preparing code for collaborative development or deployment.
- You want to enforce formatting standards for a project.
Wrapping Up
Mastering BBEdit's Text Menu: Essential Commands for Effortless Text Editing on Mac
Unlock the full potential of BBEdit\'s Text menu with this comprehensive guide to its powerful text manipulation commands.

BBEdit has always been a powerhouse tool for anyone serious about text editing on the Macintosh, and one of its most versatile areas is the Text menu. This menu might not be flashy, but it's packed with powerful commands that make text manipulation smooth, efficient, and even enjoyable. Whether you're a developer, writer, or power user, the Text menu offers a toolkit designed to help you control, transform, and refine your content with just a few clicks.
In this post, we'll dive into the features of the Text menu in BBEdit, exploring how each command can streamline your editing tasks. By the end, you'll have a comprehensive overview of this essential part of BBEdit, allowing you to use it to its fullest potential. Stick around as we list and describe each item in the Text menu, providing a handy reference to keep your BBEdit workflow sharp and efficient.
Text Menu Items and Use
- Apply Text Filter: Use this to apply custom text manipulation scripts or filters to your text, enhancing automation and customization in text processing.
- Apply Text Transform: Ideal for transforming text using predefined transformations like uppercase, lowercase, or title case directly within BBEdit.
- Run Unix Command: Allows you to execute Unix commands on your text, useful for advanced text manipulation or system integration tasks.
- Exchange Characters: Replace specific characters with others throughout your document, perfect for quick text cleanup or formatting adjustments.
- Change Case: Alter the case of selected text (e.g., upper, lower, title case), which is handy for stylistic or formatting needs.
- Shift Left: Moves selected lines or text to the left, removing indentation, useful for adjusting code or text layout.
- Shift Right: Indents selected text or lines to the right, often used for code block formatting or text structuring.
- Un/Comment Lines: Toggle comments for lines of code, essential for programmers to quickly comment out or uncomment sections of code.
- Un/Comment Block: Similar to Un/Comment Lines but for block comments, useful in languages supporting block comments.
- Hard Wrap: Forces text to wrap at a specified column, maintaining a consistent line length which is crucial for code readability or text layout.
- Add Line Breaks: Inserts line breaks at specified intervals or locations, useful for formatting text or preparing data for certain applications.
- Remove Line Breaks: Eliminates unwanted line breaks, which can be useful when dealing with text copied from web pages or emails.
- Educate Quotes: Converts straight quotes to curly quotes, enhancing typographical accuracy in documents.
- Straighten Quotes: Reverts curly quotes to straight quotes, which might be needed for programming or plain text formats.
- Reformat Document: Reorganizes the entire document to meet certain formatting standards, like code style or text alignment.
- Reformat Selection: Applies reformatting to just a selected portion of text, allowing for targeted formatting changes.
- Add/Remove Line Numbers: Adds or removes line numbers, helpful for code review or when preparing documents for editing.
- Prefix/Suffix Lines: Adds text at the beginning or end of each line, useful for batch text editing tasks like adding comments or tags.
- Sort Lines: Sorts lines alphabetically or numerically, which can be useful for organizing lists or data entries.
- Process Duplicate Lines: Manages duplicate lines by removing or marking them, aiding in cleaning up datasets or text files.
- Process Lines Containing: Acts on lines that match certain criteria, like removing or highlighting specific content.
- Remove Blank Lines: Deletes empty lines, which can help in text cleanup or formatting scripts.
- Canonize: Standardizes formatting to a canonical form, often used in text normalization for better search or comparison.
- Text Merge: Combines multiple text segments or documents in various ways, useful for document assembly.
- Increase Quote Level: Adds quotation marks or increases indentation for quoting text, useful in academic or legal writing.
- Decrease Quote Level: Removes quotation marks or decreases indentation, for adjusting quoted material.
- Strip Quotes: Removes quotation marks from text, simplifying data processing or text cleanup.
- Zap Gremlins: Removes or replaces non-printing characters or problematic symbols often found in text files.
- Convert Escape Sequences: Translates escape sequences to their corresponding characters or vice versa, crucial for handling special characters in programming.
- Convert Spaces to Tabs: Useful for adjusting text or code to use tabs for indentation instead of spaces.
- Convert Tabs to Spaces: Converts tab characters into spaces, which can improve consistency in text alignment.
- Strip Trailing Whitespace: Removes unnecessary spaces at the end of lines, which is good practice for coding.
- Normalize Line Endings: Ensures consistent line endings (like LF or CRLF) across the document, important for cross-platform compatibility.
- Normalize Spaces: Adjusts spacing between words or around punctuation to meet typographical standards.
- Precompose Unicode: Combines diacritical marks with base characters, useful for certain text encoding requirements.
- Decompose Unicode: Separates combined Unicode characters into base characters and diacritical marks, which can affect sorting or display.
A Guide to Customizing BBEdit 15 Cheat Sheets for Quick Code Insertion
My tips on how to create, organize, and optimize Cheat Sheets

BBEdit 15, the go-to editor for Mac users, is packed with new features to boost productivity. Among them is the Cheat Sheet tool - a handy, customizable reference that makes recalling common code snippets a breeze. Think of it as your own digital "training wheels," offering quick, one-click access to those elusive pieces of syntax or code structures you find yourself frequently looking up.
Here's a breakdown of what the Cheat Sheet tool has to offer, along with five tips I've learned along the way to help you get the most out of this powerful feature.
Getting Started with Cheat Sheets
Cheat Sheets are accessible from the Window > Cheat Sheets submenu. This brings up a floating window that acts as a mini-reference guide within BBEdit. On the left-hand side, you'll see the code snippet (or "cheat"), and on the right, a brief description.
To use a cheat sheet, simply double-click the snippet you want to insert. The code will automatically be added to your active document. Alternatively, you can drag snippets directly into your code wherever needed - perfect for quickly filling out repetitive code blocks in any programming language.
The built-in cheats include examples for Markdown and Clippings placeholders, but you can tailor your own cheat sheets to fit your coding style and language needs.
Five Tips to Master the Cheat Sheet Tool
Here are a few things I've learned to streamline the use of Cheat Sheets:
Customize Your Cheat Sheet in iCloud Drive
Cheat Sheets are stored in iCloud Drive > BBEdit > Application Support > Cheat Sheets. Open up this folder to find the JSON files where you can add your own custom snippets. Keeping your snippets in iCloud ensures they're accessible across your devices.Keep Your JSON Format Correct
If you've added a cheat sheet but it's not appearing under Window > Cheat Sheets, it's likely due to incorrect JSON formatting. Each snippet requires headers and must follow proper JSON structure. Take the time to verify the format to avoid issues.Refresh the Cheat Sheet Dialog
Whenever you make changes to the JSON file, close and reopen the Cheat Sheet dialog. This reloads the file so your latest updates will be reflected in BBEdit - no need to restart the program.Add Line Breaks for Multi-Line Snippets
If your cheat requires multiple lines, use\nto indicate where to add line breaks. This trick lets you structure more complex code snippets without cramming everything onto one line, making it easier to insert structured blocks of code.Insert Spaces Between Cheats
To separate sections or group related snippets, you can use emptytextanddescriptionfields to create a blank row. However, avoid leaving either field populated alone, as BBEdit may crash if you only have text or only a description filled out.
Sample Sheet Sheet Code

Sample code from my Python Cheat Sheet file.
Building Your Custom Coding Library
With Cheat Sheets, BBEdit 15 lets you create a personalized, easily accessible library of code snippets. Customize them for HTML, JavaScript, CSS, Python, or any language you're working with. By offloading these snippets into a Cheat Sheet, you can focus more on your actual coding and less on remembering every detail of syntax.
So if you're ready to save time and avoid unnecessary searches, take advantage of the Cheat Sheet tool in BBEdit 15. It's a straightforward yet powerful way to streamline your workflow and make your coding experience even more productive.
PermalinkPattern Playground
Cool Tool to figure out the right formula
Regular expressions (regex) are a powerful tool for text processing, allowing you to search, replace, and manipulate text with precision and efficiency. However, crafting the perfect regex pattern can be a daunting task, often involving a lot of trial and error. Enter BBEdit's Pattern Playground: a feature that transforms the art of regex into a more manageable and interactive experience.
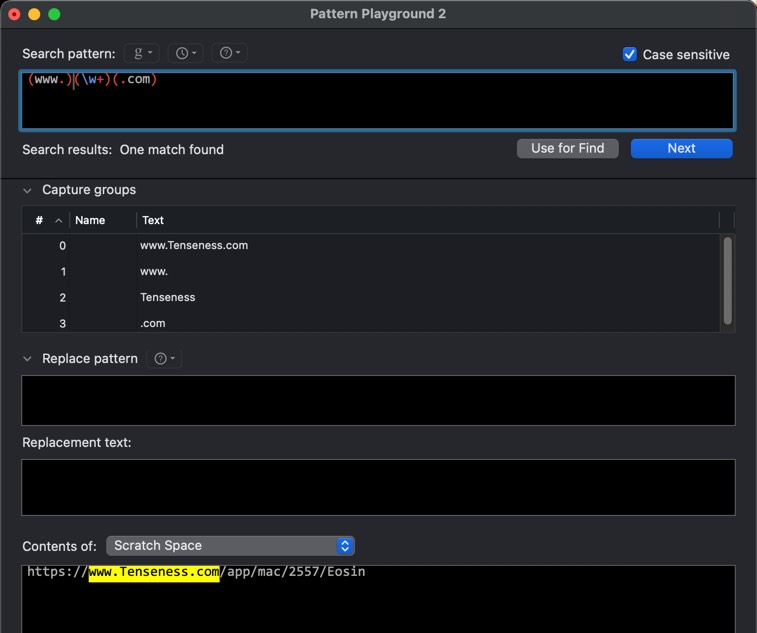
Using Pattern Playground to figure out the best way to get the Domain Name from a URL.
What is BBEdit's Pattern Playground?
BBEdit, the leading professional HTML and text editor for macOS, has long been celebrated for its robust text manipulation capabilities. With the introduction of the Pattern Playground¹[1], BBEdit takes regex handling to a new level. This interactive interface lets you experiment with Grep patterns (BBEdit's term for regex) in real-time, providing immediate feedback on what will match and how.
Why is it a Game-Changer?
The Pattern Playground addresses one of the most significant challenges in regex: the complexity of creating patterns. It reduces the guesswork and streamlines the process by showing you exactly what your pattern matches as you type. This live feedback loop is invaluable for both beginners learning the ropes and experts refining complex patterns.
Interactive Interface
At the heart of the Pattern Playground is an interactive window where you can input your regex patterns. As you type, the pattern is checked live, and any matches are highlighted in the "Contents of" section, which displays the text of all open documents.
Grep Cheat Sheet
For those who need a little help, the Pattern Playground comes with a Grep Cheat Sheet. This handy reference provides quick access to common regex idioms, helping you build patterns faster.
Capture Groups and Substitutions
BBEdit's Pattern Playground goes beyond simple search patterns. It allows you to define capture groups and experiment with substitutions. The interface shows you all the defined capture groups and updates the "Replacement Text" field in real-time as you edit the "Replace Pattern" field¹[1].
How Does it Benefit You?
Whether you're a developer, writer, or data analyst, the Pattern Playground can significantly enhance your productivity. Here's how:
- Efficiency: Quickly find and replace text across multiple files with precision.
- Accuracy: Reduce errors in pattern creation with live validation and feedback.
- Learning Tool: Improve your regex skills through an interactive and forgiving environment.
Conclusion
BBEdit's Pattern Playground is more than just a feature; it's a testament to Bare Bones Software's commitment to making text manipulation accessible and efficient. By demystifying regex and providing a user-friendly platform for experimentation, BBEdit empowers you to harness the full potential of text processing with confidence and ease.
So, if you're looking to find the right regular expression formula without the headache, give BBEdit's Pattern Playground a try. It might just become your go-to tool for all things regex.
PermalinkBBEdit Notebooks
Great Feature to Stay Productive
BBEdit Notebook is a great way to keep your text notes organized. Now users don't have to have lots of text files cluttering their hard drives.
Five Things That Make BBEdit Notebooks Useful
Search Notebooks
Notebook search lets you find what you need instantly. This eliminates the need to sift through clutter in a broader search, saving you valuable time and frustration.
Real World Example:
I use search to find code tidbits such as Date/Time format in Javascript or opening a database in Python. Search is quick and easy in BBEdit - even faster when your targeting the search in the notebook where you stored the data.
Create Multiple Notebooks
Create dedicated notebooks for work projects, career development plans, and personal hobbies. This organizational approach keeps your thoughts on each topic focused and helps you avoid context switching. By compartmentalizing your life with BBEdit notebooks, you can achieve a healthy work-life balance and ensure you're giving each area the attention it deserves.
Real World Example:
I use separate notebooks for website development, work projects, and personal life. This keeps my notes well-structured and accessible. To refresh my approach in January, I created new notebooks for a clean slate. Of course, I can still search the old notebooks whenever needed.
Execute Code in Notes
BBEdit notebooks aren't just for jotting down ideas. You can write actual code in them, and then hit a button to run it! This means no more switching back and forth between your code editor and your notes. Need to use that same code snippet all the time? Just keep it in your notebook and fire it up whenever you need it. It's like having a personal code cheat sheet built right into your notes. Makes those repetitive tasks a breeze.
Real World Example:
I have some Python Automation code that does some quick check on websites that I am testing.
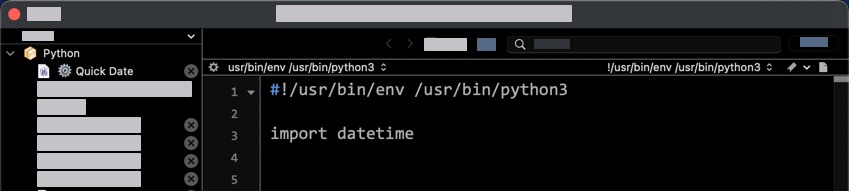
Execute Code Example
Notebook Collections
Imagine your notes panel as a bustling workspace. BBEdit Notebook Collections act like filing cabinets, letting you group related notes together. This goes beyond simple organization – it streamlines your workflow. No more wading through a sea of notes! With collections, you can categorize notes by project, topic, or any other criteria that works for you. This makes finding the information you need a snap, saving you valuable time and frustration. Plus, a clean and organized Notes panel fosters better focus and keeps you in the zone. So ditch the clutter and embrace the power of BBEdit Notebook Collections – they're the key to a more efficient and productive note-taking experience.
Real World Example:
My Blog notebook thrives on dynamic organization. I add content for future posts as inspiration strikes. For instance, after a delicious gluten-free meal at a new restaurant, I'll jot down a quick note in my "Gluten-Free Collection" to ensure I don't miss blogging about it. This approach keeps my content calendar flexible and ensures I capture every blog-worthy idea.
Notes Names with Emojis
Infuse your notebook titles with personality and purpose using emojis. These little visual icons act as powerful flags, helping you instantly recognize the right notebook at a glance. No more scrolling through endless lists of generic titles. With emojis in the mix, scanning your notebooks becomes a breeze, saving you valuable time and frustration. So go ahead, get creative and add a touch of emoji flair to your note-taking system!
Real World Example:
In my notebooks, any executable notes has a gear emoji. This helps that note to stand out from other notes. Also when I post a blog, I put a green checkmark in the name so that I know that post was posted.
PermalinkAbout
Welcome to the BBEdit Blog, the official source of insights, tips, tricks, and inspiration for all users of BBEdit, the powerful text and code editor from Bare Bones Software. Whether you're a seasoned developer, a budding coder, or someone who just loves the precision of text editing, this blog is crafted for you.
Interested in getting BBEdit? Get it from Bare Bones' Website.
Check out all the blog posts.
Blog Schedule
| Sunday | Open Topic |
| Monday | Media Monday |
| Tuesday | QA |
| Wednesday | Veed |
| Thursday | Business |
| Friday | Macintosh |
| Saturday | Internet Tools |
Other Posts
- Unix Worksheet
- Pattern Playground
- BBEdit sFTP Client
- Text Status Bar items
- Mastering BBEdit's Text Menu: Essential Commands for Effortless Text Editing on Mac
- Release Note Easter Eggs
- BBEdit Notebooks
- Organizing Your Notebooks with the Checkmark Emoji in BBEdit
- BBEdit Search Box
- HTML Paragraphs in BBEdit
- BBEdit Completion Data
- Text Handling Features
- BBEdit Version 13
- Exploring the New Text Factory Layout in BBEdit 15
- BBEdit's Select Column Feature