
Import Contacts into Documents
Some tips on using the Contacts in Swift Publisher
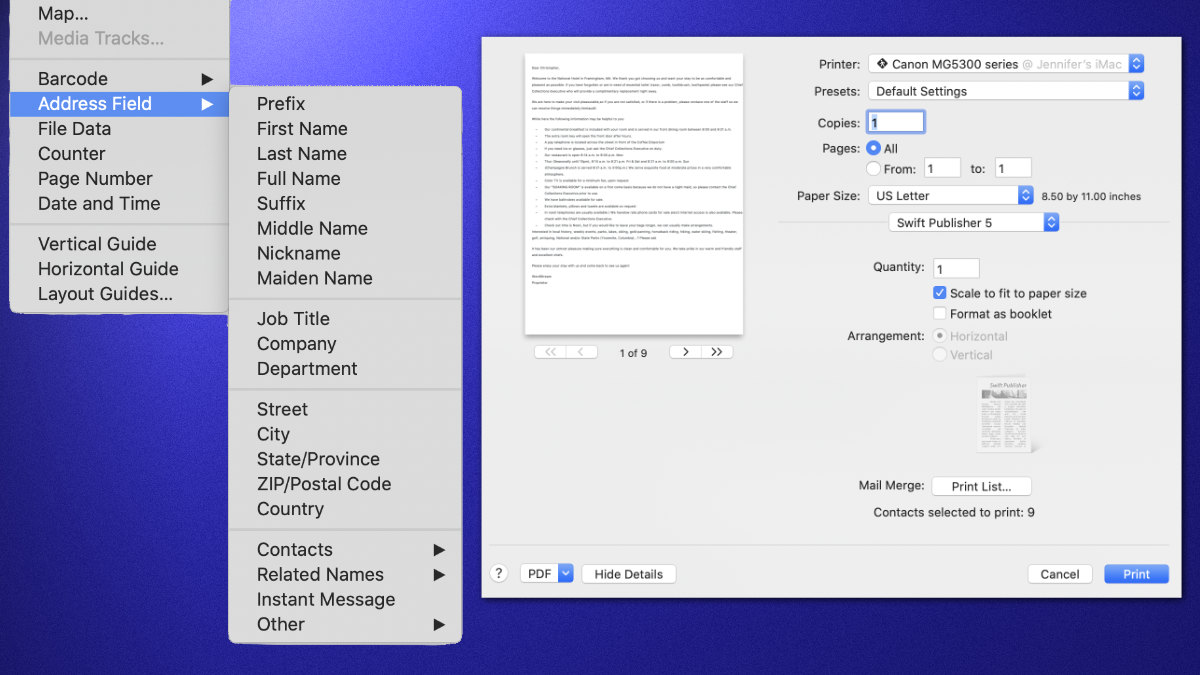
Swift Publisher has the ability to do mail merge in the documents. This is when you put in placeholders and when you print the document, the place holders get replaced with the content of a database.
Swift Publisher uses the macOS Contact database, which is nice since you don't have to go out of the way to create a whole new mail merge database.
Five Things That I learned
The placeholder text has been selected from the Insert > Address Field > Field Name menu option. You can't simply type in the field name.
The placeholder field name is not supported in the 2D Text or the 3D Text styles.
When printing the document you'll be asked which contacts you wish to use for the document. Within Contact App, you can set up groups for different segments such as Family, Christmas Card, etc. This makes it easier to find the contacts.
There is a small preview of the document in the print dialog. The problem is that the preview is too small to see your text in the document. The best option is to click on the PDF option on the lower left of the dialog and select "Open in Preview." You'll get a nice full-size preview of the document.
When you add Contacts in the Contact App there's a Note field. This could be a good place to add a personal note to the person. (Such as a Thank You Note.) You can add the Note using the Insert > Address Field > Other > Notes option.
PermalinkRandom Image Generator
Cool Random Image Generator in Swift Publisher
Swift Publisher has a feature where you can add Random Image patterns. This can be useful as a background or as a special effect in your document.
You can find the tool by going to Insert > Image > Generate Random...
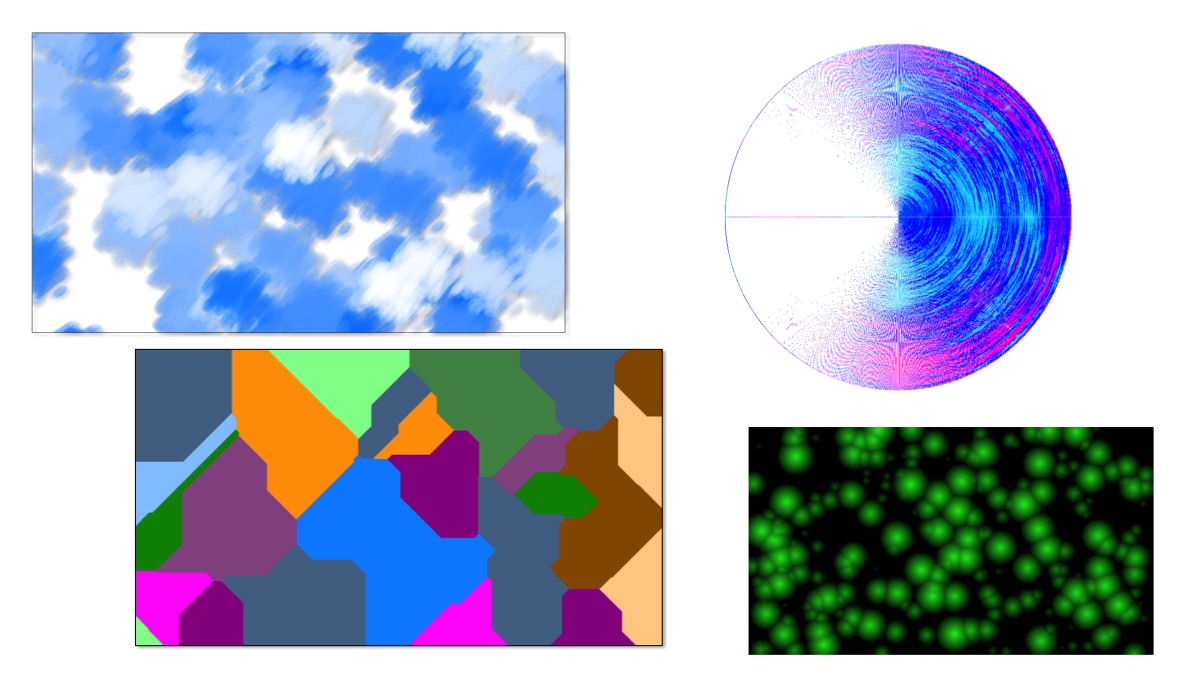
Sample of some of the images generated by the Random Image Generator in Swift Publisher.
Four Things I Learned
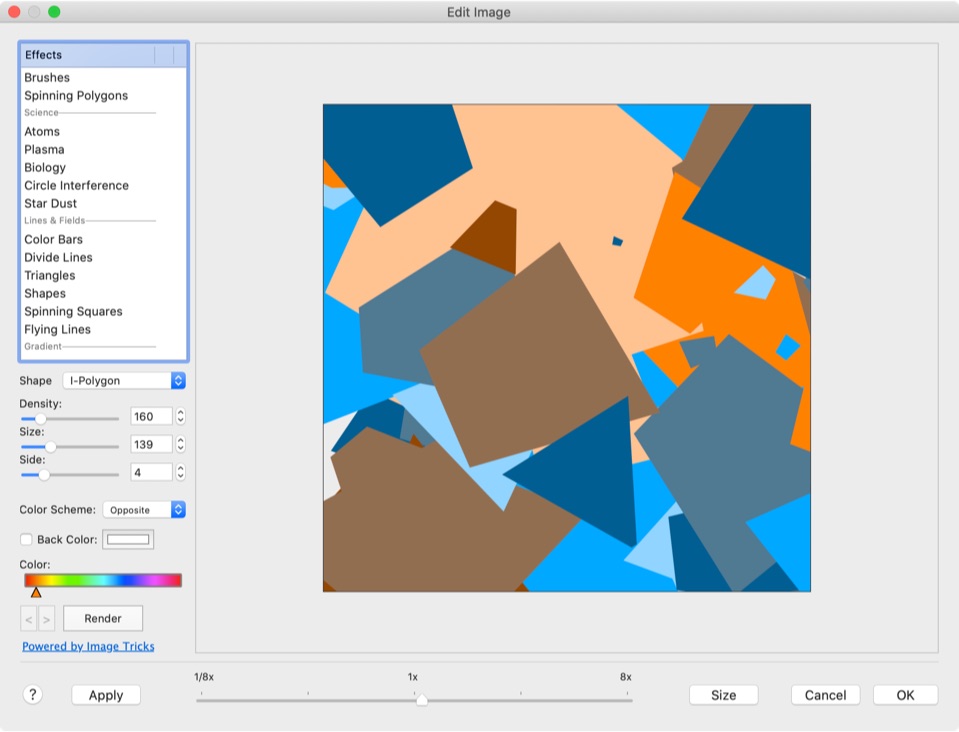
The effects are a small subset that is available in the Image Tricks Pro application, which is a separate application by Belight that cost $9.99.
There are effects in four different categories: Science, Lines & Fields, Gradient and Laying. A total of 20 effects available in Swift Publisher. In Image Tricks, there are 110 Core Image filters and 35 Quartz Compositions.
The default size is 400 by 400. You can define the size of the generated image by clicking on the Size button. In my test, I found that even if you pick the size of the document, it still shows up about 50% of the document size when you click the 'Ok' button. You can easily resize the generated image to fit your document.
Each Image generated selection has a unique set of parameters.
Random Image Dialog
Screenshot of some of the options of the Random Image function in Swift Publisher.
PermalinkQR Codes in Swift Publisher
Swift Publisher makes it easy to add QR Codes
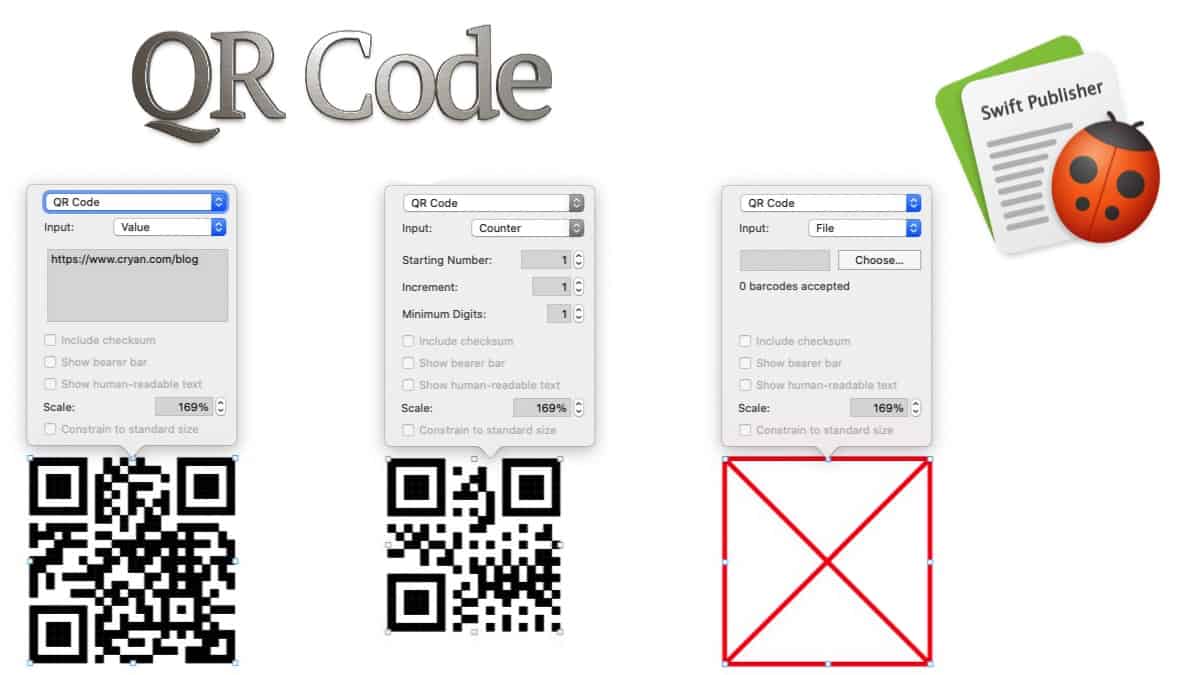
One of the cool tools that include with Swift Publisher is the ability to add your own QR Codes.
What are QR Codes?
QR Codes are machine-readable code containing a specific array of black and white squares. Most consumers are familiar with them as they appear in print and Mall Billboard ads. They are used to make it easy for people to visit websites or download documents.
Adding QR Code to Swift Documents
To add a QR Code to any Swift Publisher document, simply select the 'Insert' menu, then 'Barcode' then 'QR Code.'
You can resize the code to whatever you want.
To make modifications to the QR Code, double click on it and a dialog box will pop up above the QR Code.
There are three "input types:"
Value - This is the one to use for URL or Phone Number. Most QR Codes uses this type.
File - File is useful when you're doing a mail-merge type of document and you want a different QR Code for each output. For example, you could set this up so that customer data is displayed on a page.
Counter - When printing a mail merge document, this QR Code will increment by 1 value. Useful if you're doing inventory tracking.
Cool Tricks with QR Code
Using the "Value" input type:
Website: https://www.cryan.com
Instagram: https://www.instagram.com/gusodog/
To have a person call you, simply put your number: (800) 424-9090
New Feature: Now you can add backside!
A recent Swift Publisher update allows users to add backside content to Envelopes
Last week Swift Publisher did a software update to offer users the ability to edit the Front and Backside of envelopes, business cards, postcards and more.
Here's what the Front/Backside change does.
Previous Version
In the Swift Publisher 5.5.2 (v4152), you can't add another page to envelopes, business cards, and postcards. This prevents you from having the backside in the same document. You would have to create a new document to create a backside.
The Page Preview doesn't have the '+' and '-' options.
New in Swift Publisher
With the latest update, users can now add a single backside to their envelopes, business cards, and postcards. This is done by selecting the page preview and clicking on the '+' button.
Note: You can only have one backside. You still can't create multiple cards at the same time.
Note: In the Envelope view, you don't have the view of the backside of the envelope. So you don't know where the paper fold is.
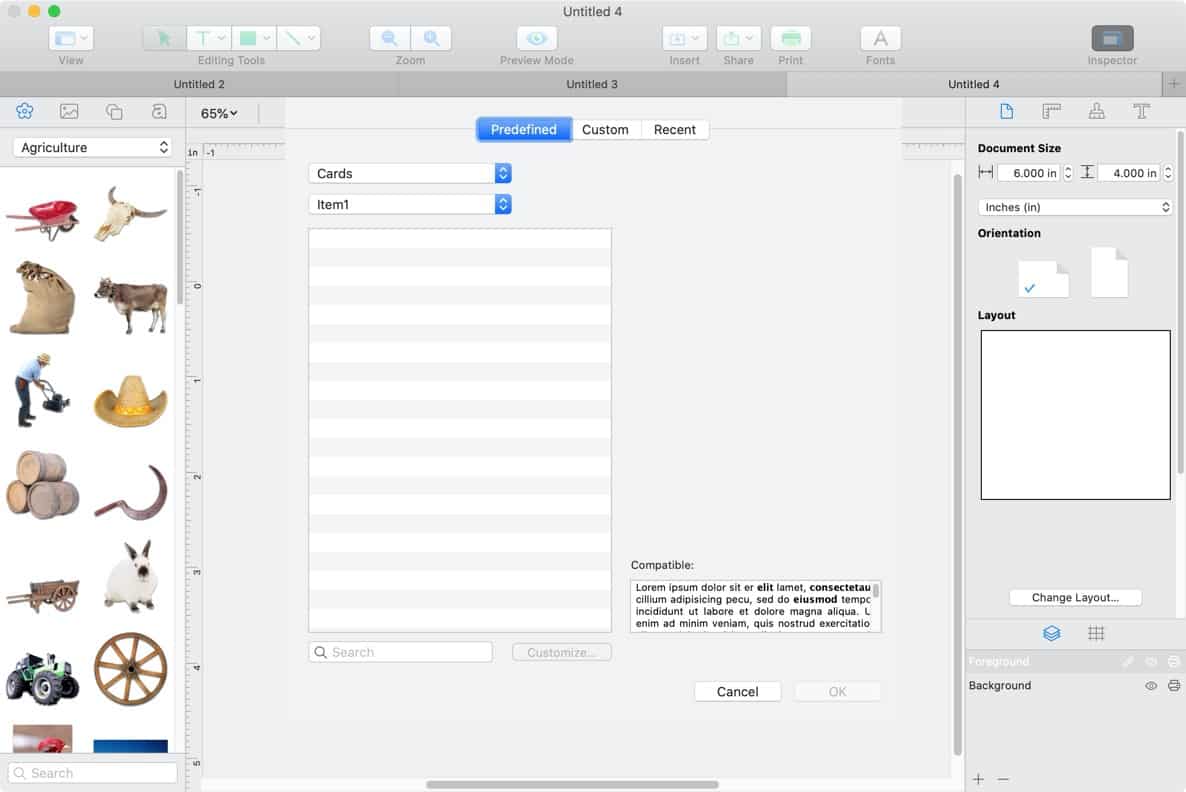
Bug Found
While playing around with Swift Publisher, I found an interesting bug. This occurs in both the current and previous release.
- Create a new Document via the Template Gallery.
- In the Template Gallery, select Blank in the Cards category and then double click on "New Card..." it's the top left choice.
- When the Document window open you have a dialog box with Cards and Item1, and everything else is blank.
- In the "Compatible" section is the "Lorem ipsum dolor sit er...""
- What you should see, are some template choices for the Cards. (At least that what you see if you perform the same action on other Blank items such as Envelopes and Business Cards.)
Here's a screenshot of the bug:
Tables in Swift Publisher
Some Tips and Tricks using Tables in Swift Publisher
Swift Publisher can add tables for your projects. They are simple to use and offer some flexibility in laying out content.
Application Description
Tables are commonly used to organize text and numeric data. Sometimes, tables are used to arrange text or images on the page, such tables are usually made invisible.
Moving, resizing and other common operations work with tables just like with other objects.
Six Things I Learned
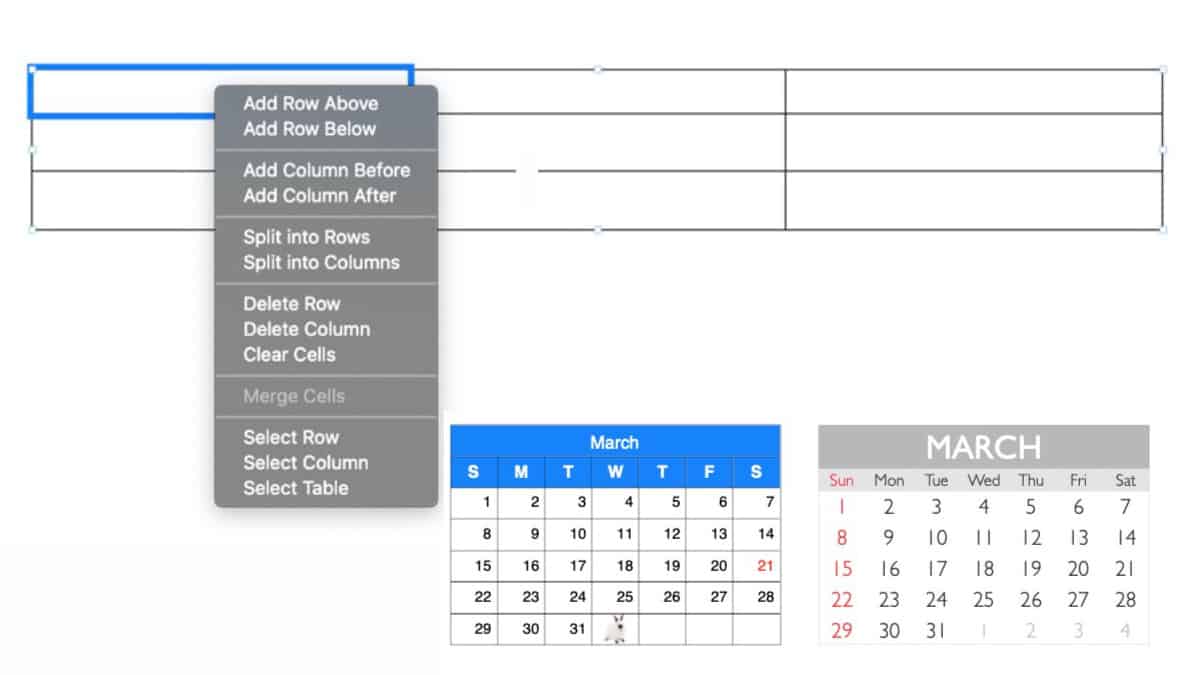
 The only way to create a table is to use the Table menu from the Insert Menu. In other words, you can't convert a text into a table format, you have to start with the table then add content.
 You can add columns and rows on any table by right clicking on the table and selecting the appropriate action.
A quick way to add a lot of Rows or Columns: Select any Table, right click, select "Edit Table" and then you have the option to Add/Remove Rows and Columns.
 You can easily tab through the cells, when you tab at the end of a row the first cell in the next row is selected. If you are at the last row, a new row gets created.
 If you want to clear the table content, select the row/column, right click and select "Clear Cells." There is no option under the Edit menu.
 Copy and Past text from Numbers or Excel just paste in the cell values and not a table format with the values.
Take Some Time To Use the Tables
As I was playing around with the functionality of the table in Swift Publisher, I found it to be a very useful feature. It took some time to understand how tables work.
Its worth spending some time with the application to get the most out of the tables functionality.
It would be nice to have a conversation functionality to "jump-start" a table in a document. For example, if you had some data from a spreadsheet that you would like to display in a flyer.
PermalinkMaster Pages
Tips and Tricks using Master Pages in Swift Publisher
Swift Publisher has the ability to use Master Pages - the ability to create similar functionality throughout the document.
For example, if you want the company logo to appear on the same page or have a similar background watermark.
Showing how to add a Master Page to a Content Page.
Five Things I learned Using Master Pages
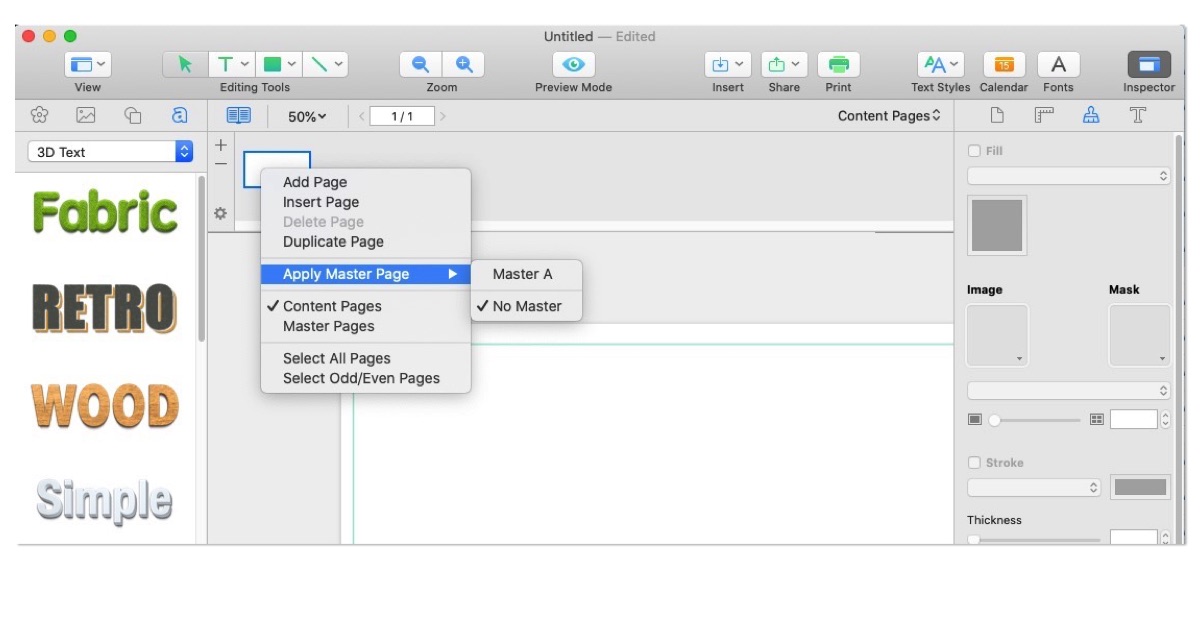
- When you create a new page a Master page isn’t applied right away. You have to assign a Master page to your Content Page.
- To access master pages you can select "Master Pages" from the view menu. In addition, you can select Master Pages from the Page Panel Window. (Use the Option-Command-P shortcut to toggle the Pages Panel Window.)
- Each Master page is identified by the letter in the alphabet. Every time you add a page it increments to the next letter in the alphabet. If you delete a master page, the pages after it names will reset to the previous letter in the alphabet. There is no way to change the Master Page name.
- To apply a Master page design, right-click on any content page in the Page Panel window and select the "Apply Master Page" menu item, then select the Master page you want to apply. (Note: This is where custom page naming would be handy, especially if you have a lot of master pages.)
- When you apply a Master Page to a page, the name of the applied Master page will appear to the right in the Pages Panel. This makes it easy to identify which Content pages are using which Master pages.
Dual Page Spread
Interesting things I learned about setting up 2 page spreads
Swift Publisher supports 2-page spread - the ability to see two pages at once. It's handy when you want to make sure that page elements look the same across pages.
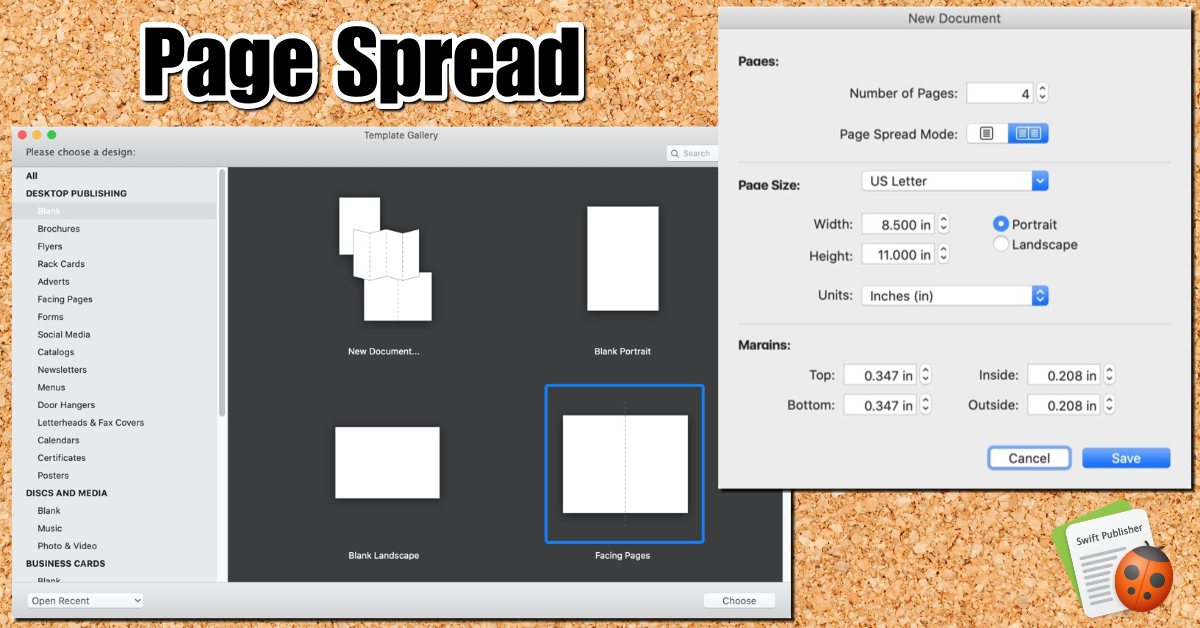
Using Templates Gallery
The Blank Facing Pages is the only template that I found that has a 2-page spread enabled. It's the fourth item that in the Blank Desktop Publishing category.
When you select this template you default to 4-pages with Page 2 and Page 3 facing each other. If you delete page one, the page spread will break.
You can't have a 2-page spread as you can do in Pages or Adobe Indesign.
Using the Blank Document Format
You can bypass the Template Gallery in the Swift Publisher General Preferences. Simply select the "Create blank Document" under the "For New Document" heading.
When you select the blank document, then the customize button becomes enabled. Click on the Customize button and you'll see an option for "Page Spread Mode." When you select the 2-Page spread the Number of Pages will increase to 4.
Now when you create a document, instead of the template gallery, you get the blank page with the page-spread enabled.
From the manual:
In the page spread mode, documents must have even number of pages. The first and last pages have no facing pages. Users cannot add, delete or reorder individual pages, but only page spreads.
Five Things I Learned
- You can't have single page It would be useful if you could have a side-by-side layout. Sometimes when I am creating documents, I want to make sure that the backside of a page is aligned with the front side.
- You can create custom blank documents that have 2-page spread enabled and save them as tempates - so they are accessable in the template gallery.
- If you have the "Create blank document" enabled so that you always create a document using the page size your familiar with if you use the short cut Option - Command N it will open the Template Gallery instead of a new blank document. A handy shortcut to know.
- The template "Half-Fold" is useful when you want to create two pages on a standard 8.5x11 document - such as a Church music flyer.
- You can not spilt pages of a spread, that is you can't add other pages between them.
Image Bundle Pack
Check out the Bundle Pack that is available in Swift Publisher
When you purchase Swift Publisher, you have the opportunity to also purchase a Extra Bundle pack. This bundle pack contains 400,000 clip arts and 100 open type fonts.
Swift Publisher comes with 2,000 images. Is it worth getting the extra images and fonts?
There’s no real answer to that, as it all depends on if the included images are something that you would actually use. Fortunately, Belight Software allows you to check out all the images included:
Checkout the 400,000 Images
 https://www.swiftpublisher.com/useful-articles/additional-clipart-images
Checkout all 100 fonts
 https://text.design/text-design-resources/additional-fonts
I think the image pack is worth it - if you are doing a lot of newsletters or reports. It's so easy to use the image search within the application.
Just keep in mind that this database contains 4-GB of data - so if you're short on disk space you may not want to install everything.
Other Solutions Available
Thanks to sites like depositphoto.com, Creative Market and ShutterStock, you can search for graphic files that you really need. At the end of the day, your buying images that you'll actually need.
Deposit Photo is a good option because there's a link right in the applications.
Some of these solutions might be more expensive, but if you are likely to use them more - then it may be worth the additional costs.
PermalinkLinkBack and OmniGraffle
Expand your Swift Publisher capabilities with OmniGraffle
I use OmniGraffle all the time to create simple charts and text styles. There's a nice hidden benefit of using OmniGraffle and Swift Publisher - objects pasted from OmniGraffle link back to Swift Publisher.
This means that after pasting something in Swift Publisher, I can double click on the graphic and it will open that content in OmniGraffle.
This works because both Swift Publisher and OmniGraffle supported the open source LinkBack framework.
What is LinkBack?
LinkBack is an open-source framework for Mac OS X that helps developers integrate content from other applications into their own. A user can paste content from any LinkBack-enabled application into another and reopen that content later for editing with just a double-click.
Sample of OmniGraffle graphics in Swift Publisher
Why Use OmniGraffle with Swift Publisher?
OmniGraffle is useful because it offers more flexibility with some design tools.
Couple of Examples:
The Fill tool in Swift Publisher is limited to just 3 options: Color Fill, Linear Gradient Fill, and Radial Gradient Fill. In OmniGraffle, you have more options: Solid Fill, Linear Gradent, Radial Gradient, Double Linear Gradient, Double Radial Gradient, Stipple, Marker, Squiggle, and Plastic.
Shape Tool with Center Text. It's so much easier to create text in the center of shape in OmniGraffle than in Swift Publisher. Swift Publisher has some cool smart shapes, but I find it difficult to add text in the center of the object. In OmniGraffle, the shape flows around the text as you resize it to look perfectly.
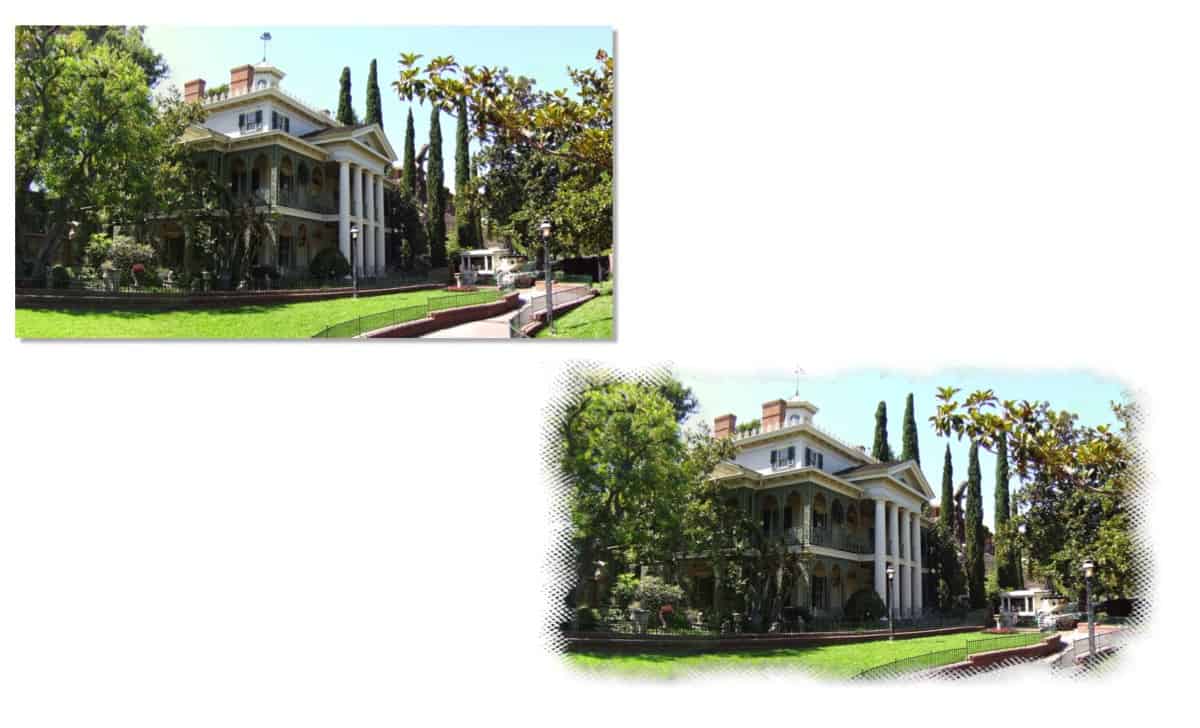
PermalinkMask Images
Swift Publisher has a lot of Mask templates
On of the nice features of Swift Publisher is the ability to apply image masks. These masks add a nice effect to an otherwise boring image.
Masks are a way to hide an area of the screen to produce some type of effect.
To use a Mask in Swift Publisher, simply select an image then under the Inspector panel, select the appearance, and then choose Mask.
Sample Image with mask
Lots of Masks
Swift Publisher 5 offers a lot of mask designs, in fact there are 116 designs to choose from.
Here's a "snapshot" of all the image masks that are available in Swift Publisher 5:

Create Your Own Mask
If you don't find the mask design that you're looking for, you can create your own mask. Simply create a black/white image and import it as an image mask.
Tips on creating a Custom Mask.
- According to Swift Publisher, the ideal mask image size is 519 x 519.
- You can create an Image Mask with any program.
- The images can be JPG or PDF documents.
- The areas of black are removed when a Mask is applied.
- You can't add the custom mask to Swift Publisher. Save the file in a reference folder to be found later.
- You can learn how to create a Mask using this YouTube Tutorial.
- If you don't have any creativity time, you can always buy a mask collection on Creative Market.
About
Swift Publisher is a popular Macintosh Desktop publishing application. It has a lot of very cool features and every Wednesday I highlight something cool that you can only do in Swift Publisher.
Check out all the blog posts.
Blog Schedule
| Thursday | Business |
| Friday | Macintosh |
| Saturday | Internet Tools |
| Sunday | Open Topic |
| Monday | Media Monday |
| Tuesday | QA |
| Wednesday | Veed |