
QA App Buttons for Snagit
Some Custom Stamps for QA
Hello fellow Quality Assurance professionals! Today, I'm excited to share a tool that has significantly streamlined my QA workflow over the past five years: Snagit's Stamp tool. As a seasoned QA professional, I've found that the right tools can make a world of difference in our daily tasks. This week, I'm introducing five custom stamps designed specifically for our QA needs, styled as sleek Apple App buttons.
1. Snagit Stamp Tool: A Brief Overview
Before diving into the custom stamps, let's briefly touch on what the Snagit Stamp tool is. For those unfamiliar, Snagit is a powerful screen capture utility that goes beyond simple screenshots. One of its features, the Stamp tool, allows users to add predefined or custom icons to their screenshots, making annotations quicker and more intuitive.
2. Why Custom Stamps for QA?
In our field, communication clarity is key. Whether we're approving features, flagging issues, or noting minor concerns, our feedback needs to be instant and unmistakable. That's where these custom stamps come in. Designed to be intuitive and eye-catching, they convey our message at a glance.
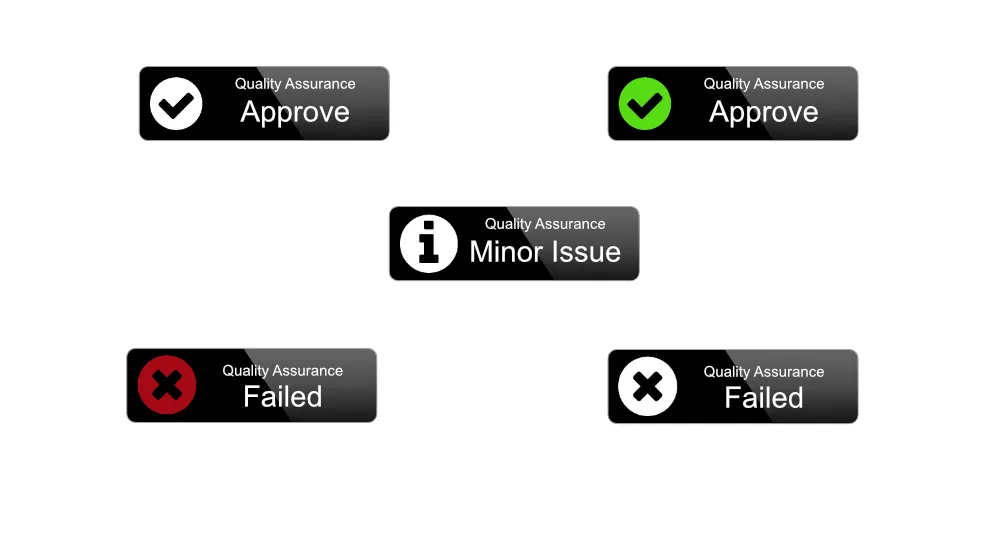
Click on image to download file.
3. The Five Custom Stamps
- Approved Stamp: This stamp signifies that a feature or section has passed QA testing. It's clean, clear, and gives a green light for progress.
- Approved Green Stamp: Similar to the Approved stamp but in a vibrant green, symbolizing a strong go-ahead.
- Fail Stamp: Use this when something isn't up to par. It's a straightforward, no-miss way to indicate that a feature needs revisiting.
- Fail Red Stamp: The red variant of the Fail stamp, for when you need to emphasize an urgent or significant issue.
- Minor Issues Stamp: Not everything is black or white. This stamp is for those in-between scenarios where minor tweaks are needed.
4. How to Add These Stamps to Your Library
Adding these custom stamps to your Snagit library is easy. Here's how you do it:
Select Your Image: First, drag one of the images to the Snagit icon. (Or select File>Open within Snagit and select one of the images) Save As Stamp: Navigate to the top menu and choose File > Save As Stamp. This action adds your selected image to the 'Custom' section of the Stamp tool.
5. Download the Custom Stamps
I've made these stamps available for you to download and add to your personal stamp library. Download the Stamp Images.
Conclusion
Incorporating these custom Snagit stamps into your QA process can save time, reduce miscommunication, and add a touch of professionalism to your work. I encourage you to download them, try them out, and see the difference they make in your QA workflow.
Stay tuned for more QA tips and tools in future posts!